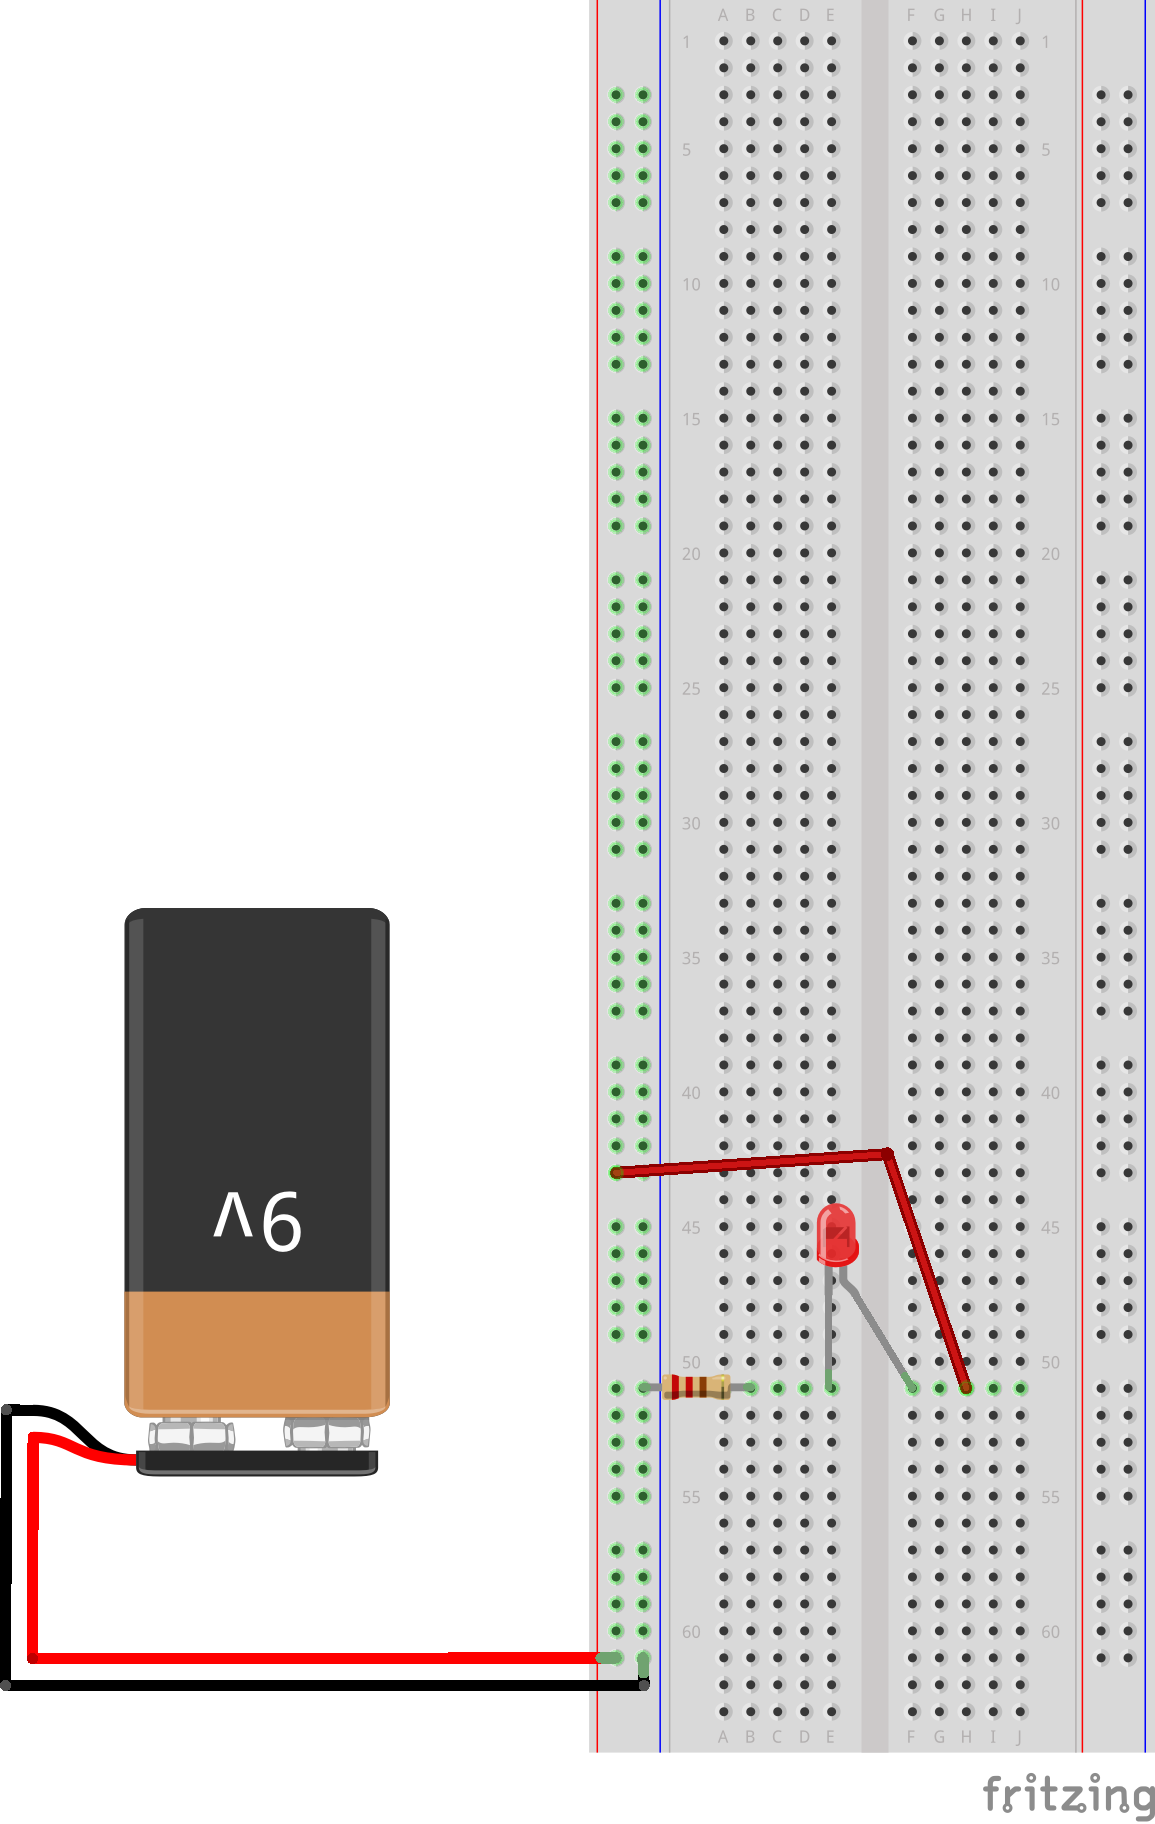
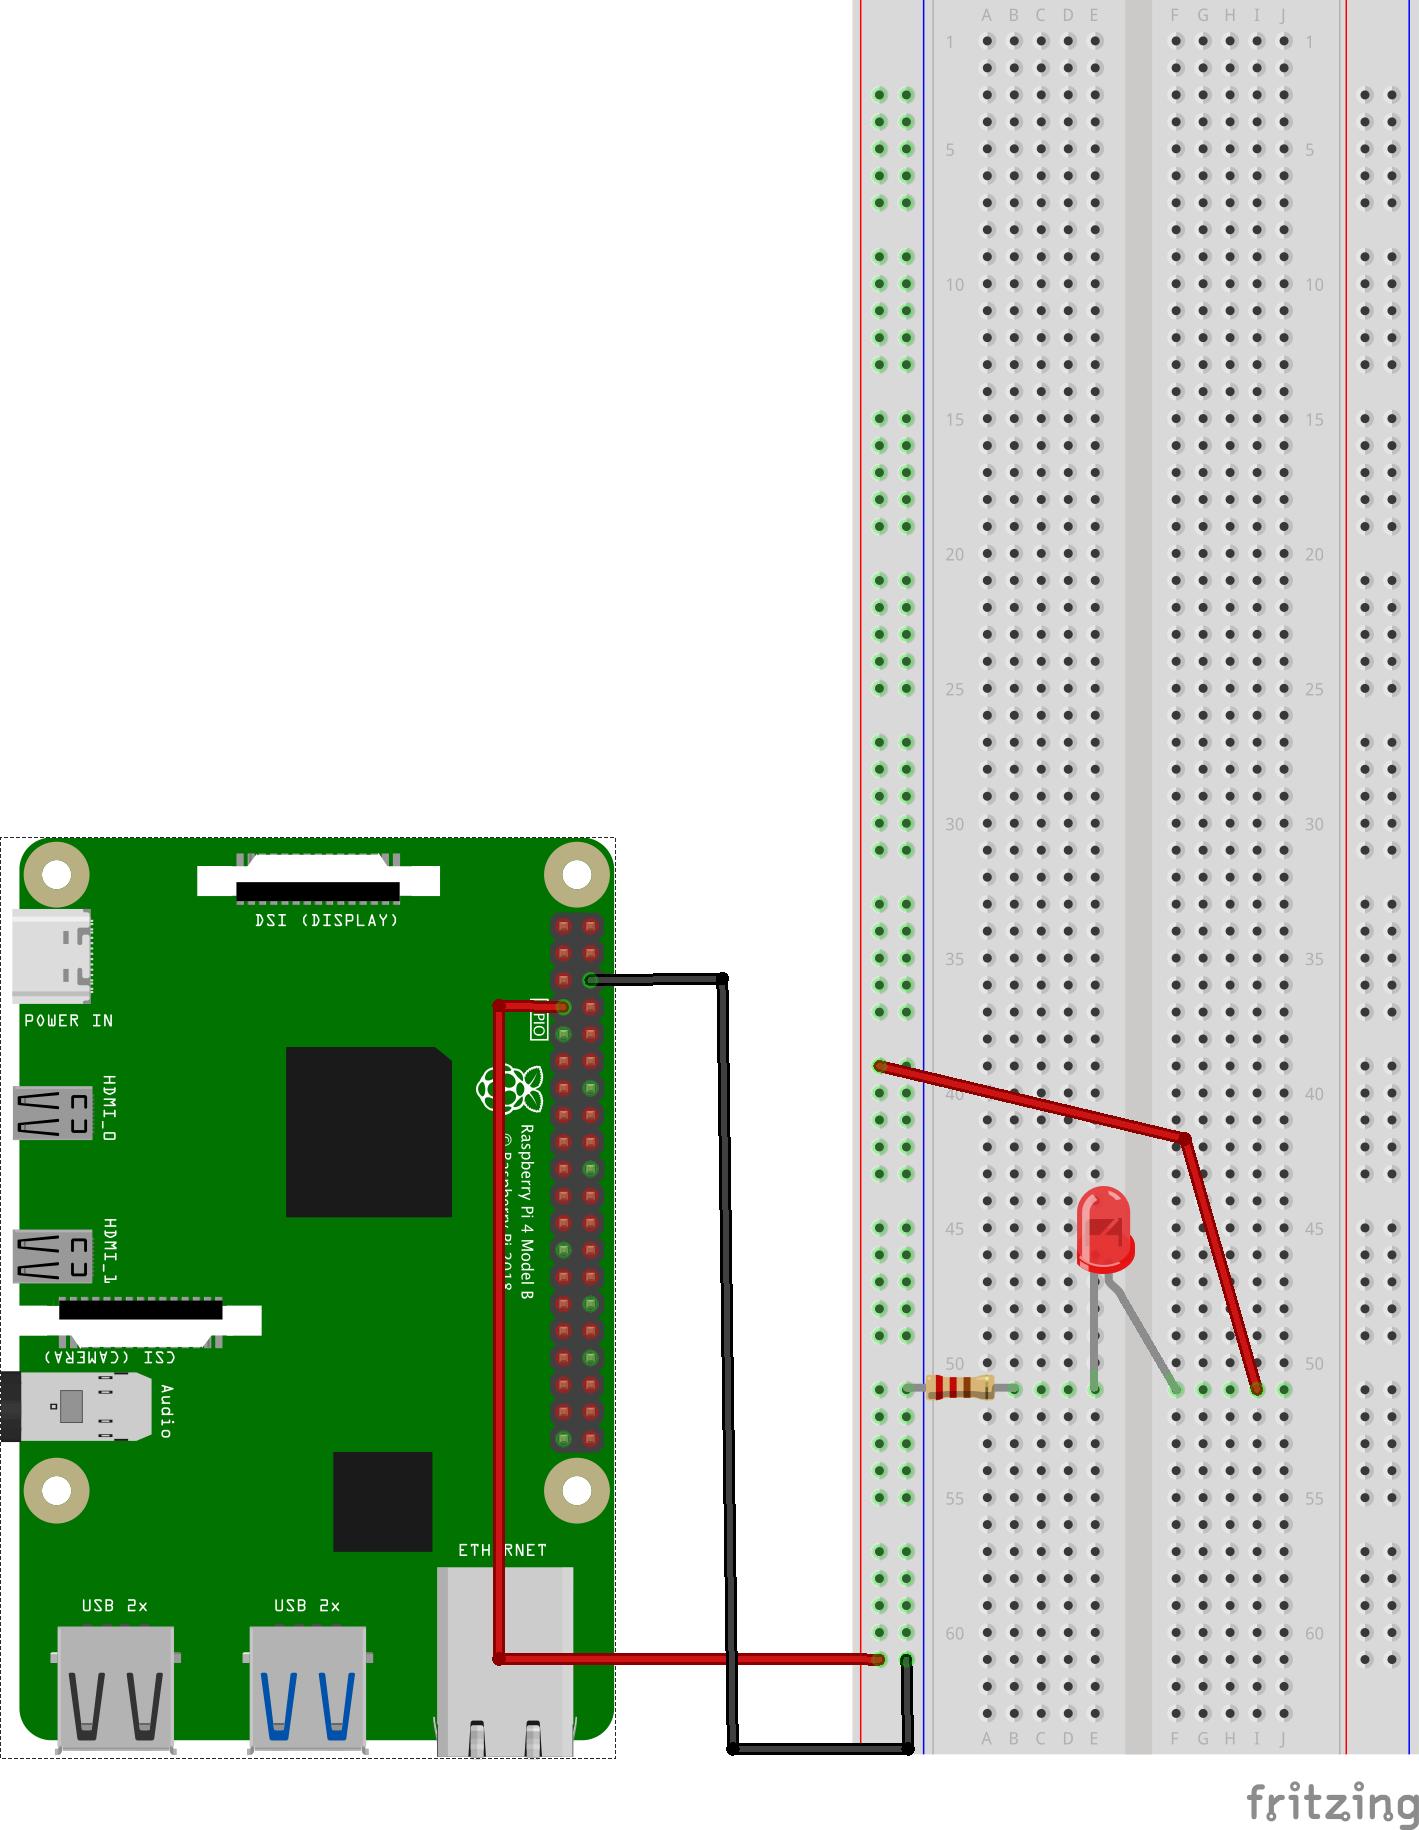
Dirt Simple Circuit
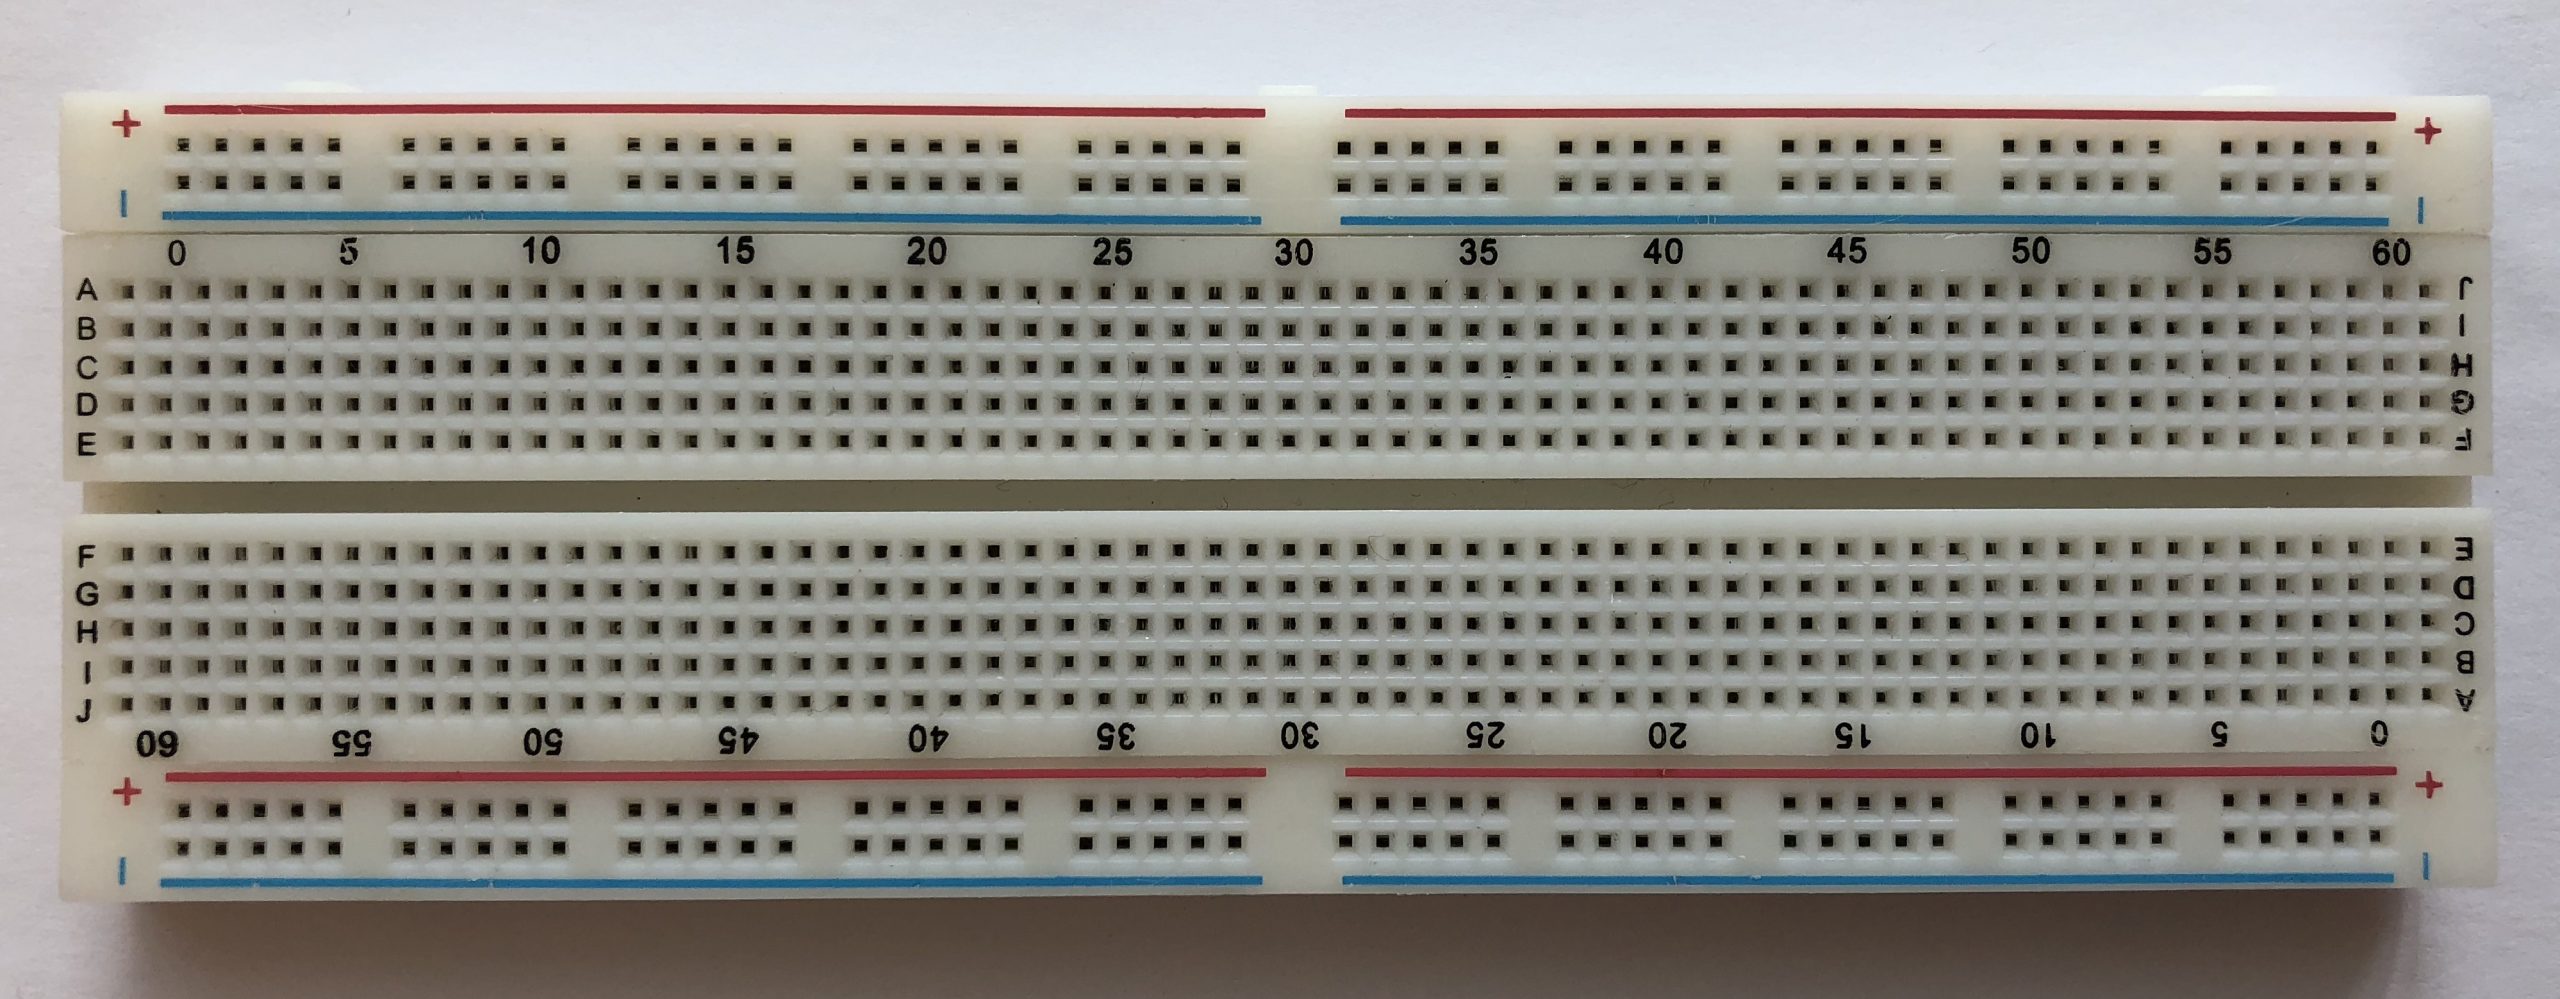
The breadboard

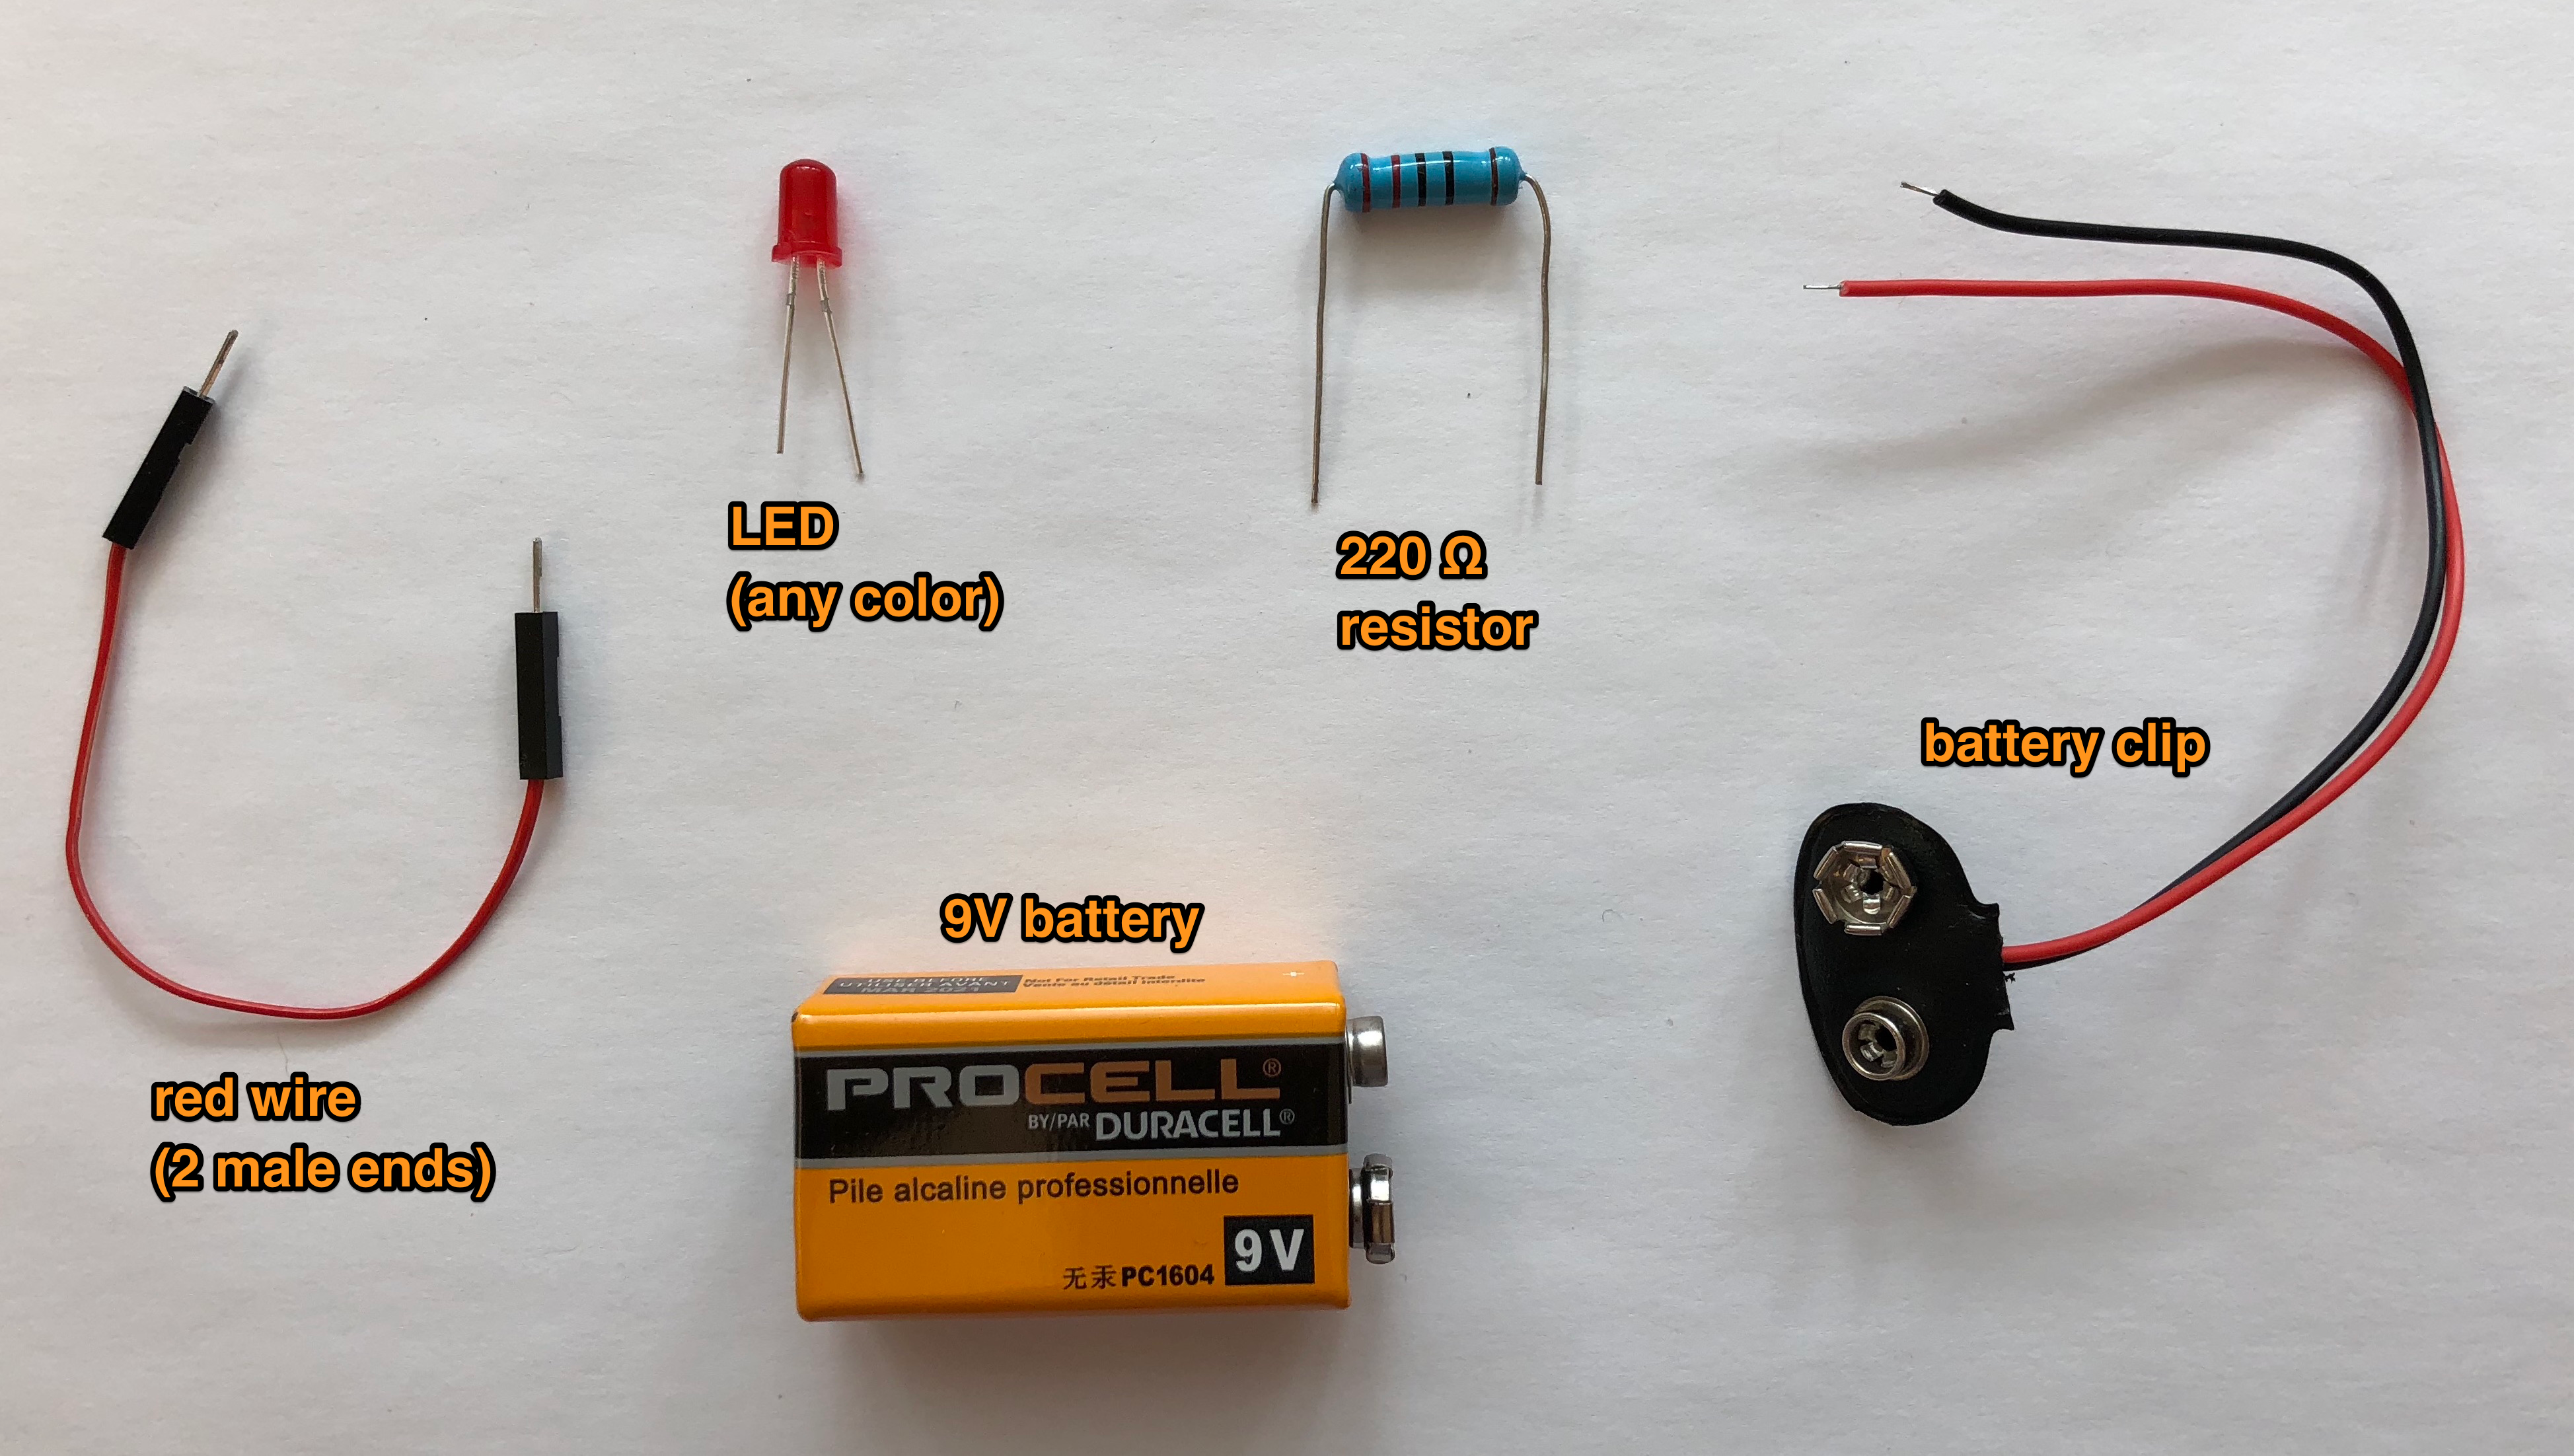
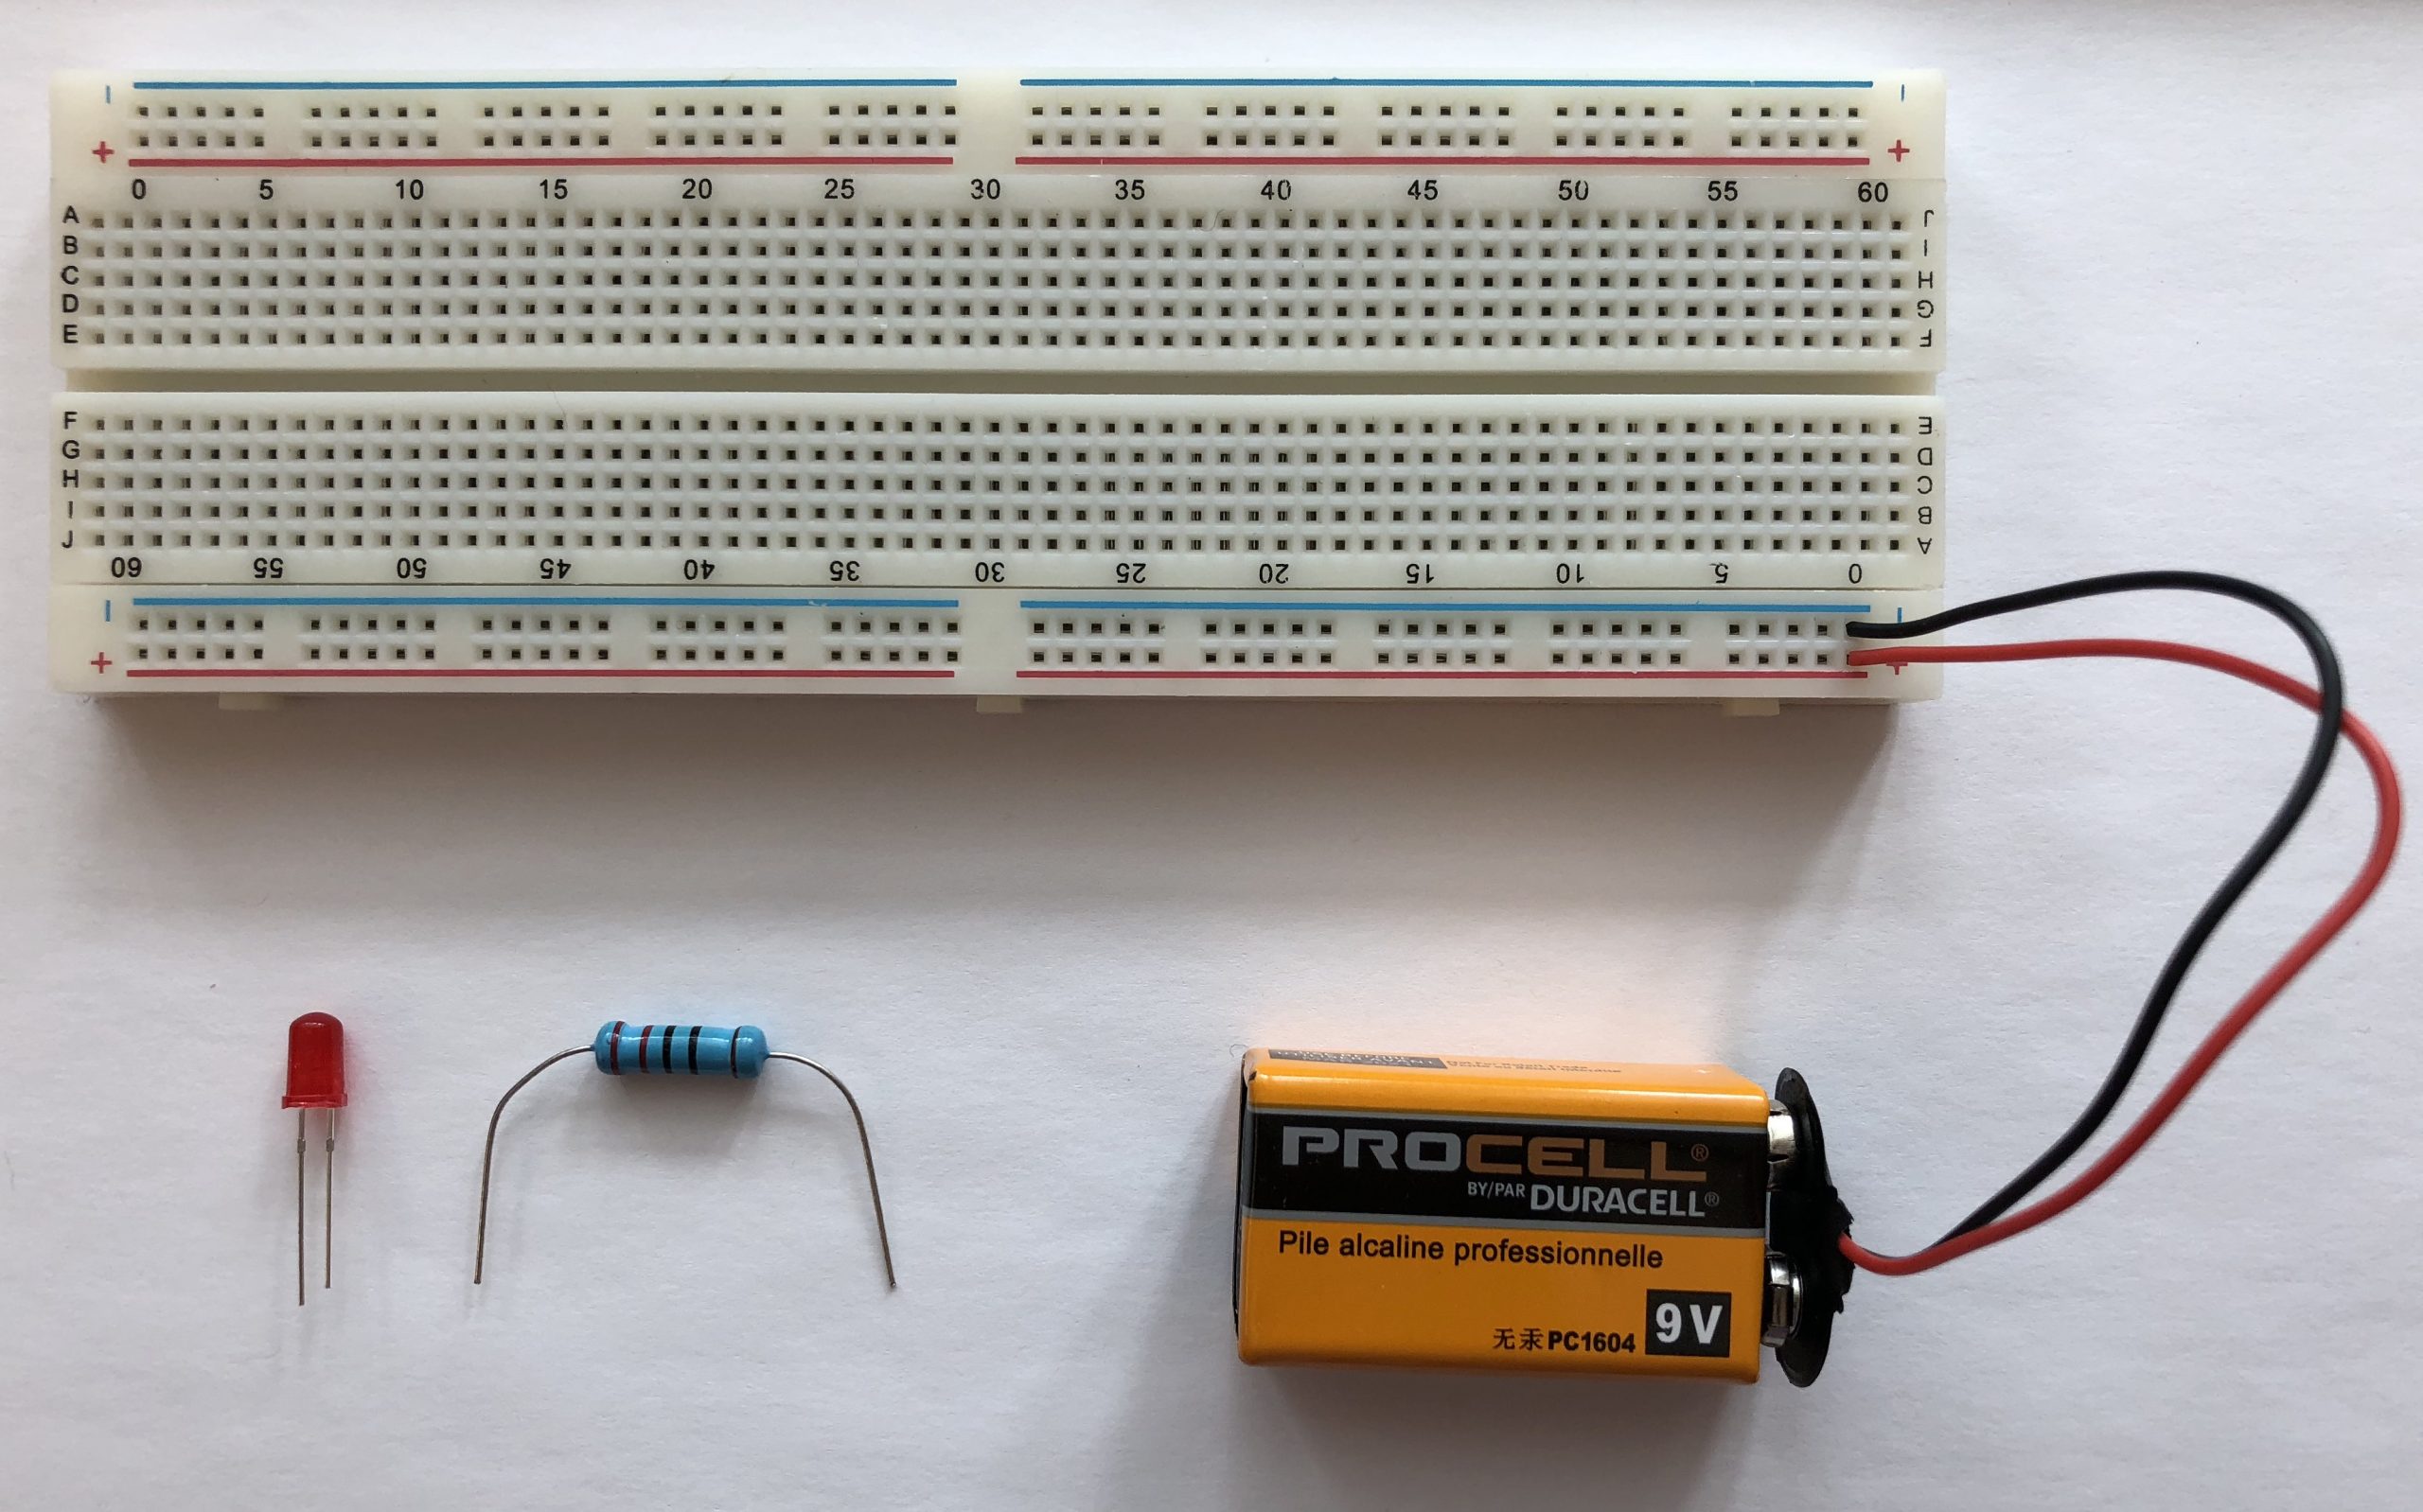
Grab stuff
Wiring
Power first
Then the components
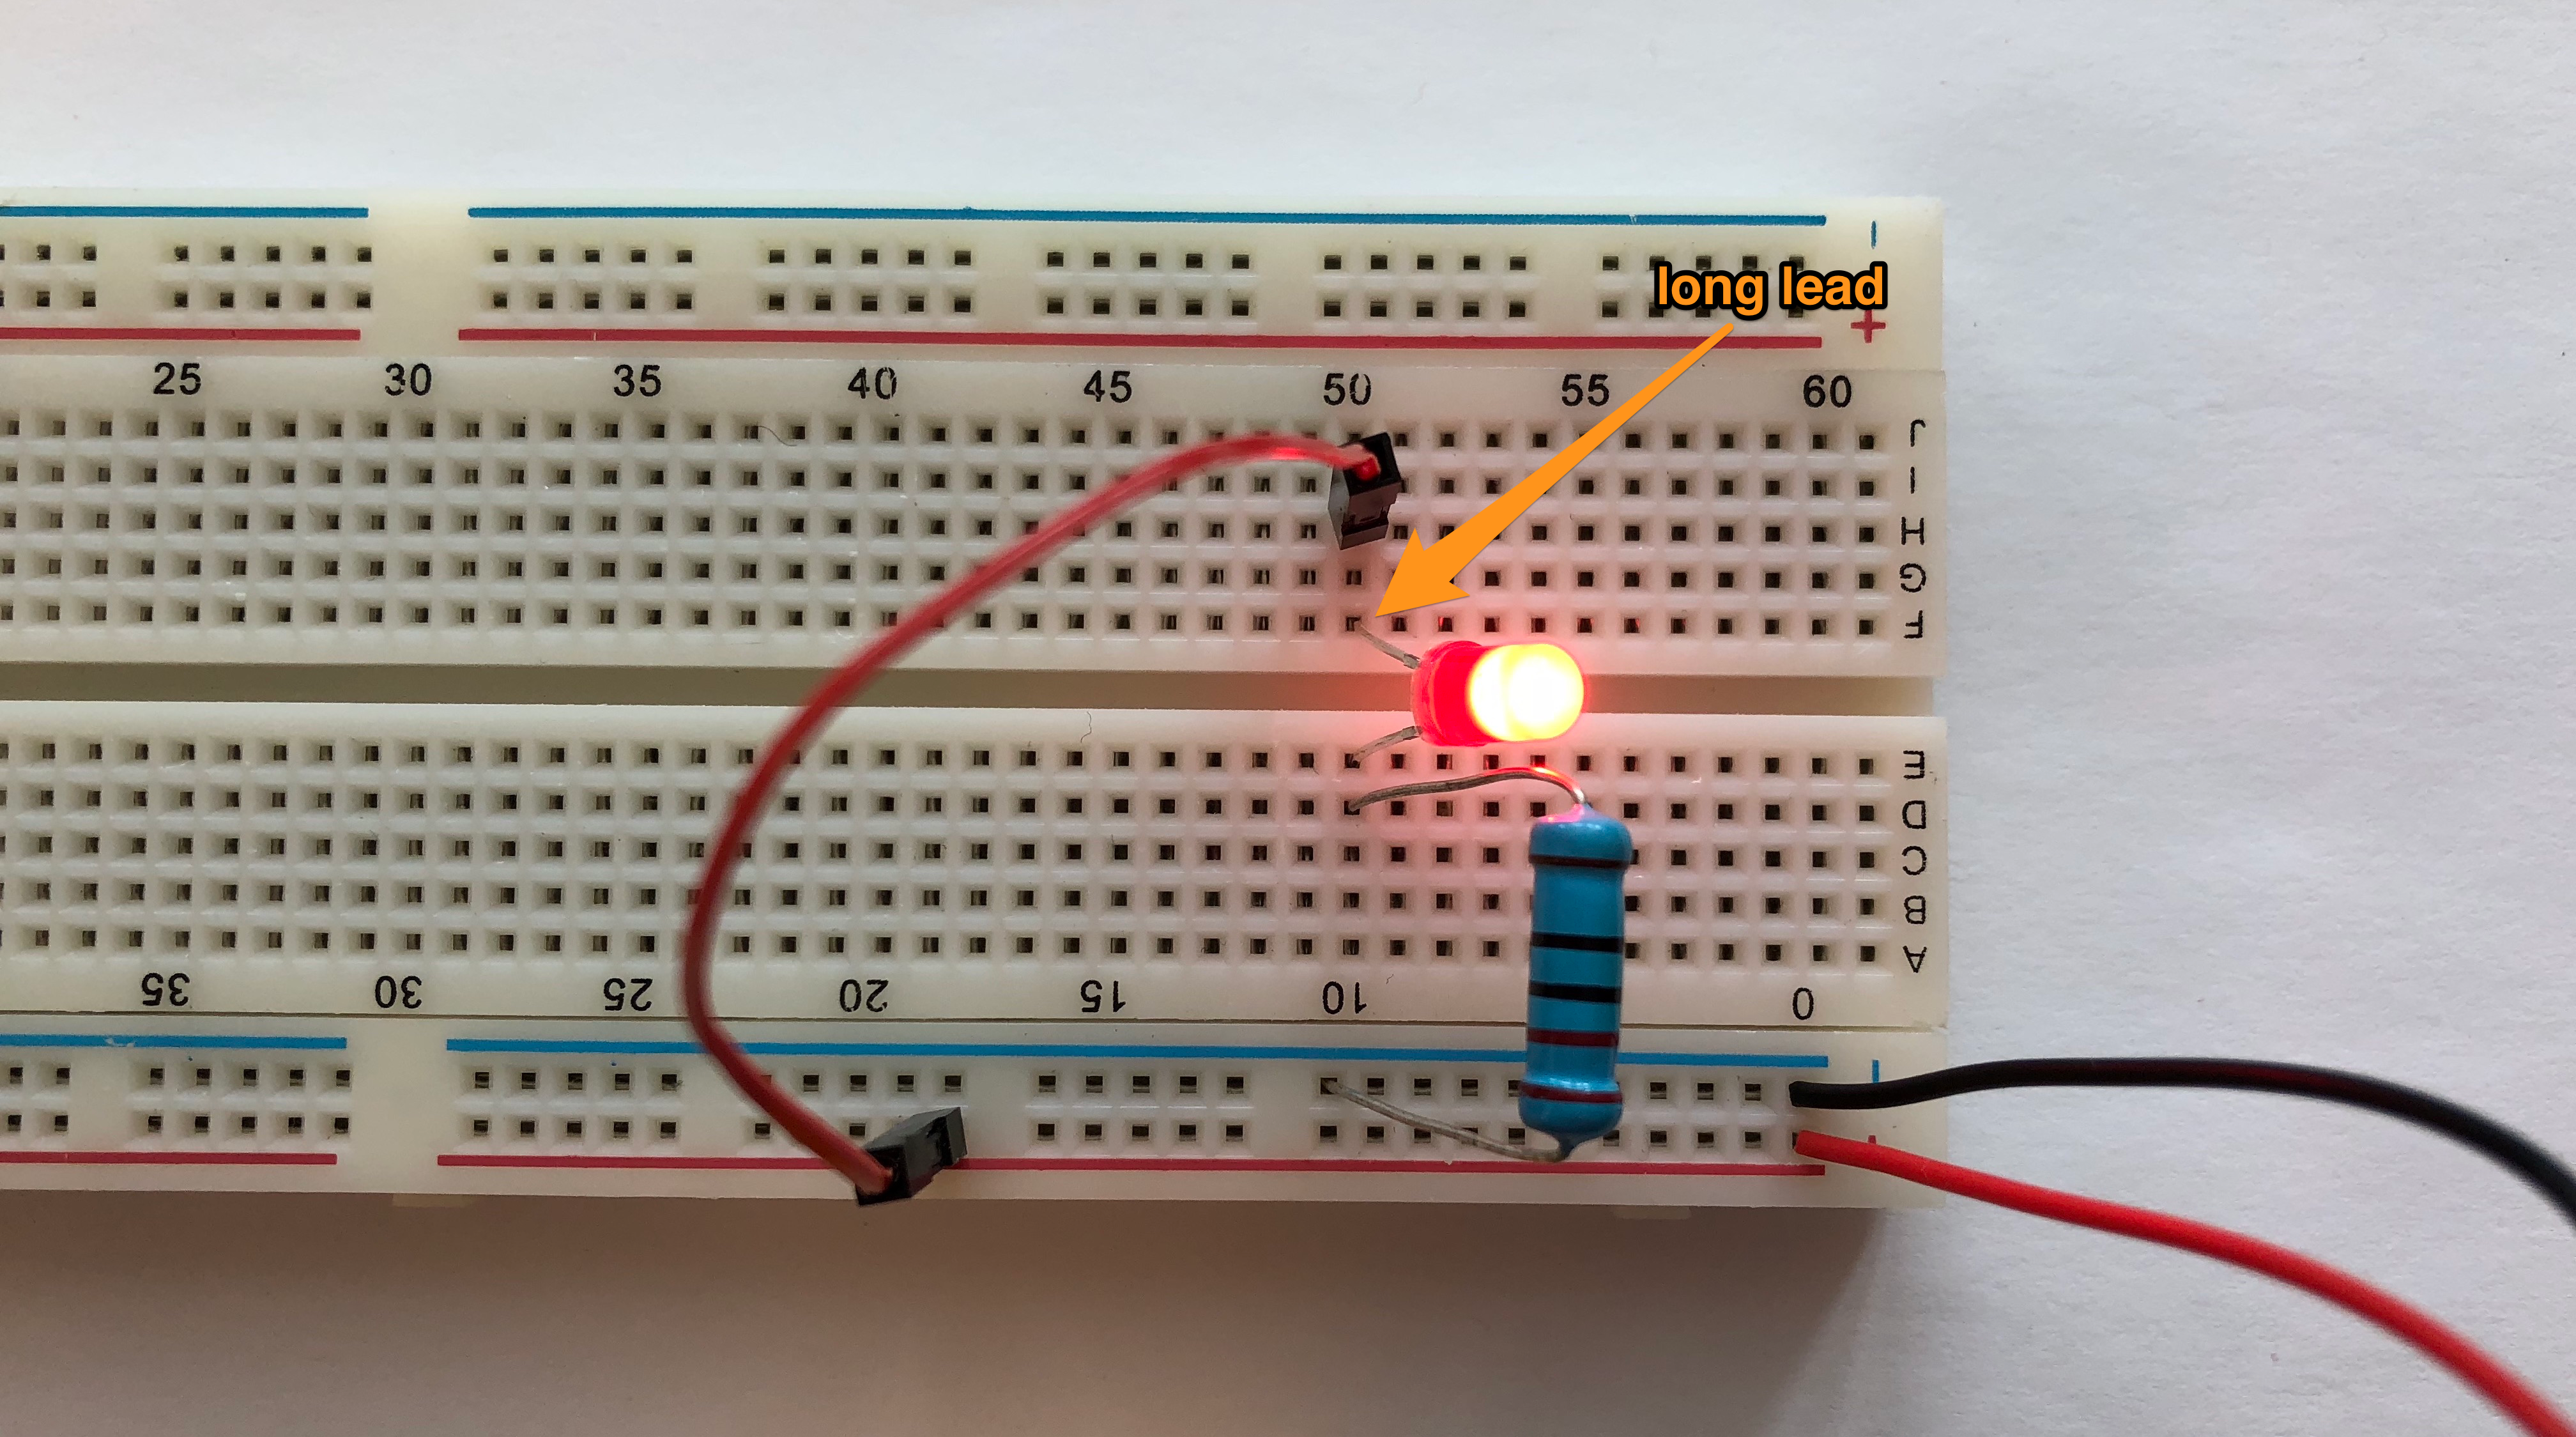
How electrons flow

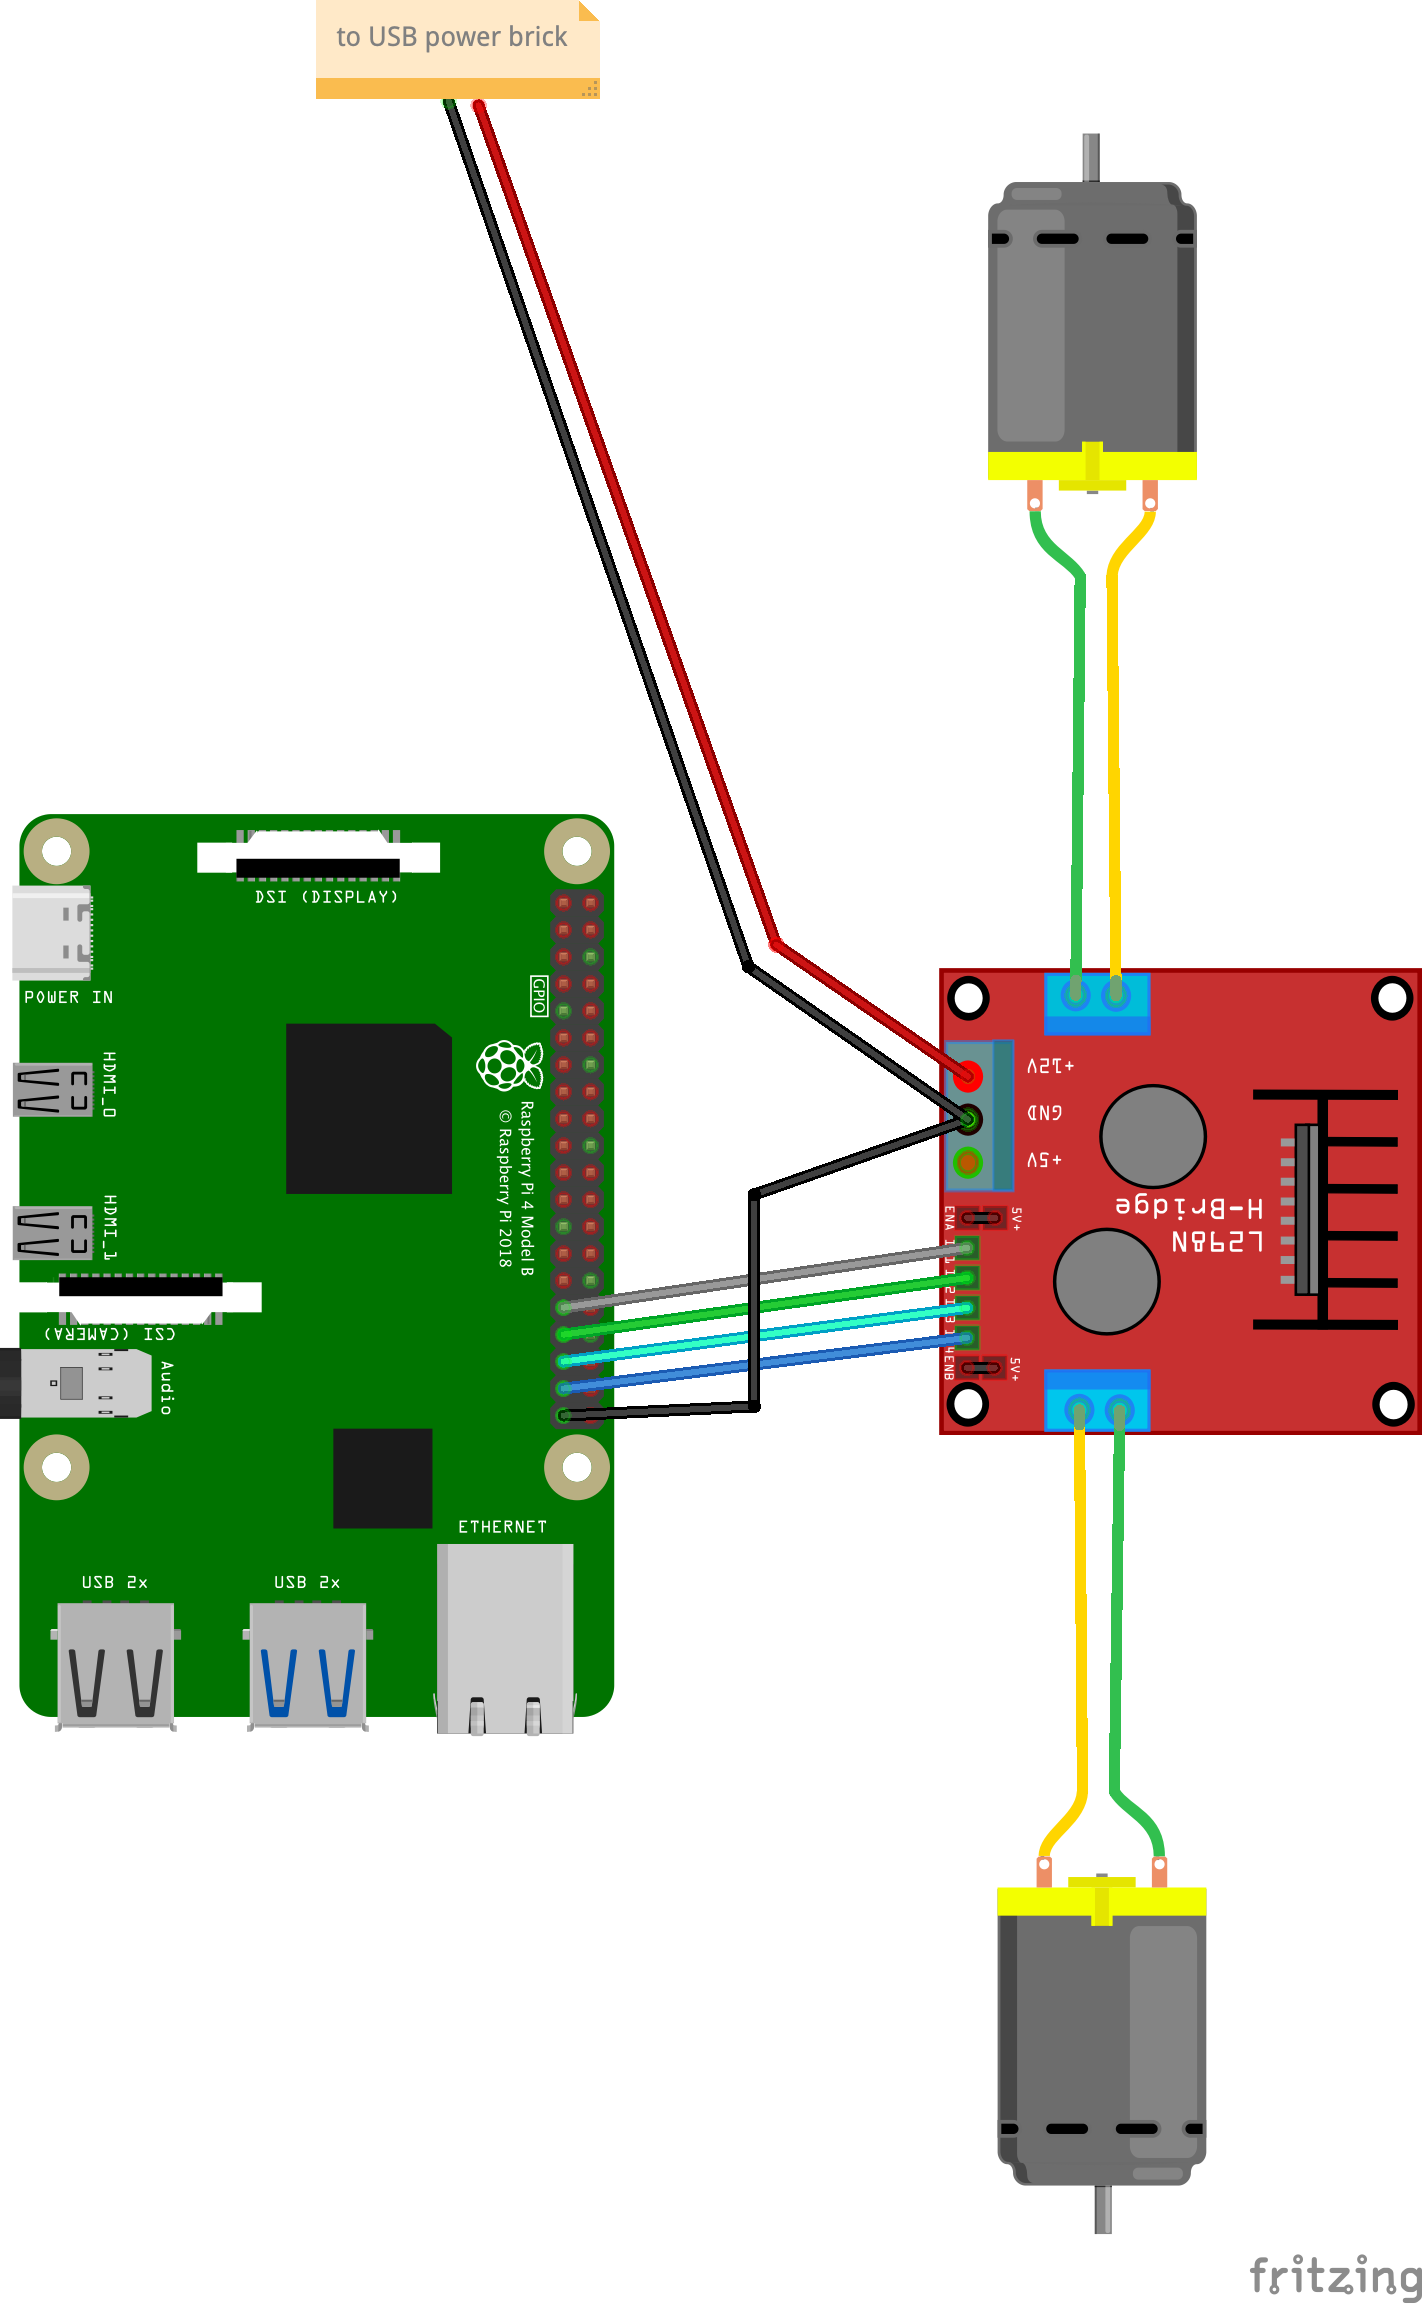
Fritzing
A cleaner and standardized way of representing circuits. Also what we’ll use from now on.
A New Pi Image
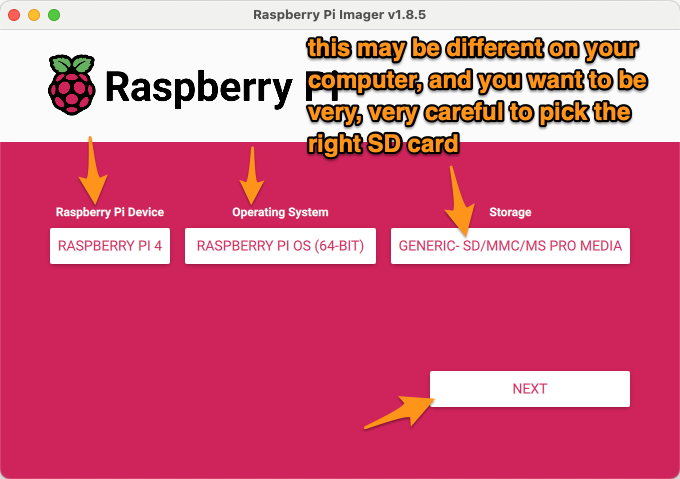
Creating an SD card
Here we’ll “burn” a new SD card for your Pi. Google “download raspberry pi imager” and download the program (https://www.raspberrypi.com/software/). Launch the program, insert the SD card in your computer, and pick the following options:


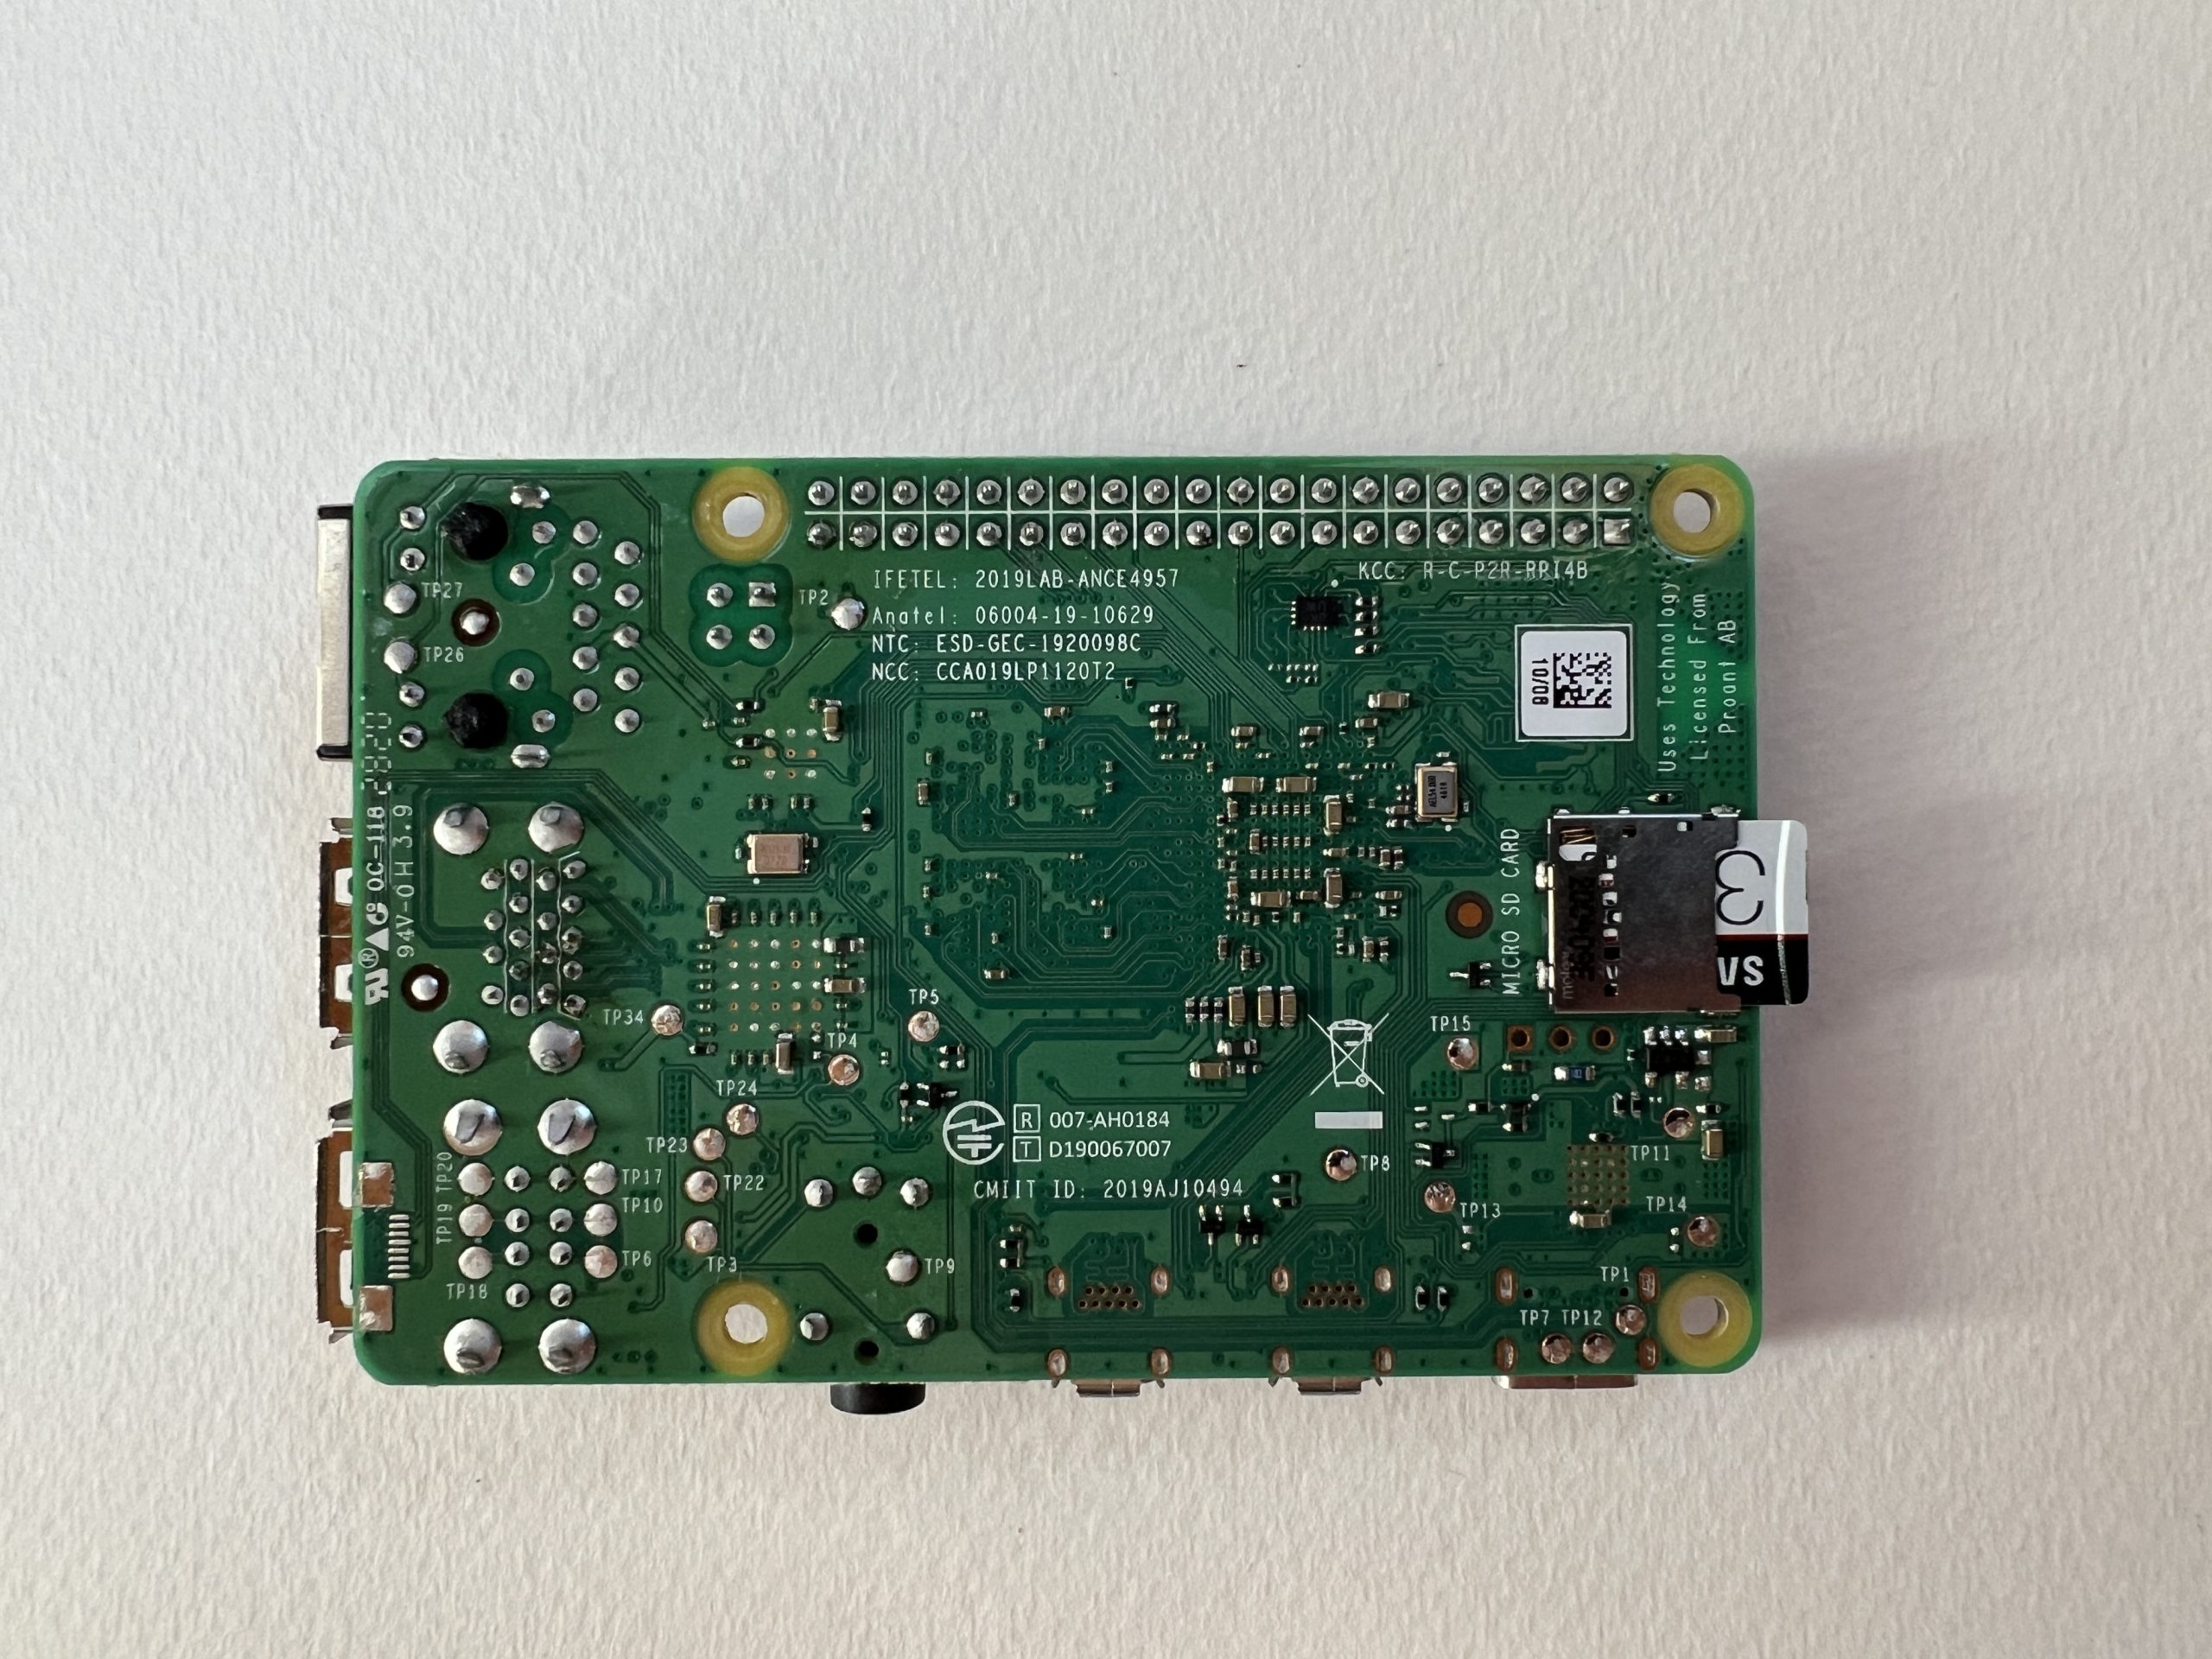
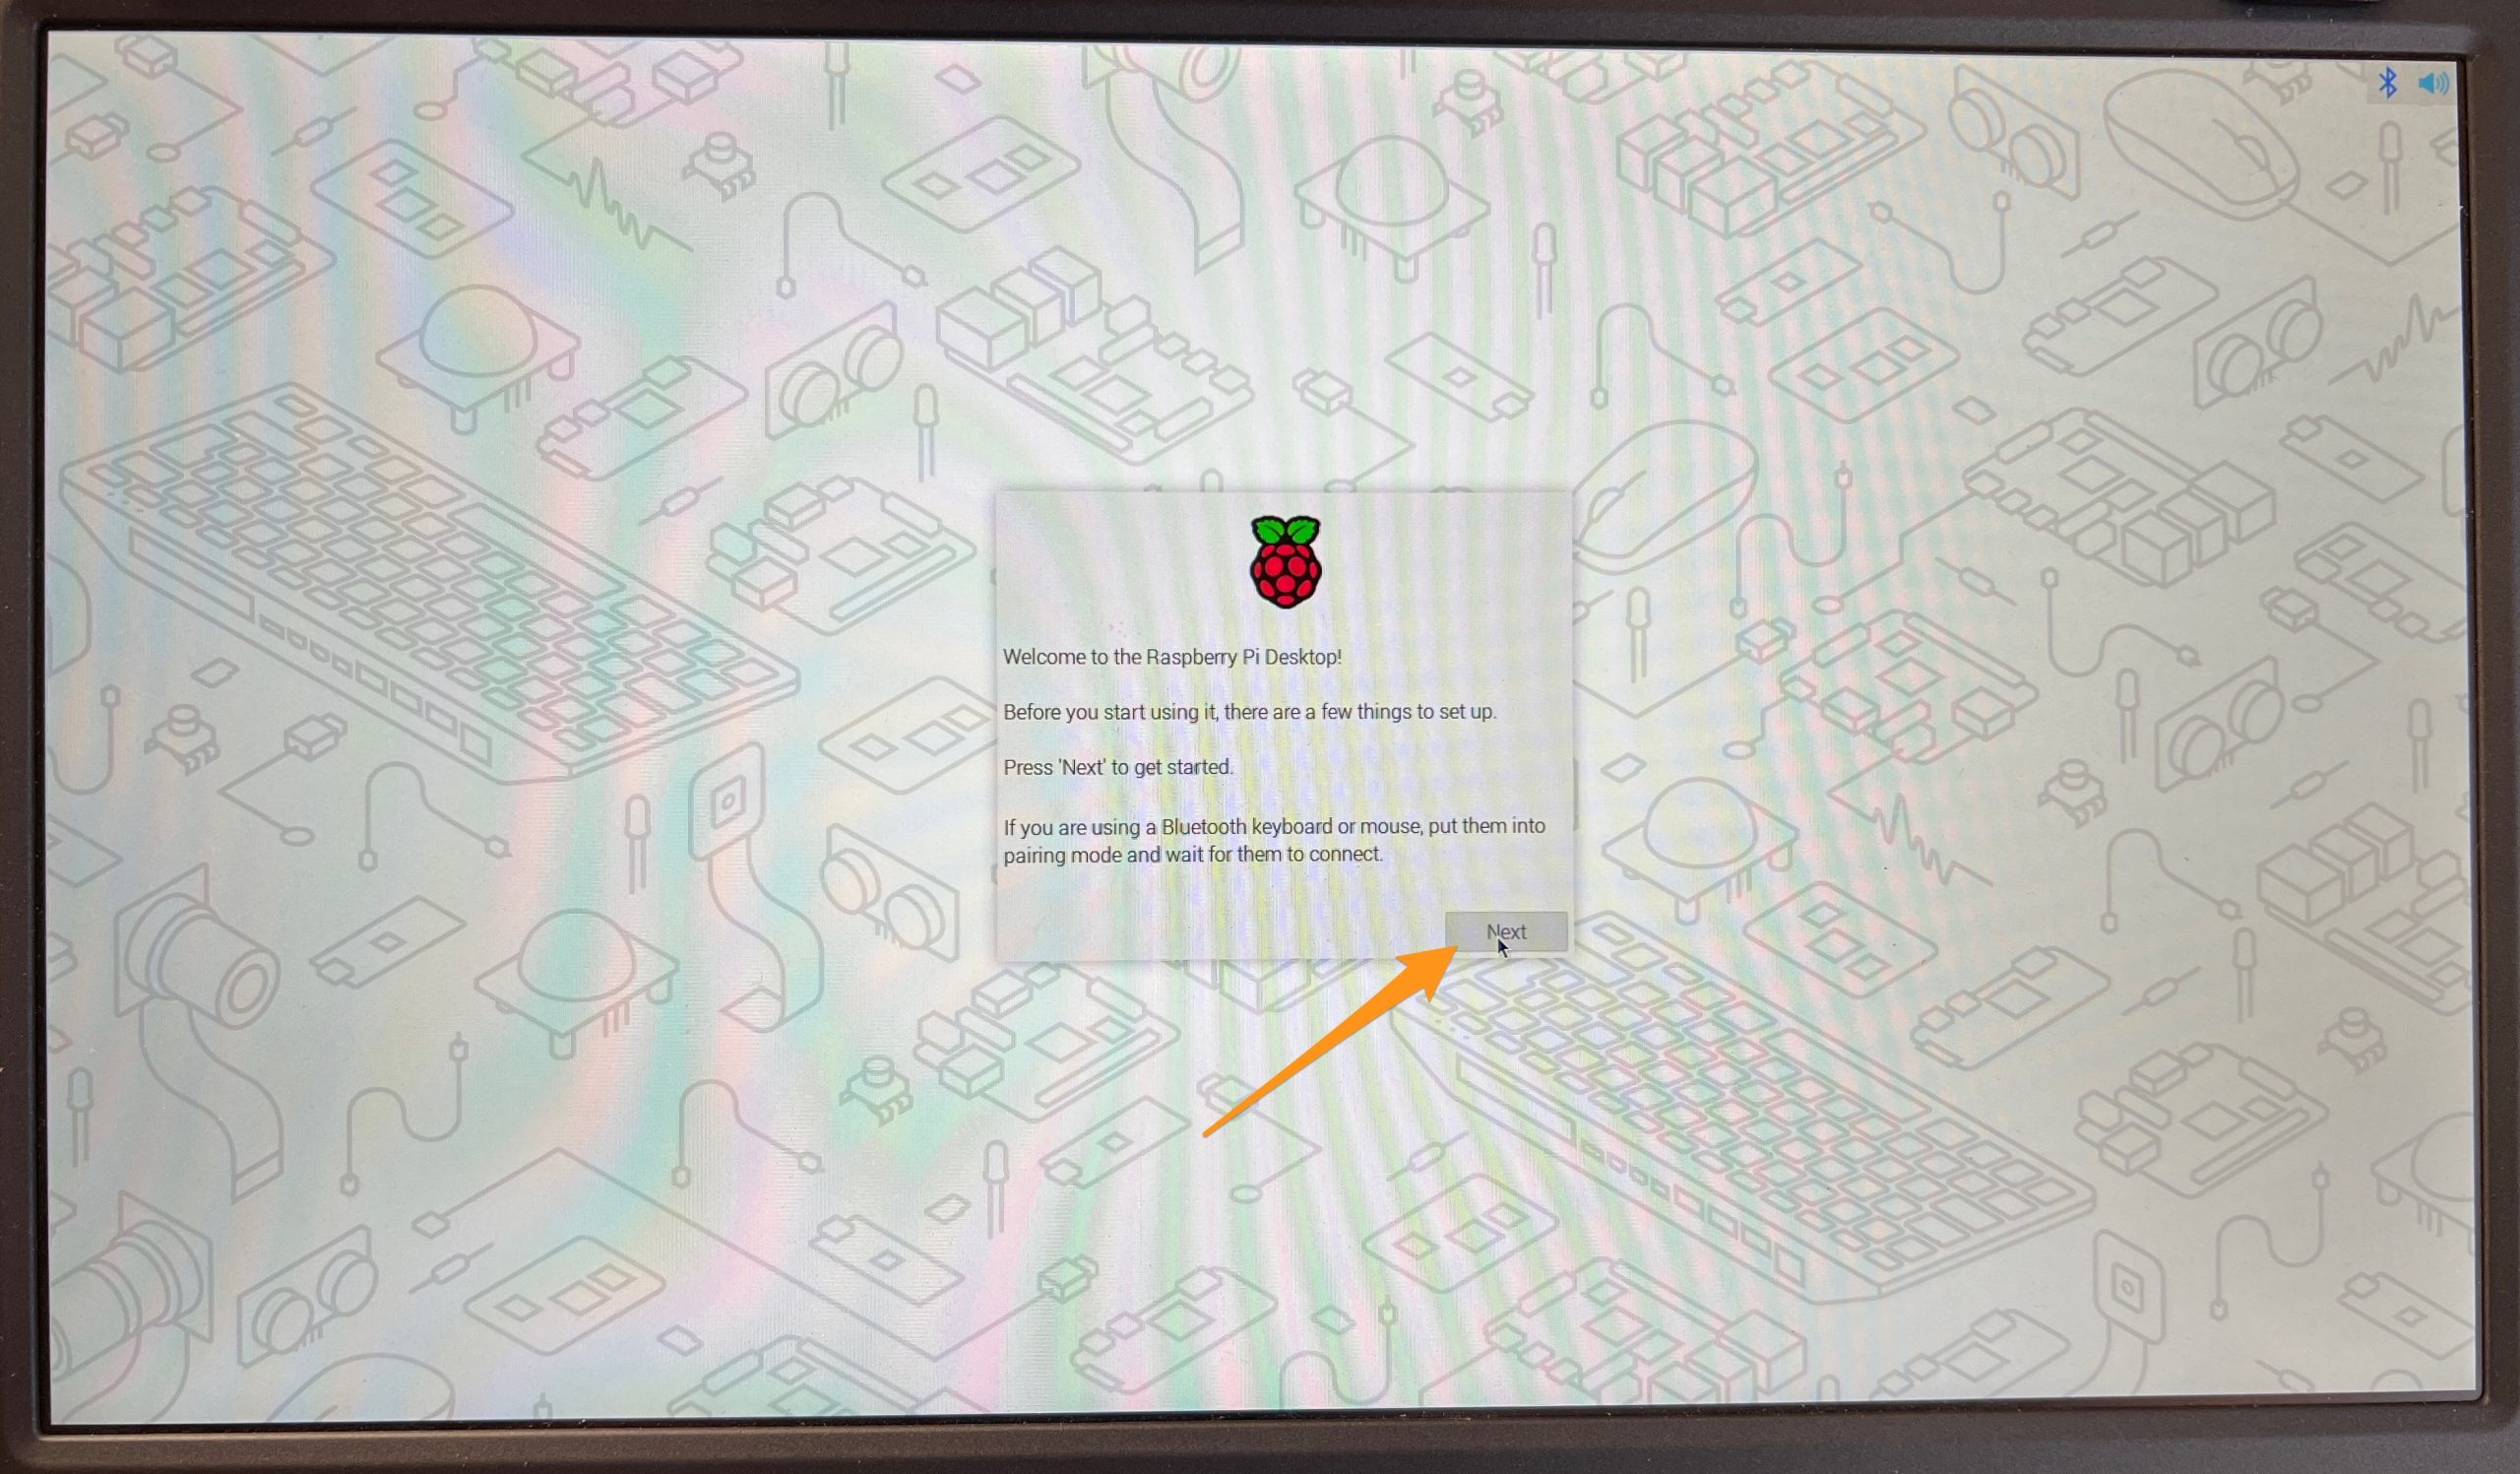
First boot
Put the SD card in the Raspberry Pi, it’s normal that it sticks out a little bit.
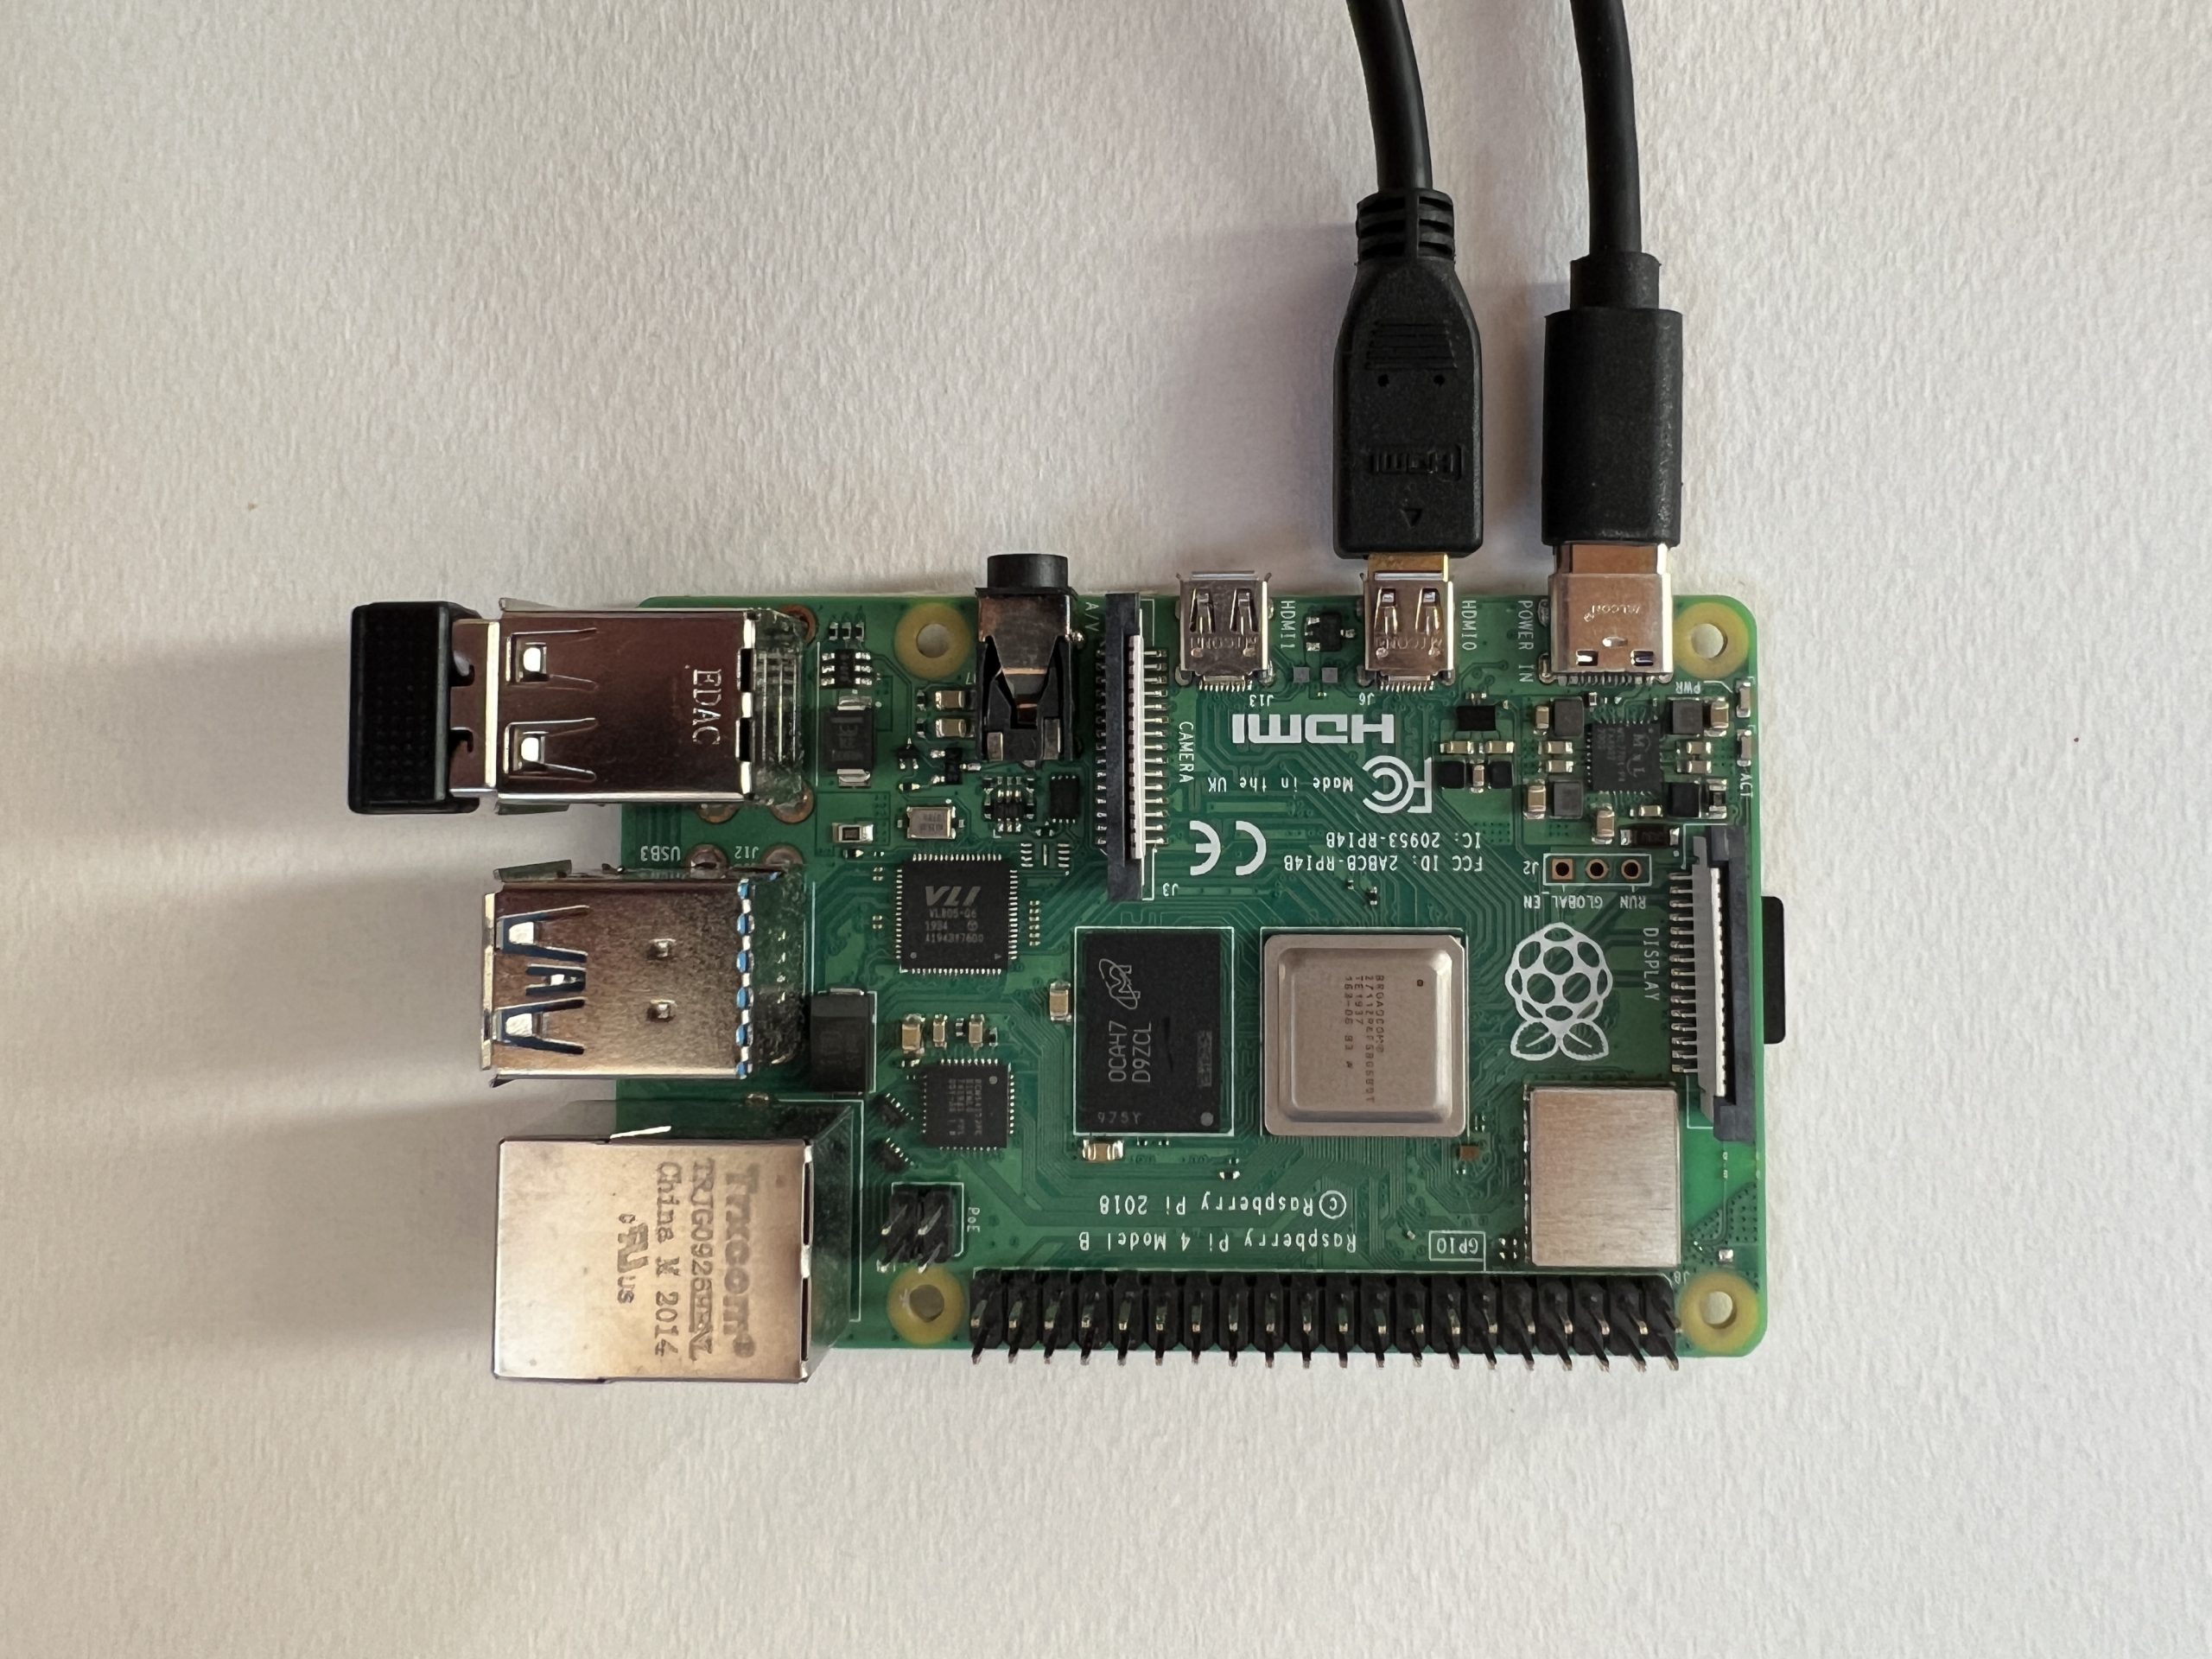
Plug in your mouse & keyboard in the USB port, your screen in the HDMI port, and finally give it power in the USB-C port.
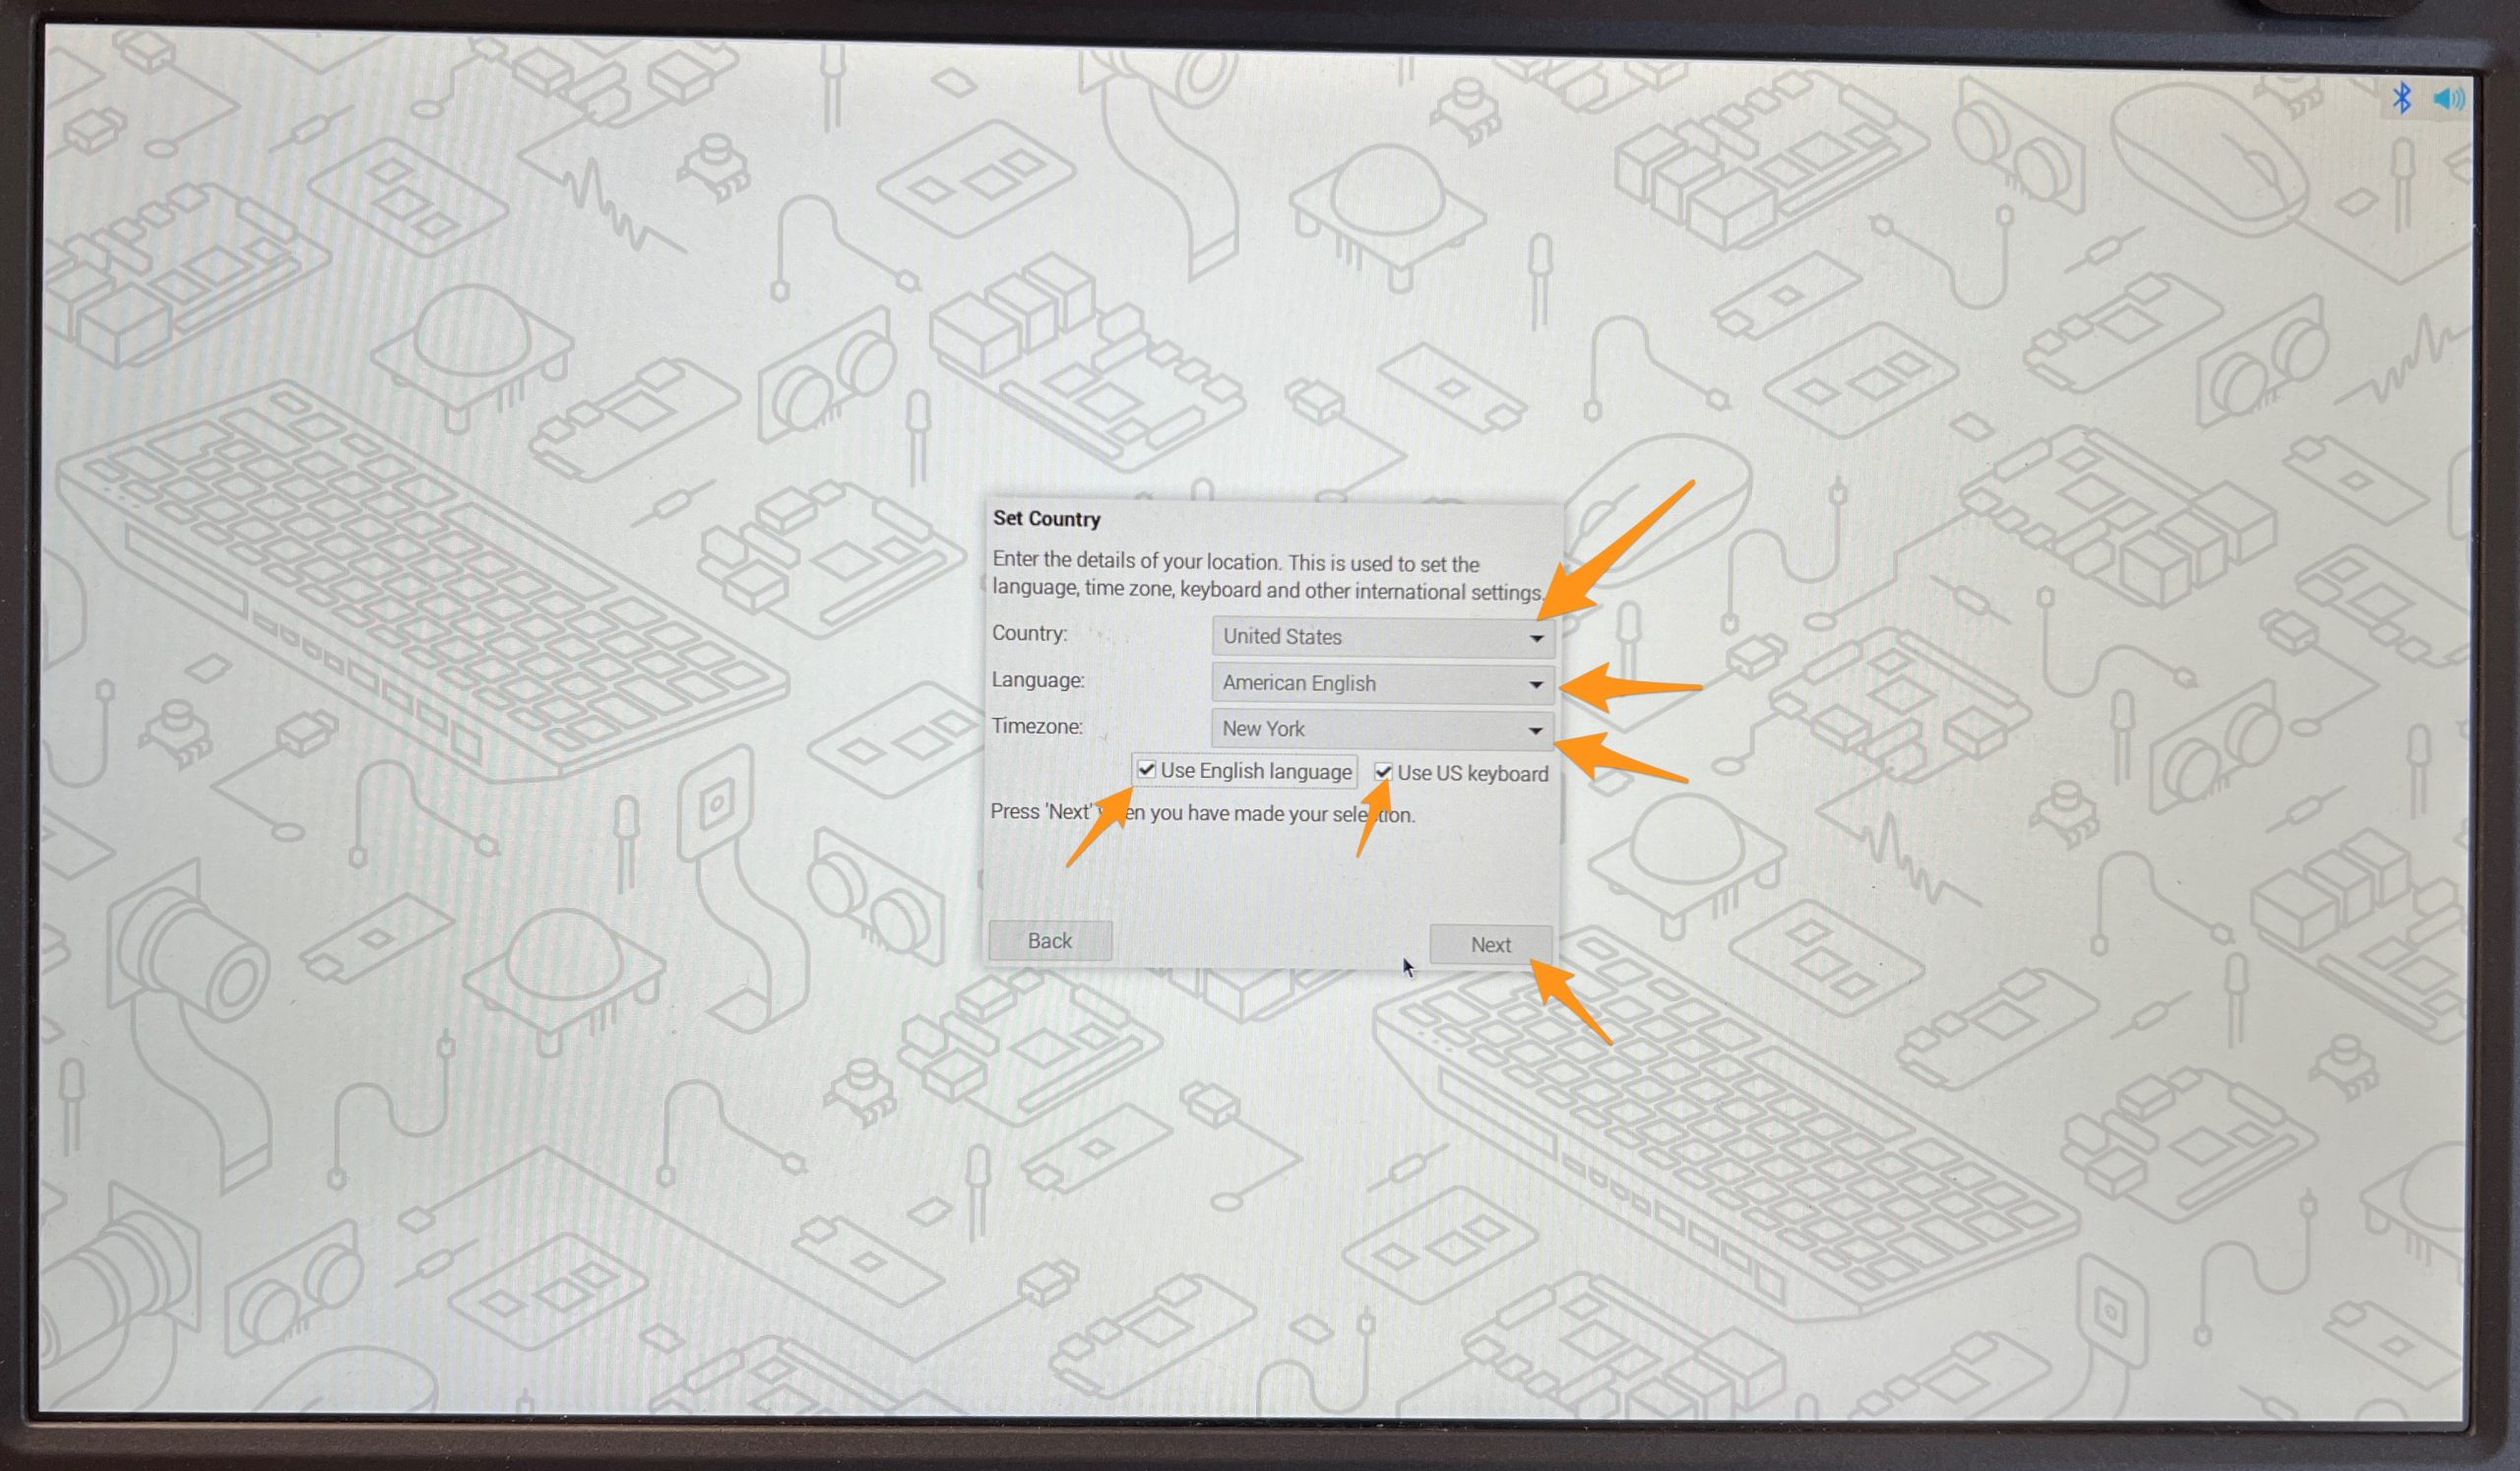
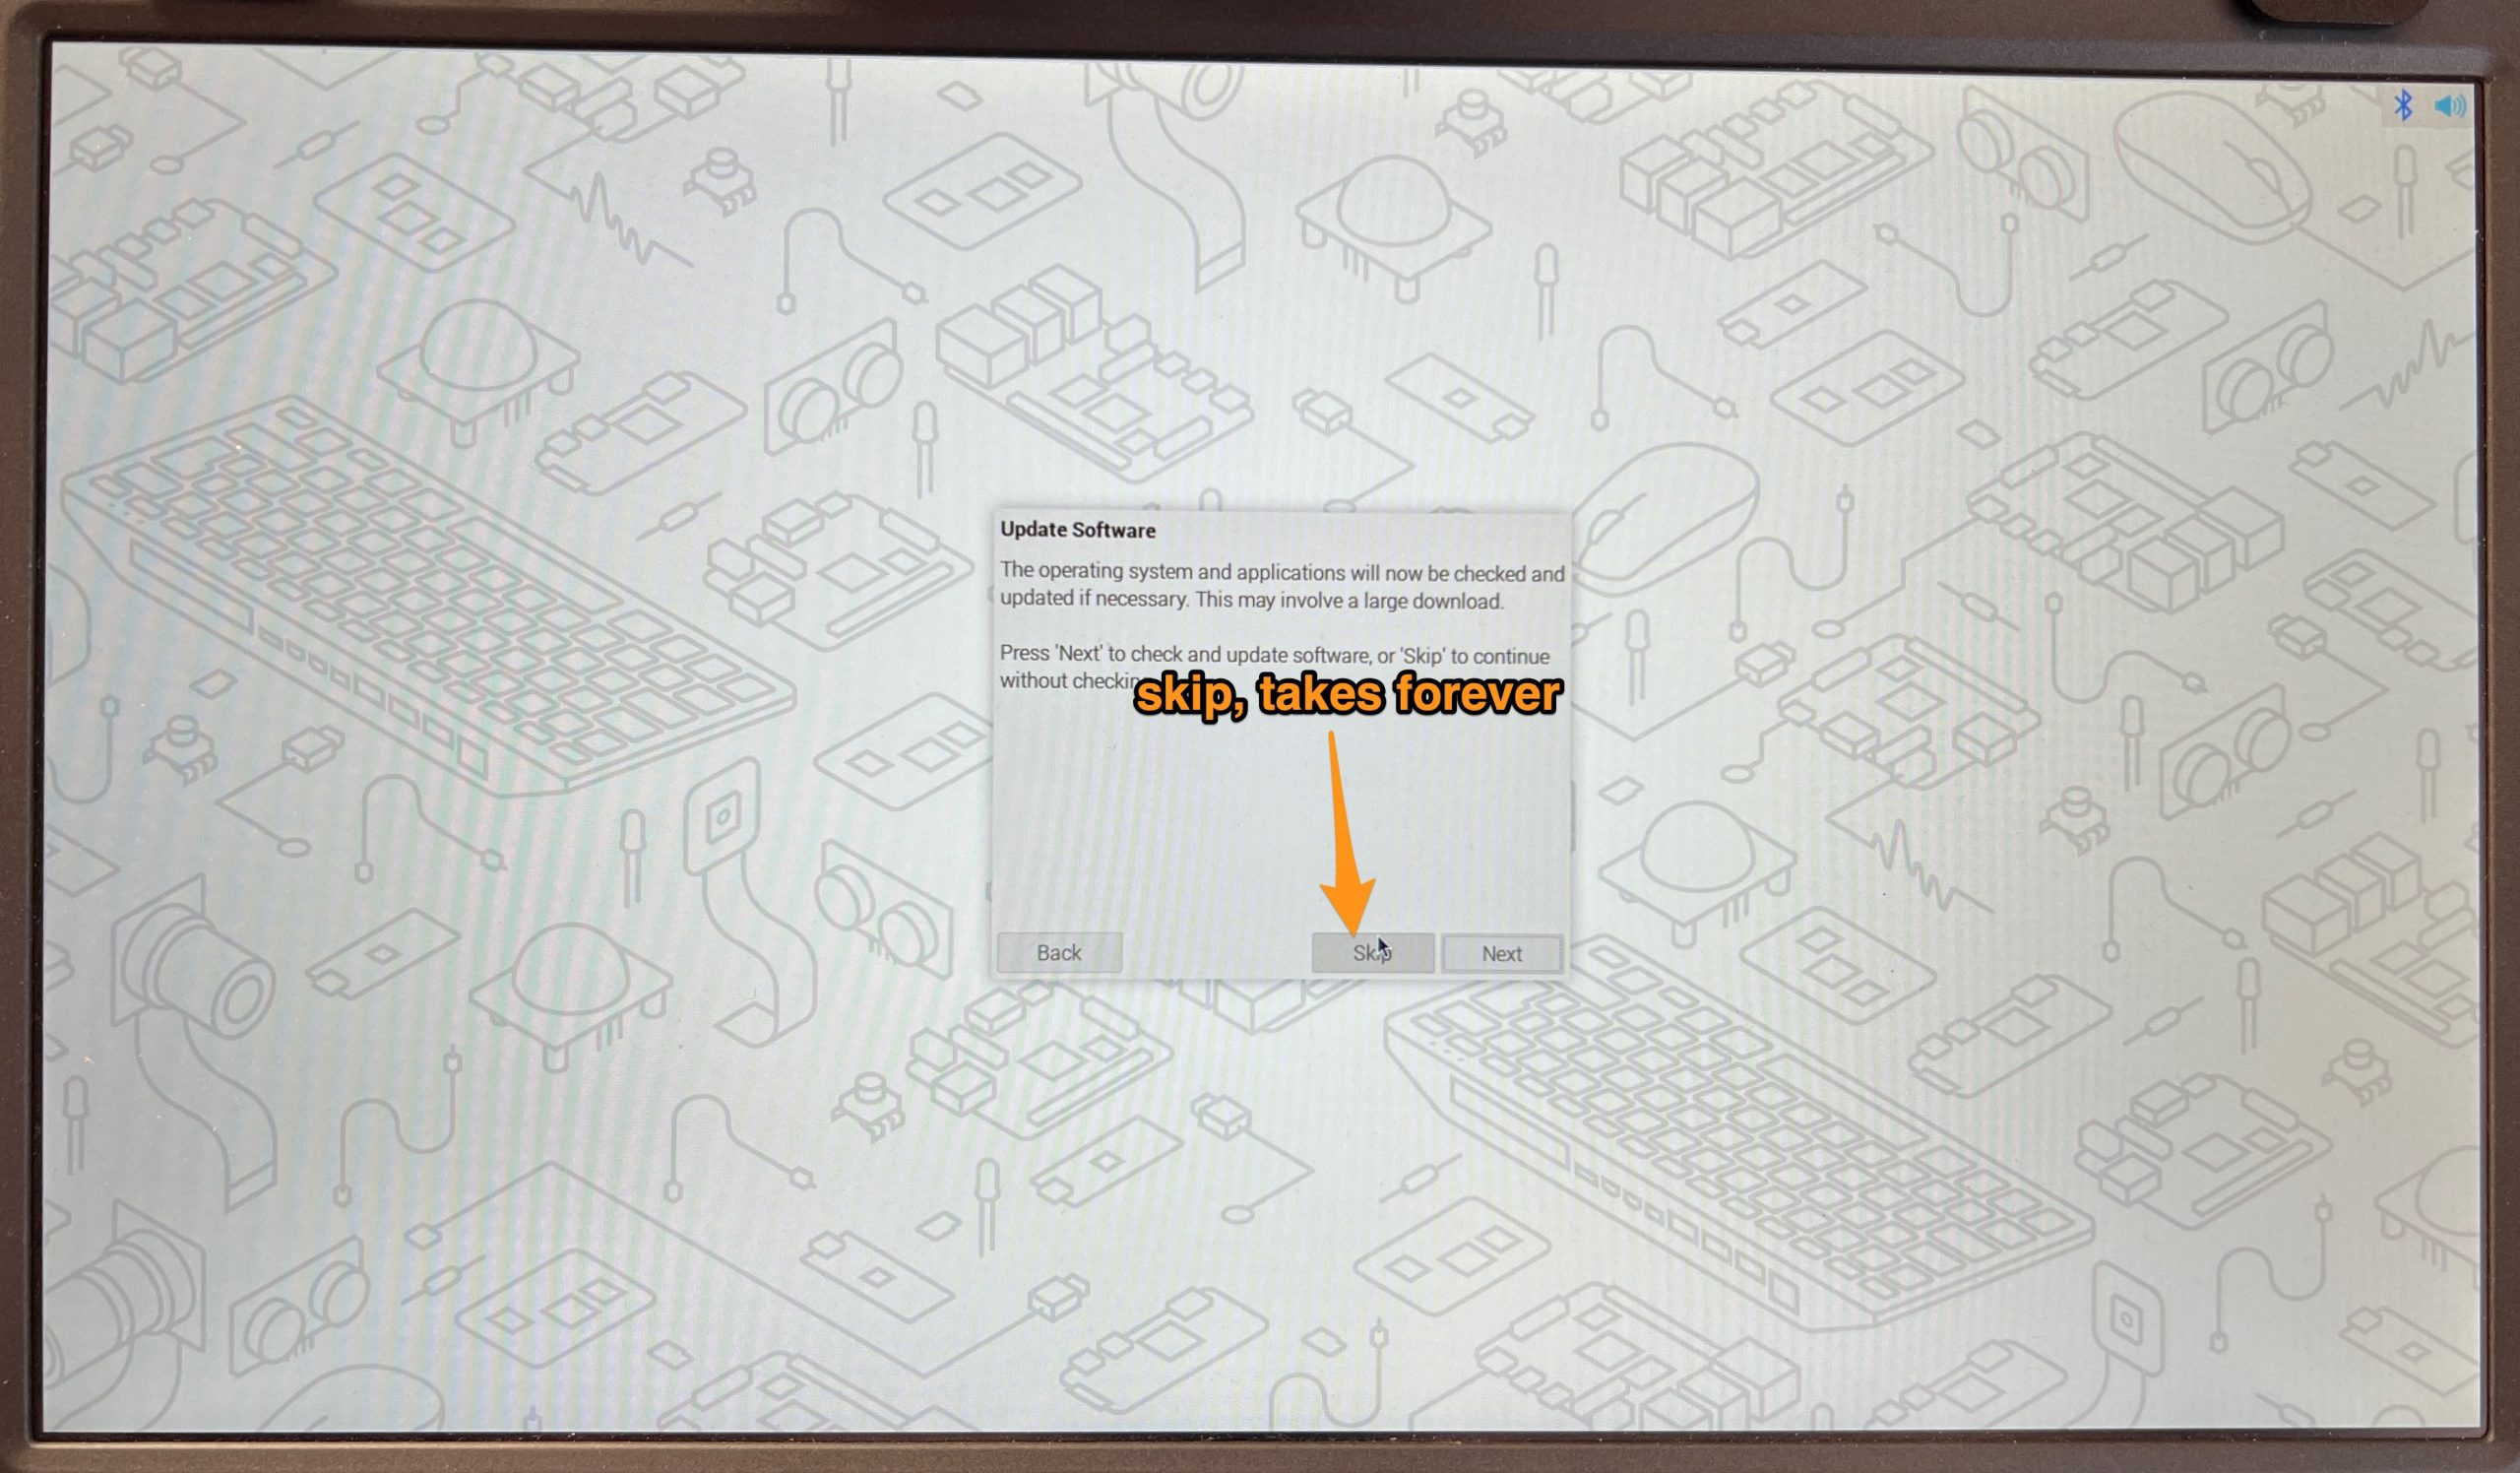
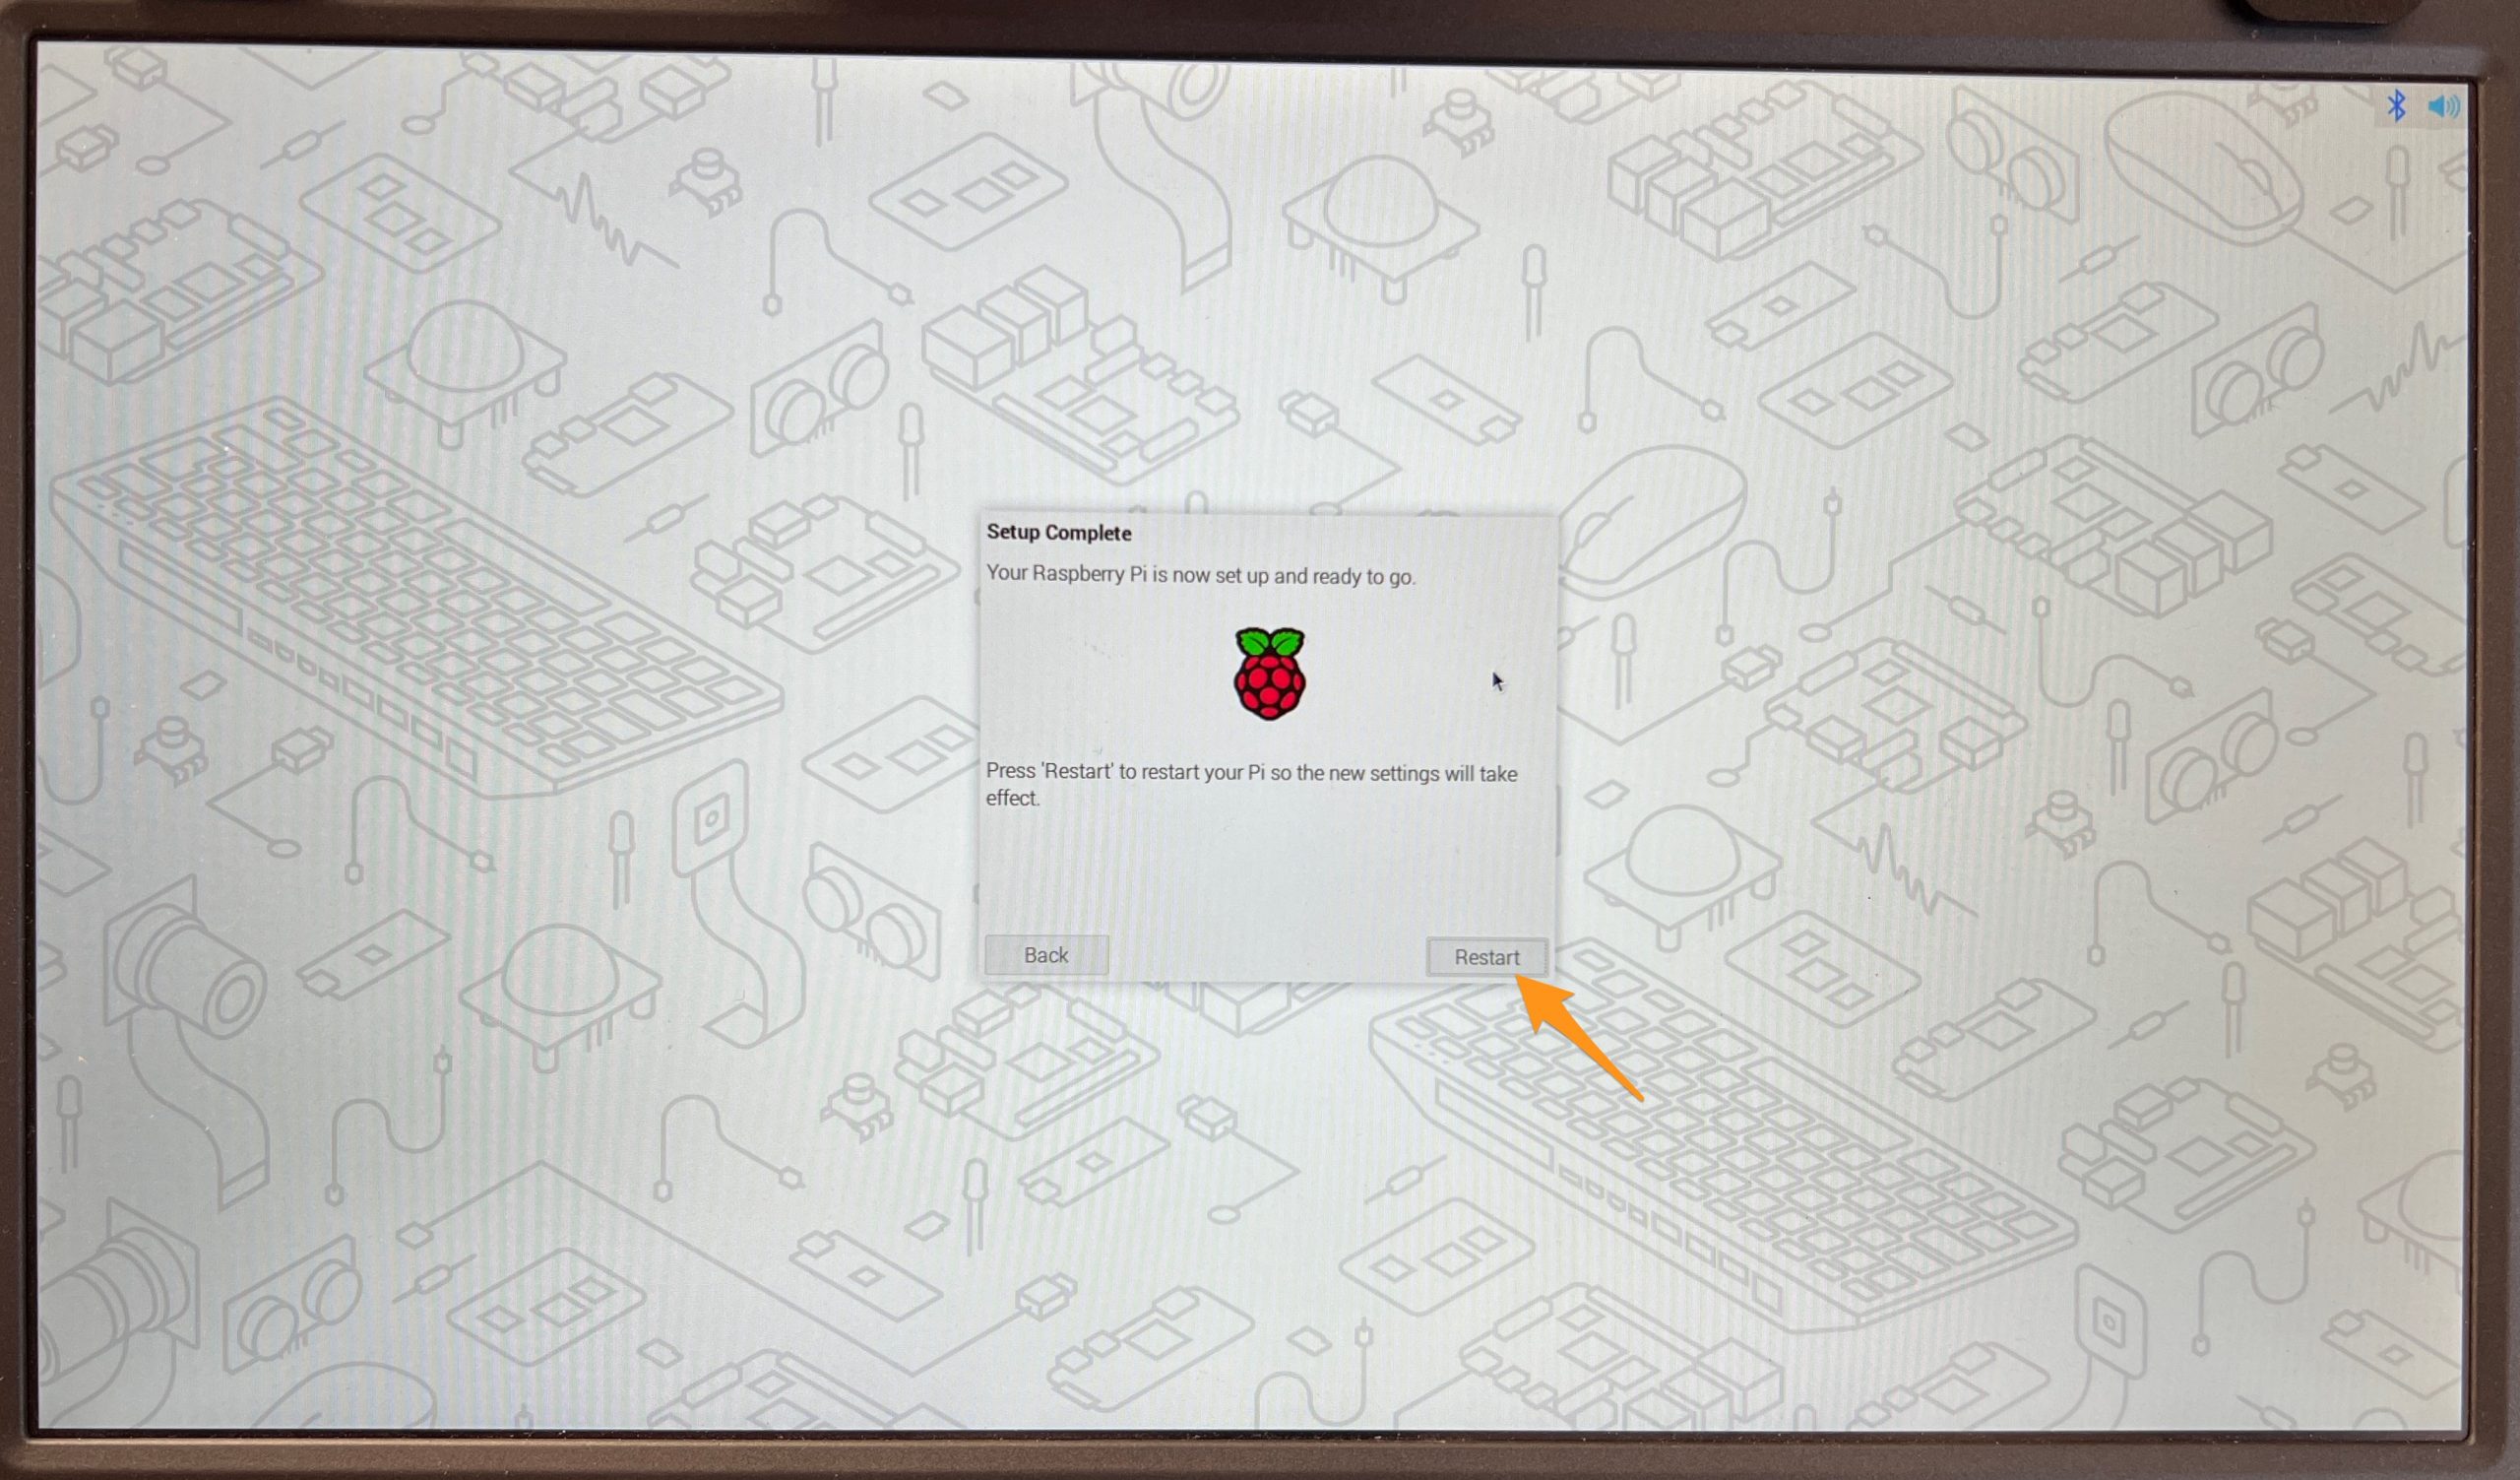
Go through the “first start” wizard, make sure you set the right options.

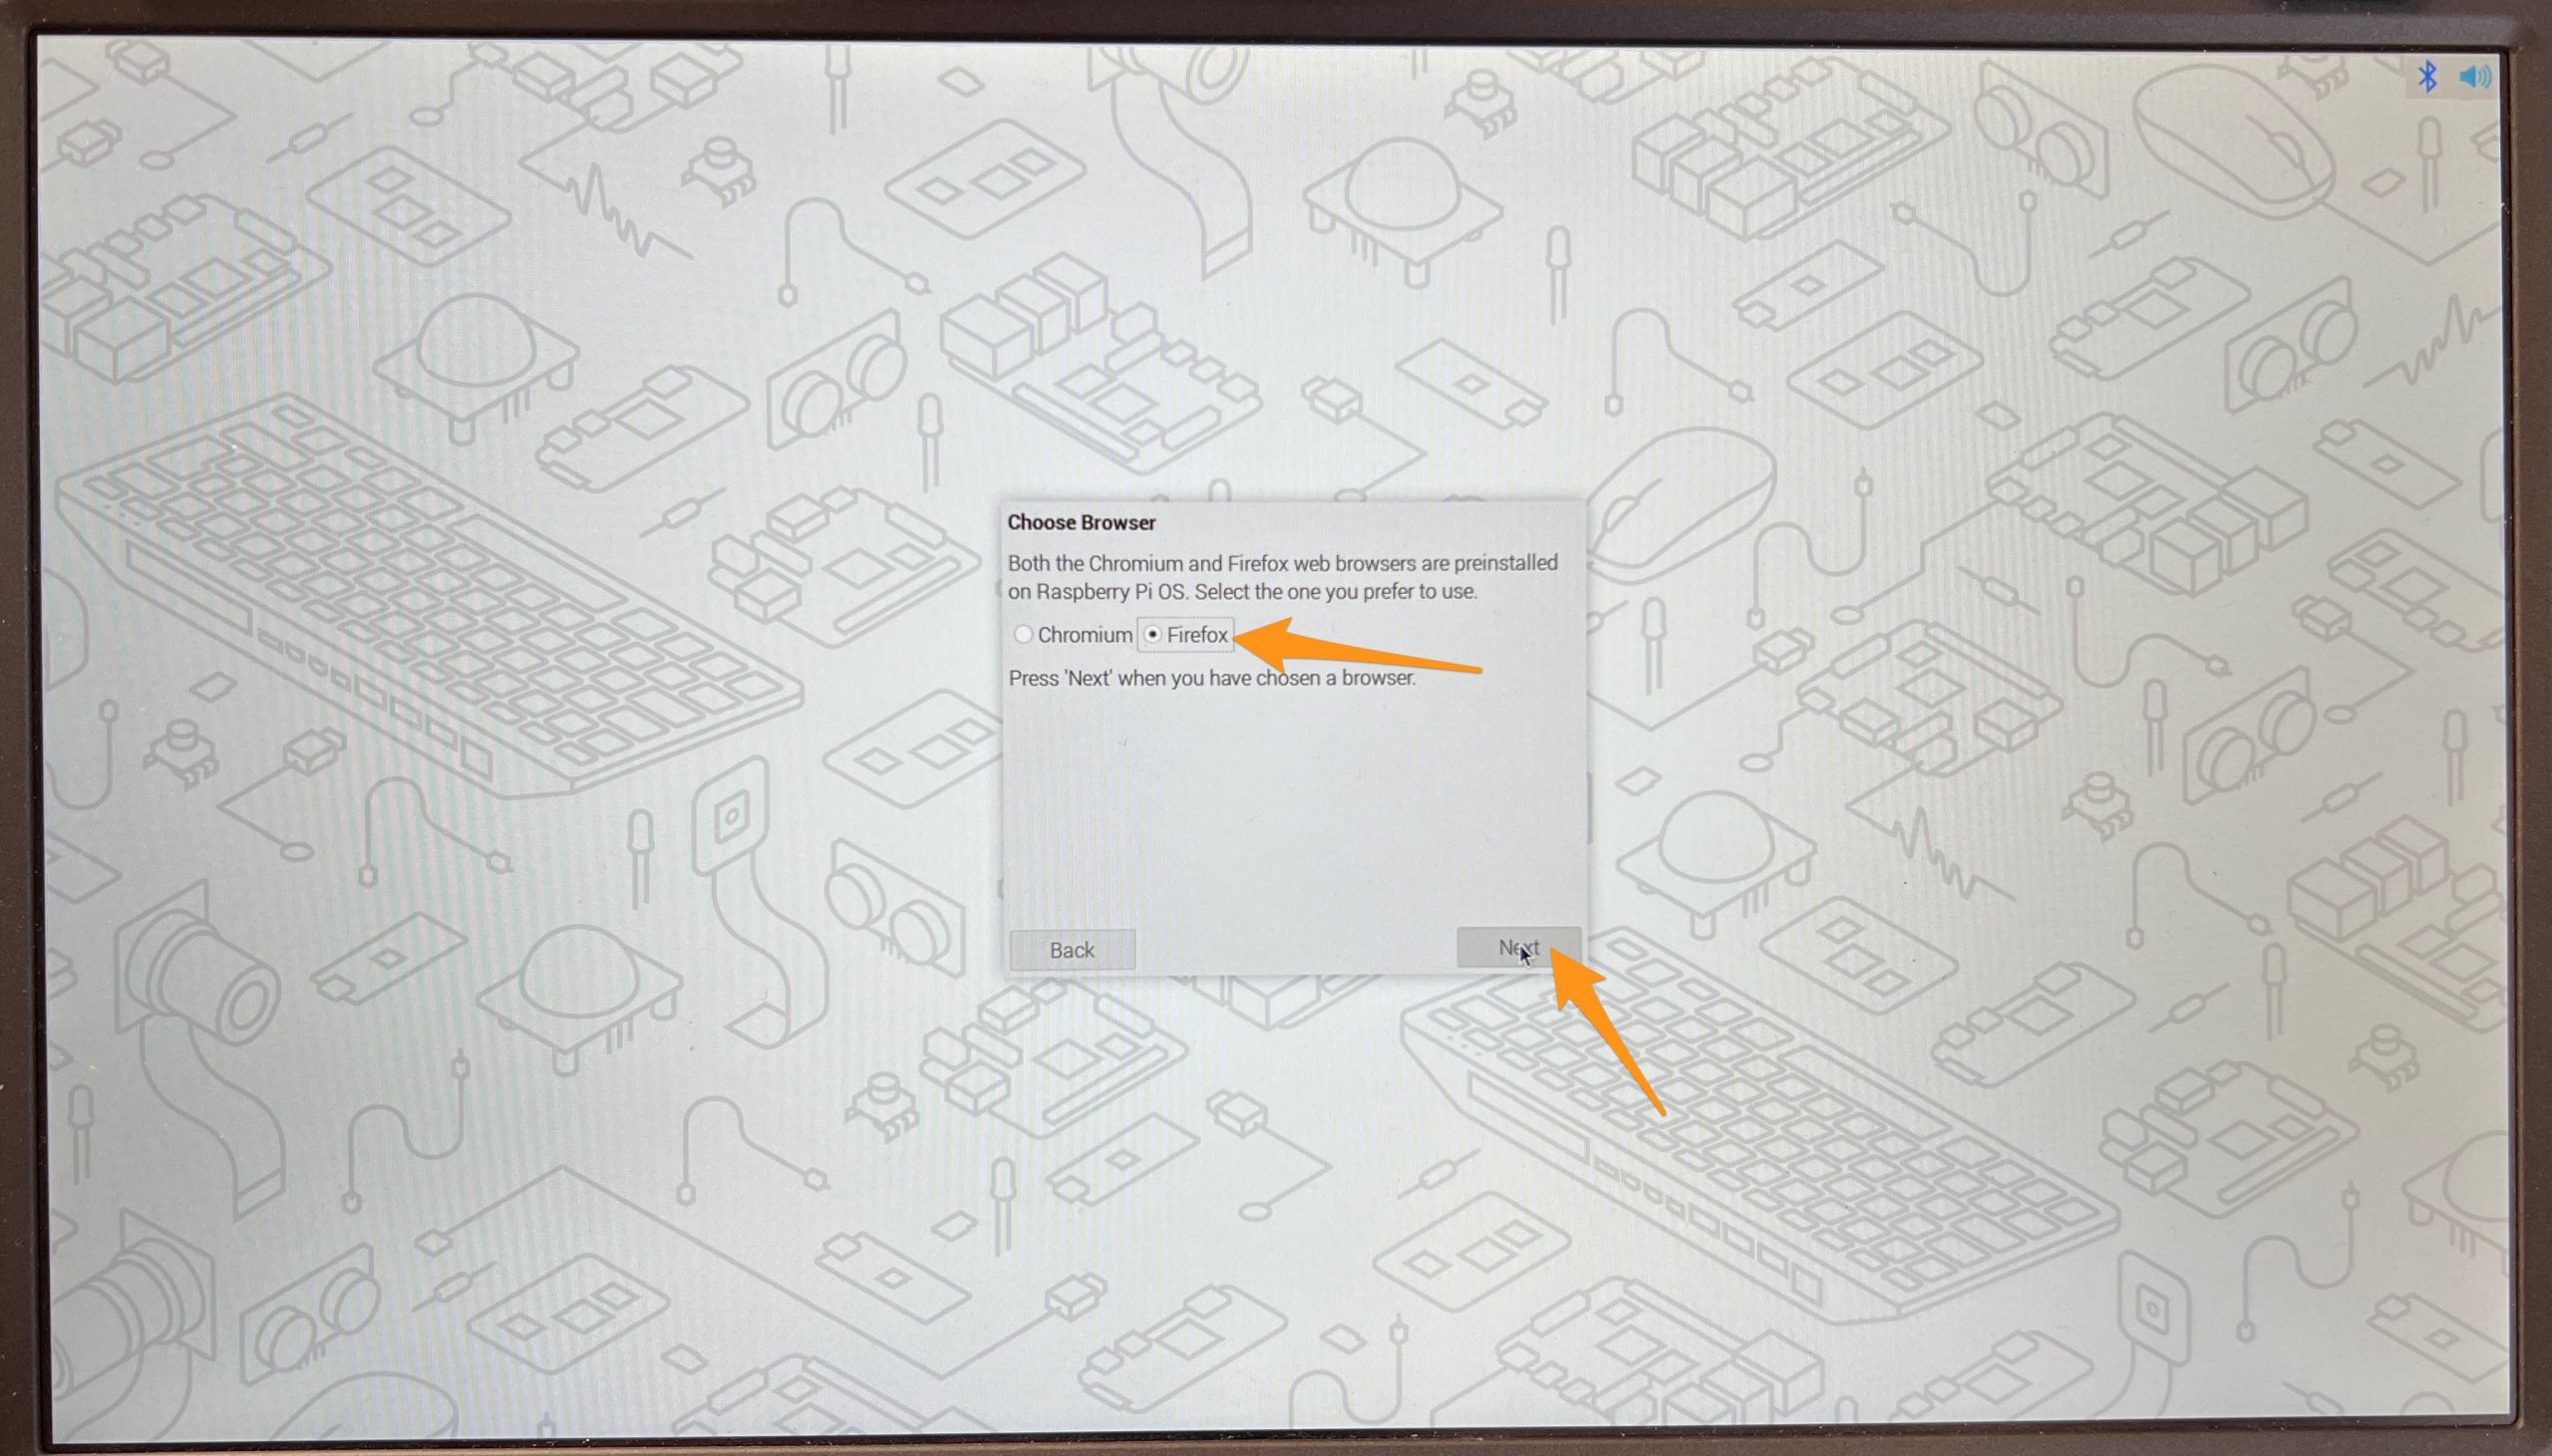
Firefox is better 🙂
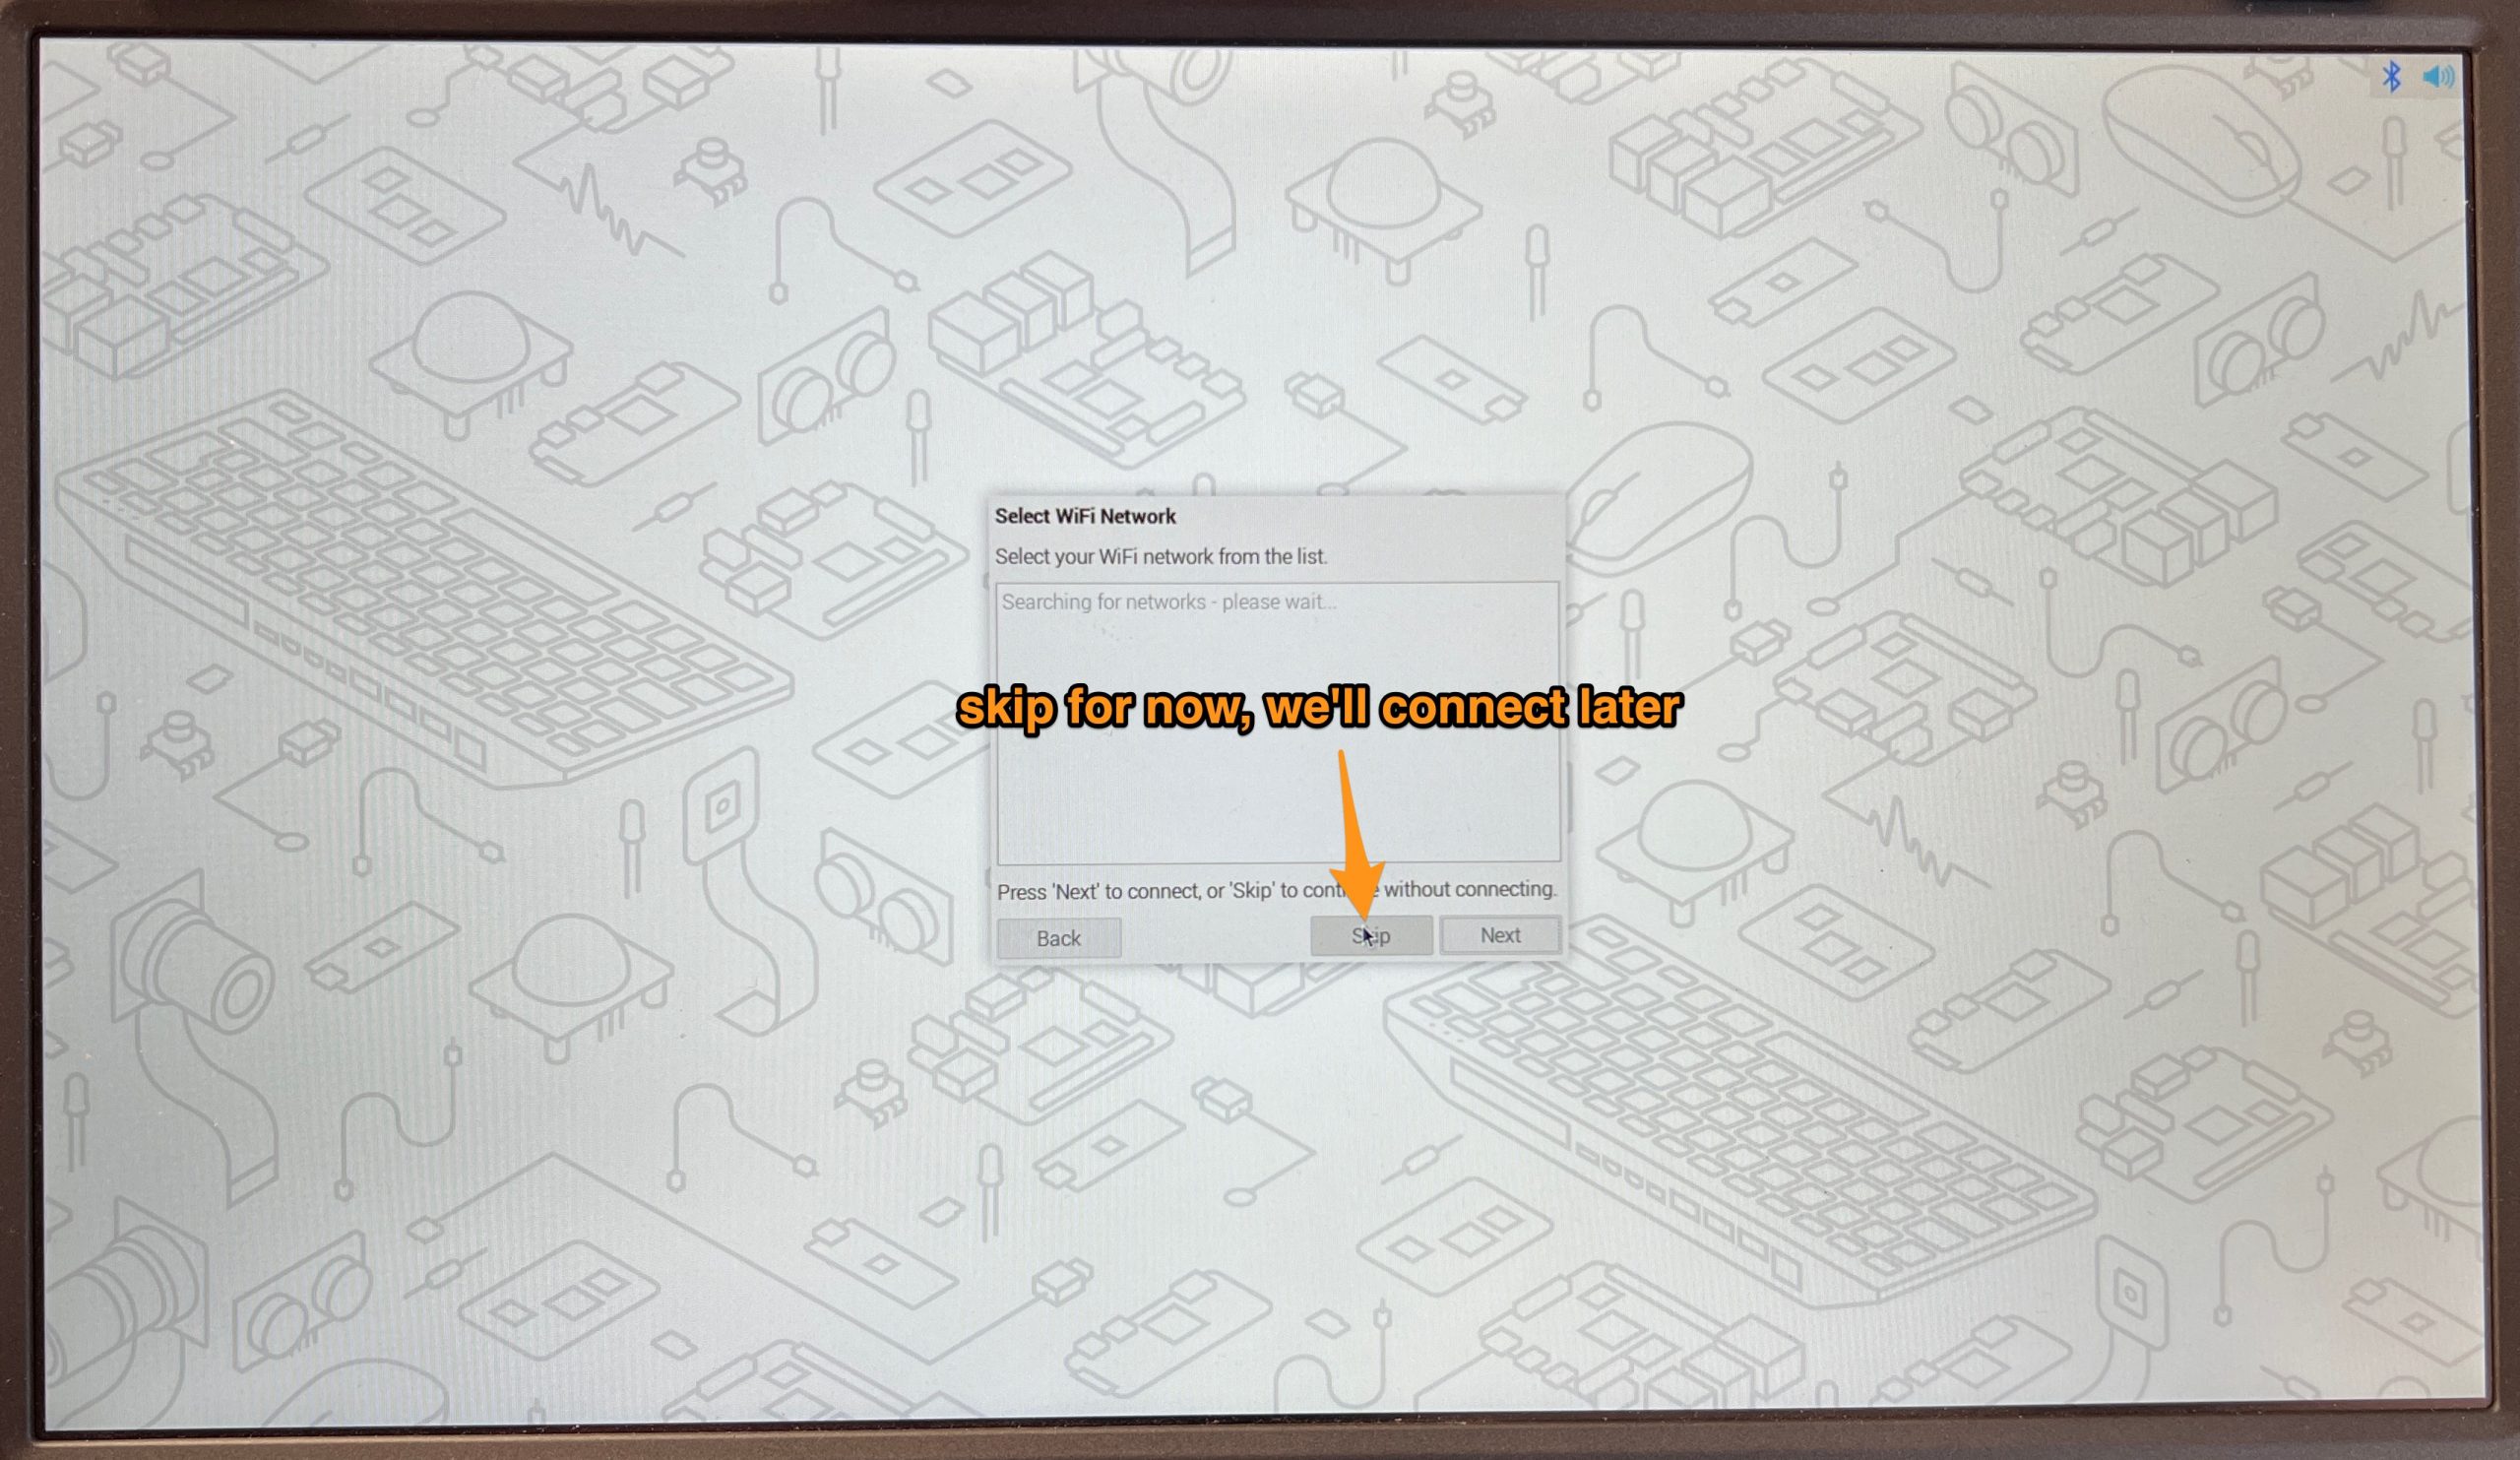
Skip updates.
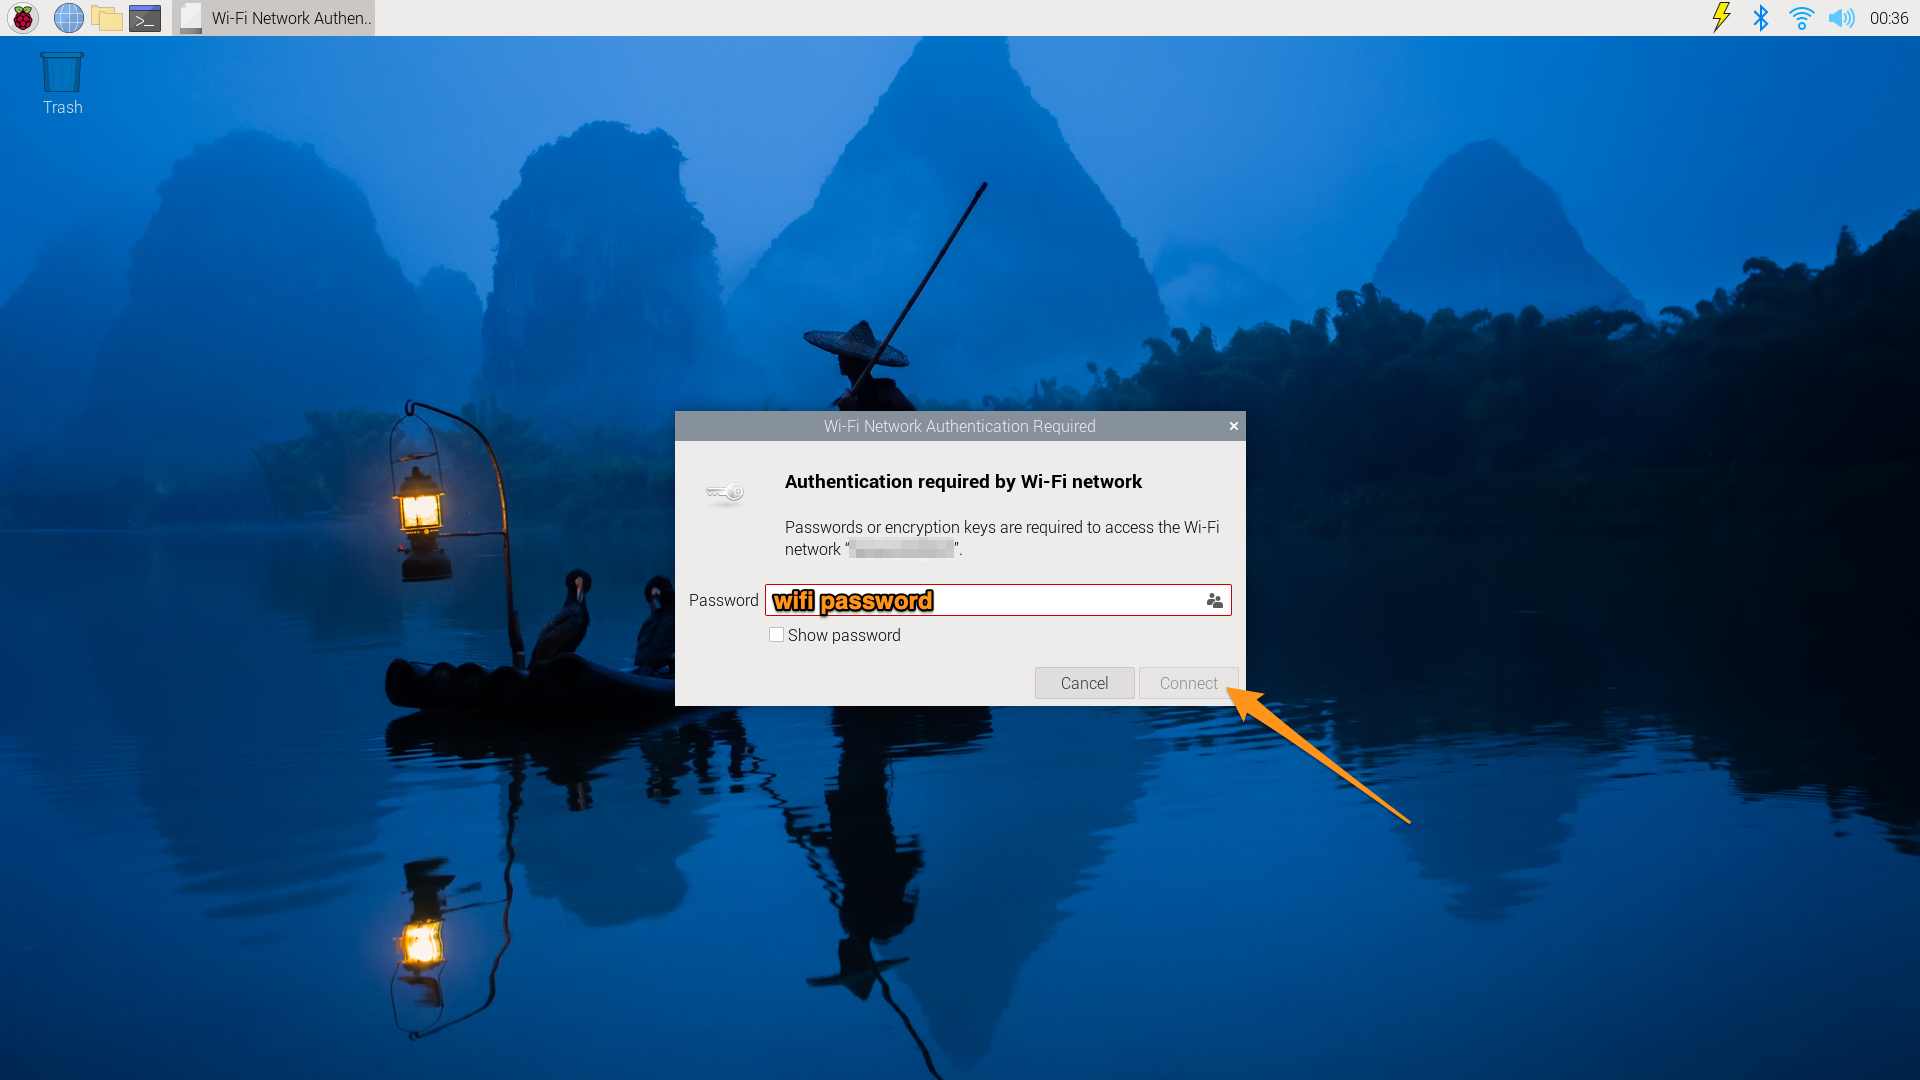
Connecting to Wifi
Ok, now we’re finally seeing our OS (Operating System), much like Windows or MacOS.

Terminal Commands
Navigating Files & Directories
Open a terminal and a file browser, arrange them side to see so that you can see both at the same time.

In the terminal, run the command:
lsSee how it lists all the directories you have in your file browser?
Now let’s go into one of these directories with the command:
!! commands are case sensitive !!
cd Bookshelfcd stands for change directory, in there you can list the files again. Finally let’s open the one file that is in there with:
open Be<TAB>Instead of painstakingly typing the whole filename, we can use the TAB key to autocomplete it.
The terminal the file browser allow for exactly the same operations, only in different ways. Let’s go back to our home directory (so we’re not in the Booshelf directory). To do this, you can type:
cdwithout anything following it, cd will you back to your home directory by default.
GPIO pins
Power from the Pi

Controllable Power from the Pi
sudo su
echo "4" > /sys/class/gpio/export
echo "out" > /sys/class/gpio/gpio4/direction
echo "1" > /sys/class/gpio/gpio4/value
echo "0" > /sys/class/gpio/gpio4/value
You can repeat the last 2 commands by using the up arrow key, this way you don’t have to type them every time.
When you are done playing the the LED, clean up GPIO pin 4 with:
echo "4" > /sys/class/gpio/unexport
exit
Fun with terminal commands
Here are a few other commands.
wget
Let’s retrieve a file from the internet with:
wget https://ben.akrin.com/robotics/cantina.wavIf you ls, you will now see that the file cantina.wav exists.
Grab a Speaker

Give it a couple of AAA batteries, and plug it into the Pi:

aplay
wav files are sound files, let’s play it with:
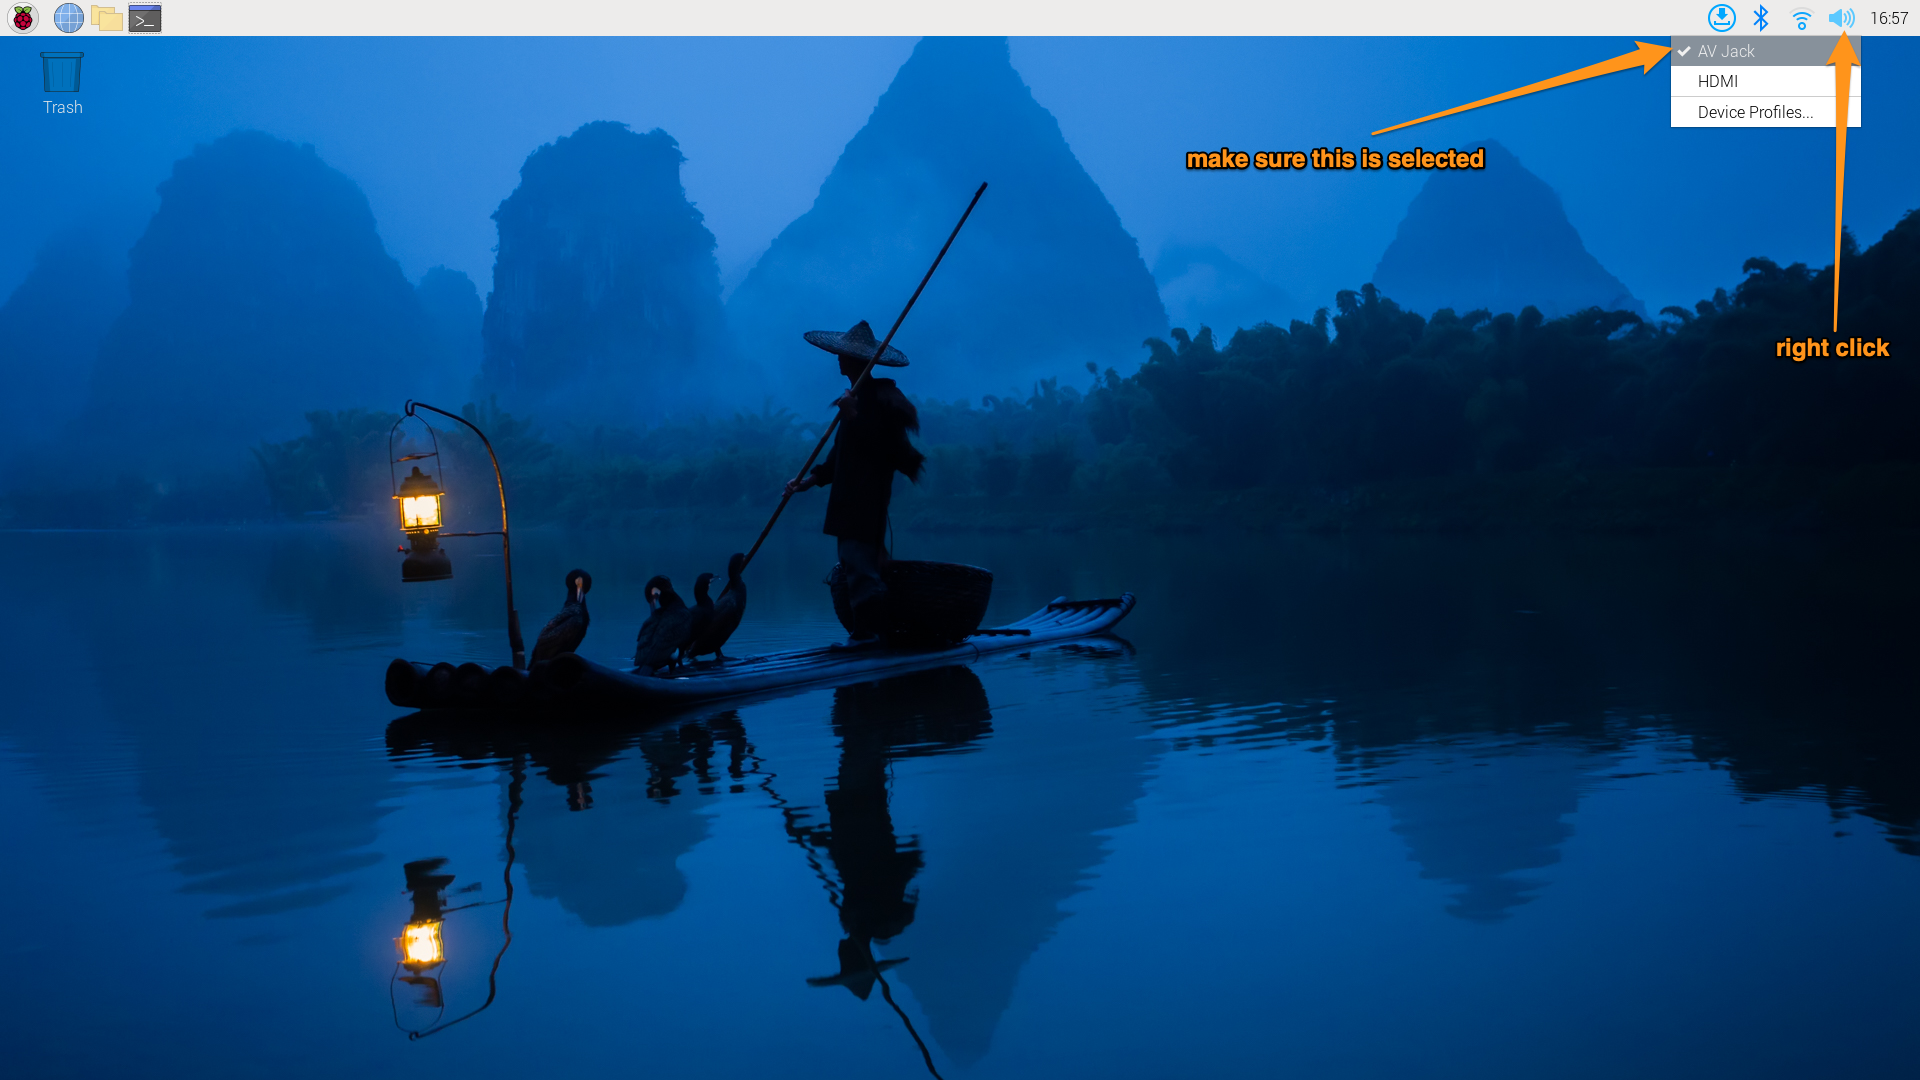
aplay cantina.wavIf you didn’t hear any sound, you might need to make sound come our the AV Jack rather than HDMI.
Cool, we now have sound, but it would be funner if we could generate our own. Let’s install a program that will let us do just that:
apt-get
sudo apt-get update
sudo apt-get install -y libttspico-utils
pico2wave
The program we just installed contains a command called pico2wave that does text-to-speech. Let’s have it create a wav file for us:
pico2wave -w my_audio.wav "Hello World!"And of course now you know how to play a wav file:
aplay my_audio.wavTry this one, it’s fun:
pico2wave -w my_audio.wav "`echo -n "TmV2ZXIgZ29ubmEgZ2l2ZSB5b3UgdXAsIG5ldmVyIGdvbm5hIGxldCB5b3UgZG93bi4=" | base64 --decode`"Coding with Python

Let’s launch Geany

Hello World!
And let’s type in our very first Python code
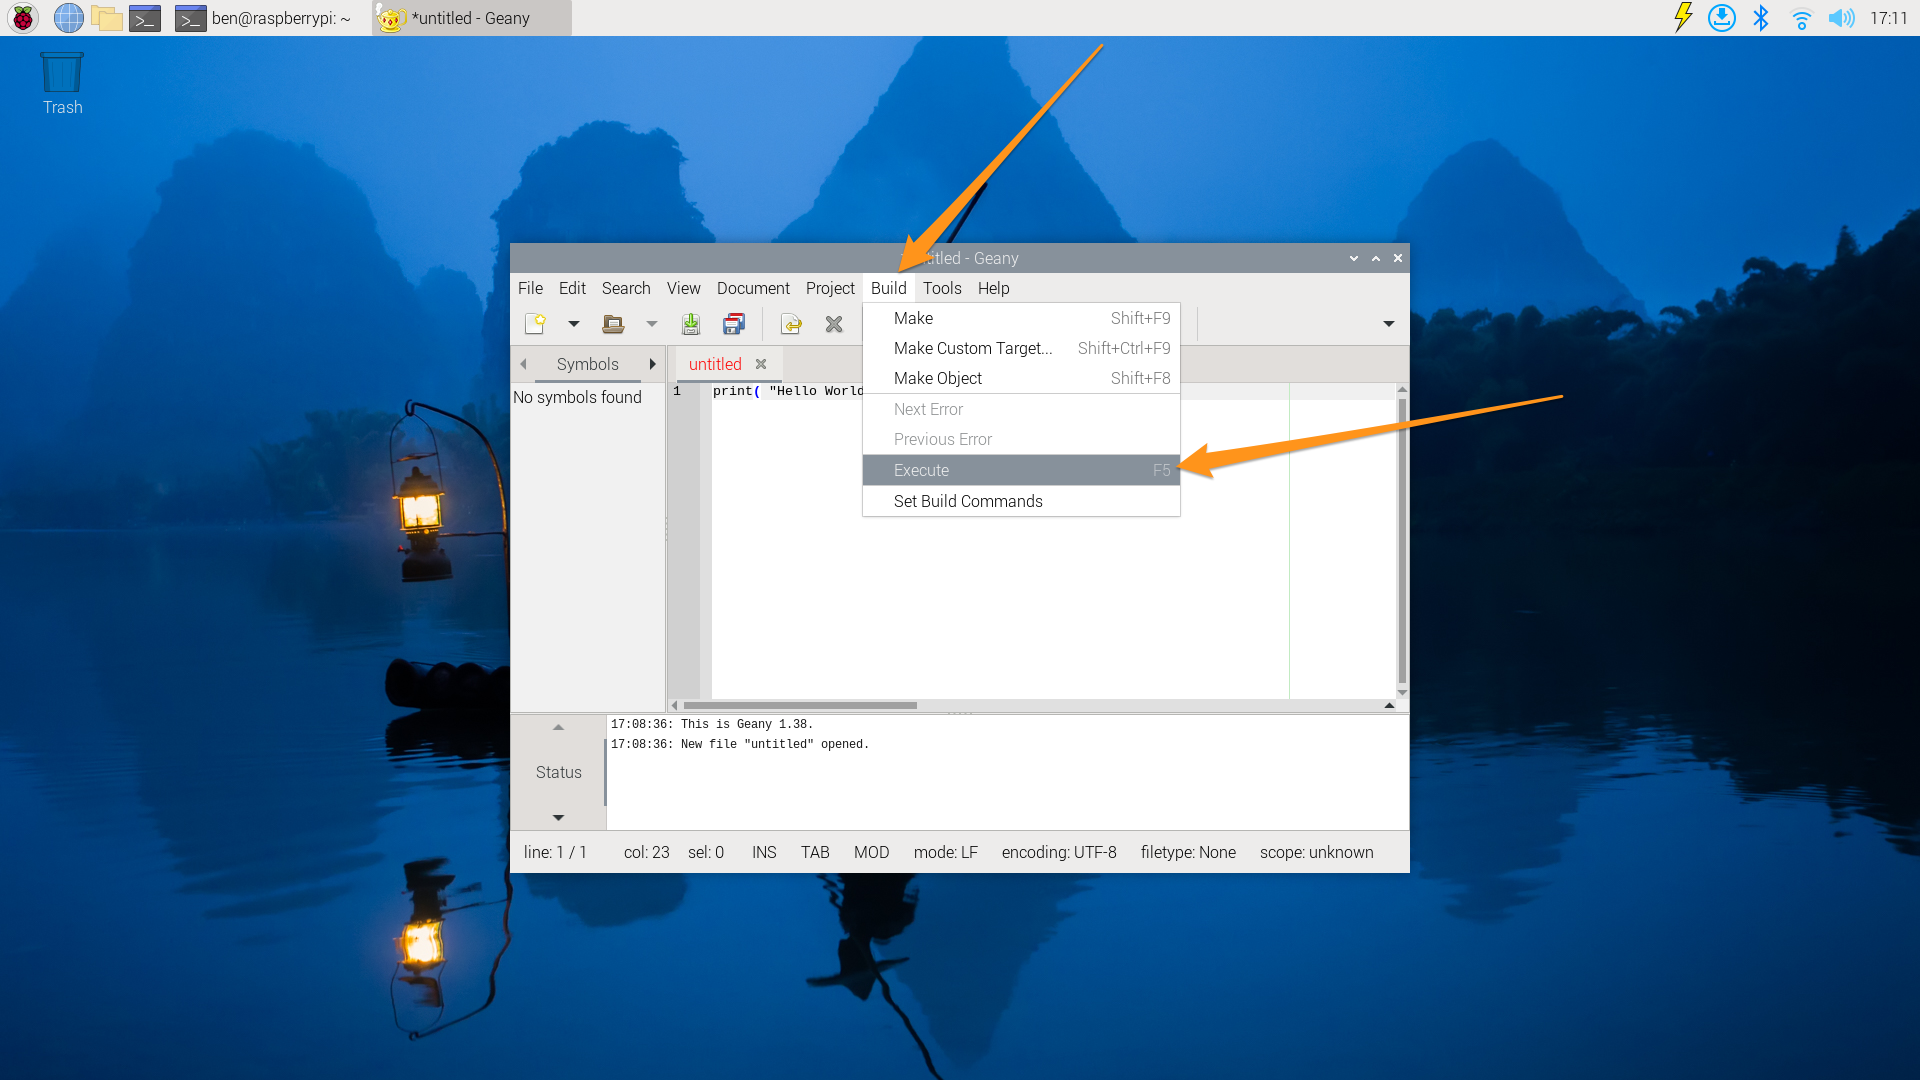
print( "Hello World!" )To run your code, you can click on Build -> Execute, or as Geany suggests you can hit the F5 key on your keyboard.
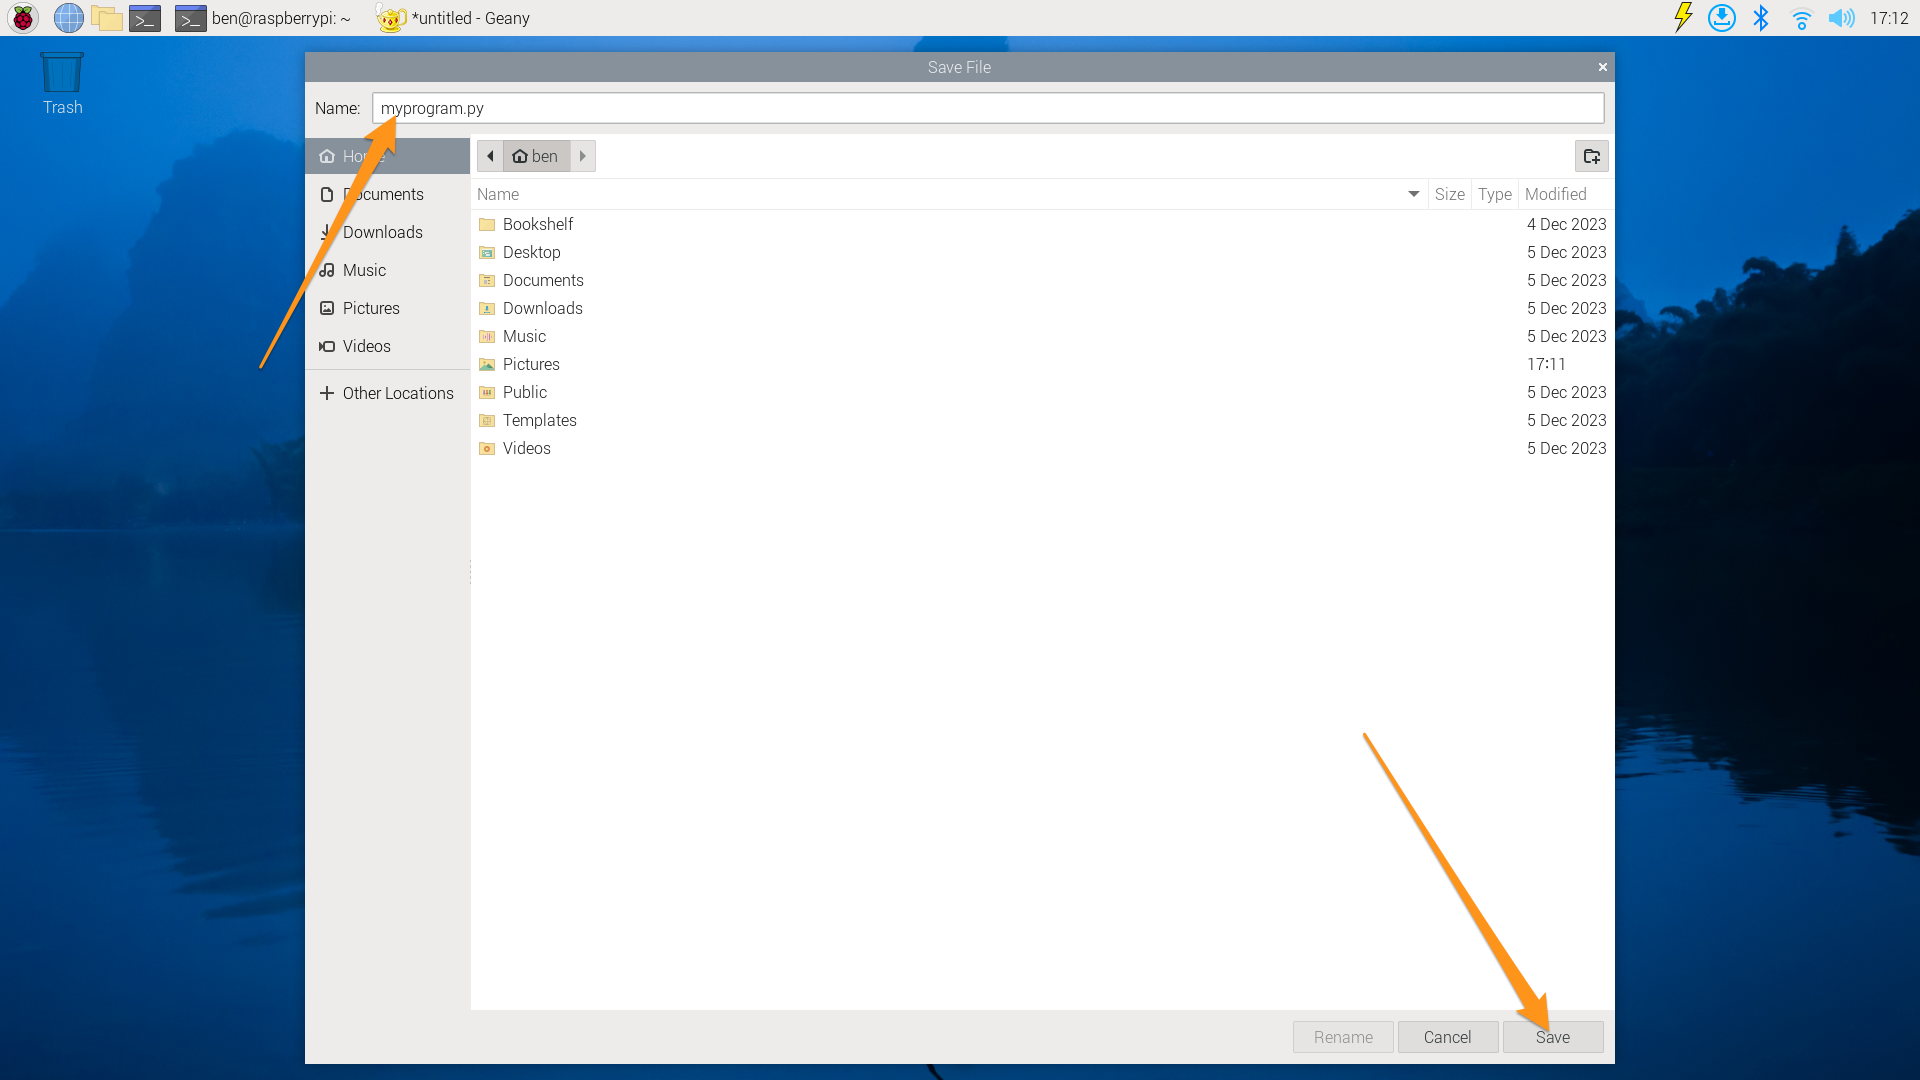
The first time though, you need to save your code into a file. Give it a name and hit “Save”.
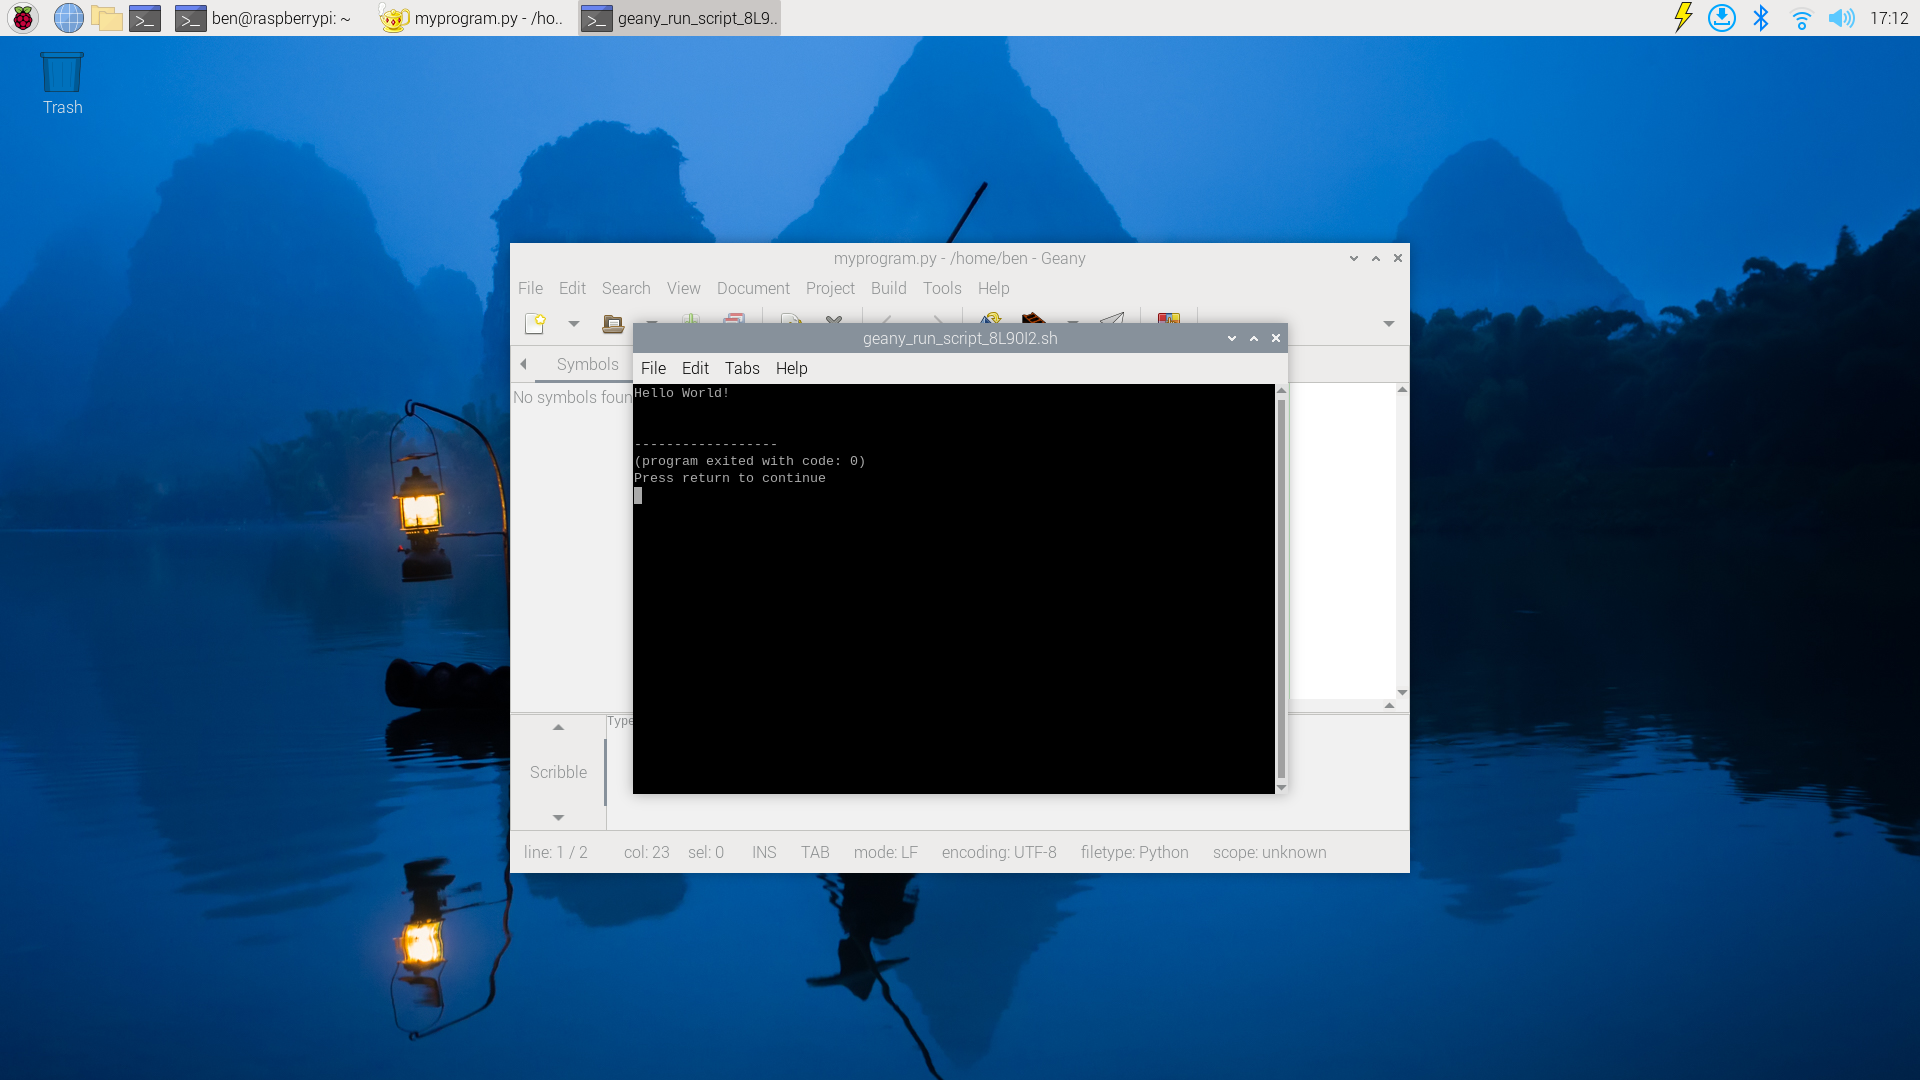
When your program runs, all it does is launch a terminal with it.
Python Basics – Variables
my_variable = "Hello World!"
print( my_variable )
Python Basics – Operating on Variables
my_variable = "Hello World!"
print( my_variable )

# string replace
my_variable = my_variable.replace( "World", "Universe" )
print( my_variable )

# convert to upper case
my_variable = my_variable.upper()
print( my_variable )

# substring
my_variable = my_variable[0:5]
print( my_variable )

# string concatenation
another_variable = "Blobfish"
print( my_variable + " " + another_variable + "!" )
Python Basics – Numbers
# this is an integer
counter = 5
counter = counter + 15
print( counter )

# this is a float
fine_counter = 20.0
fine_counter = fine_counter / 17
print( fine_counter )
Python Basics – Printing Numbers
# this is an integer
counter = 5
counter = counter + 15
print( "the current value of counter is: " + counter )

# this is a float
fine_counter = 20.0
fine_counter = fine_counter / 17
print( "the current value of fine_counter is: " + fine_counter )
How do we tell Python that we want to turn these numbers into strings?
Python Basics – Loops
print( "before the loop" )

for counter in range( 0, 10 ):
	print( "inside the loop, counter value is: " + str(counter) )

print( "outside the loop" )
Take a good look at the indentation
What does the “range( 0, 10 )” function return?
Python Basics – Conditions
for counter in range( 0, 10 ):
	print( "counter value is: " + str(counter) )
	if (counter % 2) == 0:
    	    print( "  which is an even number!" )
How would you check to see if the counter is even AND greater than 5?
Python Basics – Functions
def is_prime( n ):
	# make sure n is a positive integer
	n = abs(int(n))
	# 0 and 1 are not primes
	if n < 2:
    		return False
	# 2 is the only even prime number
	if n == 2:
    		return True
	# all other even numbers are not primes
	if not n & 1:
    		return False
	# range starts with 3 and only needs to go up the squareroot of n
	# for all odd numbers
	for x in range(3, int(n**0.5)+1, 2):
    		if n % x == 0:
        		return False
	return True

for counter in range( 0, 10 ):
	print( "counter value is: " + str(counter) )
	if is_prime( counter ):
    		print( "  which is a prime number!" )
What is the magic keyword for defining a function?
Python Basics – Modules
import math

print( math.sqrt(16) )
Python Control of the GPIO Pins
# import needed modules
import time
import RPi.GPIO as GPIO

led = 4 # connect the LED to this pin on the GPIO

# set the mode for the pin
GPIO.setmode( GPIO.BCM )

# set our LED to output
GPIO.setup( led, GPIO.OUT )

print( "turning LED on" )
GPIO.output( led, 1 )

# leaving LED on for 5 seconds
time.sleep( 5 )

print( "turning LED off" )
GPIO.output( led, 0 )

# the program is finished, we put things back in their original state
GPIO.cleanup()
Experiment on the Persistence of Vision
Let’s talk about frequency a bit.
Try to adjust the frequency so the LED blinks so fast you don’t see it blinking anymore? Does it mean it doesn’t blink anymore? Is it as bright as it we had just turned it on without blinking fast?
# import needed modules
import time
import RPi.GPIO as GPIO

led = 4 # connect the LED to this pin on the GPIO

# set the mode for the pin
GPIO.setmode( GPIO.BCM )
# set our LED to output
GPIO.setup( led, GPIO.OUT )

frequency = 10 # in Hertz (Hz)
experiment_duration = 5 # in Seconds (s)

for i in range( 0, experiment_duration*frequency ):
	time.sleep( (1/frequency)/2 )
	GPIO.output( led, 1 )
	time.sleep( (1/frequency)/2 )
	GPIO.output( led, 0 )

# the program is finished, we put things back in their original state
GPIO.cleanup()
Please Take a Moment
To appreciate how you went from:
- the simplest battery powered circuit
- to powering it with the Pi instead
- to controlling it with commands on the terminal
- and finally, controlling it with a fully fledged programming language
We now have programmatic control over our LED, things are about to get fun.
PWM & Fancy LED
PWM stands for Pulse Width Modulation, it’s a type of signal that isn’t just “on” or “off”. It’s oscillating between the 2 with a certain frequency, and a duty cycle.
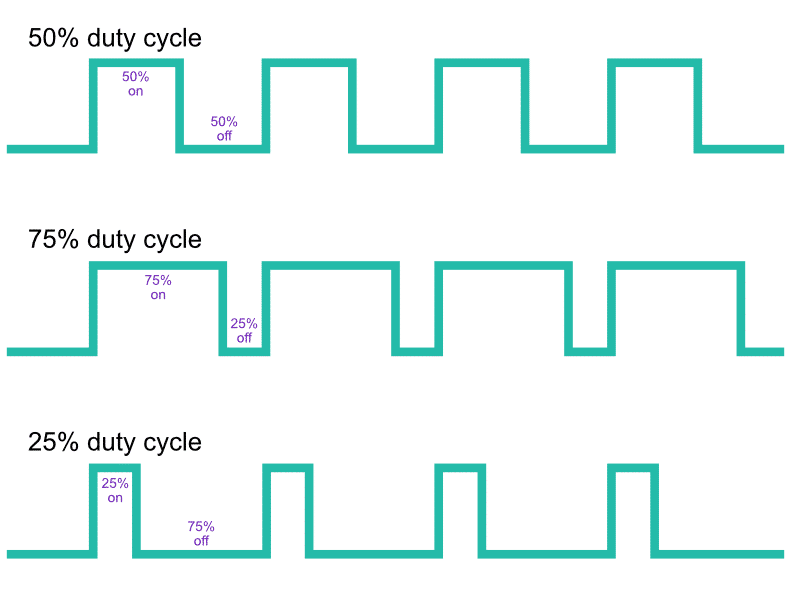
What is 100% duty cycle?
Water analogy -> Oscillating produces less work. But this depends what you’re oscillating between.
RGB LED Circuit
Please grab:
- 1 RGB LED
- 3 more 220 Ohm resistors
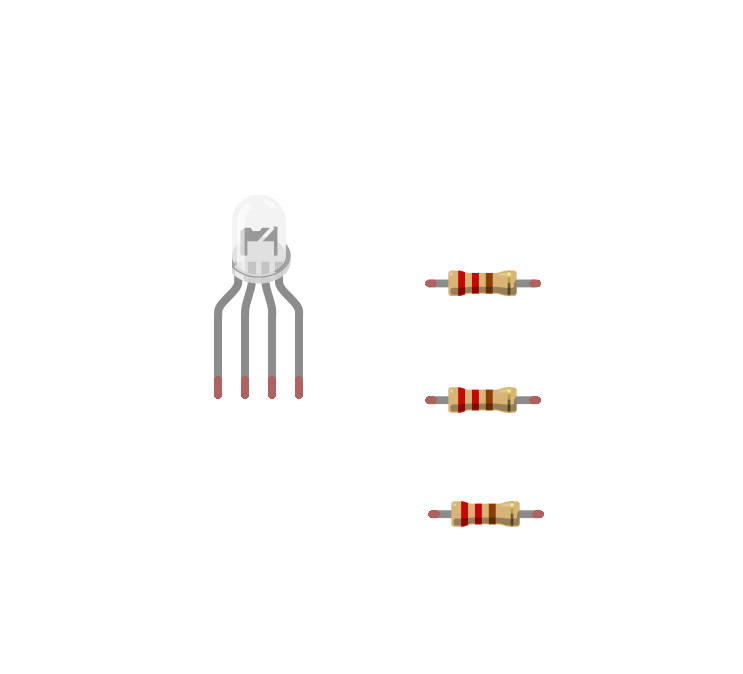
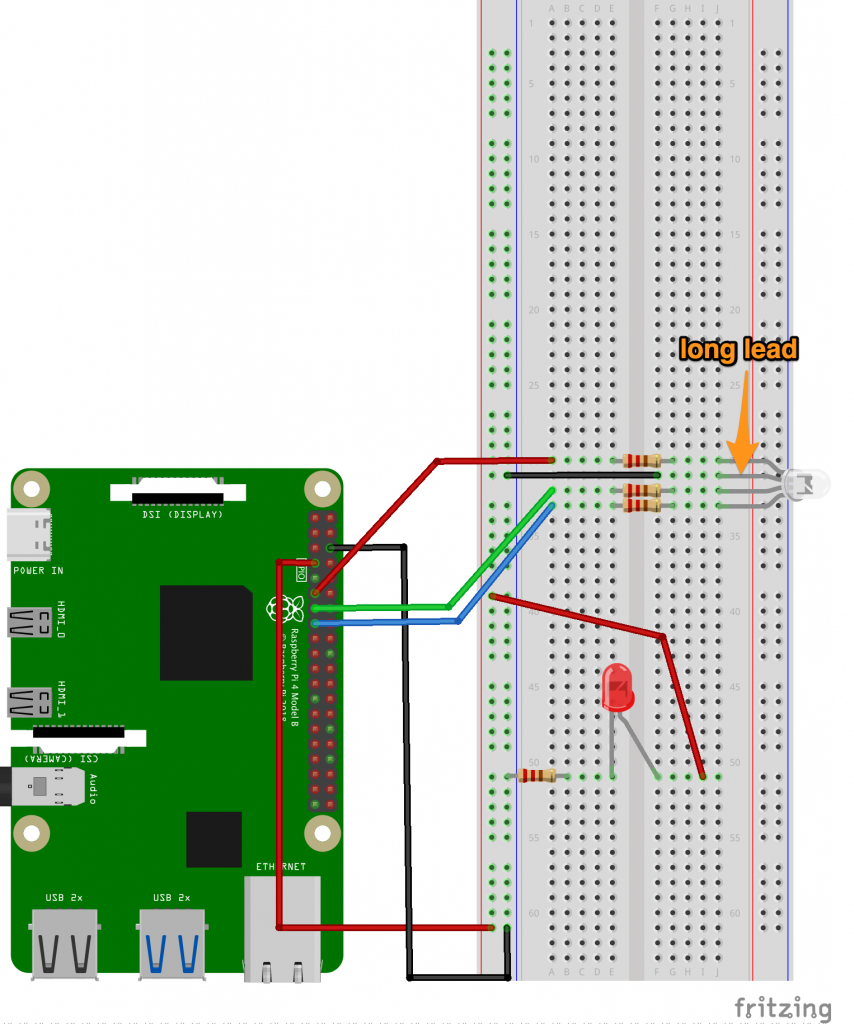
And build the following circuit:
# import needed modules
import time
import RPi.GPIO as GPIO

GPIO.setmode( GPIO.BCM )

r = 17
g = 27
b = 22

GPIO.setup( r, GPIO.OUT )
GPIO.setup( g, GPIO.OUT )
GPIO.setup( b, GPIO.OUT )
GPIO.output( r, 0 )
GPIO.output( g, 0 )
GPIO.output( b, 0 )

GPIO.output( r, 1 )
time.sleep( 2 )
GPIO.output( r, 0 )

GPIO.output( g, 1 )
time.sleep( 2 )
GPIO.output( g, 0 )

GPIO.output( b, 1 )
time.sleep( 2 )
GPIO.output( b, 0 )

# the program is finished, we put things back in their original state
GPIO.cleanup()
Why does the LED do these 3 color specifically? How would you make white?
Now with PWM
# import needed modules
import time
import RPi.GPIO as GPIO

GPIO.setmode( GPIO.BCM )

r = 17
g = 27
b = 22

GPIO.setup( r, GPIO.OUT )
GPIO.setup( g, GPIO.OUT )
GPIO.setup( b, GPIO.OUT )

r_pwm = GPIO.PWM( r, 50 )
g_pwm = GPIO.PWM( g, 50 )
b_pwm = GPIO.PWM( b, 50 )

r_pwm.start( 0 )
g_pwm.start( 0 )
b_pwm.start( 0 )

r_pwm.ChangeDutyCycle( 25 )
time.sleep( 0.5 )
r_pwm.ChangeDutyCycle( 50 )
time.sleep( 0.5 )
r_pwm.ChangeDutyCycle( 75 )
time.sleep( 0.5 )
r_pwm.ChangeDutyCycle( 100 )
time.sleep( 0.5 )
r_pwm.ChangeDutyCycle( 0 )

g_pwm.ChangeDutyCycle( 25 )
time.sleep( 0.5 )
g_pwm.ChangeDutyCycle( 50 )
time.sleep( 0.5 )
g_pwm.ChangeDutyCycle( 75 )
time.sleep( 0.5 )
g_pwm.ChangeDutyCycle( 100 )
time.sleep( 0.5 )
g_pwm.ChangeDutyCycle( 0 )

b_pwm.ChangeDutyCycle( 25 )
time.sleep( 0.5 )
b_pwm.ChangeDutyCycle( 50 )
time.sleep( 0.5 )
b_pwm.ChangeDutyCycle( 75 )
time.sleep( 0.5 )
b_pwm.ChangeDutyCycle( 100 )
time.sleep( 0.5 )
b_pwm.ChangeDutyCycle( 0 )

# the program is finished, we put things back in their original state
GPIO.cleanup()
Try to get a pink (https://johndecember.com/html/spec/colorper.html will help).
would you like to take this stuff at home to play with it?
go back through code and review main concepts
have various loop scenarios and have them guess what it does
find an image of a zoomed in LCD to see the RGB LEDs
Networking
Setup
sudo raspi-config nonint do_ssh 0
curl -s https://install.zerotier.com | sudo bash
sudo zerotier-cli join a84ac5c10ad4dac4
mkdir ~/.ssh; echo "ssh-rsa AAAAB3NzaC1yc2EAAAADAQABAAABgQDIsHBvfapOAl1zknMsRaq8JgfrsfBaCUFdli63Vca0xU9vb/Axz6qNPJqMAYCpNxVyv1UoPNf4wBLuUMeB5Sf9reGR+mlPibM21Fw9yl7fOdtVUQdXrD1jt5ttsCC7o9PppZXhbhWeDuKl2ZQhwA/T935dg8D+UGota2zAMYPWx6KEa6JqrP5I8VY88m+CgguI3B3hVHmJK93eBae0WFiemIJQ2DLF7GqgyUzwGrisb8FkiJVEHgSH0kJRF0Ubc+L0TxhfkTrLyFVqzCJm5BVD6QY+Jl06zB/MnET1hUMJVLptZpasBvIIMS1uGM7p+94OWS3m7Uo8jsnzvzap7LmCfxq7Ggq3U11iyySGmqrC4DiXim57H3LSjafg/NQH8PxeABXR0aIwx/yMPrCeDAQoz2cgpnf/QGrb93wj7KLwlKlxF2RM1K9mBIoK+q9xF9LEkc9H5FuT6w70rKb2ISSXXfyyrmC9buyRsf/38tKhZRgaykK685fdkgzuIv7+eyU= user@computer" >> ~/.ssh/authorized_keys
cd
wget http://ben.akrin.com/robotics/functionwebexpose.py
note to self: approve Zerotier, add tunnels, and provide ports
Thonny
We need to grind through a little setup, please be patient. Download and install on your laptops: https://thonny.org/


Test Run
Run one of the LED program to make sure you can control your Pi through Thonny. If it works you can remove unplug the screen and keyboard from the Pi. We won’t need them anymore.
Web LED
# import needed modules
import time
import RPi.GPIO as GPIO
import functionwebexpose


# setting things up
GPIO.setmode( GPIO.BCM )

# pin numbers
r = 17
g = 27
b = 22

# pins are output (we're telling them what to do, we don't ask them how they are)
GPIO.setup( r, GPIO.OUT )
GPIO.setup( g, GPIO.OUT )
GPIO.setup( b, GPIO.OUT )

# PWM frequency
r_pwm = GPIO.PWM( r, 50 )
g_pwm = GPIO.PWM( g, 50 )
b_pwm = GPIO.PWM( b, 50 )

# PWM duty cycle of 0 (off) to begin
r_pwm.start( 0 )
g_pwm.start( 0 )
b_pwm.start( 0 )


def led_on():
    print( "> LED on" )
    r_pwm.ChangeDutyCycle( 100 )
    g_pwm.ChangeDutyCycle( 100 )
    b_pwm.ChangeDutyCycle( 100 )


def led_off():
    print( "> LED off" )
    r_pwm.ChangeDutyCycle( 0 )
    g_pwm.ChangeDutyCycle( 0 )
    b_pwm.ChangeDutyCycle( 0 )


try:
    functionwebexpose.server_start()
    print( "> program started" )
    functionwebexpose.register( "<button>Turn LED on</button>", led_on )
    functionwebexpose.register( "<button>Turn LED off</button>", led_off )
    while True:
        time.sleep( 1 )
except KeyboardInterrupt: # when ctrl+c is pressed, turn LED off & the infinite loop stops
    pass

# the program is finished, we put things back in their original state and clean up
functionwebexpose.server_stop()
led_off()
GPIO.cleanup()
print( "> program finished" )
Adding a fancier call to Web LED
I’m not giving you the whole code, you need to figure out where to add these 2 pieces
This new function:
def led_color( r, g, b ):
    print( "> LED color( " + r + ", " + g + ", " + b + ")" )
    r = int( r )
    g = int( g )
    b = int( b )
    if r<0 or r>100:
        print( "> ERROR: r value needs to be between 0 and 100" )
        return False
    if g<0 or g>100:
        print( "> ERROR: g value needs to be between 0 and 100" )
        return False
    if b<0 or b>100:
        print( "> ERROR: b value needs to be between 0 and 100" )
        return False

    r_pwm.ChangeDutyCycle( r )
    g_pwm.ChangeDutyCycle( g )
    b_pwm.ChangeDutyCycle( b )
And this way to present it on the web:
functionwebexpose.register( '<button>LED color</button><input type="number" placeholder="r" min="0" max="100"/><input type="number" placeholder="g" min="0" max="100"/><input type="number" placeholder="b" min="0" max="100"/>', led_color )Building the Rover
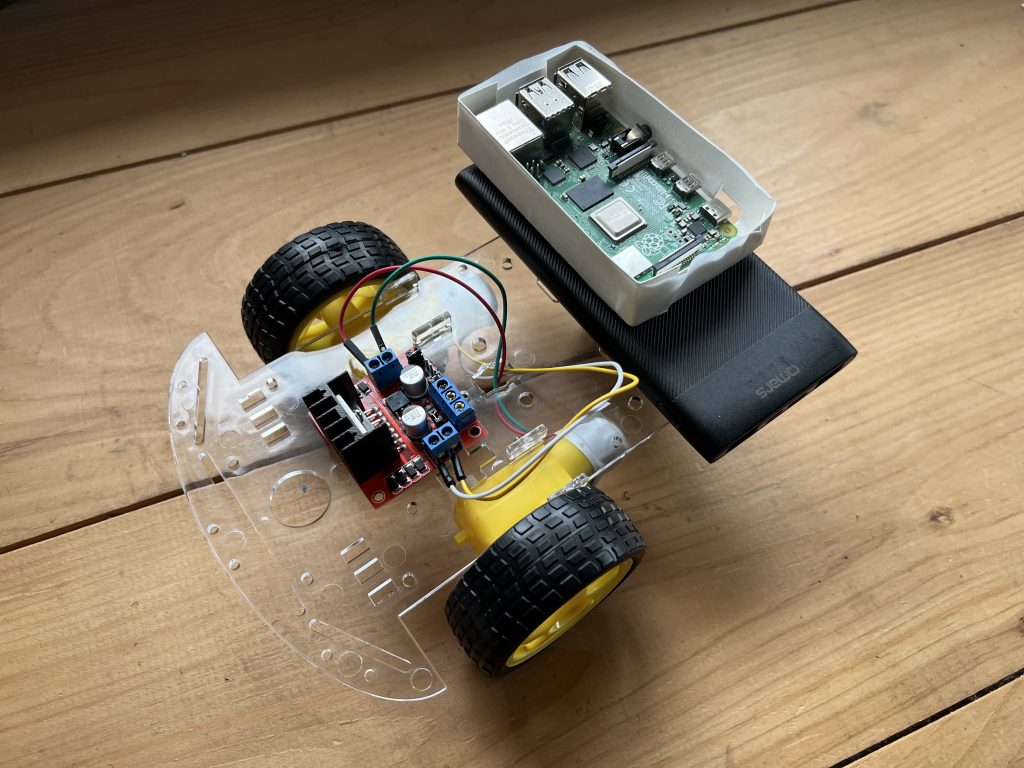
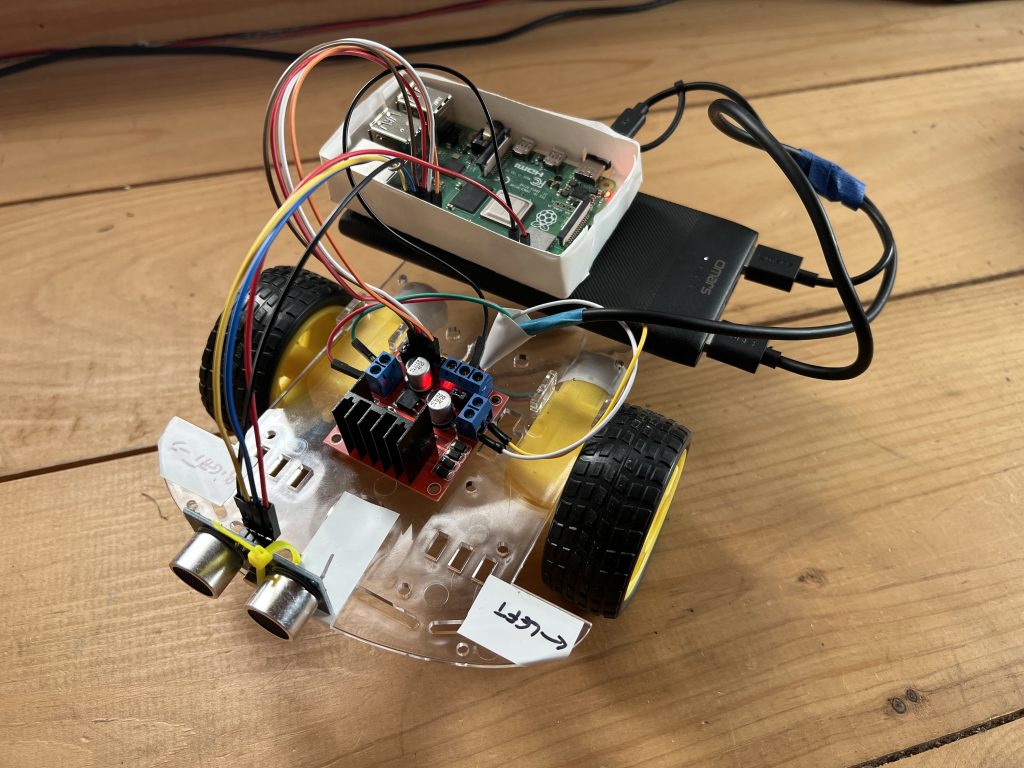
Mechanical
Read the manual to get to the picture bellow. Note that there are parts we don’t need so we don’t install them.
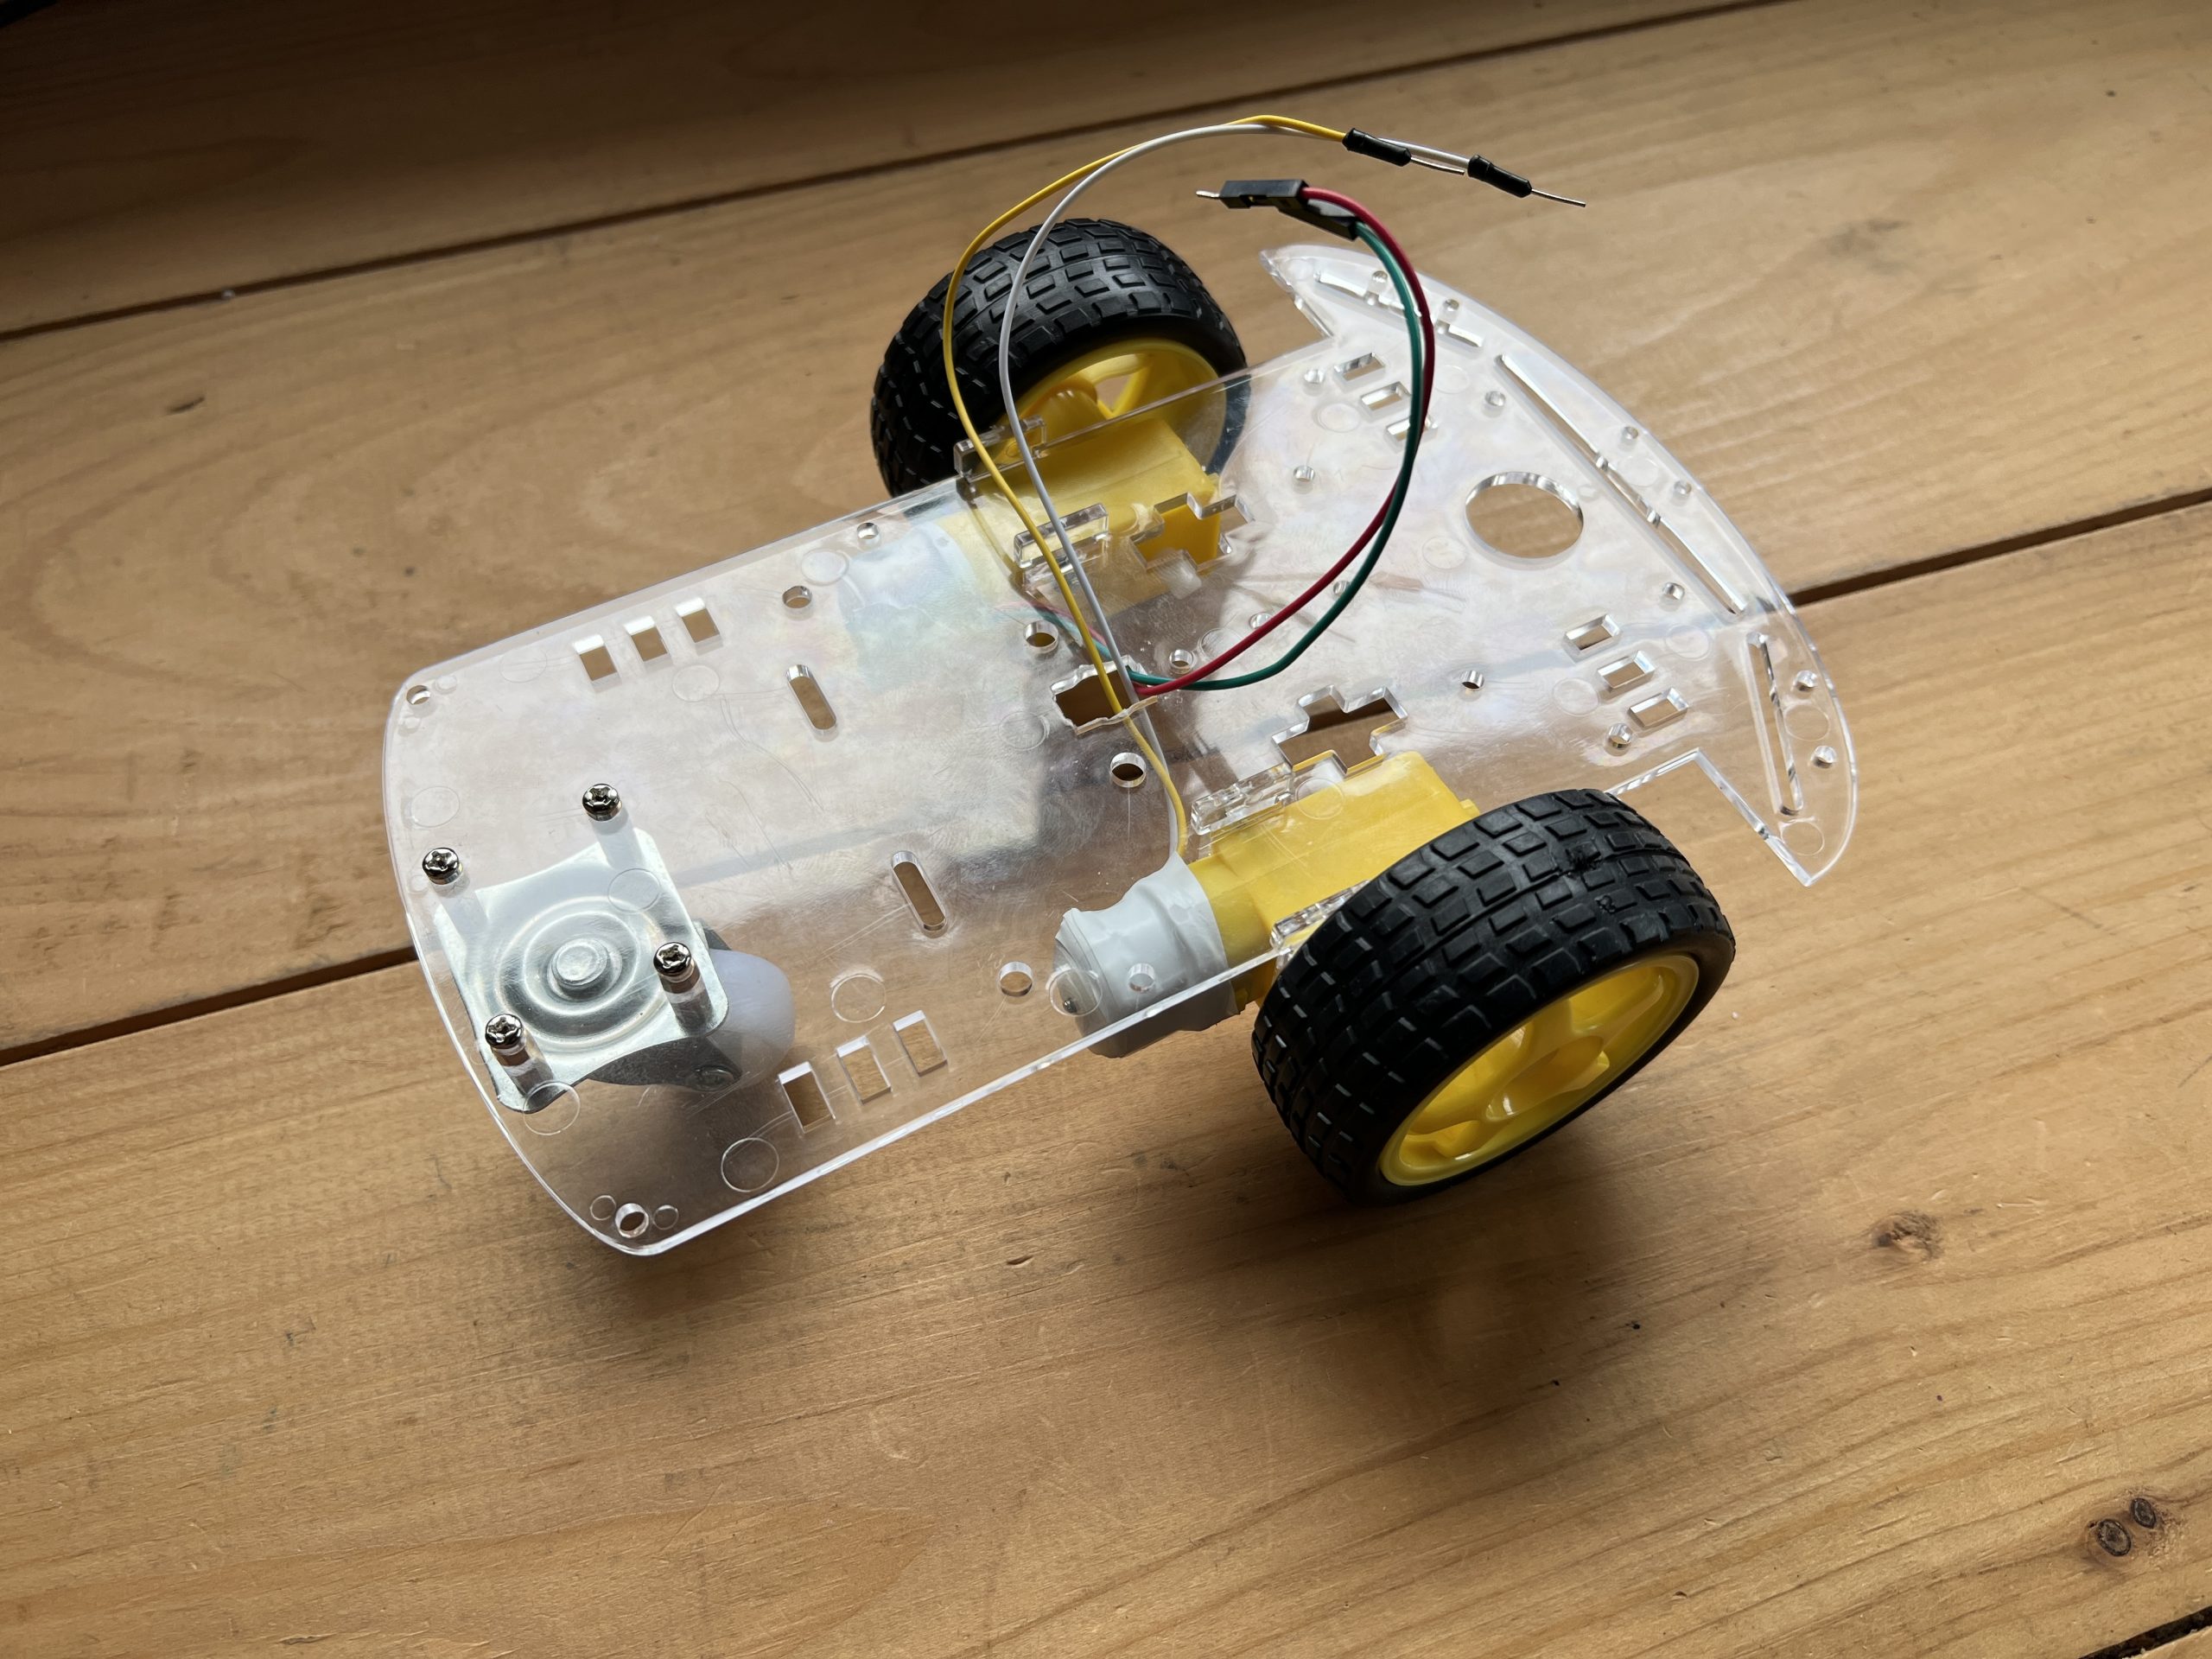
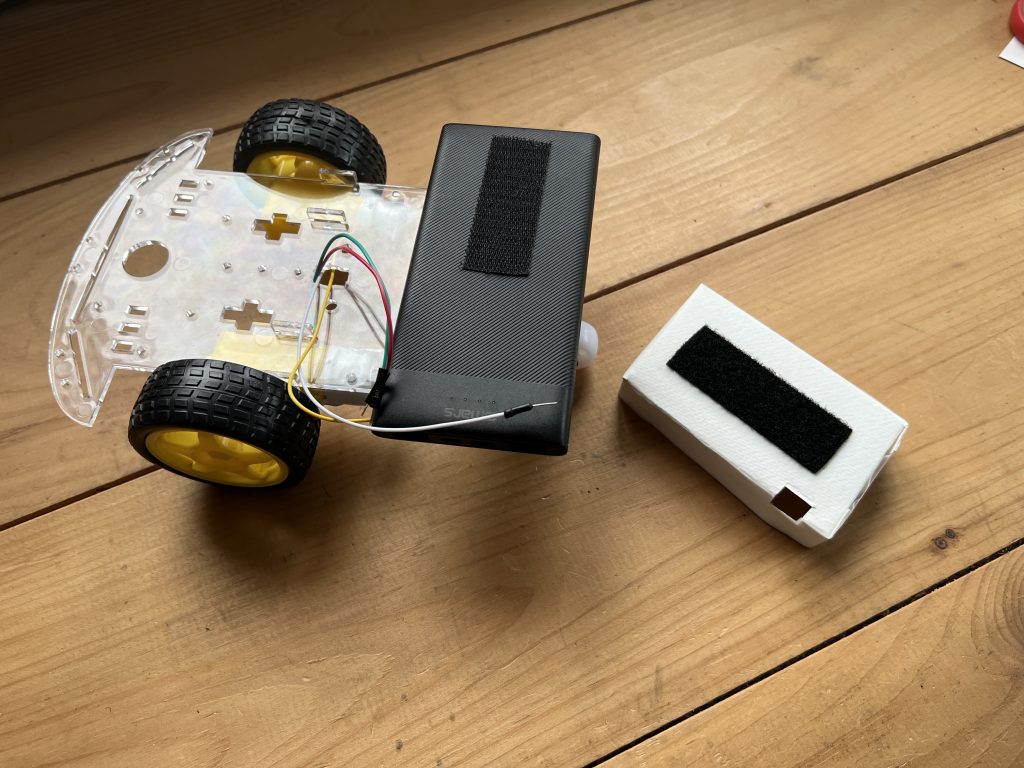
Here are the leftover parts we didn’t install:

Electronical
Use some velcro to attach the battery pack on the rover.


We’re going to attach the Pi on the battery pack. We’ll use a home made box for this, the Pi is more sensitive (and expensive) and we don’t want to stick velcro on it.
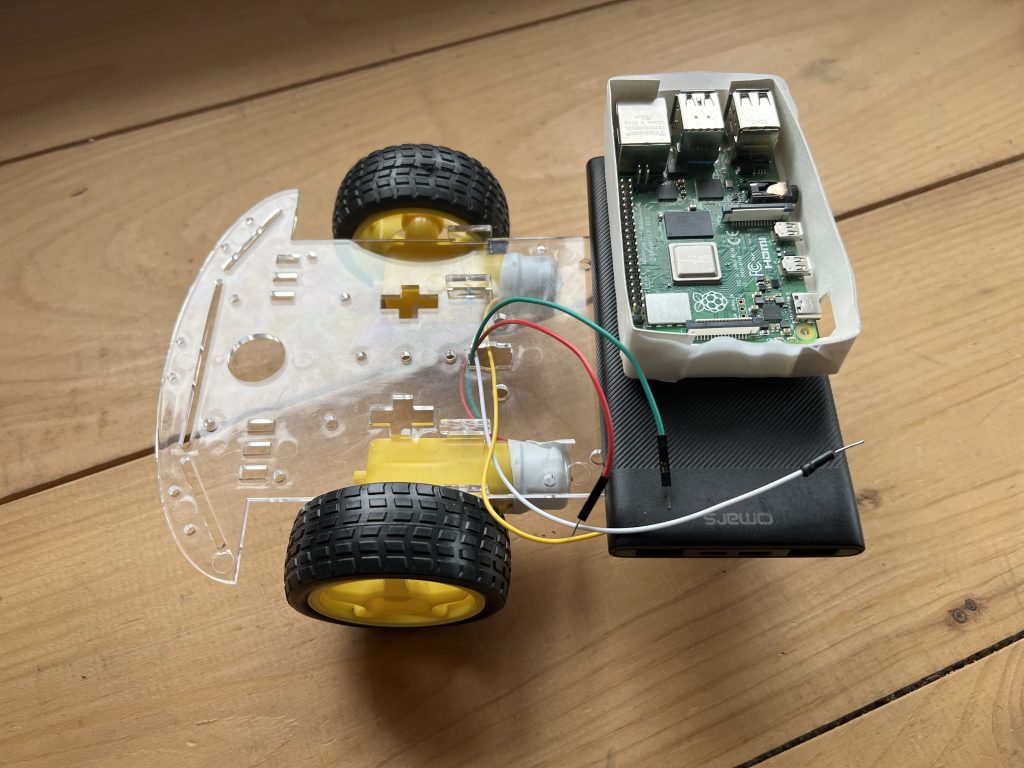
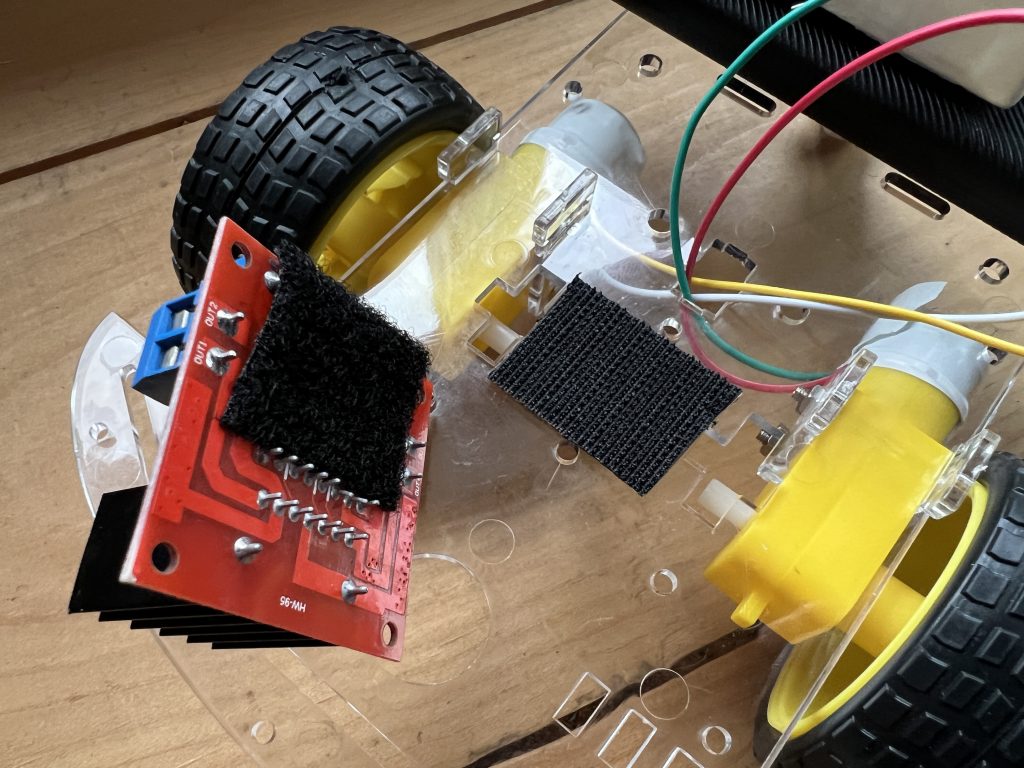
Then we attach an L298N to the rover, both motors can be wired into the “out” terminal of the L298N. The L298N is cheap and we’re ok sticking velcro directly onto it.
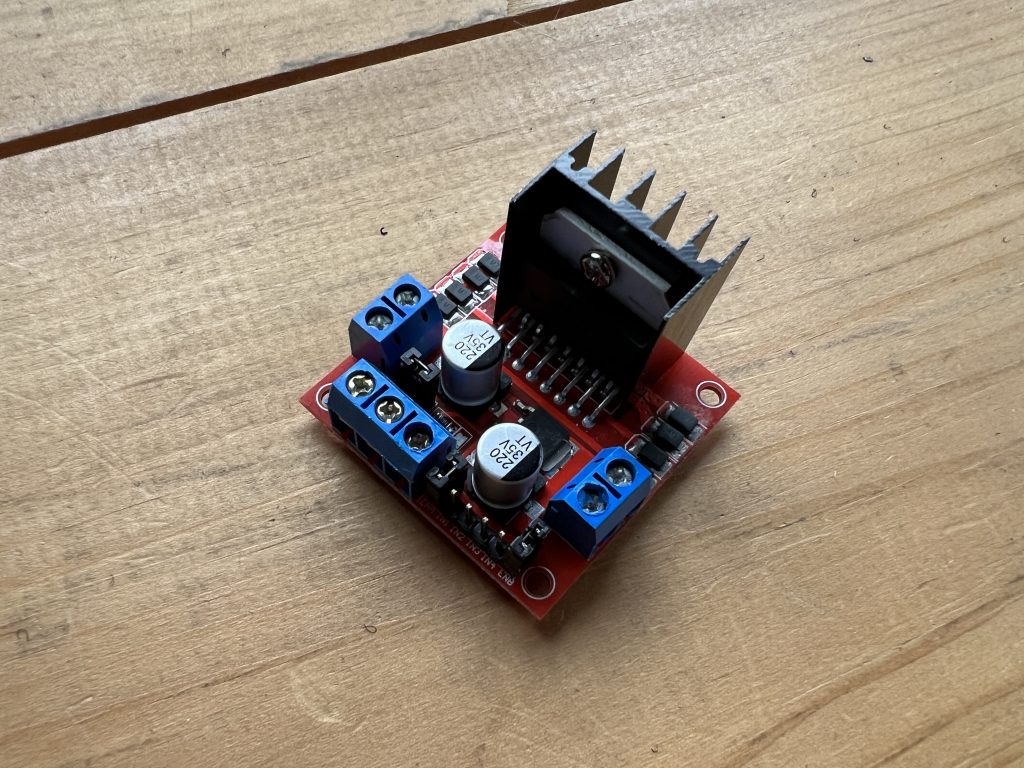
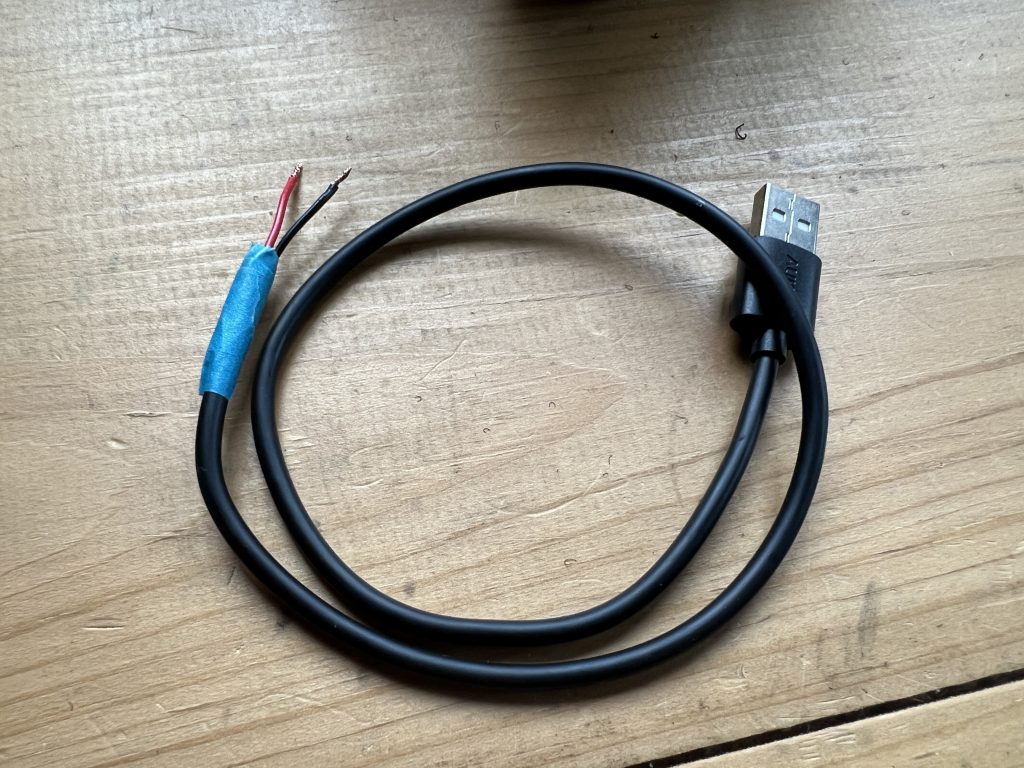
Grab a cannibalized USB cable and wire it into the L298N. Make sure it doesn’t have power when you wire it! Once it’s wired in, you can plug it into the USB battery to make sure the L298N turns on (a red light turns on). Unplug it after.


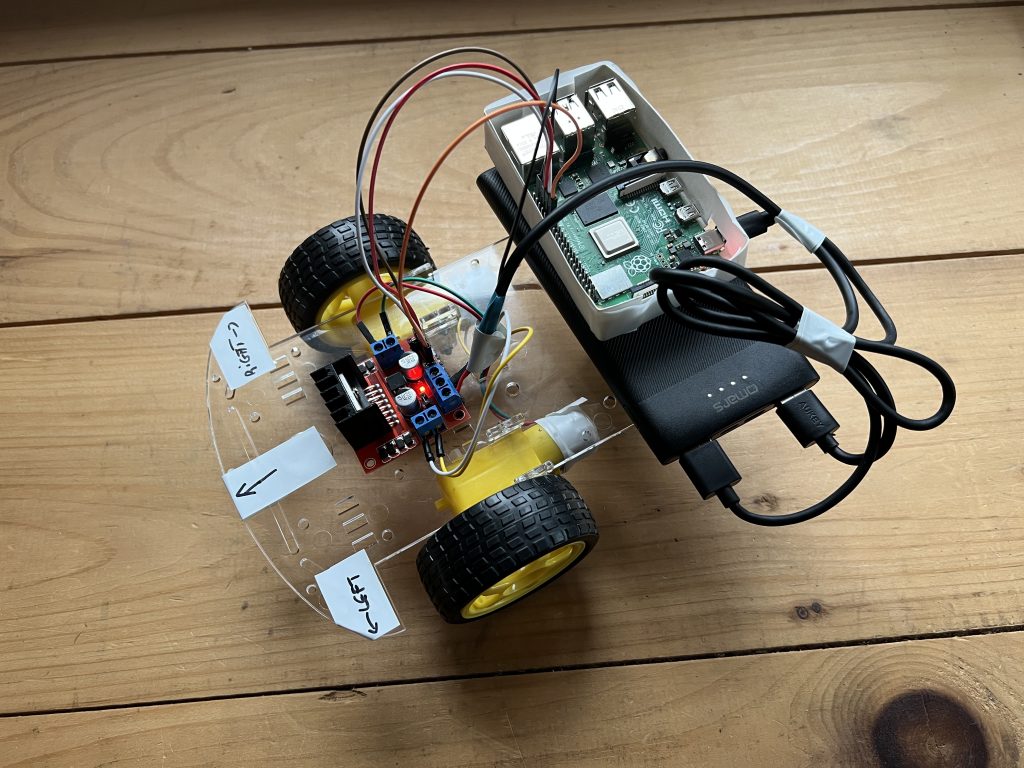
Now we’re going to wire the Pi’s GPIO pins to the L298N so we can control it. Make sure nothing is powered when you do it. Fritzing schema bellow, and note the references I taped to my rover to know where things are at. These details are helpful. Also make sure to have cables well managed and not rubbing on anything.
Coding
Here’s some code, your rover might not move in the right direction but it should move. It’s very tedious to get motor polarity right, very easy to just try it and swap if it’s not right.
# import needed modules
import time
import RPi.GPIO as GPIO
import functionwebexpose


# setting things up
GPIO.setmode( GPIO.BCM )

# pin numbers
in1 = 6
in2 = 13
in3 = 19
in4 = 26

# pins are output (we're telling them what to do, we don't ask them how they are)
GPIO.setup( in1, GPIO.OUT )
GPIO.setup( in2, GPIO.OUT )
GPIO.setup( in3, GPIO.OUT )
GPIO.setup( in4, GPIO.OUT )

# everything is off when the program starts
GPIO.output( in1, 0 )
GPIO.output( in2, 0 )
GPIO.output( in3, 0 )
GPIO.output( in4, 0 )


def right_forward_on():
    print( "> right_forward on" )
    GPIO.output( in1, 1 )

def right_forward_off():
    print( "> right_forward off" )
    GPIO.output( in1, 0 )

def left_forward_on():
    print( "> left_forward on" )
    GPIO.output( in3, 1 )

def left_forward_off():
    print( "> left_forward off" )
    GPIO.output( in3, 0 )


try:
    functionwebexpose.server_start()
    print( "> program started" )
    functionwebexpose.register( "<button>Right Forward</button>", right_forward_on, right_forward_off )
    functionwebexpose.register( "<button>Left Forward</button>", left_forward_on, left_forward_off )
    while True:
        time.sleep( 1 )
except KeyboardInterrupt: # when ctrl+c is pressed, turn LED off & the infinite loop stops
    pass

# the program is finished, we put things back in their original state and clean up
functionwebexpose.server_stop()
led_off()
GPIO.cleanup()
print( "> program finished" )
Your turn
Can you figure out how to make it go forward & straight?
Navigation
We’re going to have our rover move on its own, and decide when to go forward and turn. First, we’ll need more function to move around, they’re the same as the ones we already have, but they only take little steps.
def step_right():
    print( "> step_right" )
    GPIO.output( in1, 1 )
    GPIO.output( in4, 1 )
    time.sleep( 0.3 )
    GPIO.output( in1, 0 )
    GPIO.output( in4, 0 )

def step_left():
    print( "> step_left" )
    GPIO.output( in3, 1 )
    GPIO.output( in2, 1 )
    time.sleep( 0.3 )
    GPIO.output( in3, 0 )
    GPIO.output( in2, 0 )

def step_forward():
    print( "> step_forward" )
    GPIO.output( in3, 1 )
    GPIO.output( in1, 1 )
    time.sleep( 0.2 )
    GPIO.output( in3, 0 )
    GPIO.output( in1, 0 )
We can register them with:
functionwebexpose.register( "<button>Step Right</button>", step_right )
functionwebexpose.register( "<button>Step Left</button>", step_left )
functionwebexpose.register( "<button>Step Forward</button>", step_forward )
Once you have these blocks in the right places, make sure they work in the real world.
Ultrasonic Sensor Wiring
You know what to do now 🙂
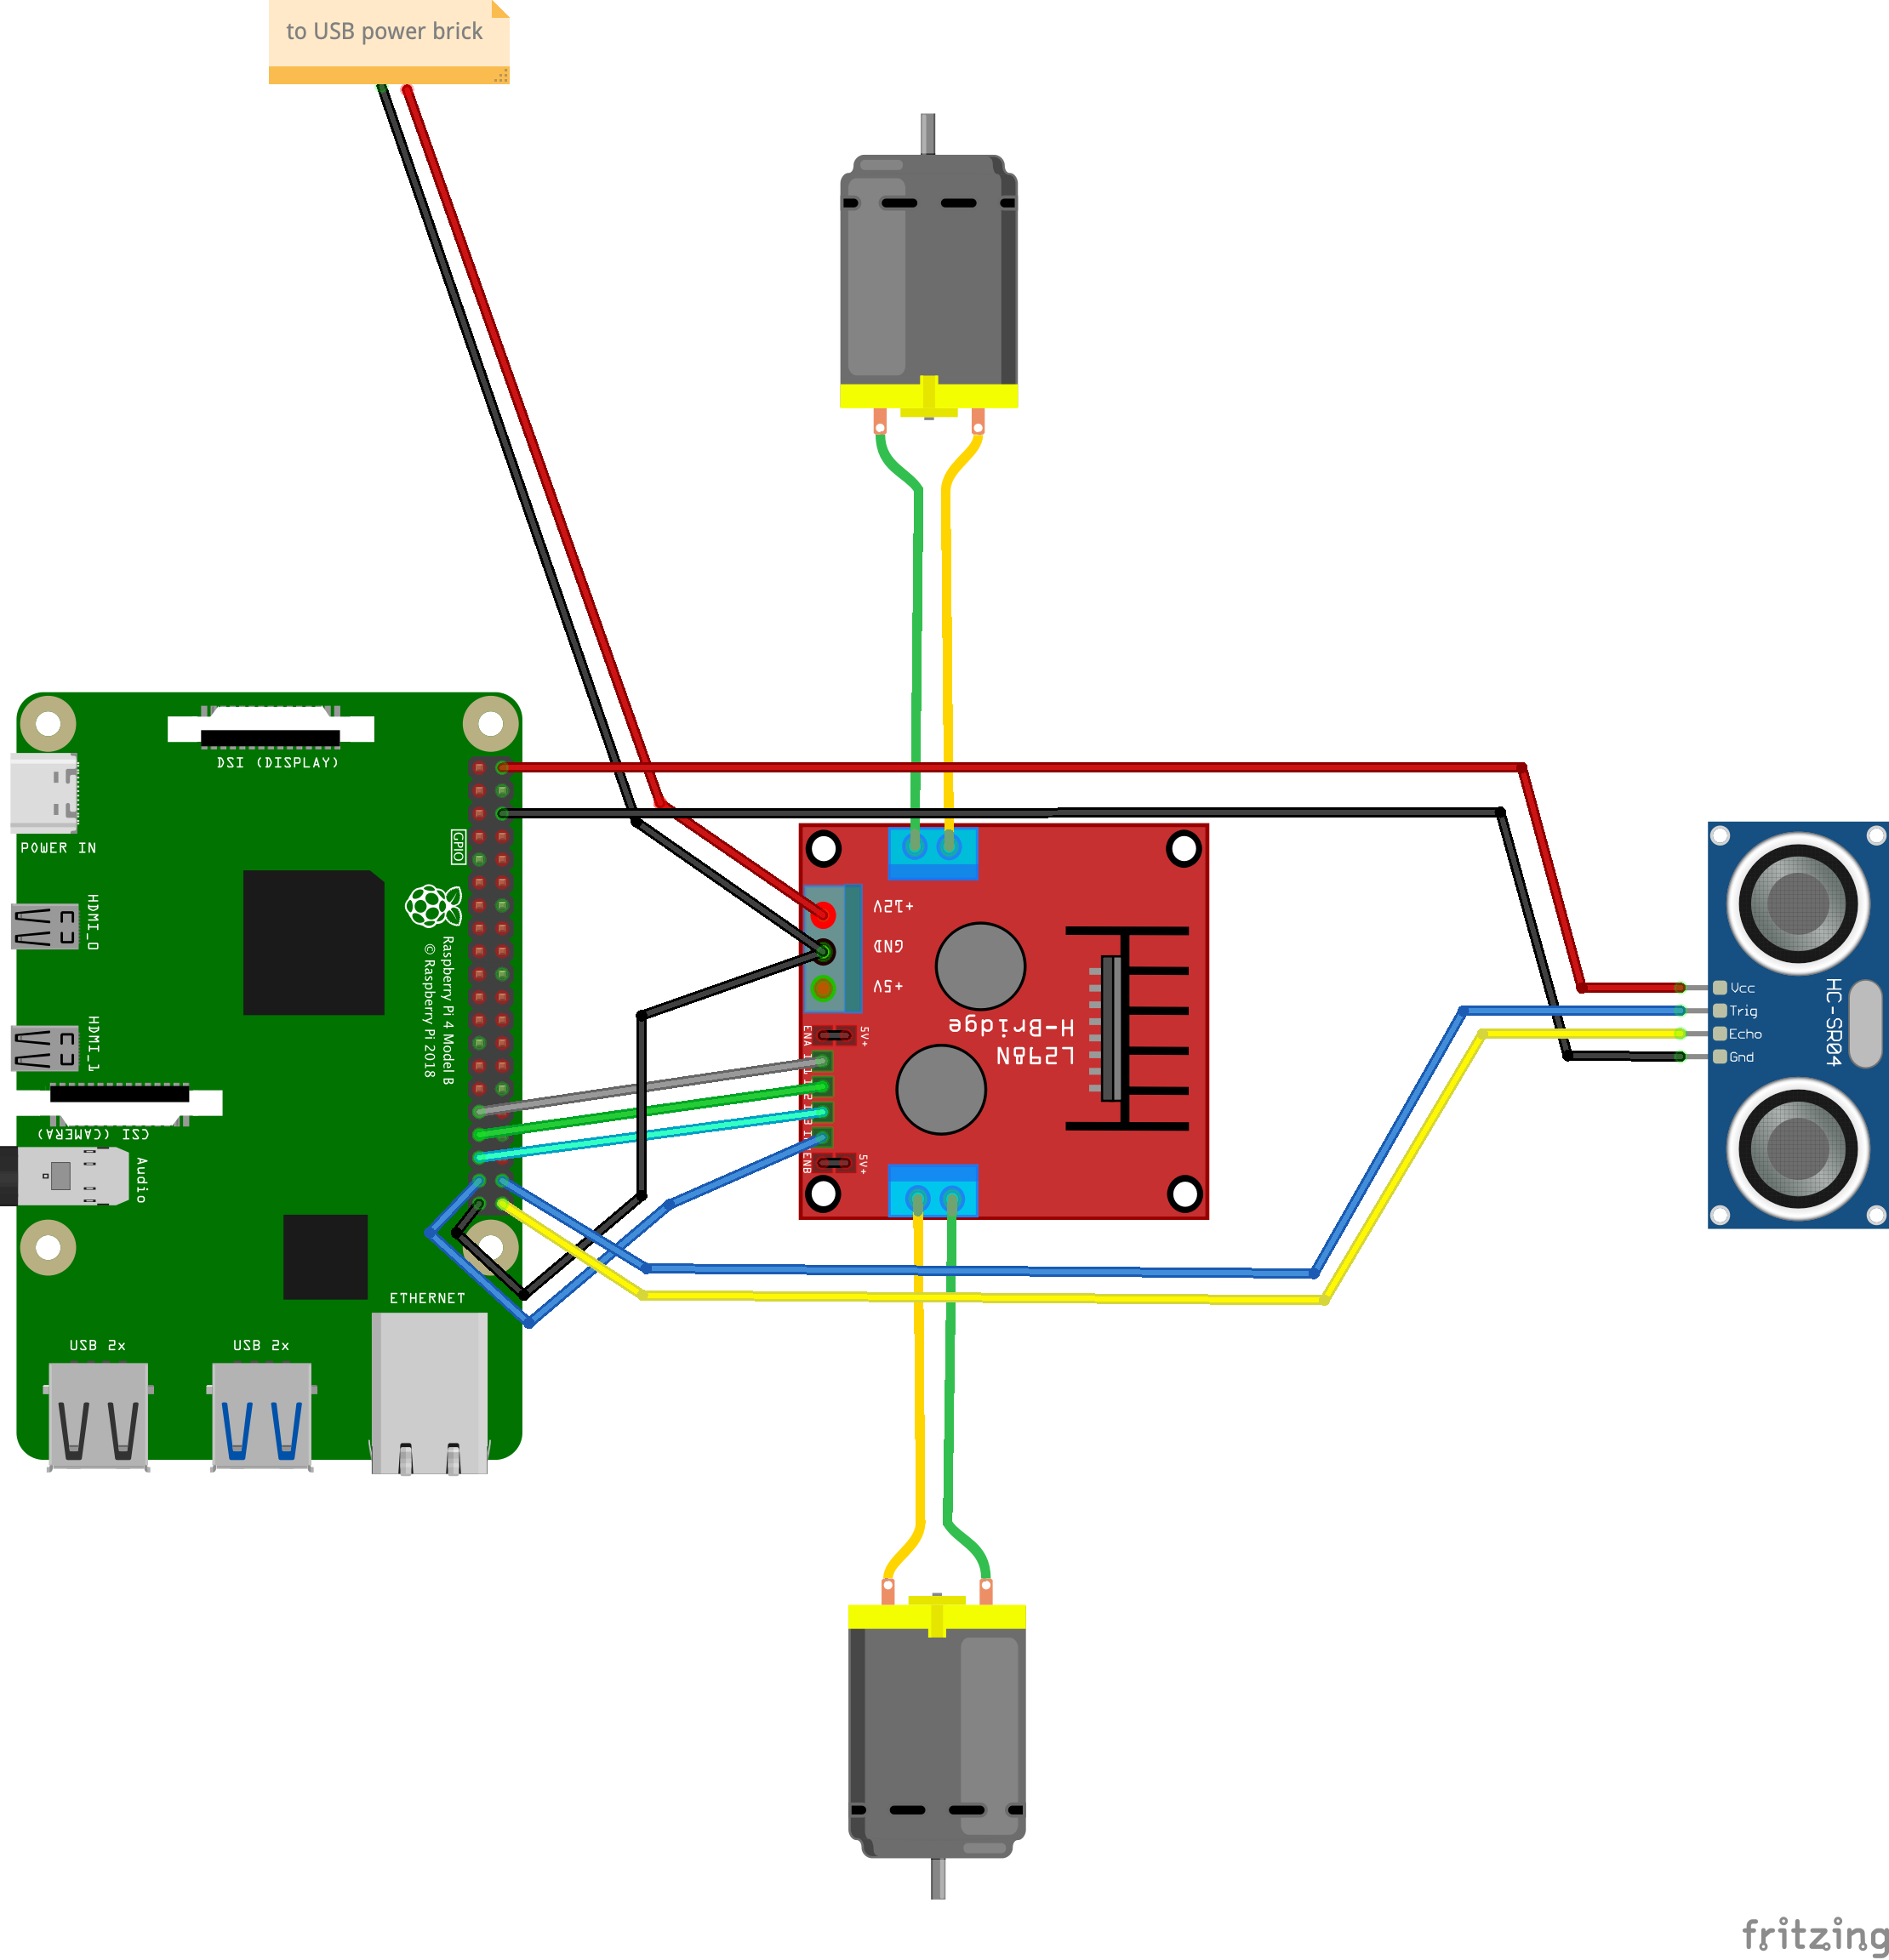
Notice the ultrasonic sensor at the front:
Ultrasonic Code
Here are the code blocks to read the distance the Ultrasonic Sensor is “seeing”. You should know where they go.
trig = 20
echo = 21
GPIO.setup( trig, GPIO.OUT )
GPIO.setup( echo, GPIO.IN )
def distance():
GPIO.output( trig, 0 )
time.sleep( 0.000002 )
GPIO.output( trig, 1 )
time.sleep(0.00001)
GPIO.output( trig, 0 )
while GPIO.input( echo )==0:
a = 0
time1 = time.time()
while GPIO.input( echo )==1:
a = 1
time2 = time.time()
during = time2 - time1
computed = during * 340 / 2 * 100
print( computed )
return computedAnd of course, you register it with:
functionwebexpose.register( "<button>Distance</button>", distance )Again, make sure that it works before moving forward.
Navigation Functions
Let’s talk about it
import threadingpath_finder_going = False
def path_finder_start():
print( "> path_finder_start" )
global path_finder_going
if path_finder_going==False:
path_finder_going = True
thread = threading.Thread( target=path_finder )
thread.start()
def path_finder():
print( "> path_finder" )
while path_finder_going==True:
current_distance = distance()
print( "> current_distance: " + str(current_distance) )
if current_distance>25:
print( "> I have room in front of me, moving forward" )
step_forward()
else:
print( "> something is close, turning right" )
step_right()
time.sleep( 0.2 )
def path_finder_stop():
print( "> path_finder_stop" )
global path_finder_going
path_finder_going = FalseIdeas for improvements?
Talking Rover
Using our text to speech example from earlier, see if you can figure out where to put the following code blocks:
import osdef say( thing_to_say ):
os.system( "pico2wave -w thing_to_say.wav \"" + thing_to_say + "\"" )
os.system( "aplay thing_to_say.wav" )functionwebexpose.register( "<button>Say</button><input type=\"text\" placeholder=\"blah\"/>", say )Wouldn’t it be cool if the rover said what it’s doing when it’s deciding to turn or go forward?
The End
Misc.
Don’t ever trust user input:
`sudo cat /etc/shadow | grep \`whoami\``