House – plans

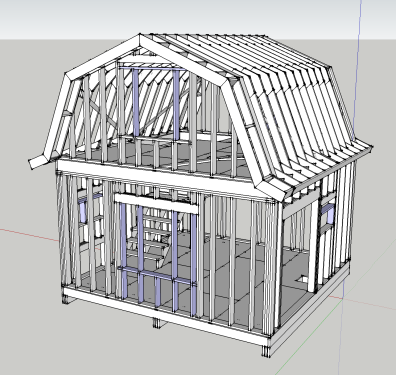
Since the modifications I’m making to the house now are quite specific to our living arrangements, I’ve stopped updating the 3D model I made to design the house. I’ve also gained in confidence and experience such that I don’t need to do everything virtually before I grab a hammer.

Before launching into this adventure, I spent a good deal of time online reviewing designs, techniques and best practices. In case this is useful to someone else I’m publishing the core design here. This design was critiqued over multiple iterations by many carpenters, builders, furniture makers & all around smart handymen.


A few points:

  • it is very modular
  • a few features are specific to us
  • the gambrel design is balanced (every angle 22.5 and equal lengths)


Screen Shot 2015-09-23 at 22.21.36


House – Insulation

The house is all insulated thanks in no small part to my brother. R30 in the floor, R23 everywhere else; with this and the stove we will be just fine this Winter. We lost 64ft^2 to wall insulation.

Working against gravity

IMG_0587

Sealed.

IMG_0601

House – Chimney & Stove ready for action

It took me much longer than anticipated to get the chimney in place. There is a lot to know about it and I can’t afford half measures for this one needs to be perfect. It took a lot of research and an ton of measuring and thinking to do. Also a couple of tough days spent on the roof, again. This is probably the most emotional project of this whole ordeal. Cutting a hole through the roof that cost us so much in worry, sweat and money was hard. Messing up design or tolerance could bring an abrupt end to a dream coming to fruition. On the other hand it means getting wood heat on the coldest days. It’s hard to think straight with this much at stake.

 Looking up the chimney through the 2nd floor to its topIMG_0450

The house looks more complete with a chimneyIMG_0364

Everything went well with the chimney and the stove took quite a bit of work too, most of it was done a while back when we acquired it.

Weights a ton

IMG_0441

We bought the stove second hand & disassembled so there was quite a bit to figure out.

IMG_0451

To line the sides of the burning chamber with fire bricks, we had to chip them to shape with a hammer and chisel. I then coated every hole, crack or worn surface with refractory cement.

First time I got to use the expression “chipping at it” literally.

IMG_0458

Nice fit

IMG_0466

One clean looking burning chamber

IMG_0481

We fired the stove last night; first time since we own it, first fire in our house just as the days are starting to get colder. The first of many ritualistic fires to come.

IMG_0493