I built it last year and took a bunch of pictures to document the build. Then life happened and I didn’t. Someone noticed I had an undocumented v2 and asked about it, so it was time to fix this.
Refining the Formula
I was invited back to the science museum to do something cool with my machines. Any time I do a public event it’s an opportunity to figure out what’s engaging and do better the next time around.

I was maybe a little too motivated and brought several machines, almost my whole apparatus, and deployed them in various modes. 1 PewtyBot, 1 Mirror PewtyBot, 1 PlottyBot & 1 SkecthyBot doing portraits, and 1 PewtyBot people could control with their phones. The laser portraits worked wonders again, but the original PlottyBot drawing post-it portraits worked even better.
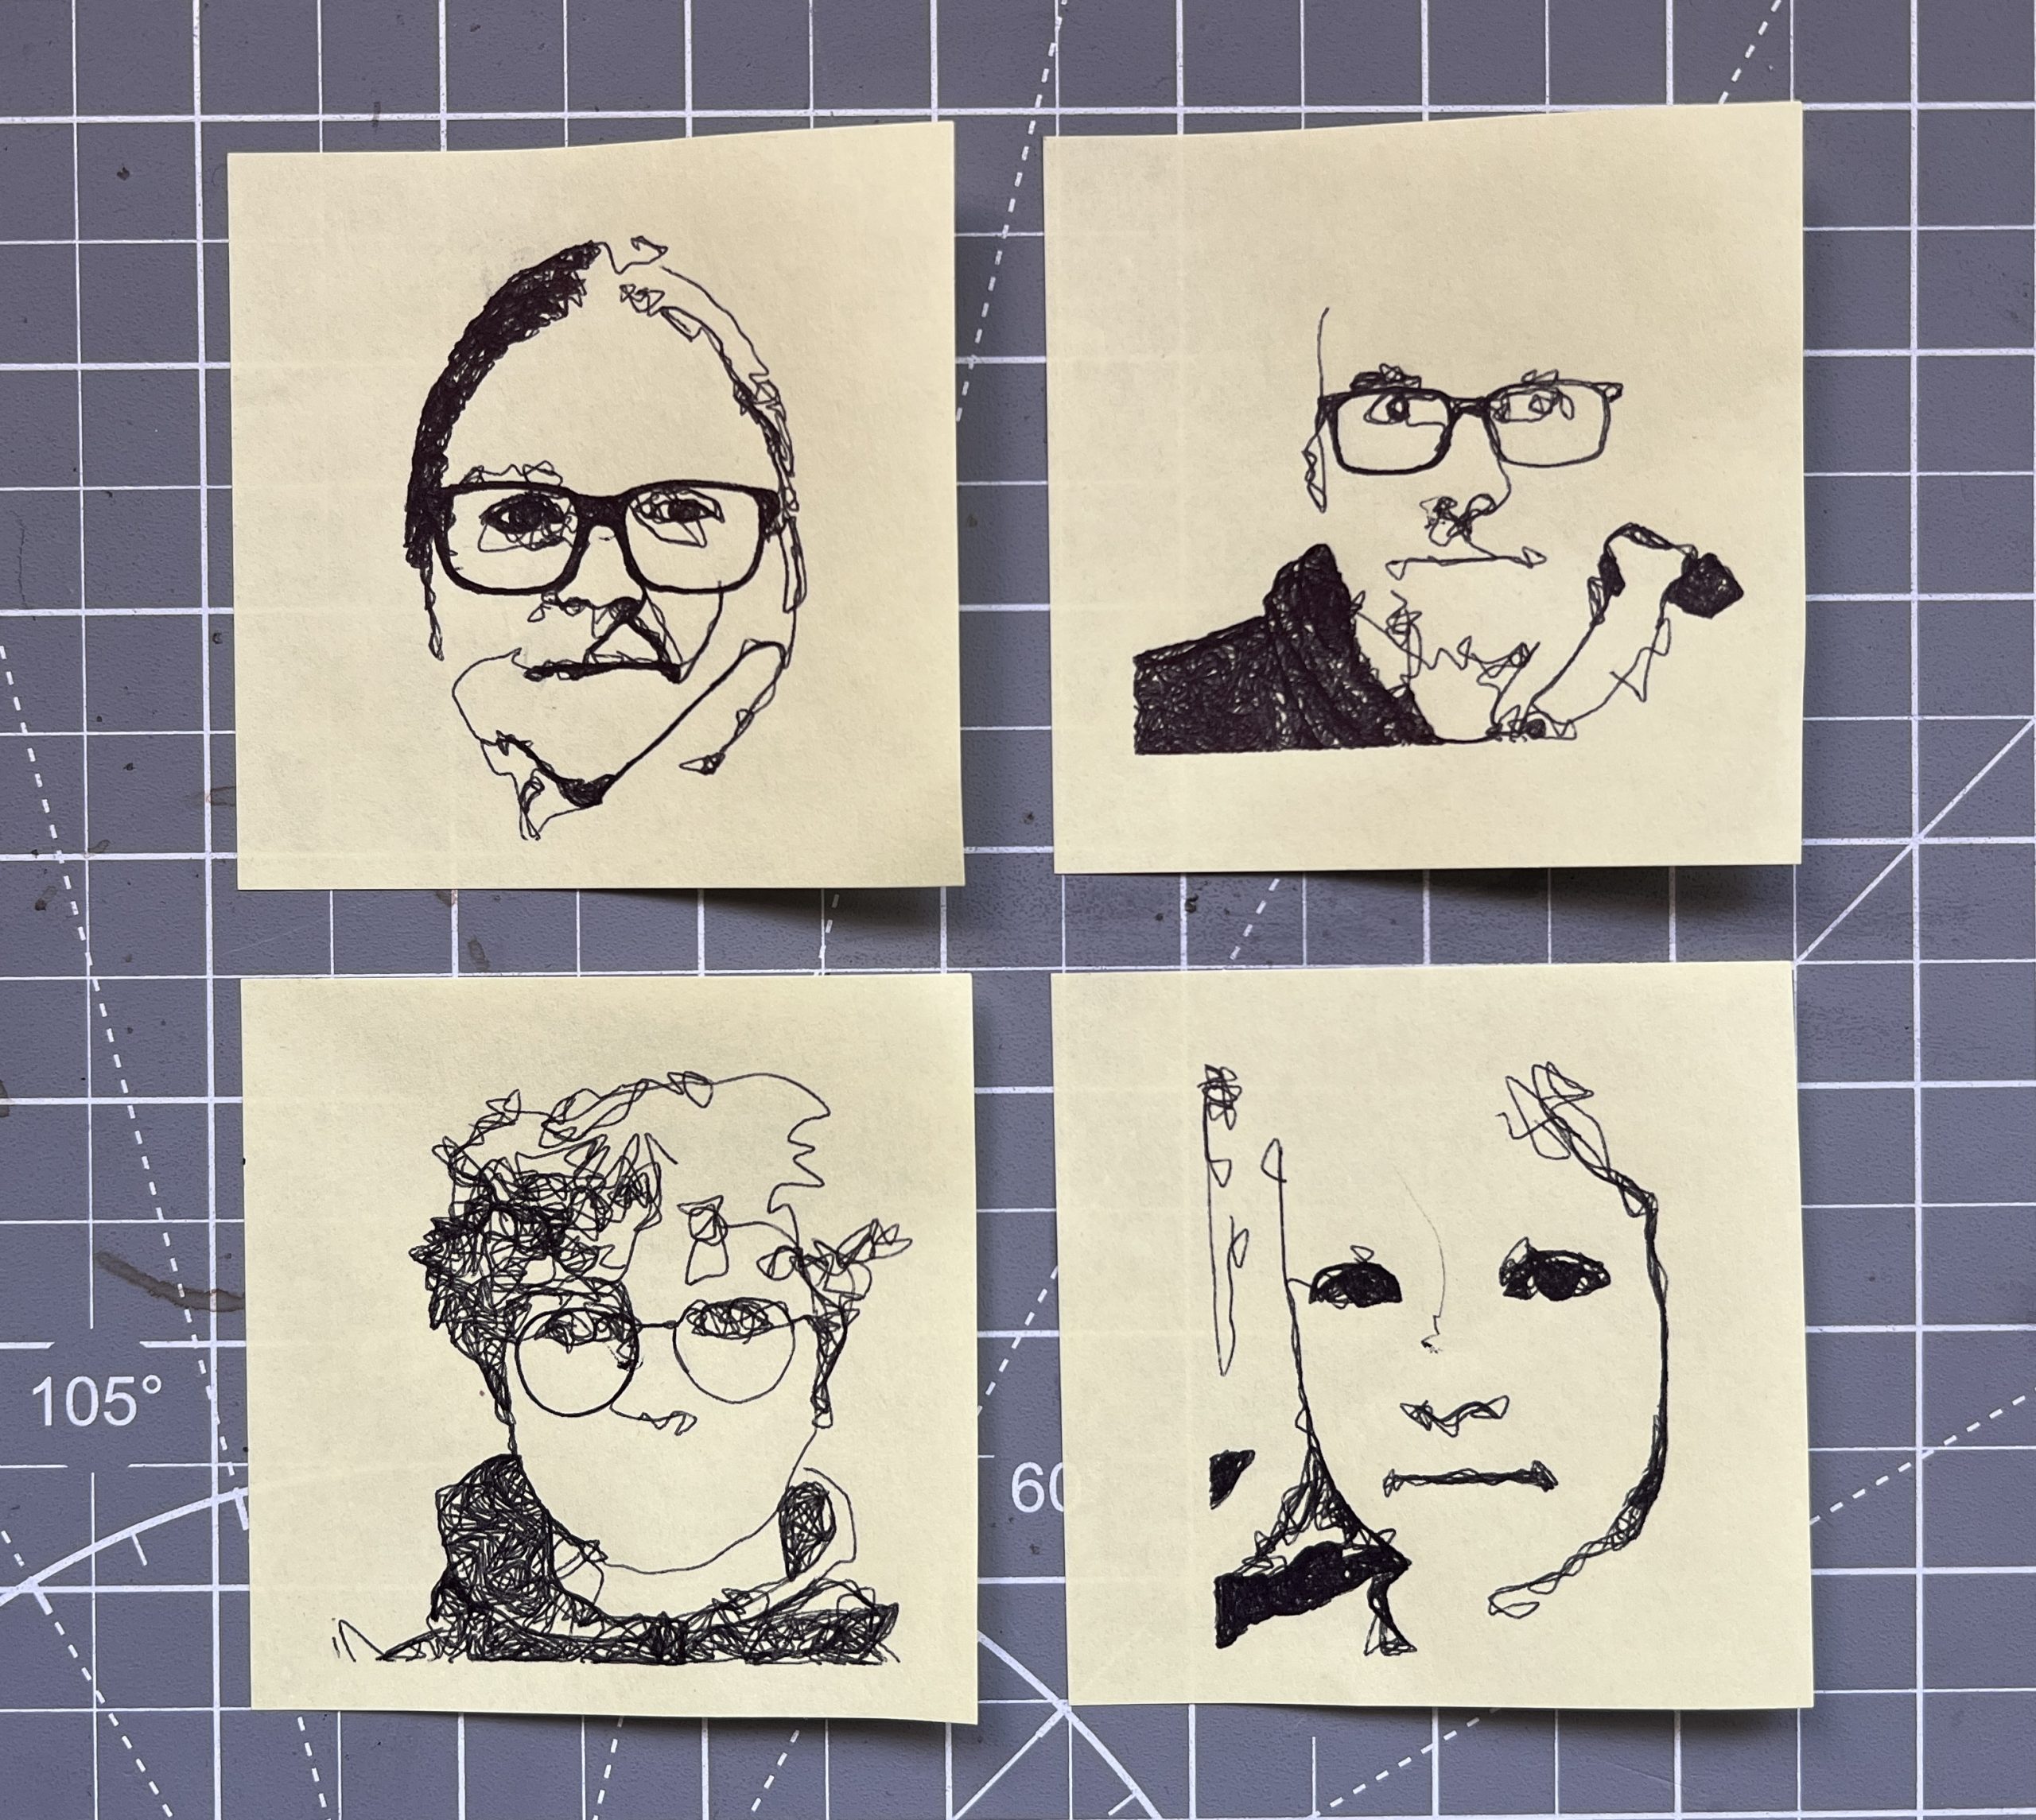
People were clearly keen on getting a tangible souvenir from the evening. Having a robot draw their portraits on a Post-it note struck a chord hard. I think what I’ve learned from this event is that while the lasers throw a lot of pazzazz at you, they are more complex machines that most people don’t try to engage with beyond taking in the light show. While a pen based machine is doing the same thing you’d do with your hand so it’s more approachable to be curious about. As usual a small fraction of them were fixated beyond reason on watching the machine at work. There has to be a “drawing automaton obsession” gene present in ~10% of the population.
Unfortunately, I only had one PlottyBot doing the Post-it portraits, and they take much longer than the lasers so I spent much of the evening trying to keep track of a queue of people who wanted one.
I built 2 4’x4′ photoluminescent paper holders so I could deploy this easier. In the past, finding a decent spot on a wall for the rolls and unrolling them was difficult and time consuming. I also have plans for doing random outside events at dusk in random places this Summer, which is why having something deployable was worth the construction effort. I tried it some already at home last Summer and it’s kind of cool to have the lasers go on a warm Summer night.
I had several people ask me if this was AI :), this seems to have become the go-to explanation for anything tech based that can’t be explained easily. Much like Clarke’s law that “Any sufficiently advanced technology is indistinguishable from magic”, only now it’s AI instead of magic. I’d respond that it was just good old organic grain-raised free-range “I”.
As usual, it was very hard to capture the coolness while manning it so I don’t have much visuals to represent what went on. Ultimately it’s just me running 5 machines, a software stack and talking a lot. Suffice it to say people were into it and I’m emboldened to keep trying public events. Fun times!
Fancy Meerers
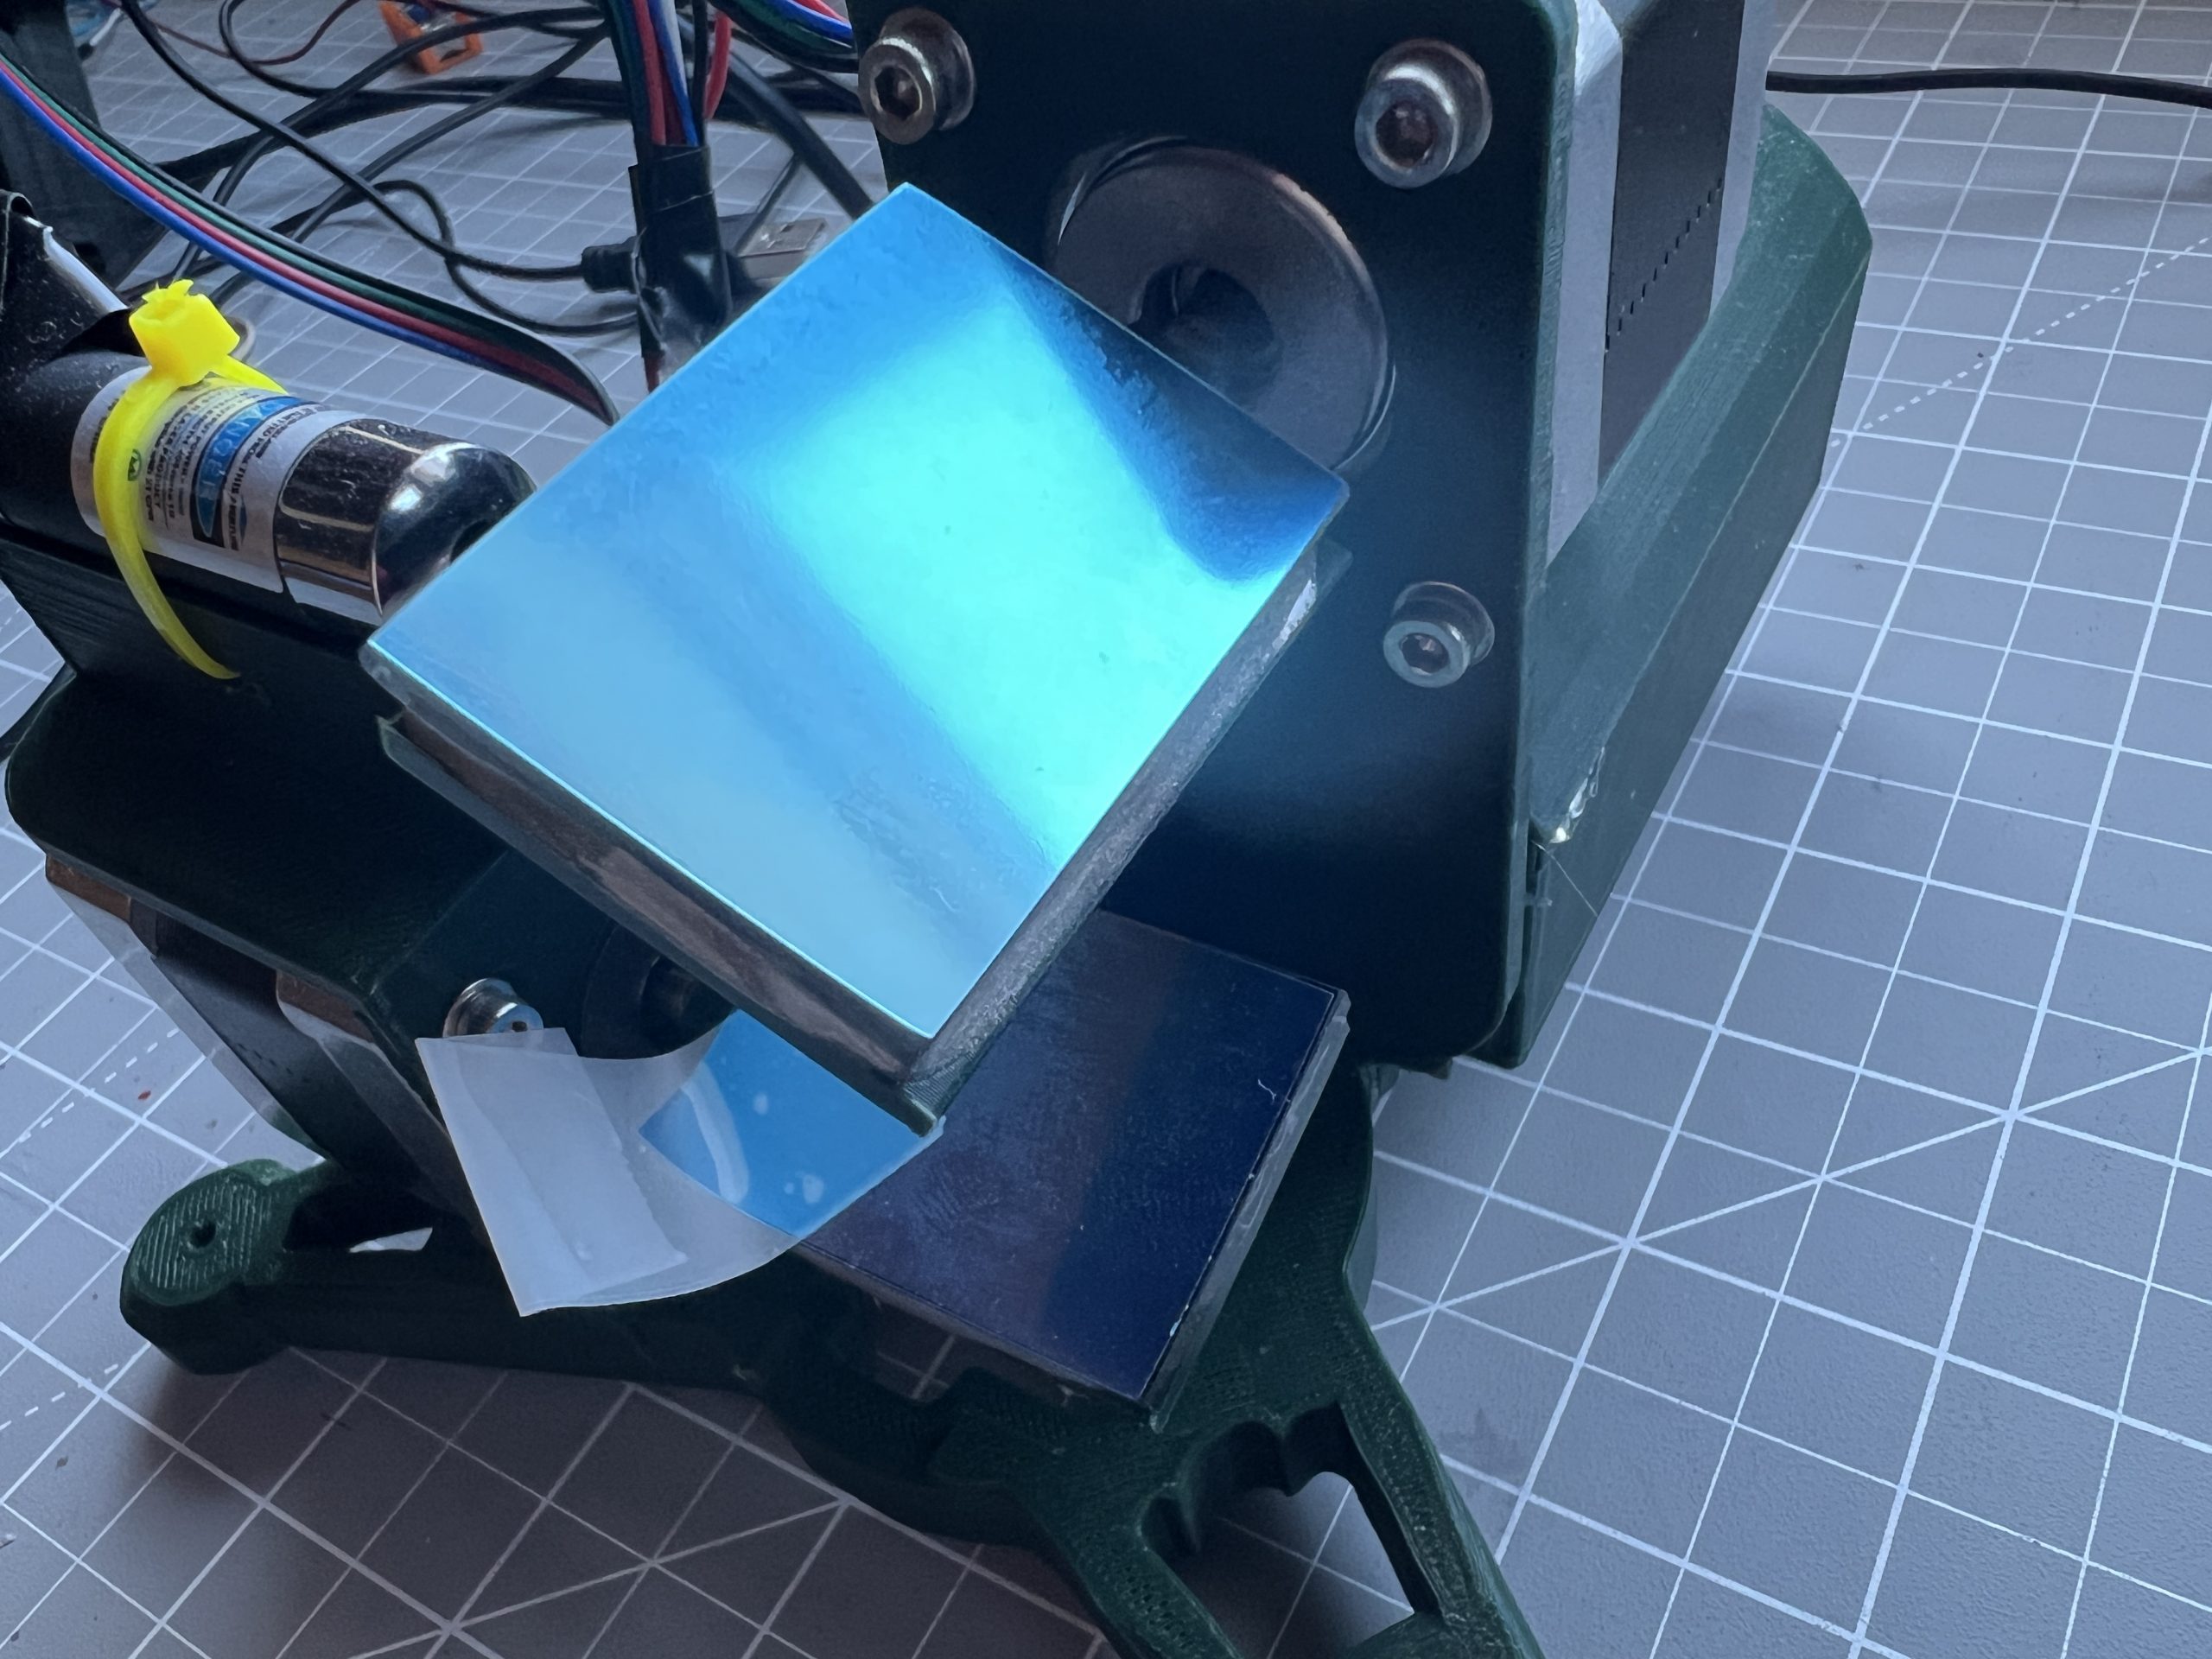
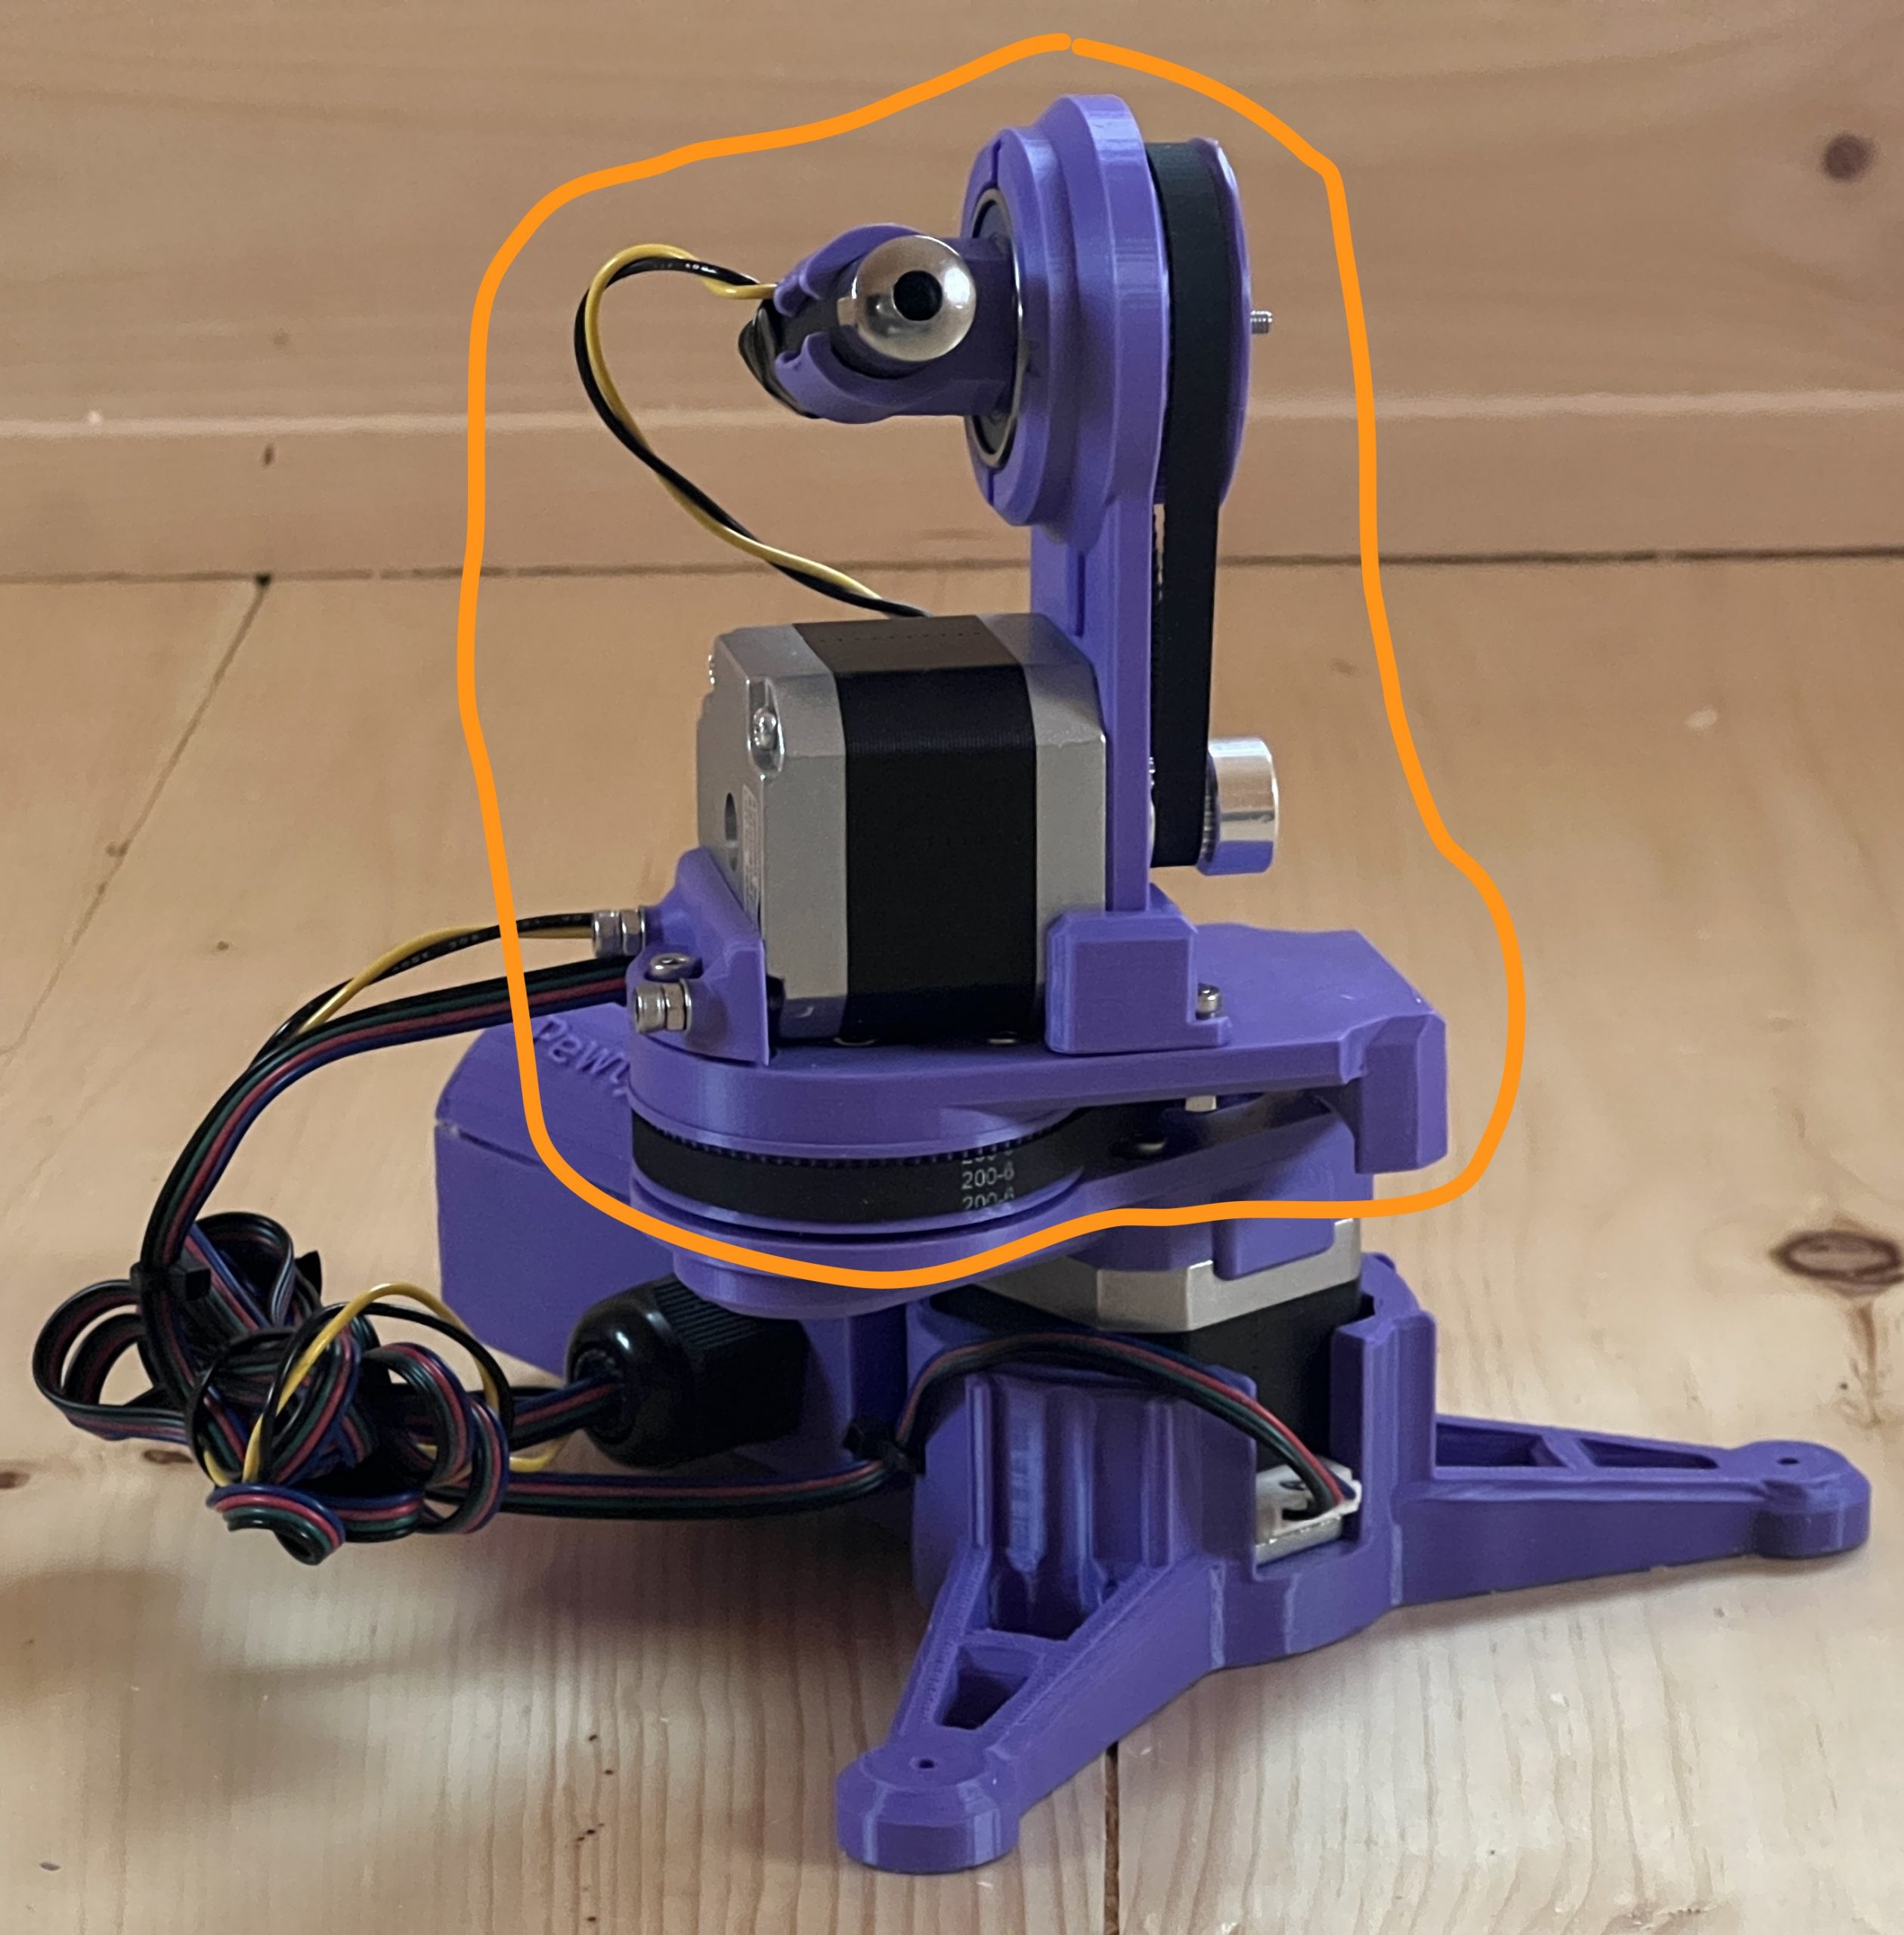
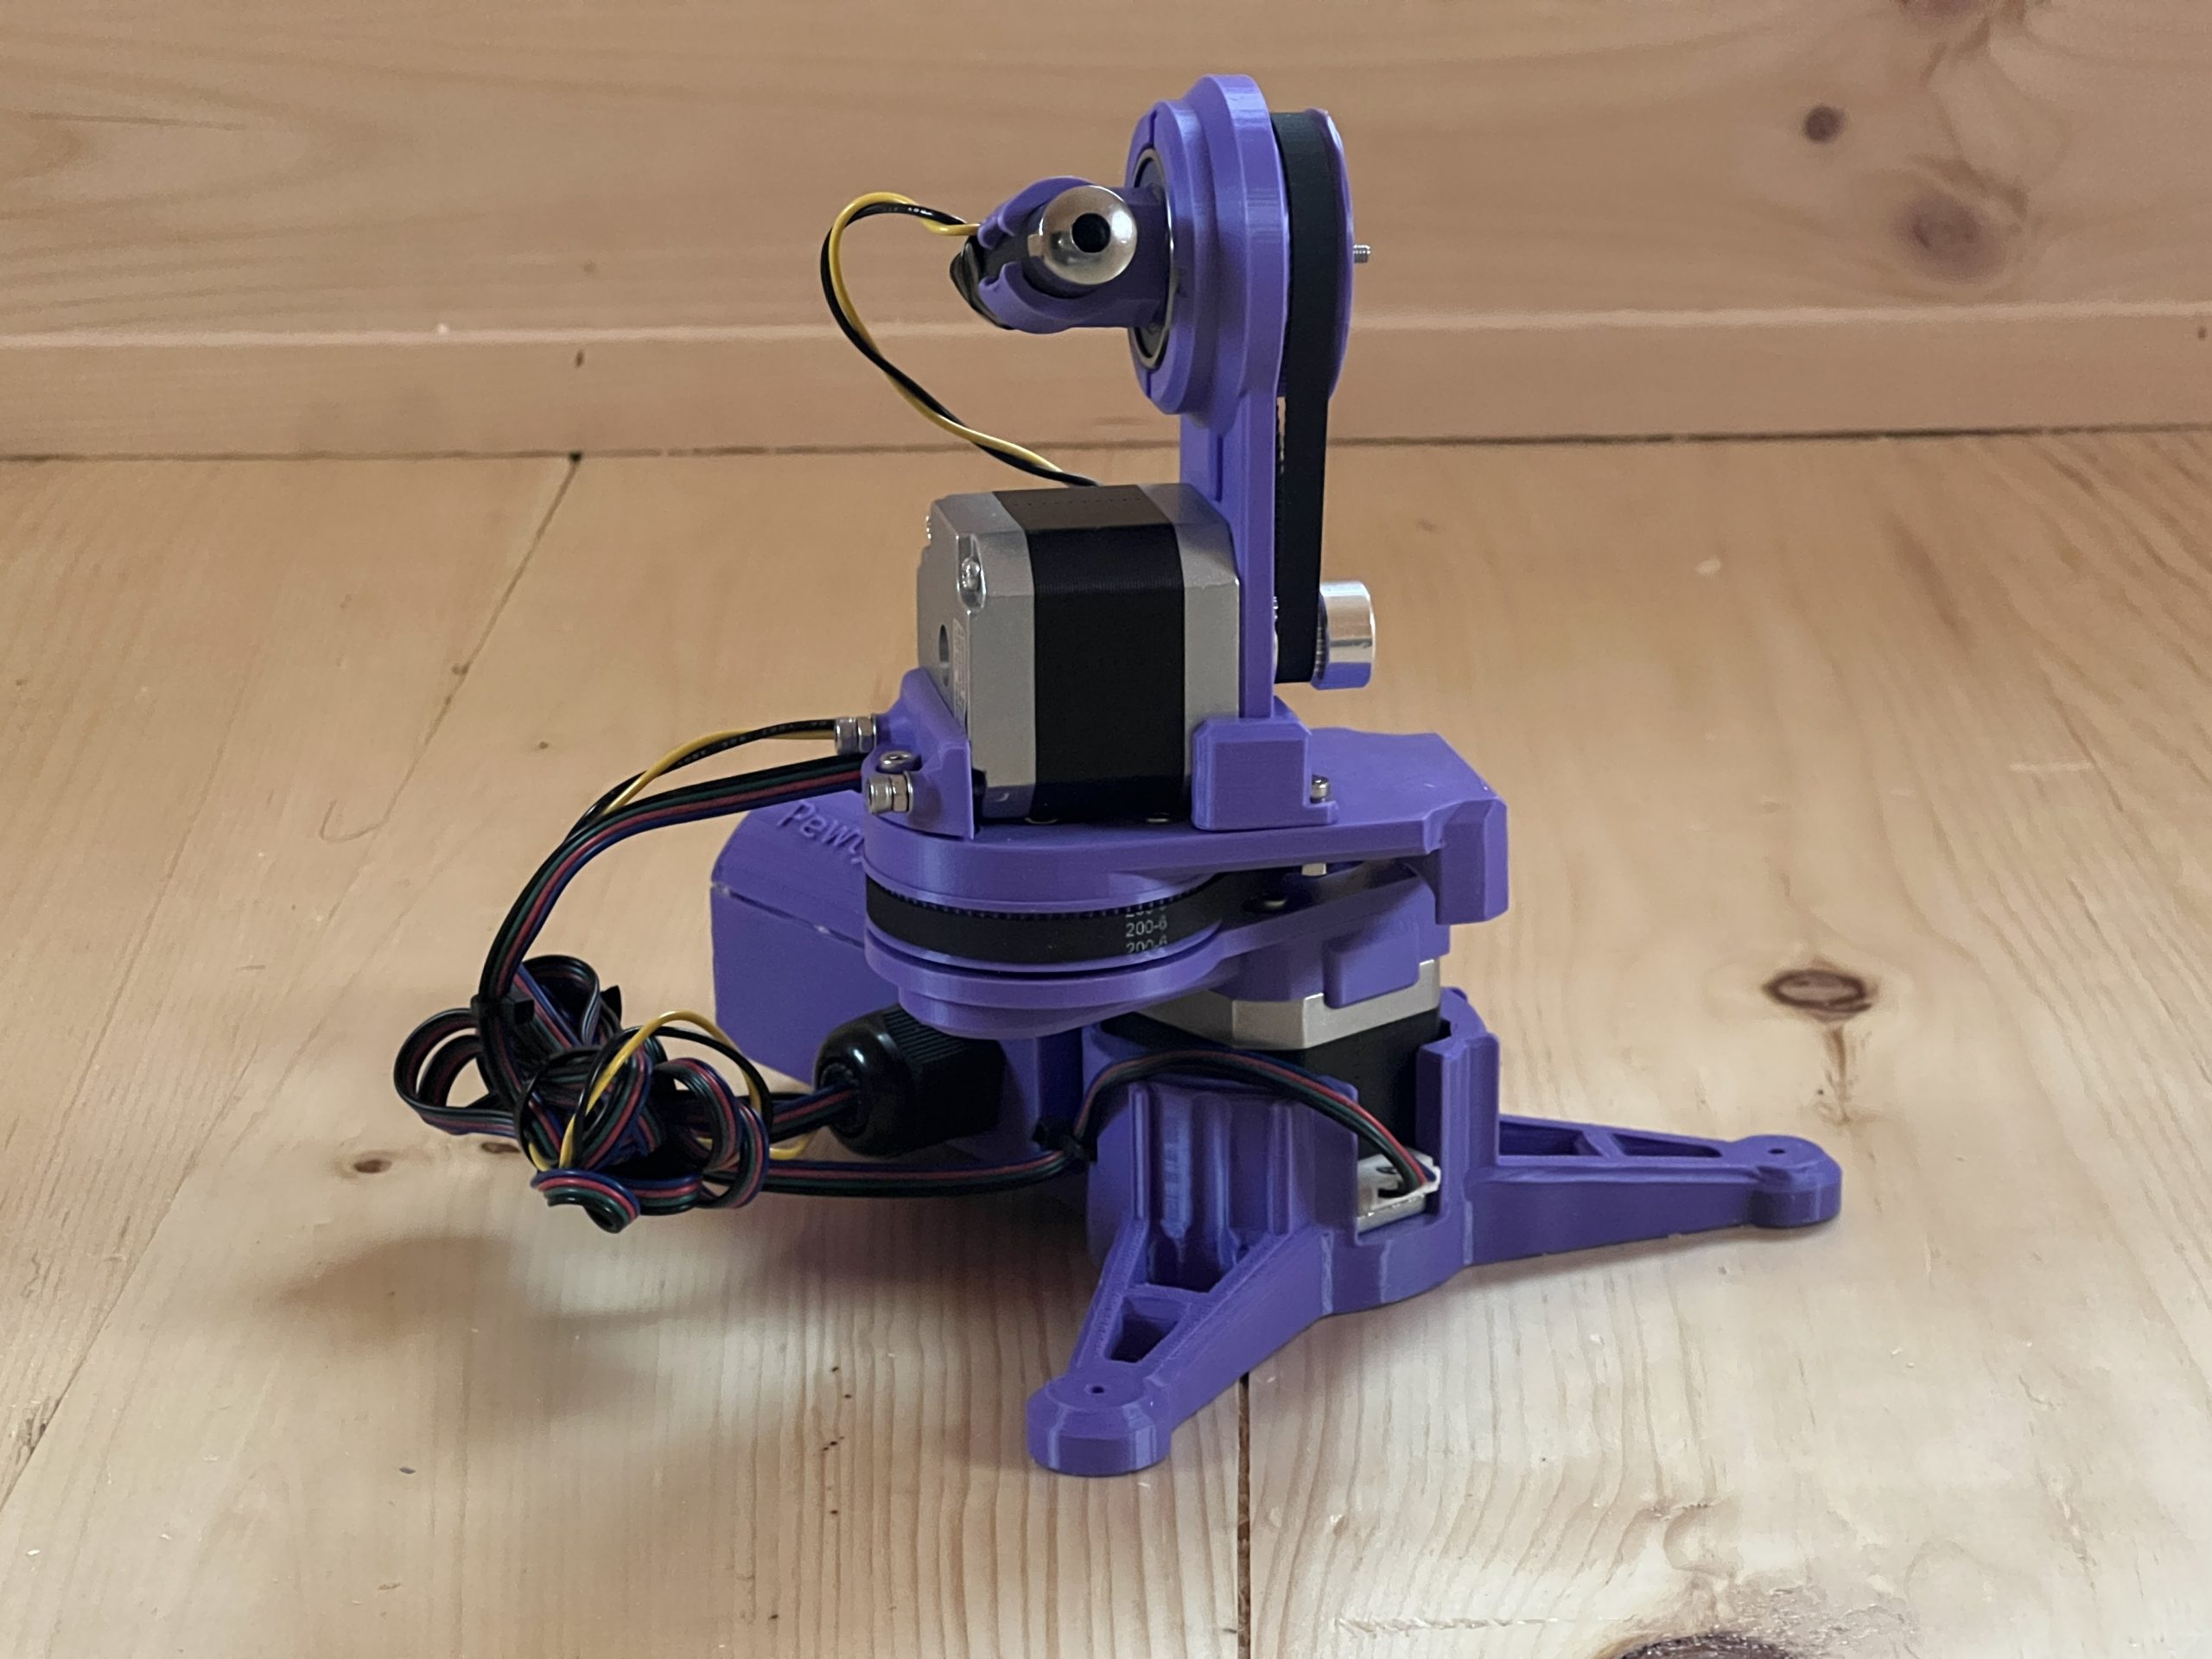
The mirror based PewtyBot proved conclusive enough but since the laser is reflected twice, a degradation is clear on the medium if the mirrors aren’t high quality. Clearly the cheap plastic ones I got to test with aren’t, but they served their purpose. With much research on mirror specs & bounding agents, I went ahead and spent $70 on two tiny “surface first enhanced aluminum” mirrors. Once again, I forgot everything about my high school physics lessons, but some vague notions are left to help me navigate through specs. And this being 2026, of course there’s a website dedicated to optics of all sorts I can buy any sort of mirror from. The modern world has its flaws, but access to information and stuff is definitely covered.
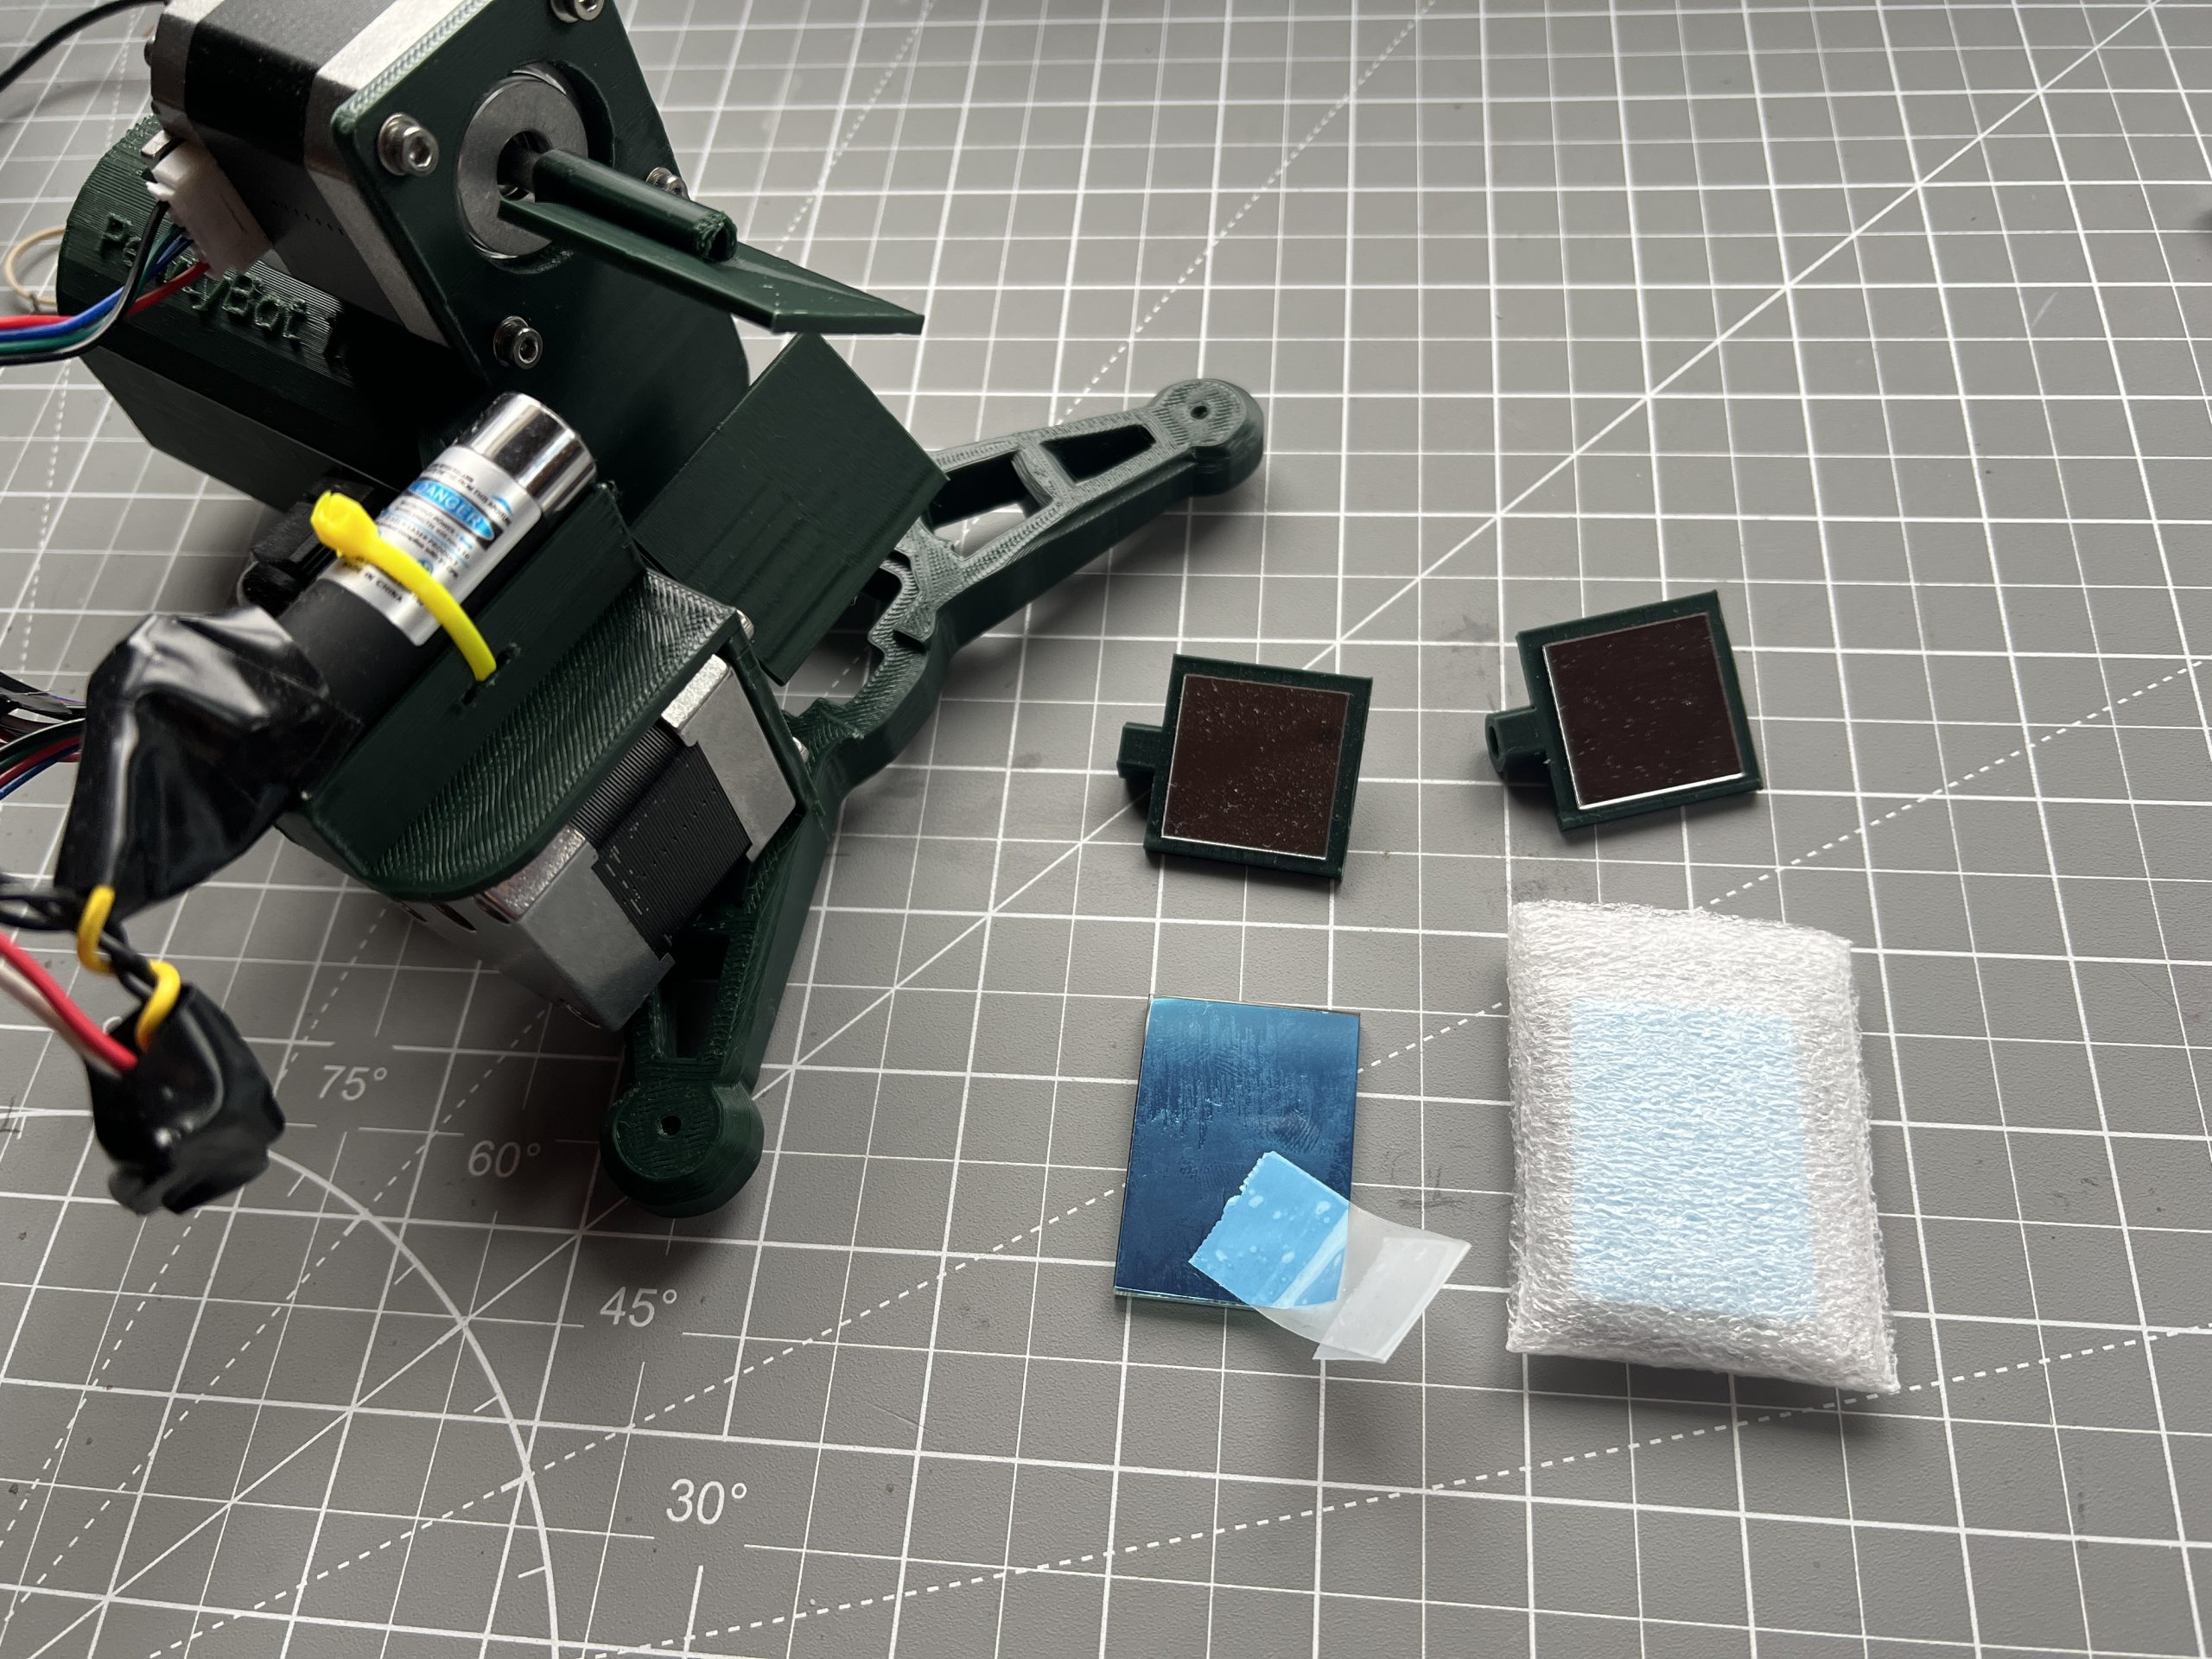
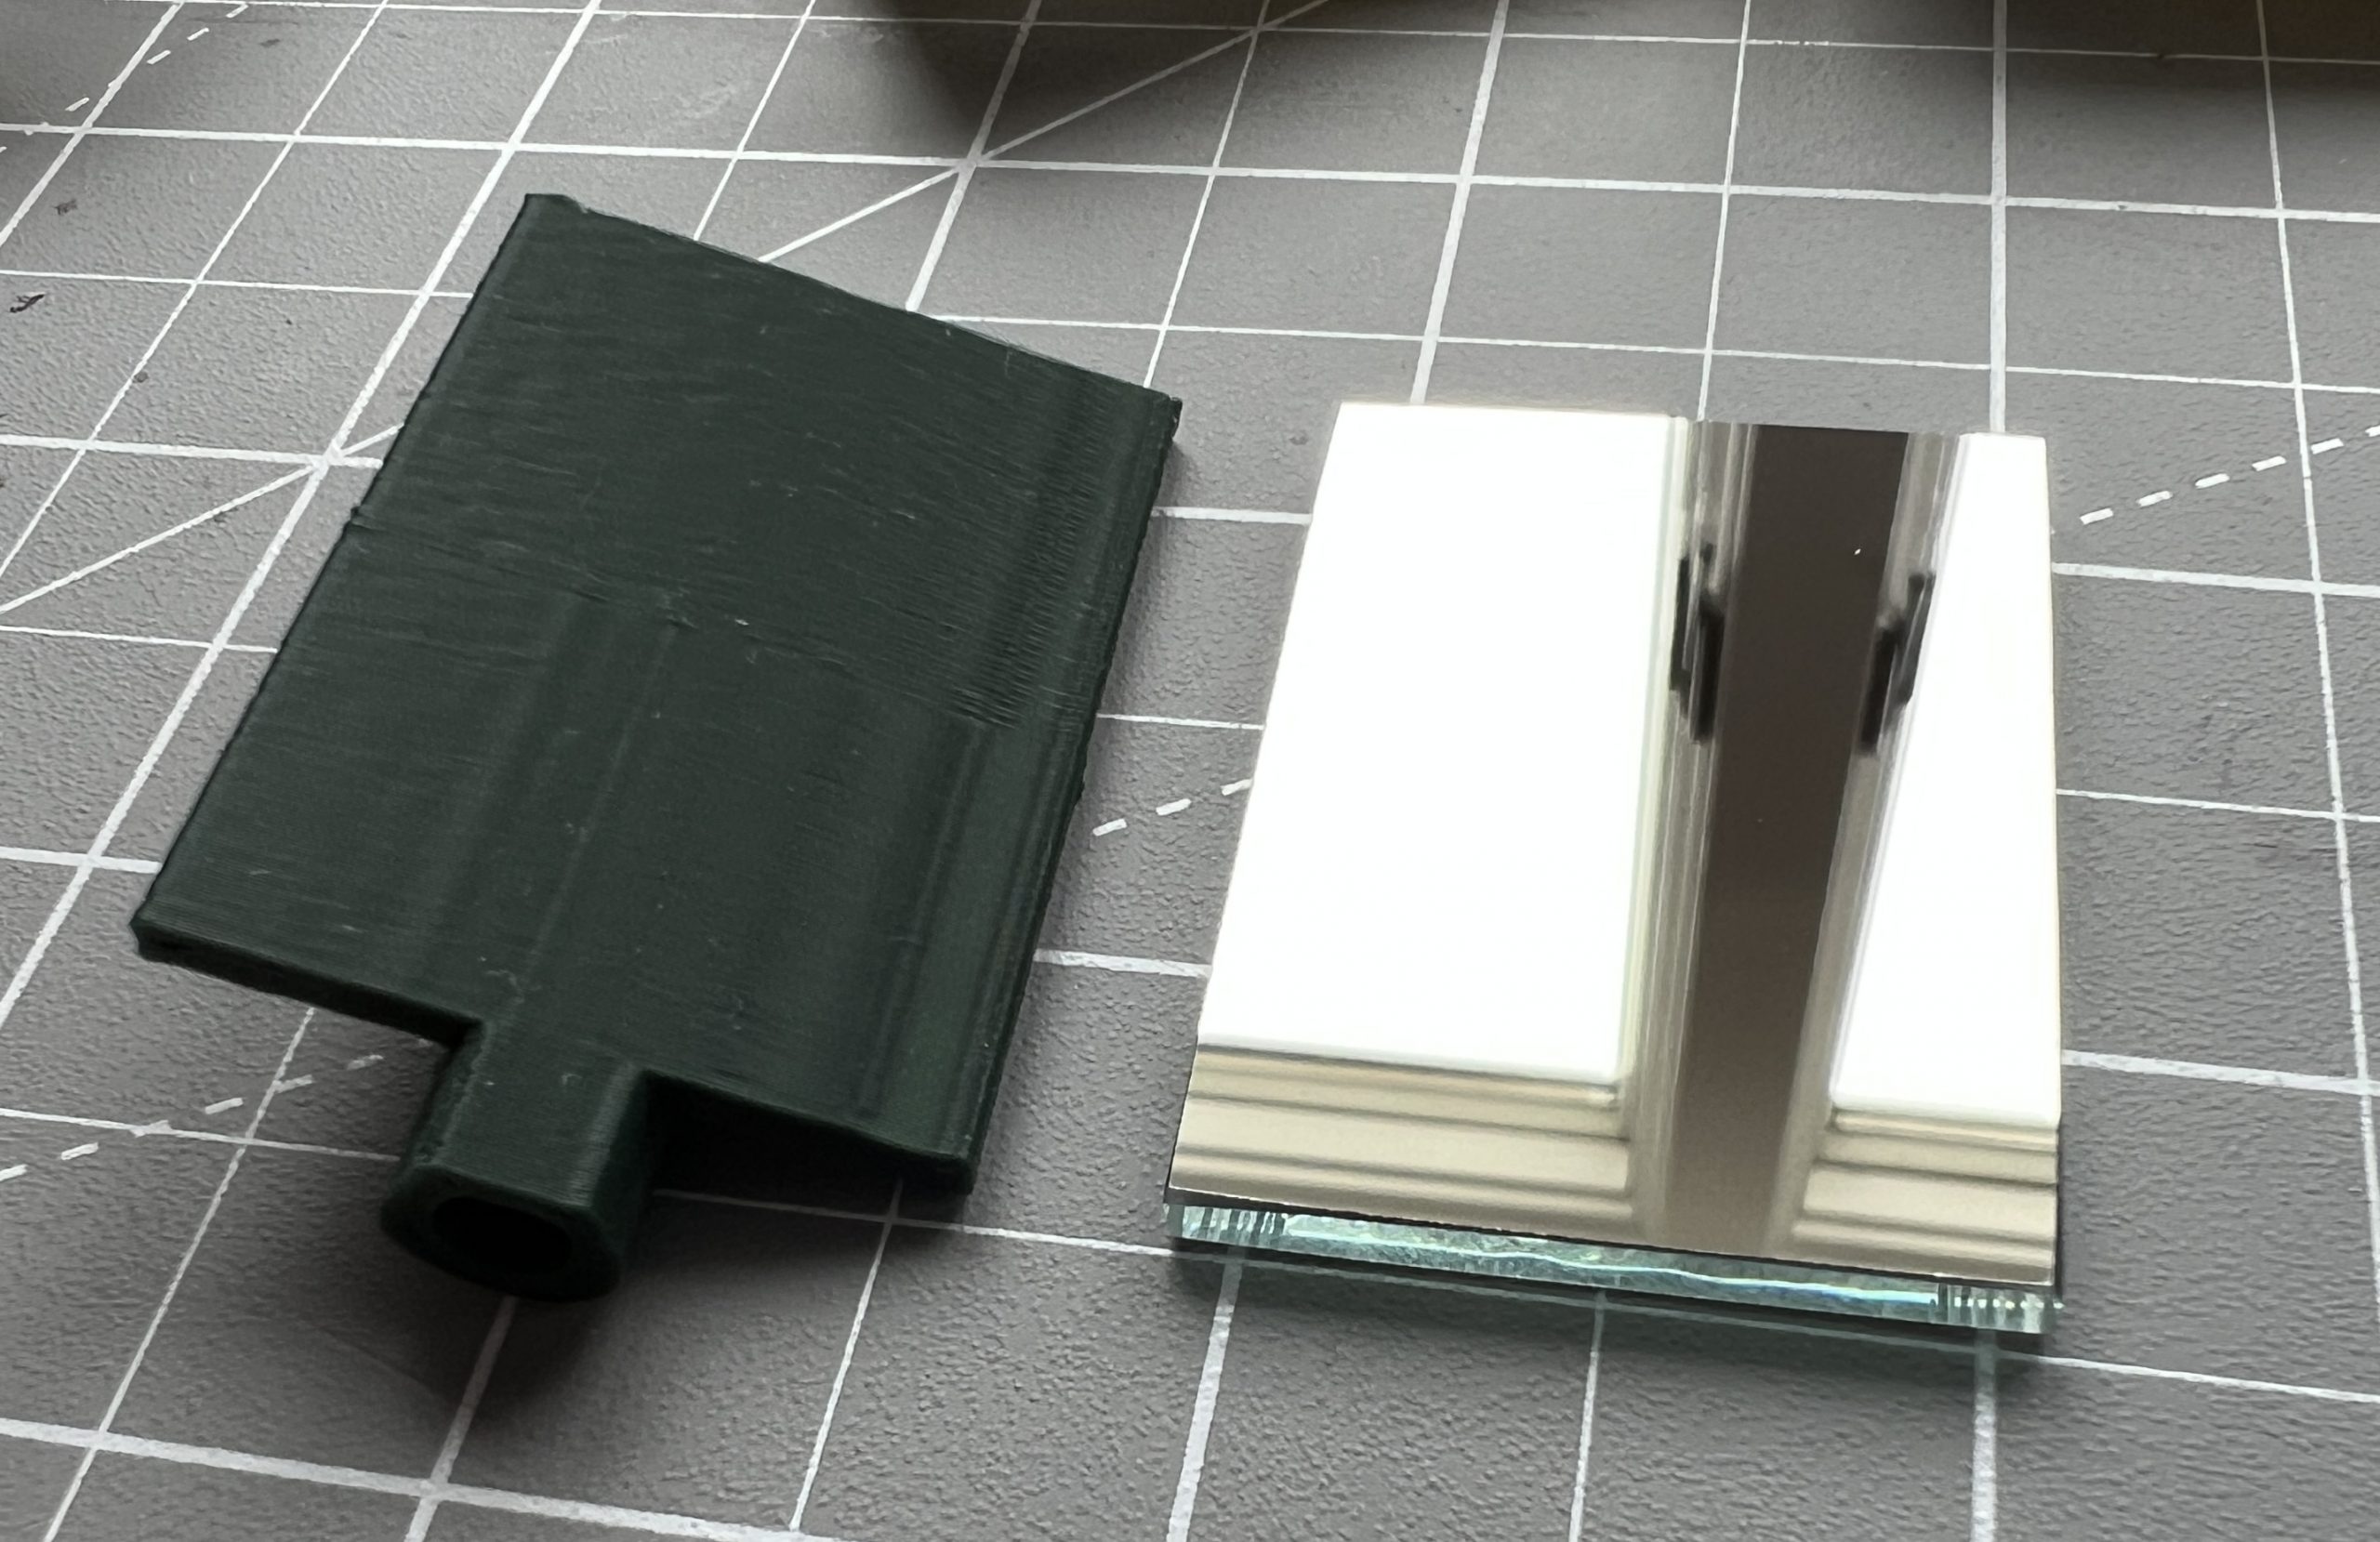
These new fancy mirrors are extremely crisp. Unfortunately, one of them slid on the epoxy as it cured, this won’t impact use but I’m bummed for I really did all I could to get everything perfect.
I tested the upgraded machine and it performed just as well as before, but the laser pointer was pristine as it hit the medium. This might not be a $70 improvement, but if I’m going to build a machine it’s hard to leave it lacking. The kids have been curious about this new development, it’s always fun to see the gears turn when they engage.
Overcoming Inertia
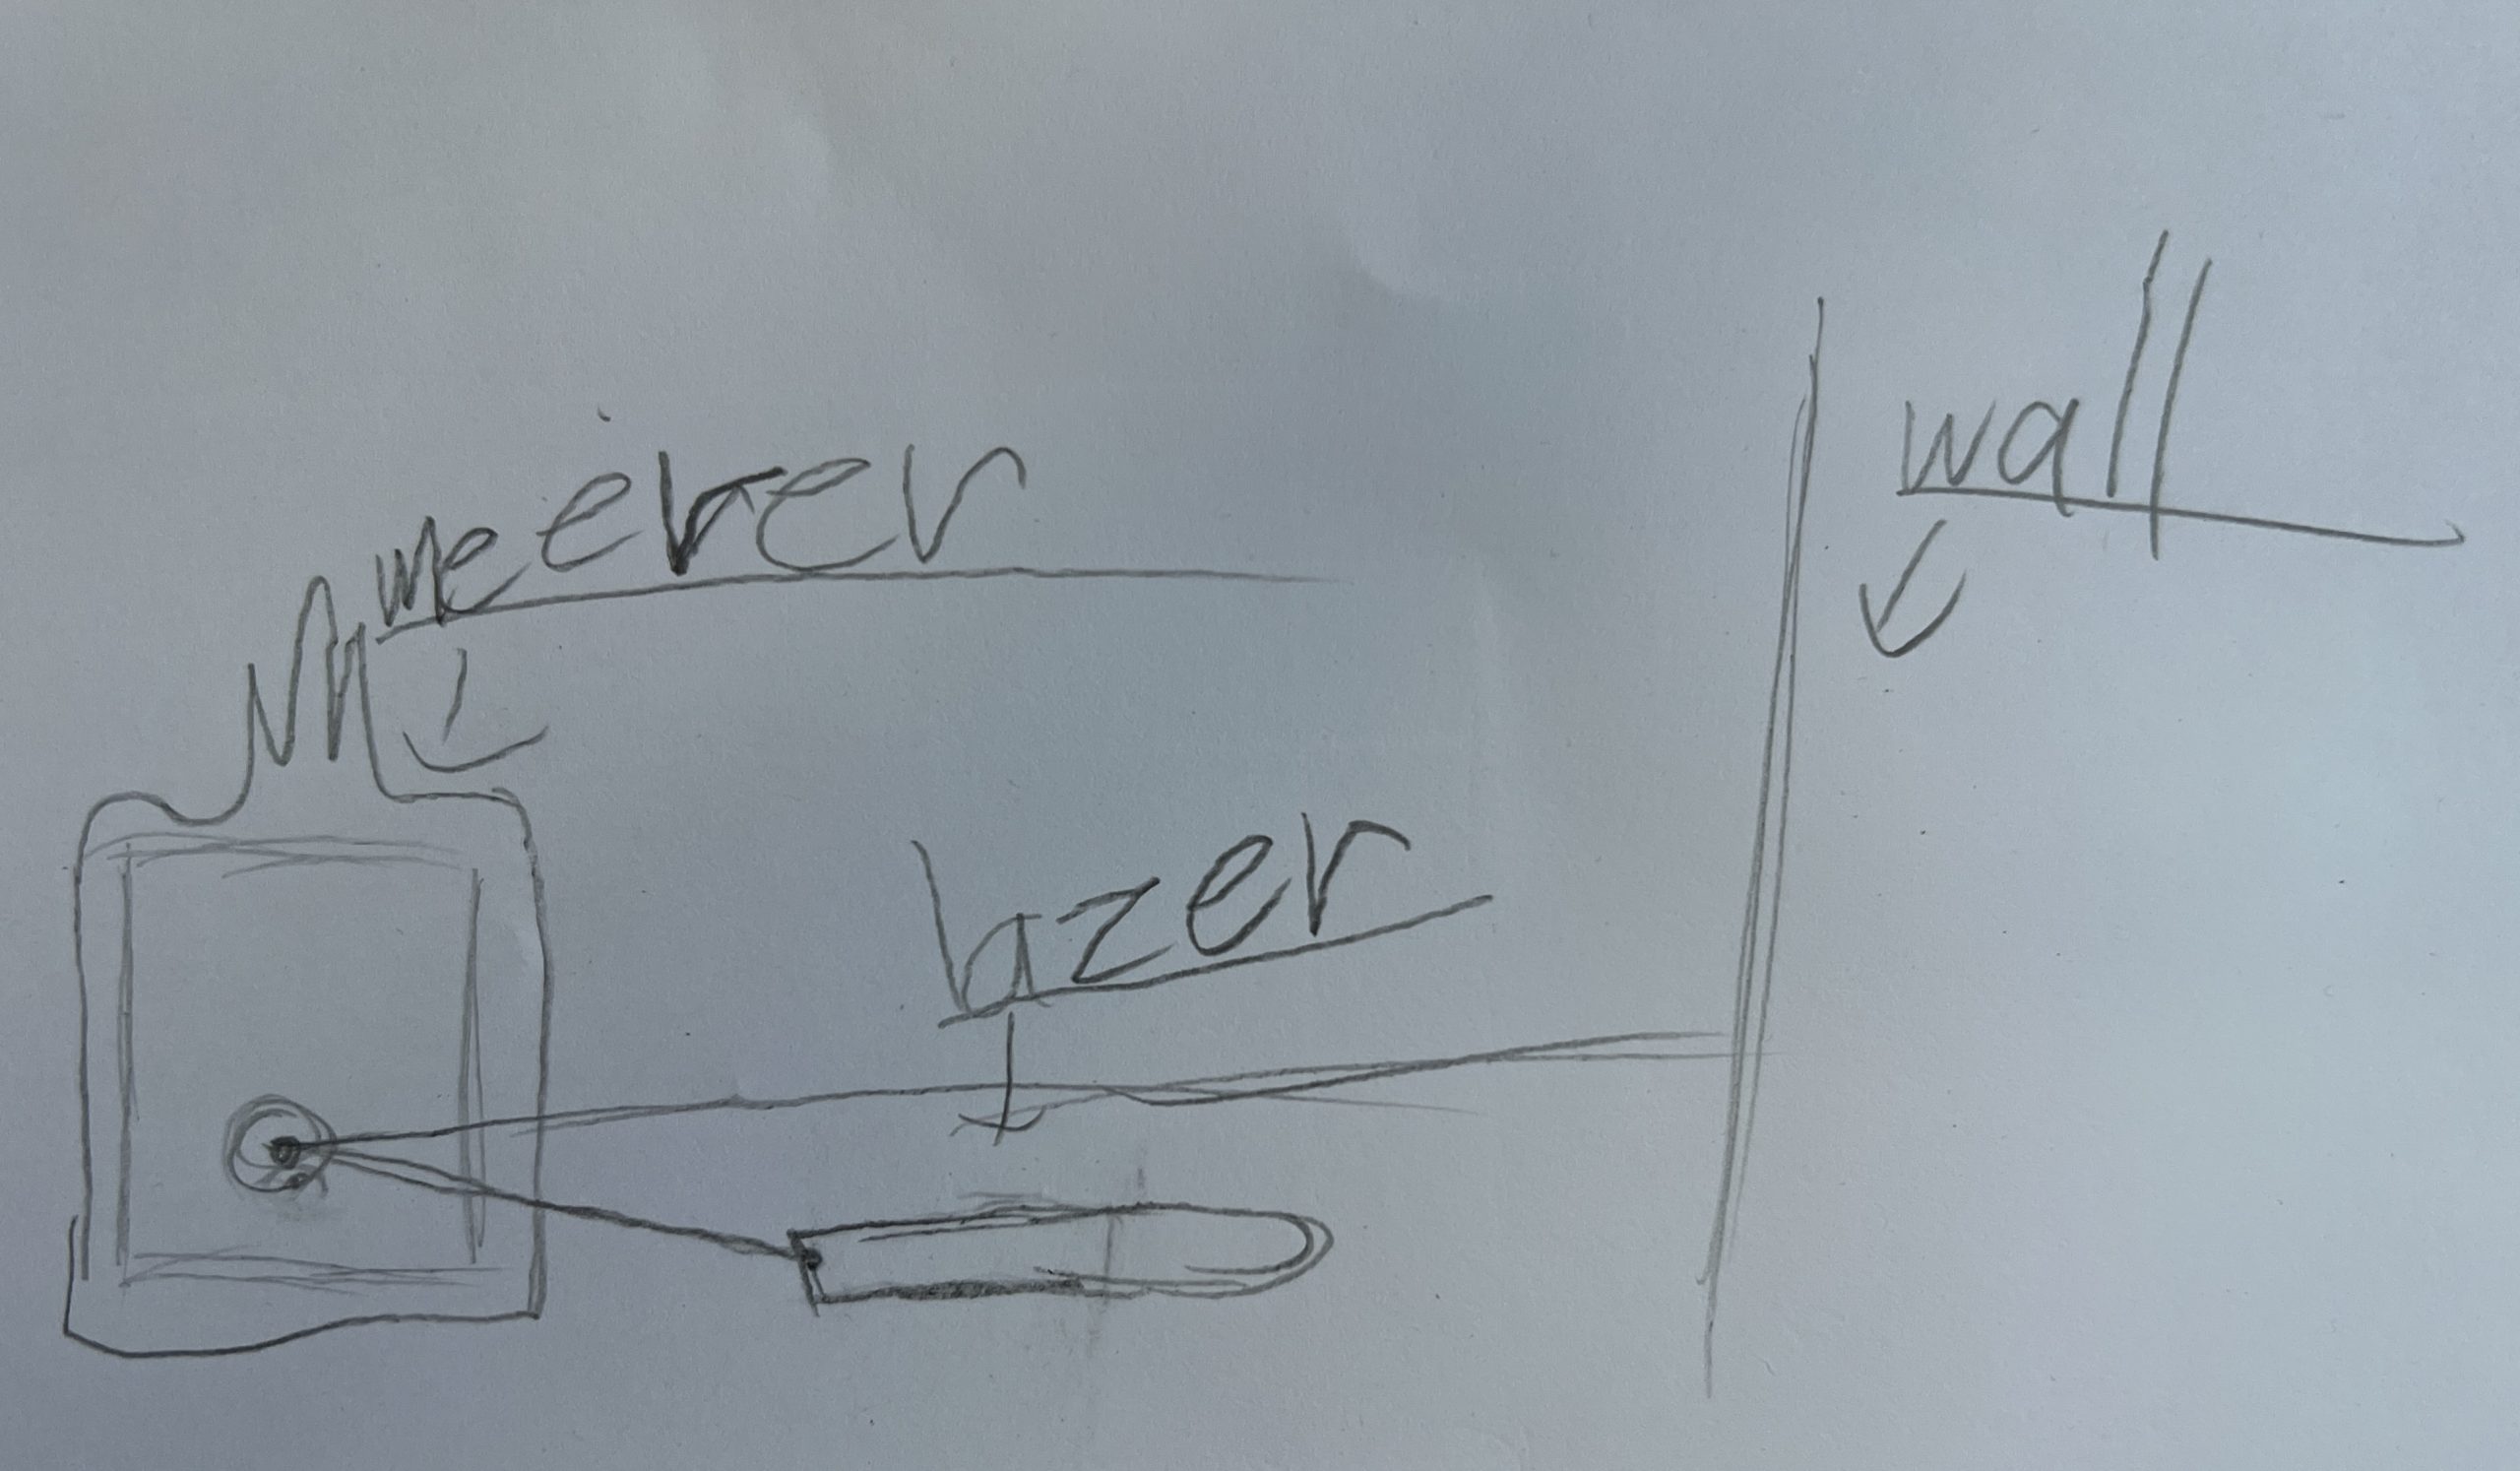
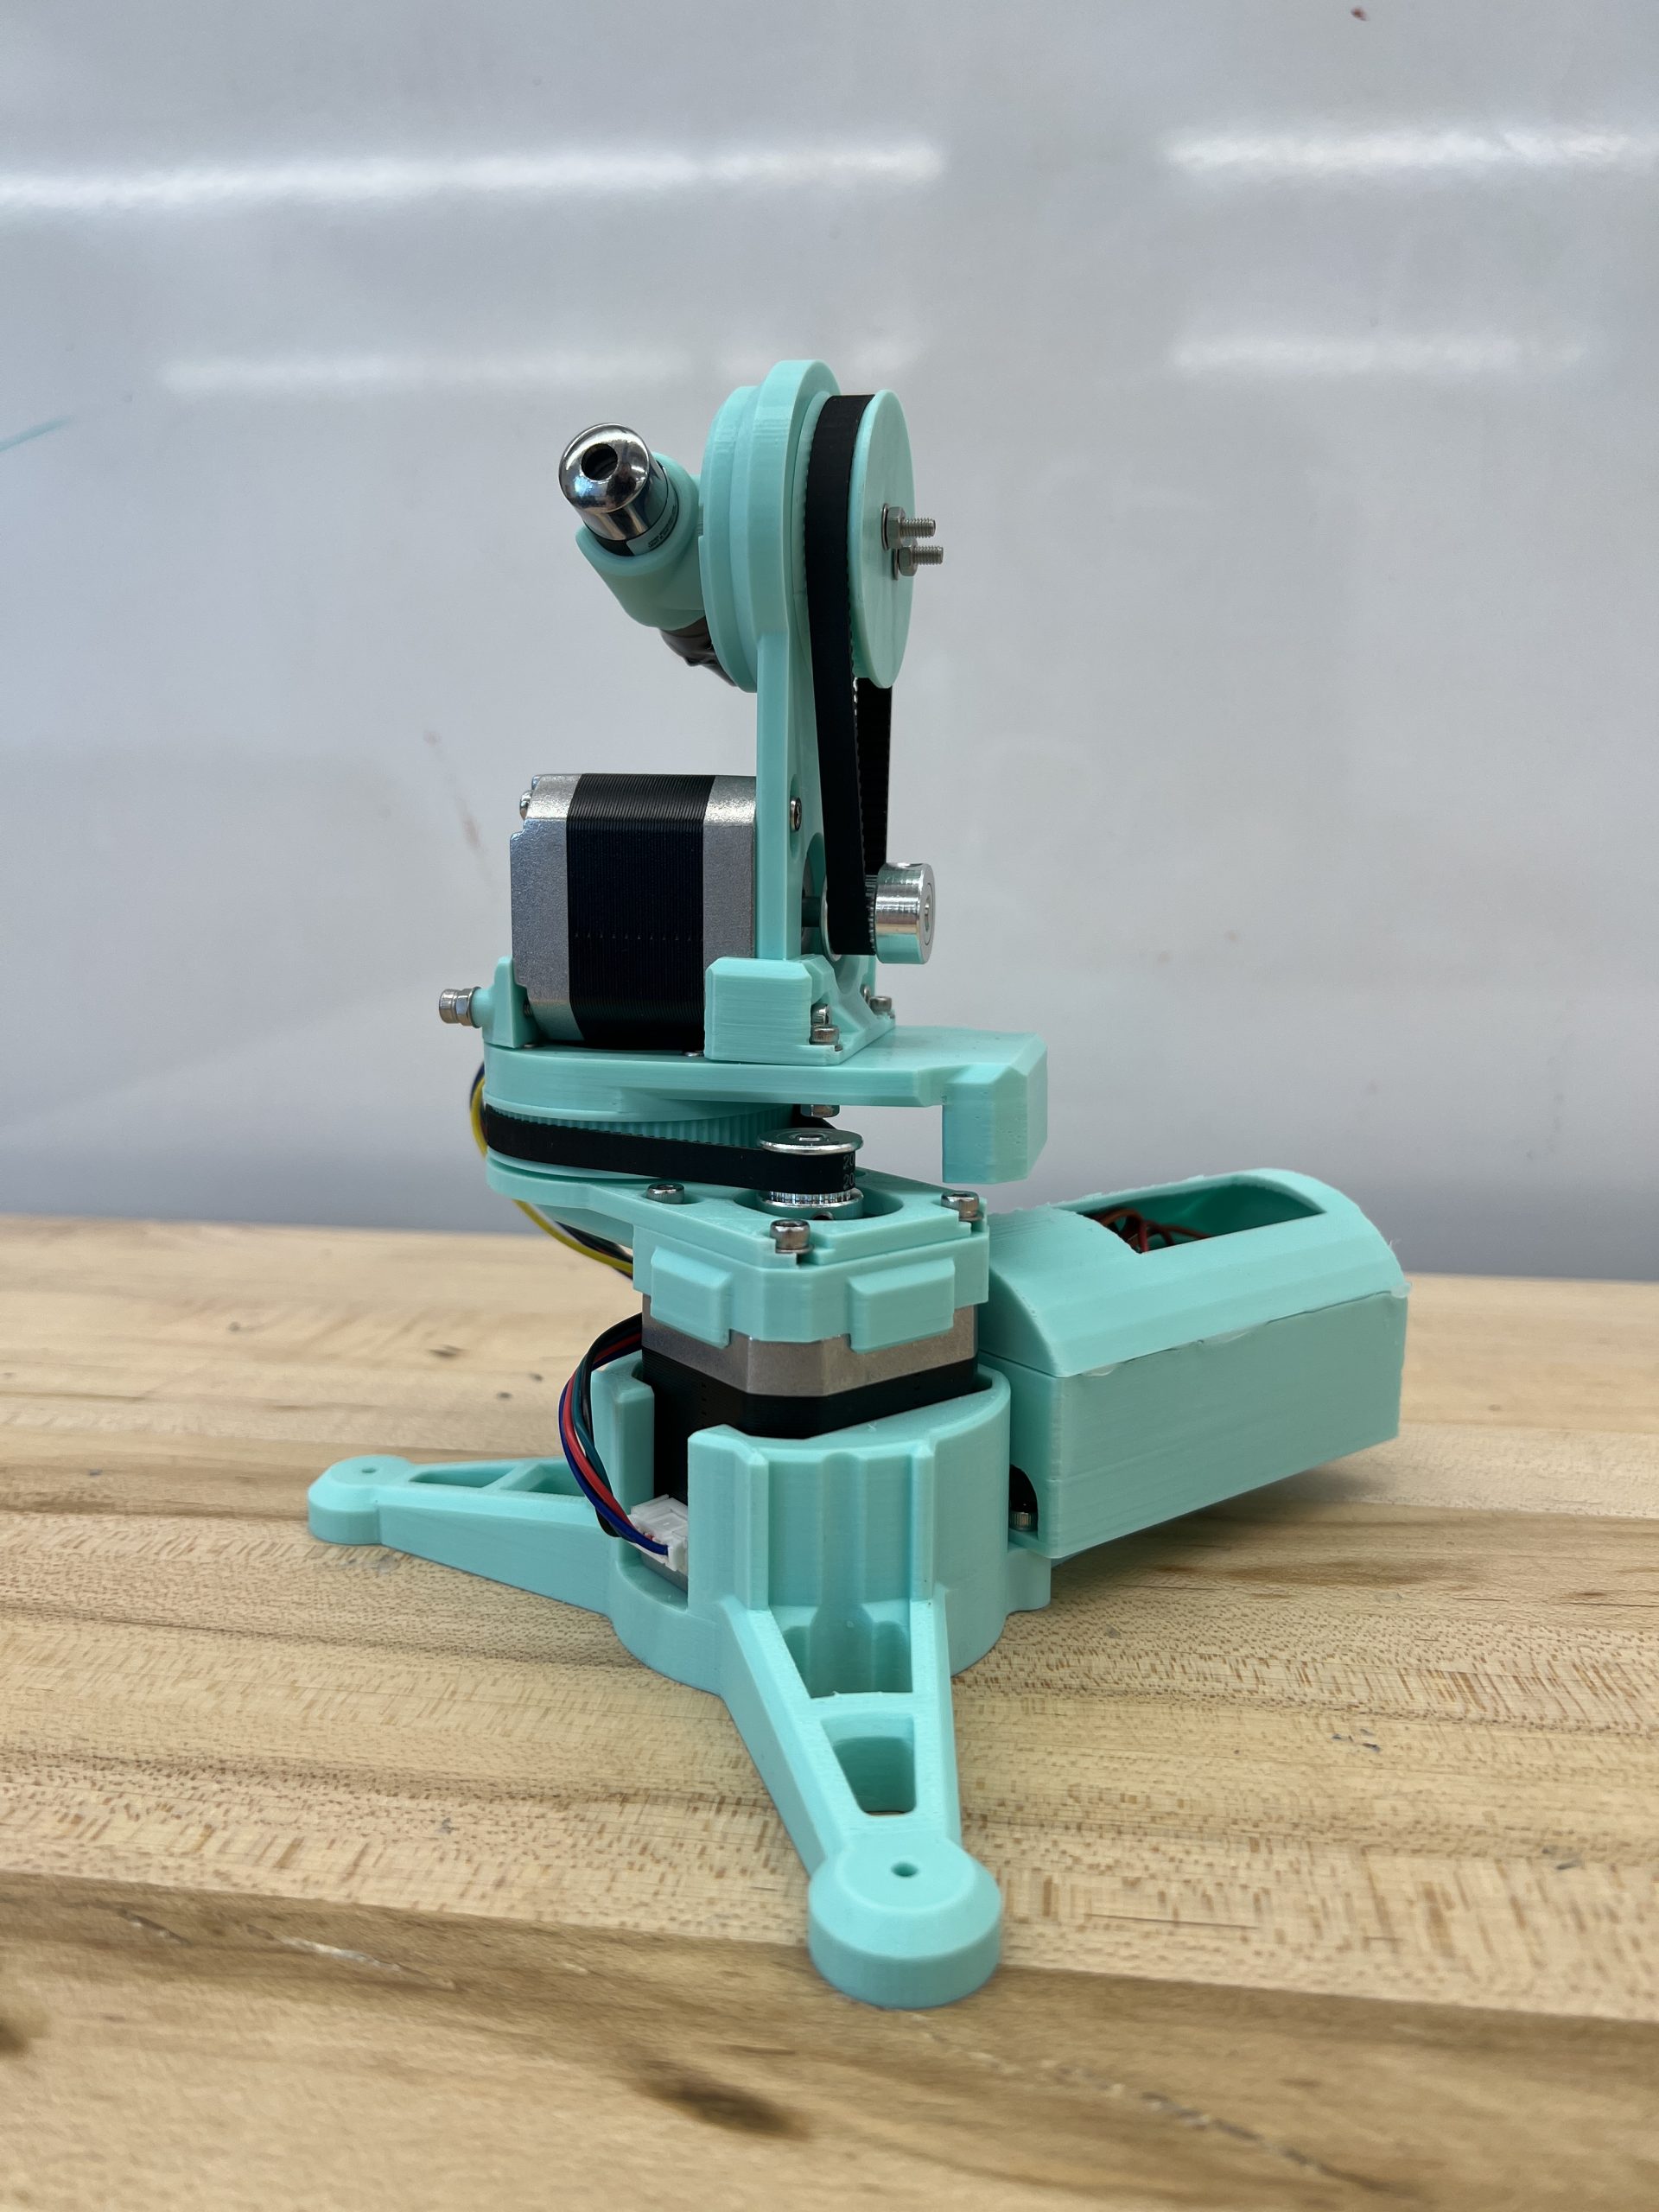
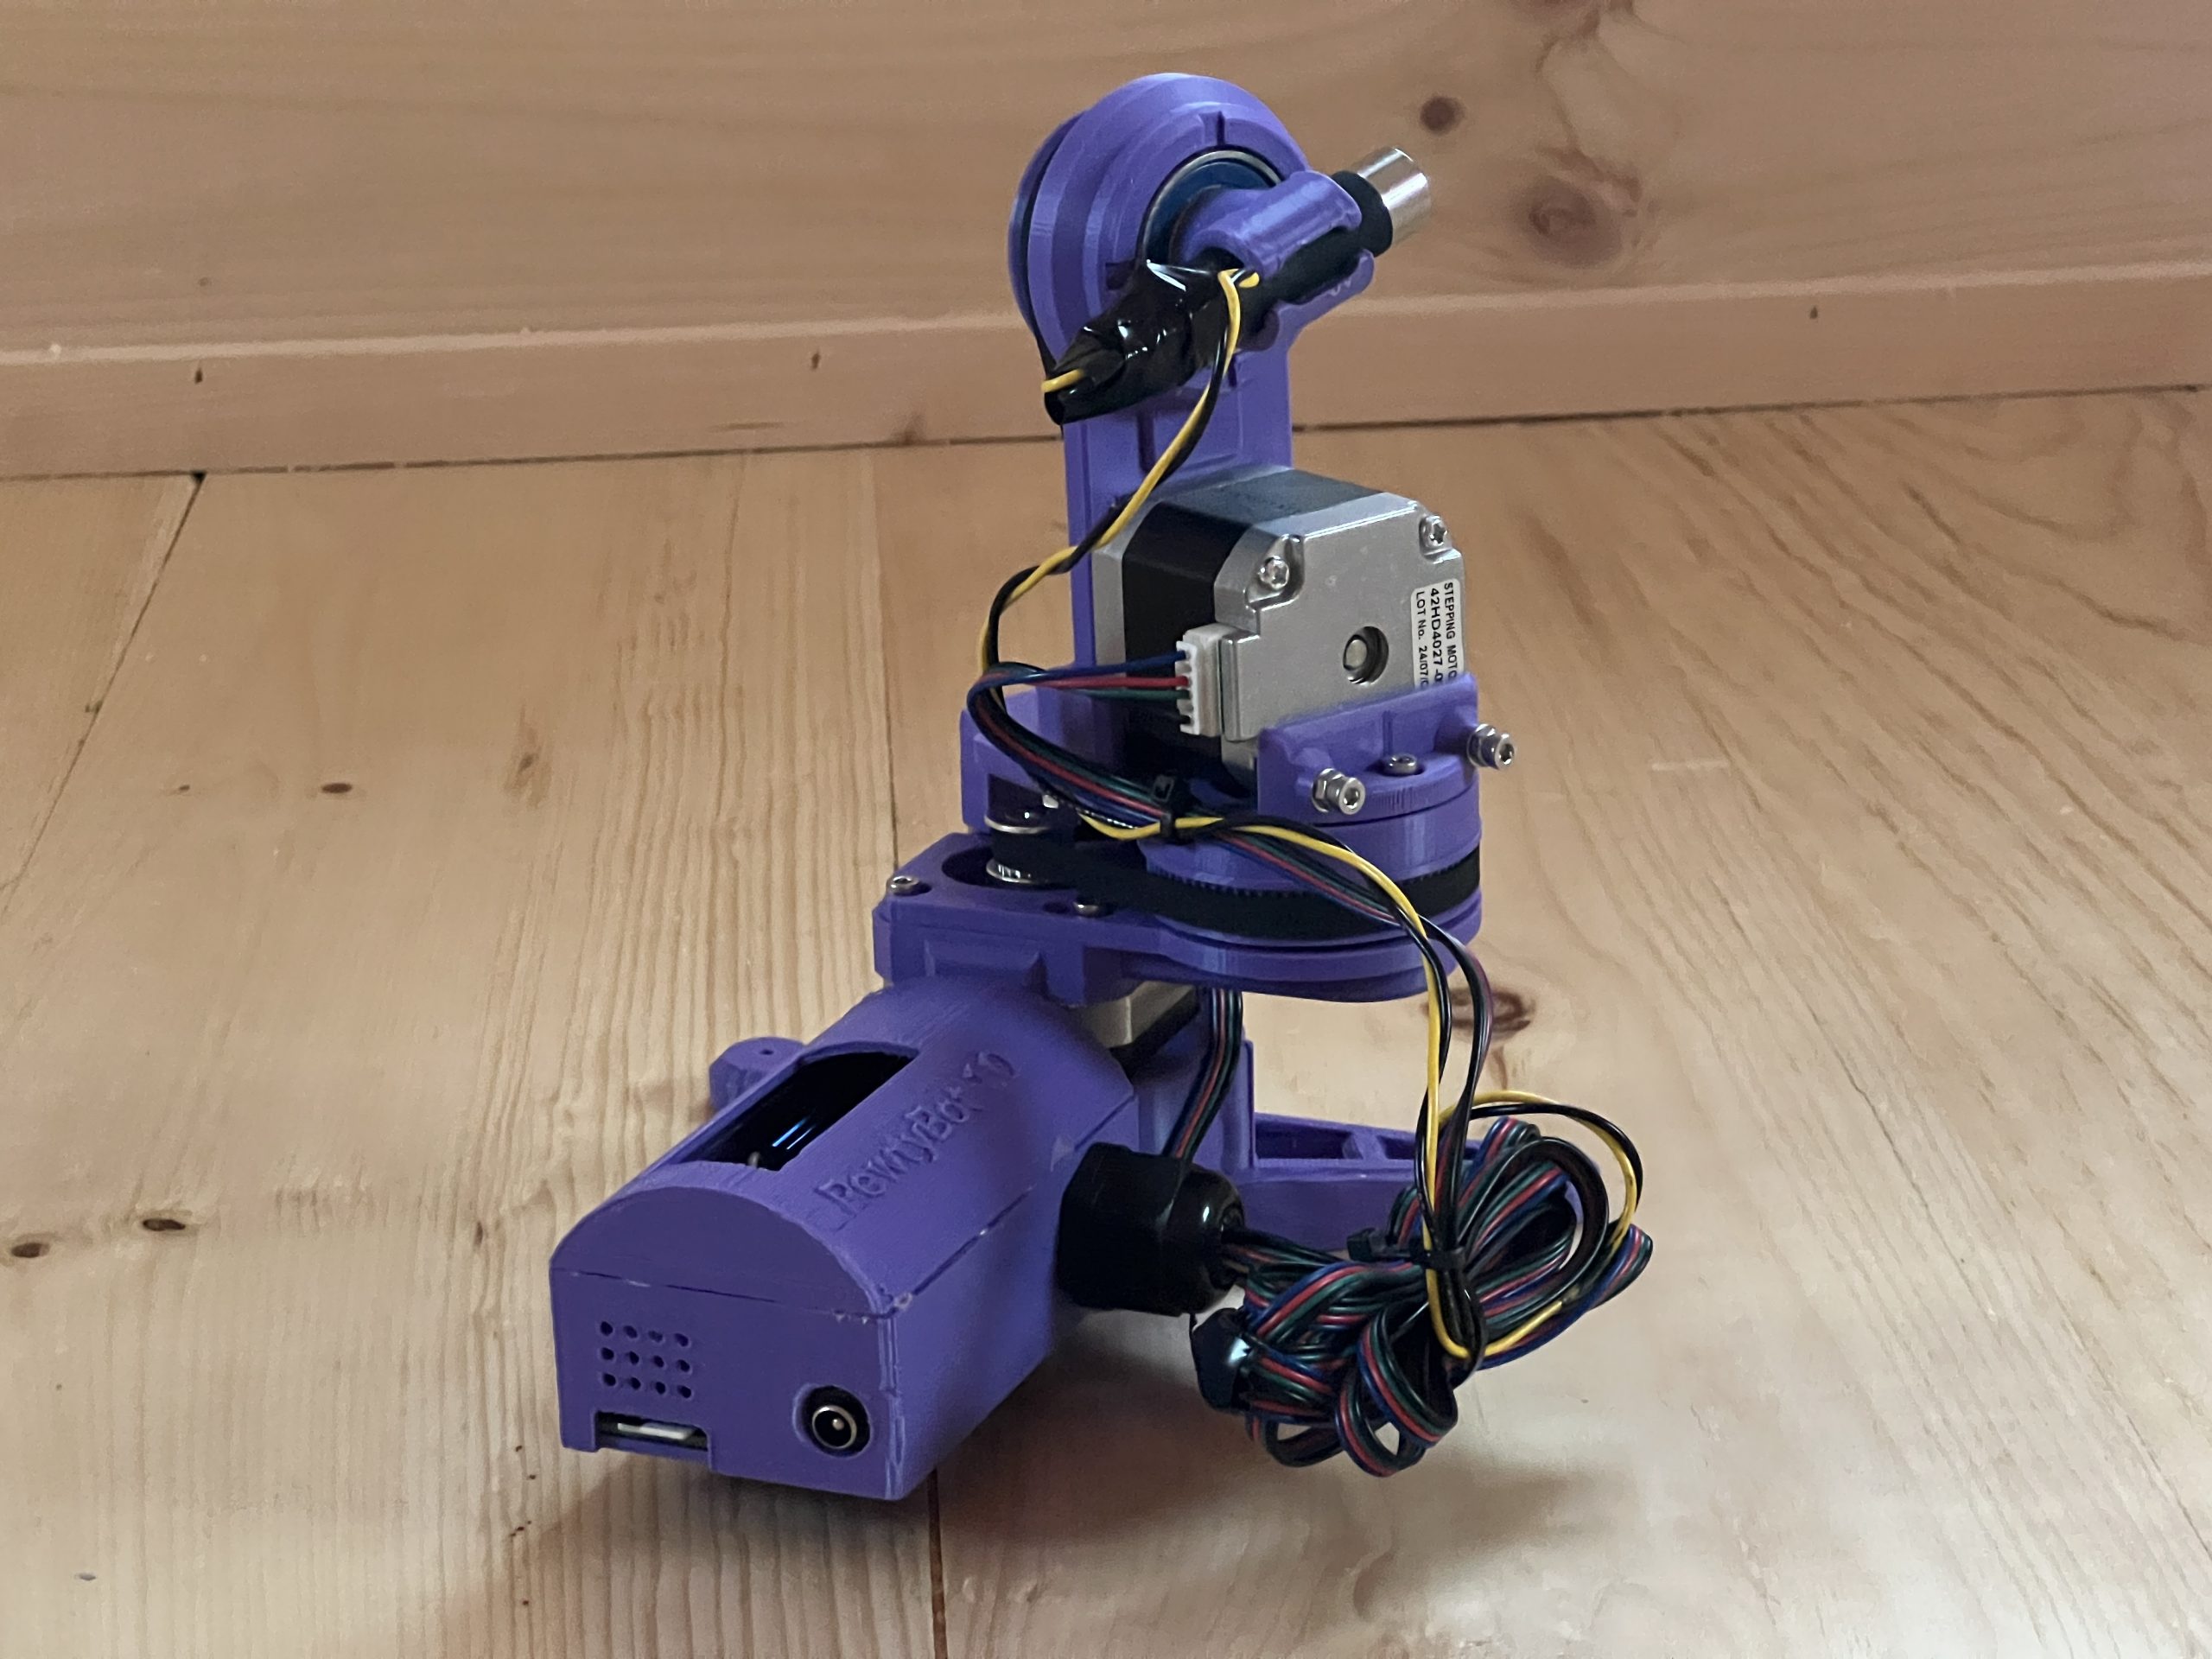
The design of PewtyBot 1.0 left something to be desired: the whole top section (stepper motor, assembly & laser) is moving, and that is a decent amount of mass that needs to be accelerated rapidly many times over.
As I was tuning parameters, it became obvious that I needed to slow things down to avoid inaccuracies from the vibrations of a fast accelerating mass. I found happy parameters which led to several public deployments, but deep inside I knew I wanted to try the mirror approach. Instead of moving the laser, it remains static and only a couple of light mirrors are doing all the moving.
Introducing PewtyBot 1.1!
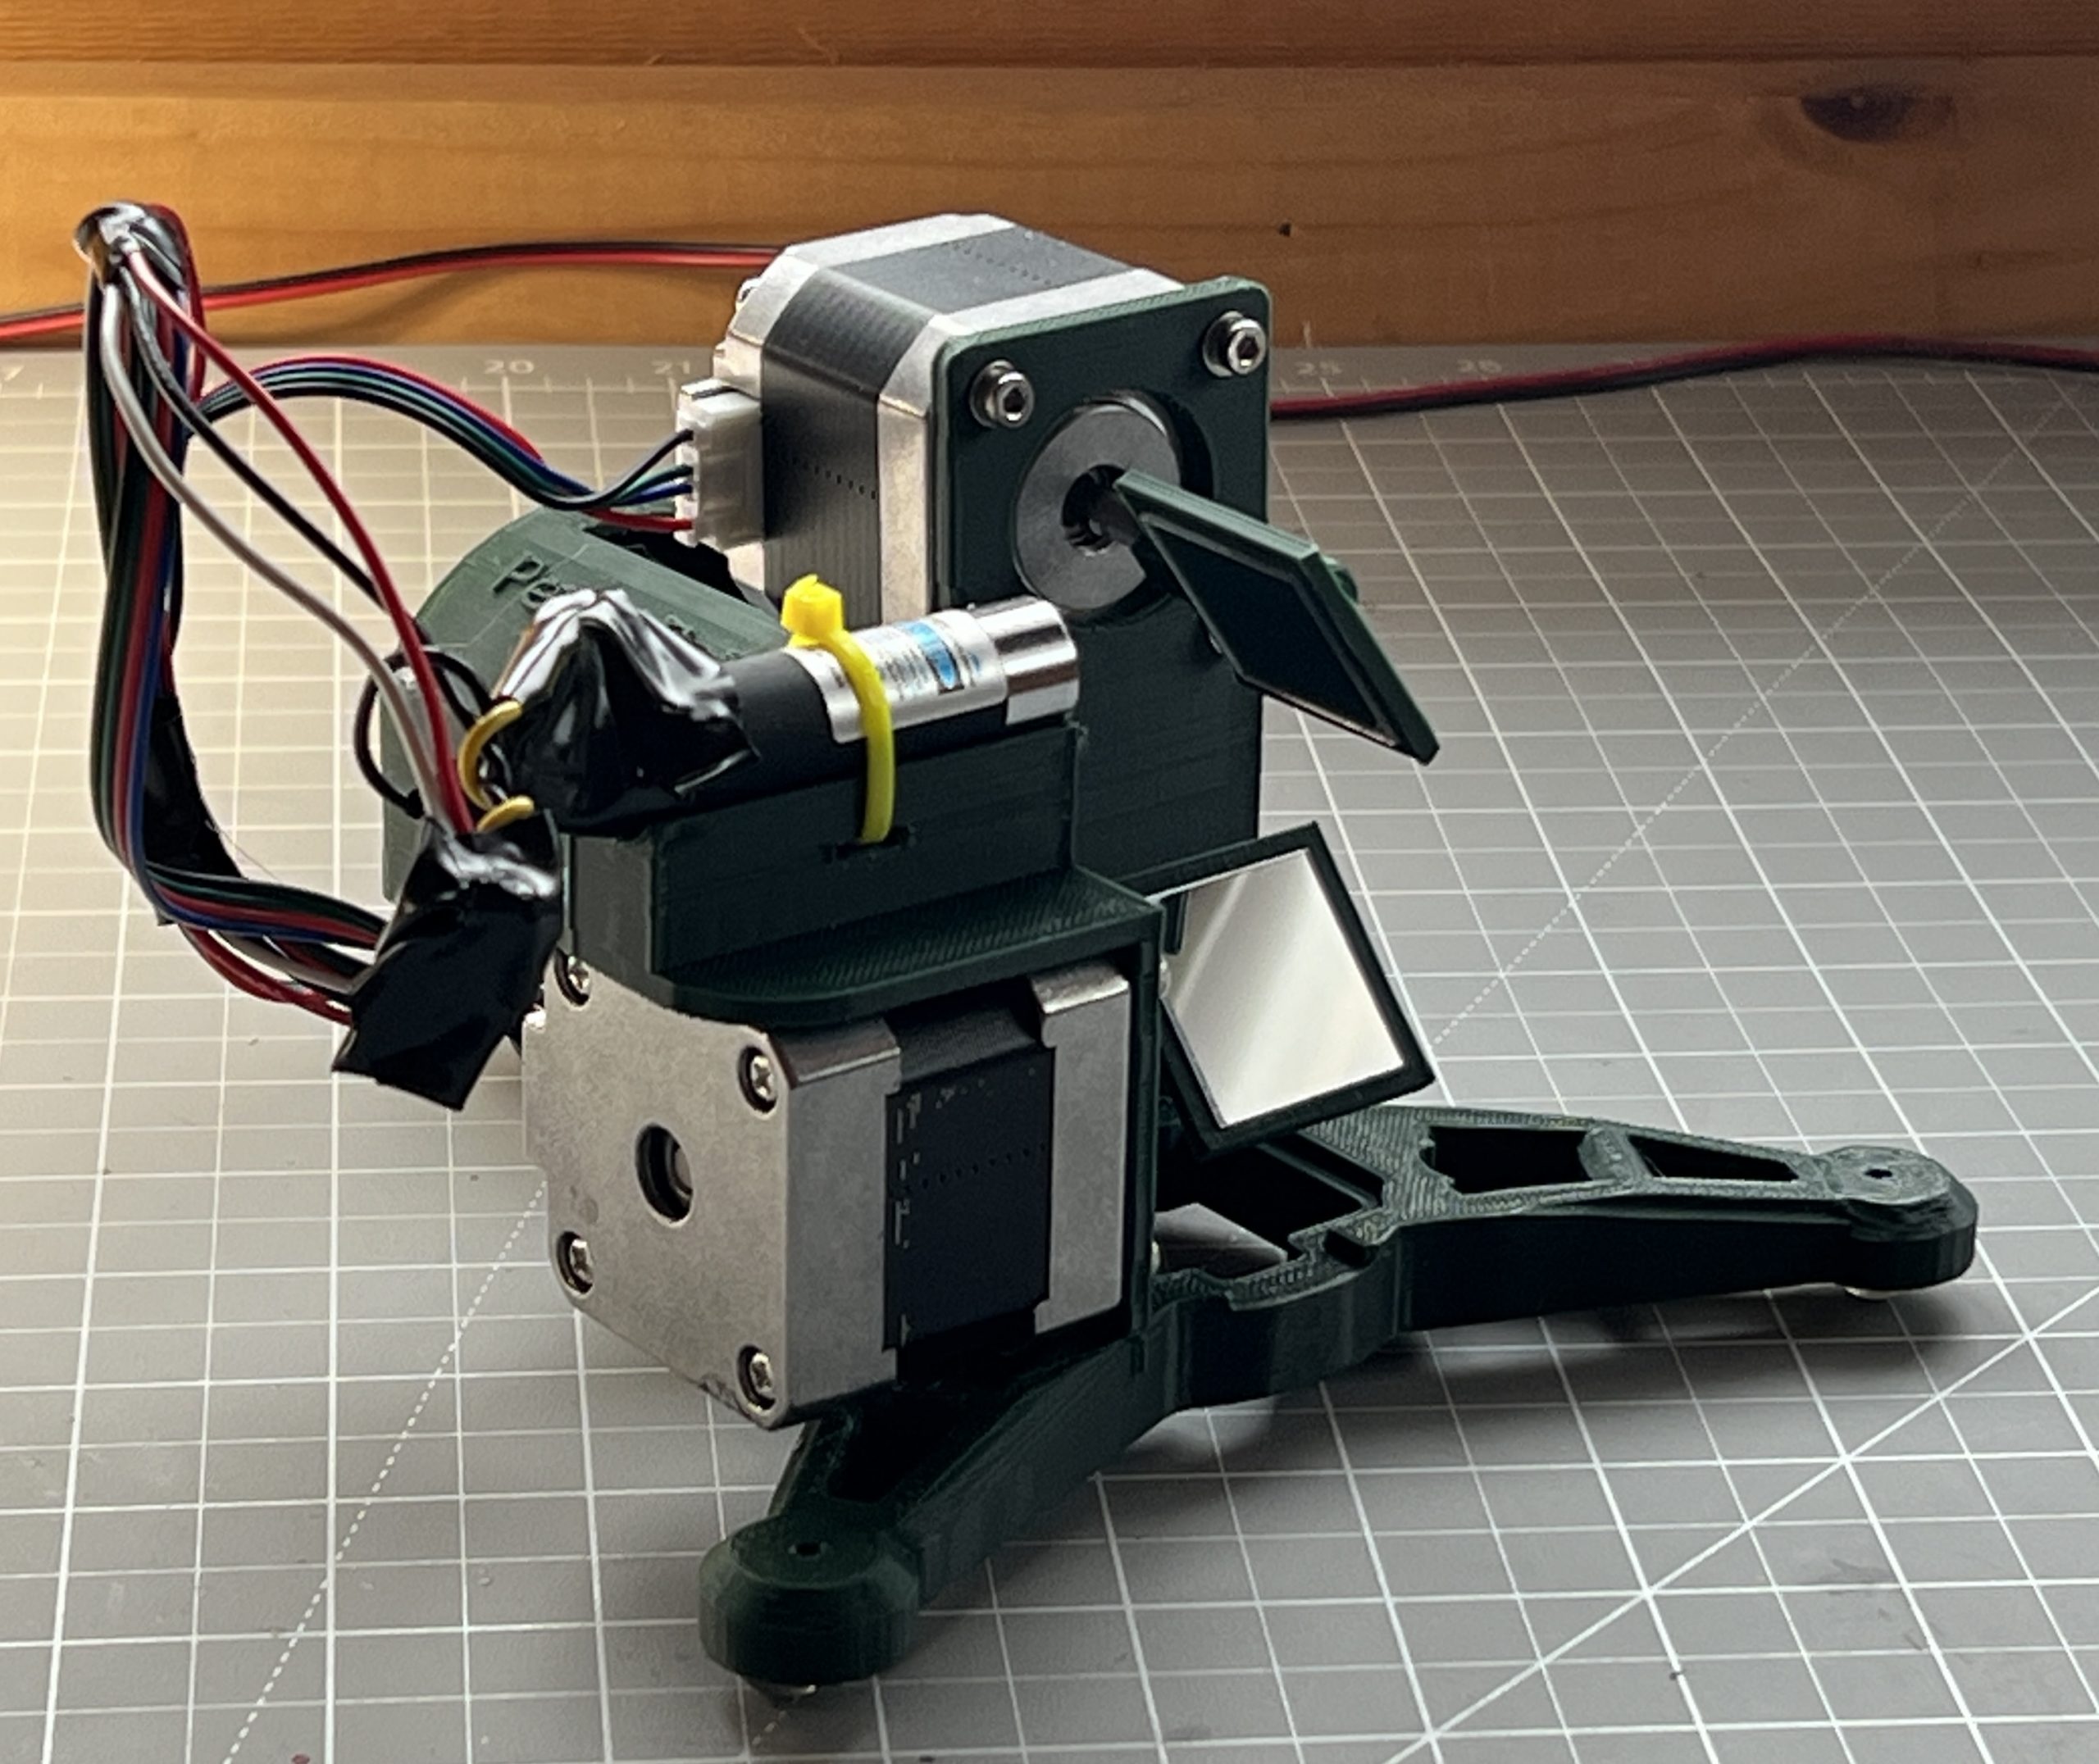
There’s a funny story in there about losing code, reimplementing, and a core issue I was struggling with being solved without knowing why. As always, a few unforeseen challenges got in the way, but ultimately the math is exactly the same as PewtyBot 1.0 so that was a relief. It’s just the motion code that needs to be adjusted some to deal with mirrors.
And well the results are cool, but somewhat mitigated. Definitely not “rocks your socks off” levels of cool. I can definitely move the laser a lot faster. Although through the exercise, I’ve realized that the “slow” speed of PewtyBot 1.0 may have been in the perfect sweet spot for laser light retention on a photoluminescent medium. And so maybe I got lucky there. Of course I could get a beefier laser that emits more light to compensate for the reduced time it spends on any particular area. I’m pretty convinced though that I want to remain in the “cat laser” realm for risk & safety. And so the other variable I get to play with is mirror quality, and I shouldn’t be surprised that there exist a whole world of mirrors of various specs. I got some very cheap craft type acrylic mirrors at first to test concepts. But you can tell the pointer hits the medium diffused and discolored. And so ultimately I’ll want to spend the money on a few square centimeters of first surface mirrors rated for blue light wavelengths. But first I’d like to convince myself that the mirror approach actually brings something extra to the table.
Not Spectacular but Definitely Specular
I watched Steve Mould’s video of Specular Holograms a while back, and it wasn’t until a cool student wanted to borrow my tabletop plotter to try it that I realized it was within reach. The plotter approach didn’t work, it really wasn’t designed to take the friction of a carbide tip etching surfaces. But its software stack is easily portable to anything with 2 stepper motors and a “tip” based action. So I thought it’d be a cool Christmas project to turn an old Creality 3D printer into something capable of etching specular designs.
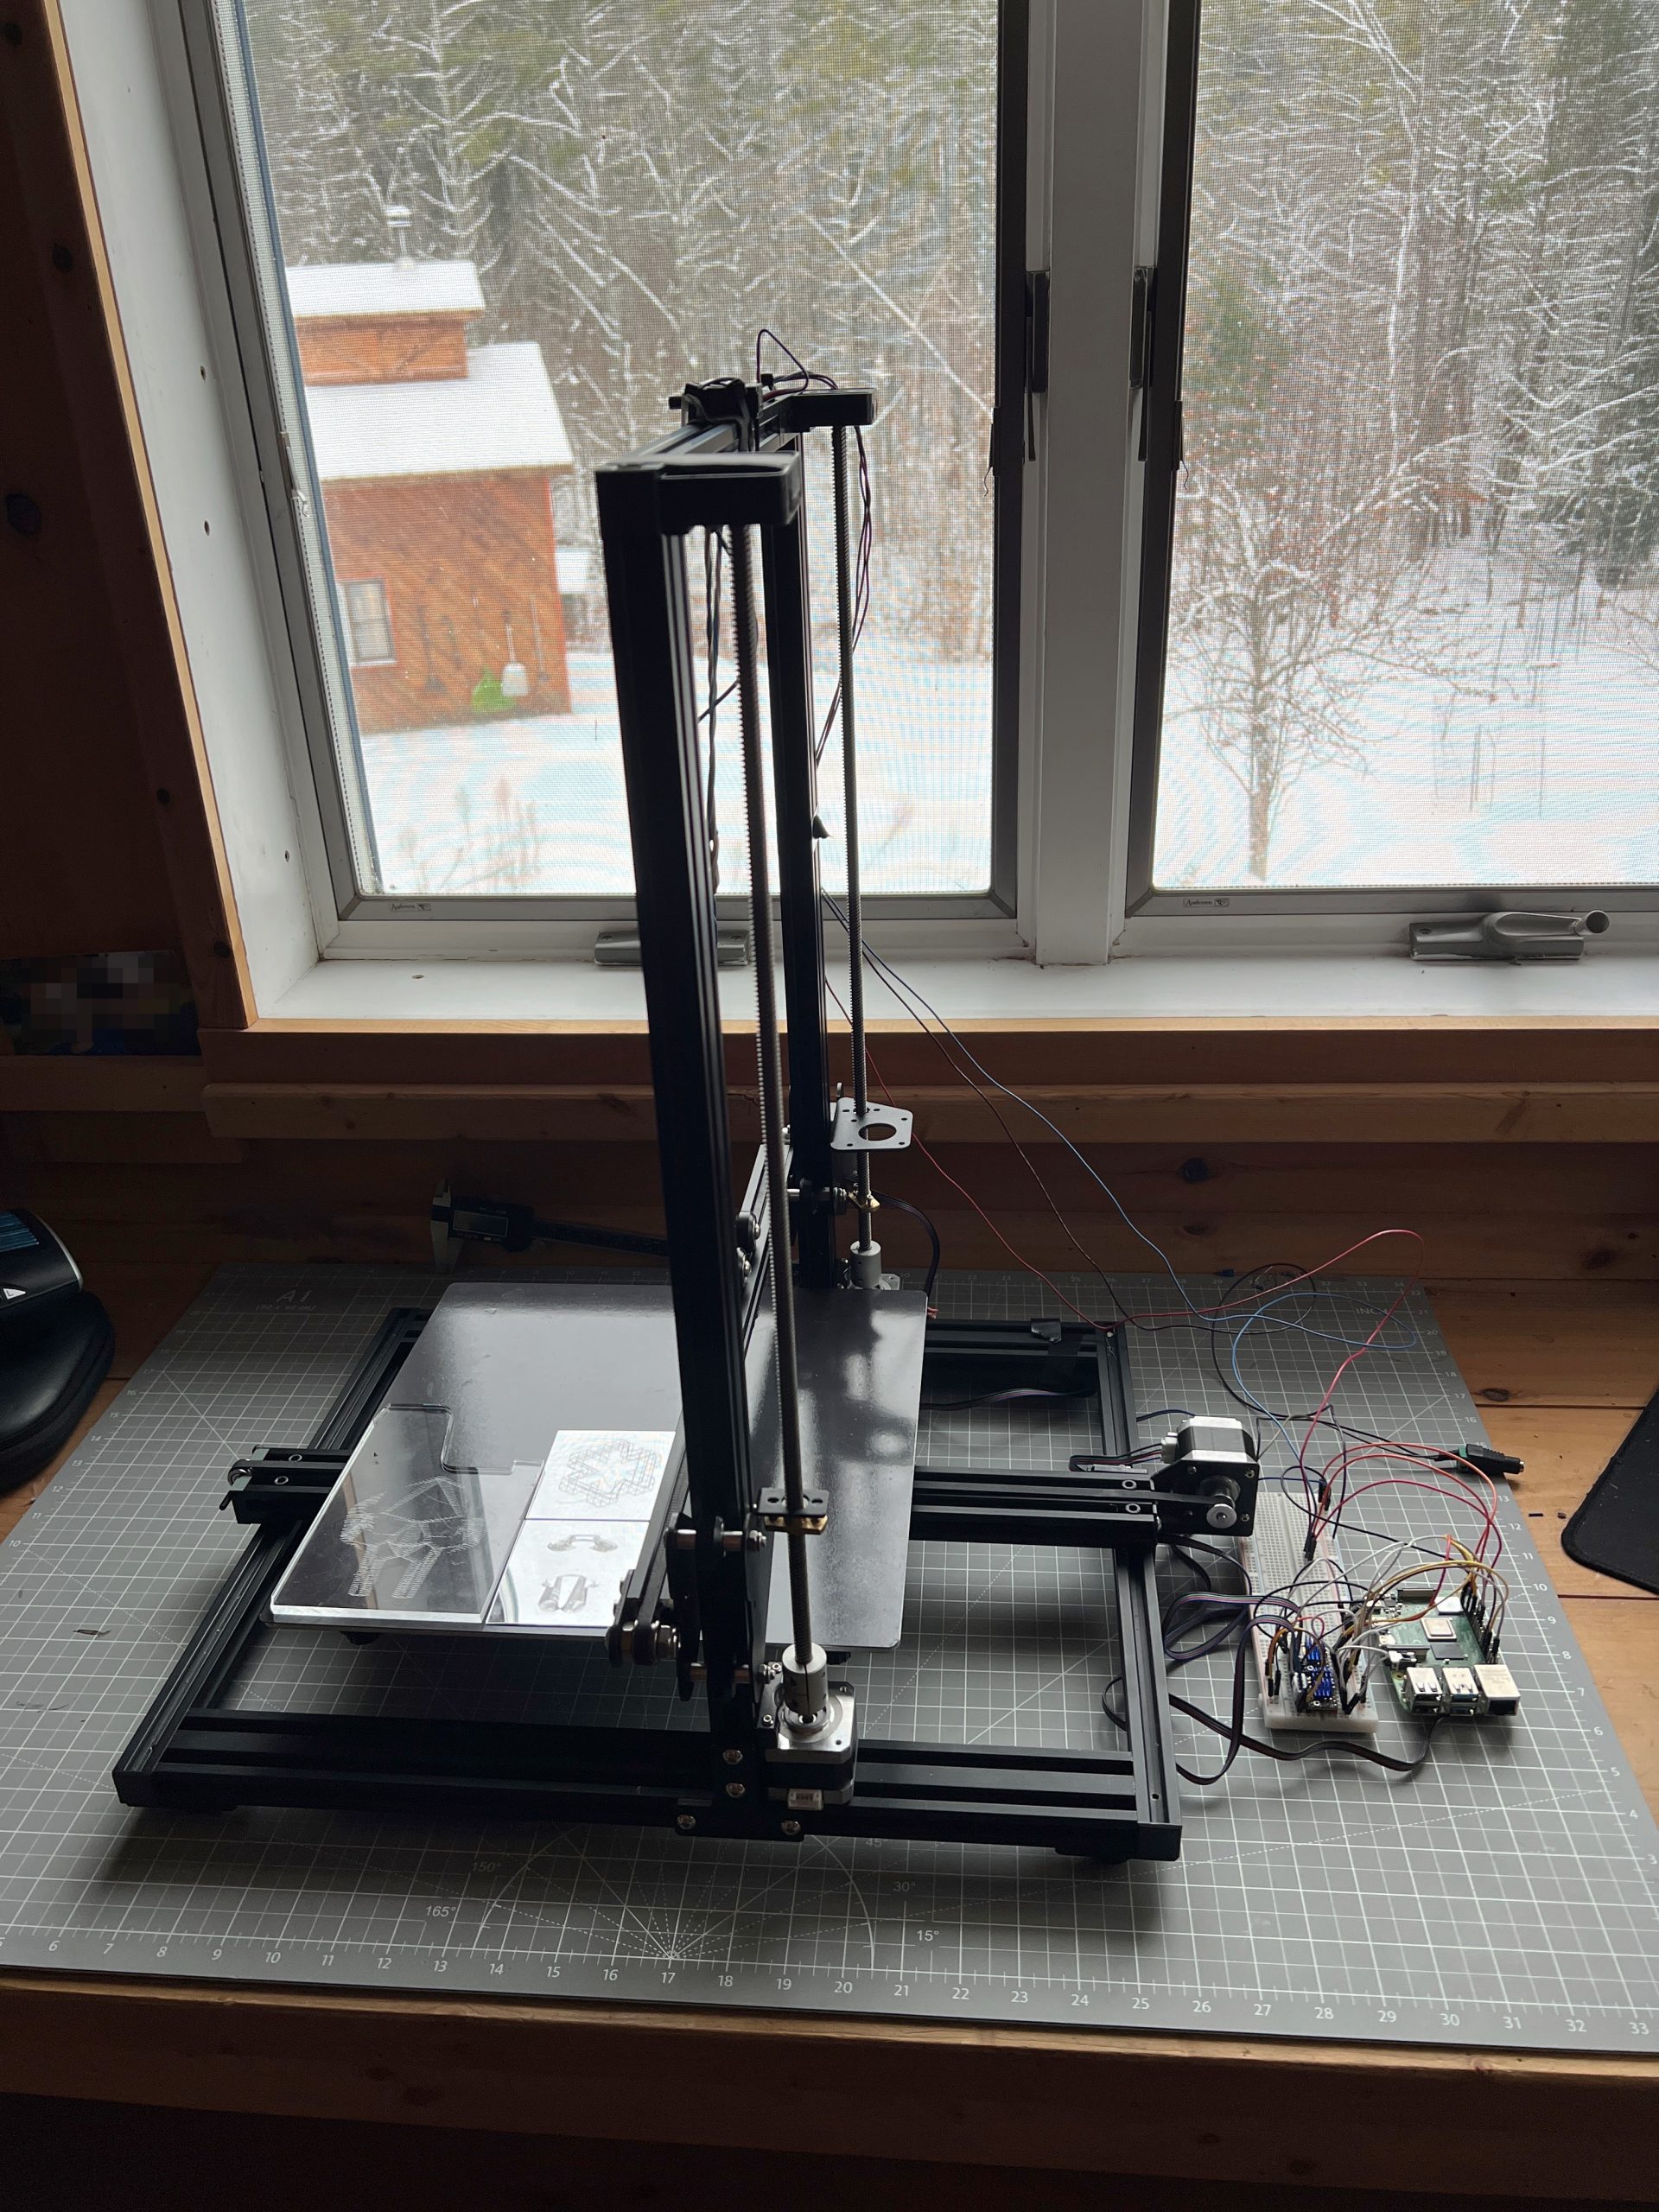
And well, the results are mitigated so far, but I’m getting somewhere with a moving glint effect.
I need to tune the machine to barely touch the medium, and figure out model creation. Moving a tip is easy these days, unsurprisingly though there are a lot more intricacies to uncover to get good results.
That’s a Wrap
Robotics 2025 concluded with 2 kids having built the small Etch-a-Sketch plotter after 5 sessions, and an extra one to just consolidate and draw. There isn’t much to say other than it went like a charm. I’ve added onto the Inherently Programmable Pi so they could have a basic HTML interface to their machine, I have yet to publish the update. This solution I feel is a bit of a game changer for engaging with robotics. At best it lowers the bar significantly for uninitiated learners; at worst it’s just darn convenient to get to work on your Pi project anywhere. A few years ago I’d promote it on a few online communities, these days I just don’t have the will to do much of anything online, but I really should.


Playing with the RPi Etch-a-Sketch
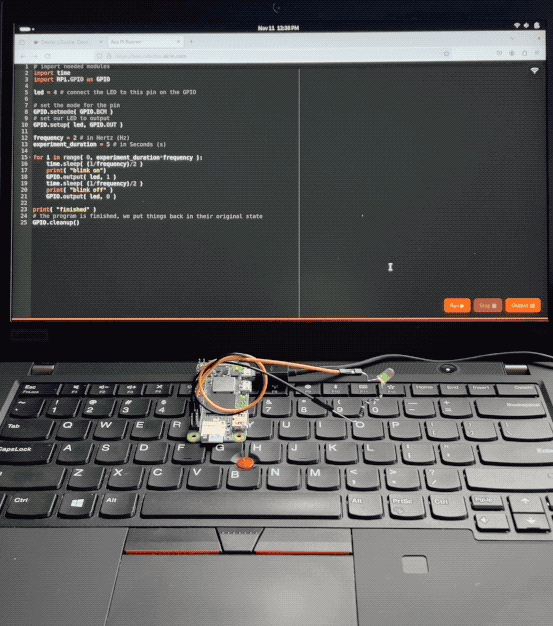
I’m recreating the small SketchyBot for an electronics/robotics curriculum. It’s a perfect opportunity to let kids play with it.


Inherently Programmable Pi
I’m teaching a small robotics class, we’re making the small Etch-a-Sketch plotter. Just a couple of kids, good eggs from the 5th grade X,Y coordinates class I teach every year. I’ve already done similar classes in various contexts, it’s a ton of work but very rewarding. One thing I always seek to improve is my Pi image management. Depending on the kids & material, we’ll go through some Linux CLI, or I won’t even want them to touch Linux but we’ll still have to click through some things to get going on Python to control GPIO pins.
What I’ve been wishing for for a while, is a Pi that’s always online everywhere, with the quickest way to get to just Python. Hopefully something web based so you don’t need anything other than your old faithful browser to start throwing code at GPIO pins.
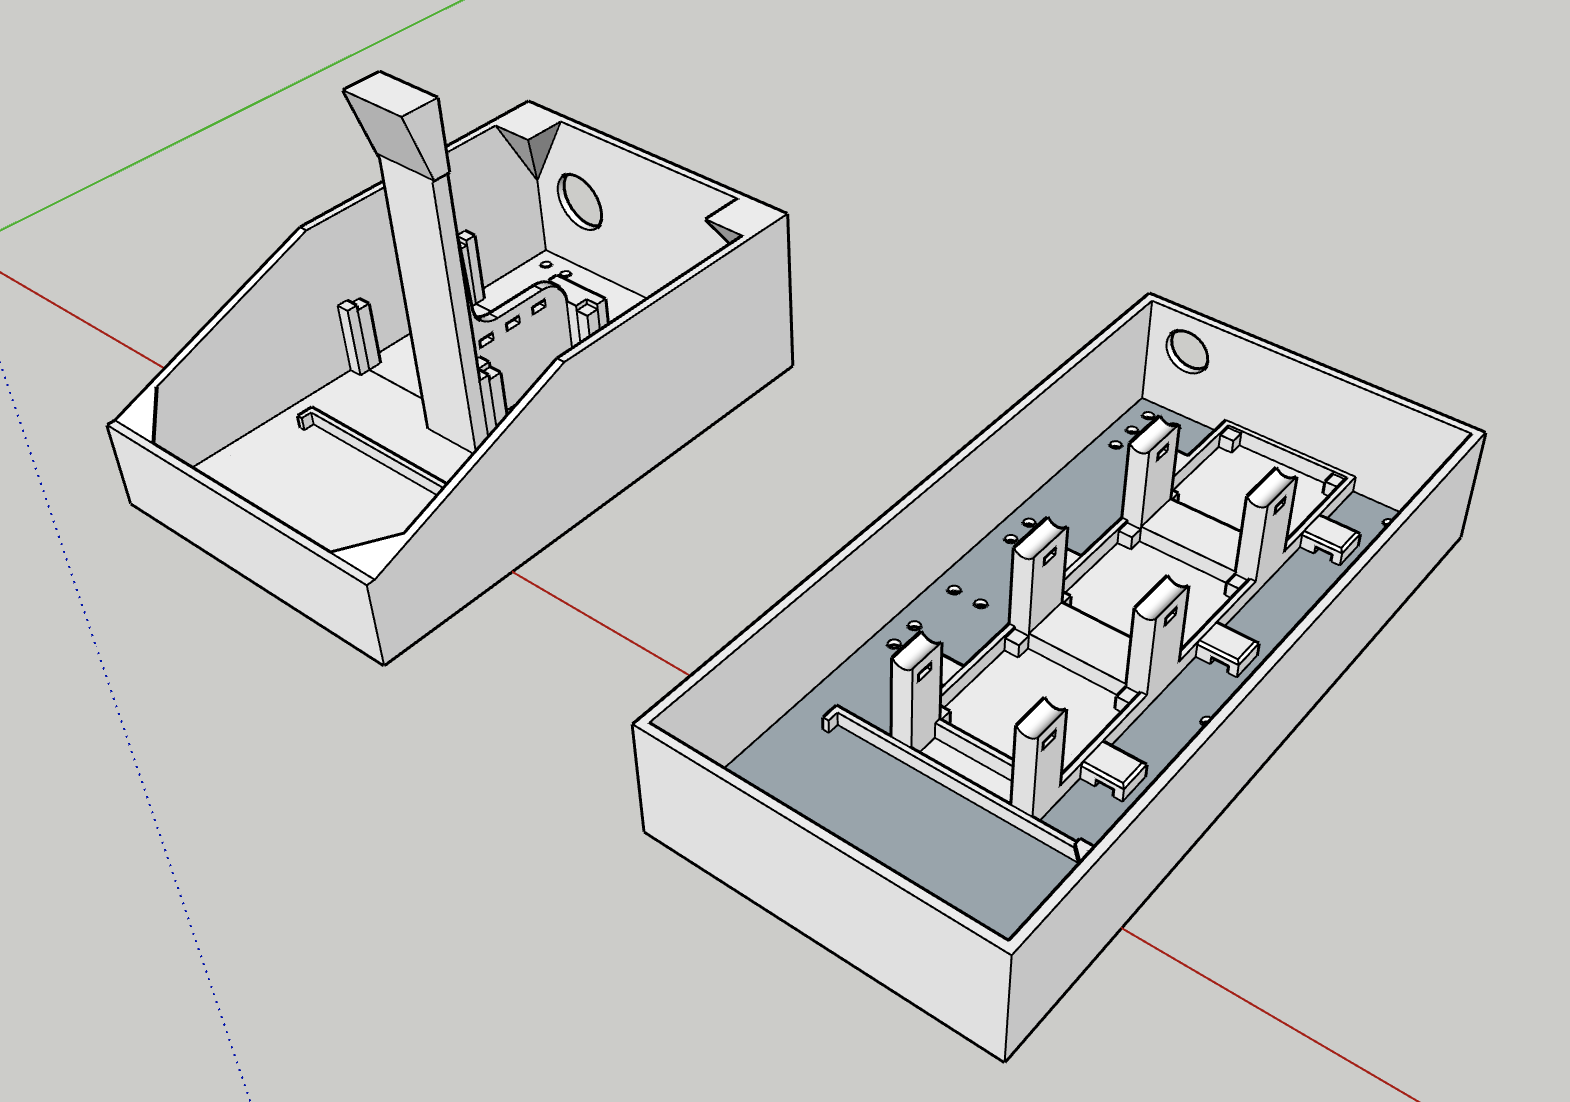
Introducing IPP, the Inherently Programmable Pi! An image you can download, or build.
Step 1 – Python Forking Web Code Editor
And so step 1 is obvious, I want the Ace web based code editor, preset to Python settings, and served by the very Pi it’s meant to write code for. With a few buttons for running code, stopping it, and checking the output.
AI made that a breeze to code, it always blows my mind how well it understands even convoluted assignments. There’s some pretty gnarly stuff going on there. Python runs a web server that serves a coding environment that can fork another Python process, and kill it with varying degrees of prejudice when it won’t go away on its own. I want this packaged a a single Python file with all the bits and pieces bundled in. AI got all this with little help.
Step 2 – Zerotier & Public Bridge
For step 2, I want the Pi to be easily accessible online, no matter what crazy wifi it’s connected to. For this we’re using Zerotier, and an online bridge that is publicly available to forward traffic into it. In my case this is done with Traefik and a Docker container dedicated to forwarding into Zerotier. I unfortunately can’t offer this part of the stack with the image, but you can at least specify a Zerotier network ID as a tunable when building it.
This way, no matter what Wifi network your Pi is connected to, it will always be available via a public URL.
Step 3 – Local Wifi when Nothing Else
I wanted to take the script that turns PlottyBot into a hotspot if it’s not connected to the internet and modernize it for the newest Rapios (Trixie). I also want the web interface to let you connect to existing Wifi networks. This way you are either in a spot with no Wifi, and your Pi spawns a local one which doesn’t route to the internet but you can still program. Or there is pre-configured known internet Wifi within range and your Pi connects to that.
Of course AI yet again turned a multi-hour endeavor into a 30 minutes one. Well, it did mess up some fundamental things but still, I was spared hours of grinding.
Step 4 – Easy Imaging
Finally, I want to create Raspios images with all this and a few tunables baked in. No booting each one to install stuff & tune it for each kid. For this I’m using something I built years ago for mounting *.img files and tweaking them. It’s a Docker container you can pipe an image file into and out stderr comes the customized image. This might be worth its own post, I’ve used this for years to great effect, but that’s beyond the scope of this post. The point is it’s available to use, and here’s how:
Build Your Own Image
First download & decompress the latest Raspios:
wget https://downloads.raspberrypi.com/raspios_lite_arm64/images/raspios_lite_arm64-2025-10-02/2025-10-01-raspios-trixie-arm64-lite.img.xz
unxz 2025-10-01-raspios-trixie-arm64-lite.img.xz
Then download & decompress this project’s files to tweak it with:
wget https://ben.akrin.com/downloads/ipp_2025-11-11.zip
unzip ipp_2025-11-11.zip
Finally, create your customized Raspios image with:
sudo docker run --rm -i \
    --name=raspi-image-customizer \
    --cap-add SYS_ADMIN --privileged \
    --device /dev/loop0 \
    --platform linux/amd64 \
    --cpus="1" \
    --memory="500m" \
    -e HOSTNAME=mypi \
    -e HOTSPOT_WIFI_SSID=mypiwifi \
    -e HOTSPOT_WIFI_KEY=raspberry \
    -e ZEROTIER_NETWORK_ID="<ZEROTIER_NETWORK_ID>" \
    -e PIPASSWORD="raspberry" \
    -v ./ipp:/data registry.akrin.com/raspi-image-customizer:latest < 2025-10-01-raspios-trixie-arm64-lite.img 2> ipp.img
–cap-add SYS_ADMIN, –priviledged, and the loop0 device are necessary to mount a file as a disk inside the container.
HOSTNAME is evident
HOTSPOT_WIFI_SSID & HOTSPOT_WIFI_KEY are the settings for the local wifi network that the pi will spawn when it has no known networks to connect to.
ZEROTIER_NETWORK_ID is optional, if specified the pi will join it first chance it gets (when connecting to a managed wifi that routes to the internet).
PIPASSWORD is the password for the pi user, careful SSH is enabled in this image.
You can burn the resulting ipp.img to an SD card. The first boot will be longer than the subsequent ones as stuff gets initialized, but eventually you’ll see a new wifi network pop up. Connect to it, and point your browser to http://hostname.local or if that doesn’t work http://192.168.50.1, you will see the coding web interface. Now that might be enough for your to start coding, but if you want you can click on the wifi network icon at the top right to specify a standard network to connect to. And if you do so, I recommend you have a way to “follow” your Pi, either via Zerotier, or because you manage that network and are able to see what IPs devices get assigned. And if you setup a Zerotier forwarder on top of all this, your pi essentially becomes online to the world the minute it’s on. Now that isn’t just convenient, it also significantly lowers the bar to start coding with kids.
Or… Download a prebuilt one
Here’s the link.
parameters used for building it are:
HOSTNAME=ipp
HOTSPOT_WIFI_SSID=ippwifi
HOTSPOT_WIFI_KEY=raspberry
PIPASSWORD=”raspberry”
No Zerotier, but still everything else.
Looks Like the Temp Sensor
also got EMP’d. That’s kind of crazy to think about. I suppose this isn’t the most reliable electronics but it kind of gets you thinking about what else could be affected. Or what we could lose with a closer strike.

Thunder & Solar Monitoring
I lost a voltage sensor the exact minute thunder struck very close to the house, Nicole happened to be filming because it was an impressive mix of rain, hail & thunder. Does thunder create some sort of EMP? Could be a coincidence but the timing is really suspicious. Sorry I mean sus.
dead sensor :\

Oh, well I’ll just buy a replacement.

And fuck, I forgot we screw over allies and suck up to dictators now. Phidgets come from Canada, I never found any comparable alternatives in the realm of current sensing that goes beyond small hobbyist projects. And I don’t really want to relearn/recode a whole new deal anyway. I just want replacement parts.
Extensive searching pointed to robotshop.com having Phidgets parts in stock. So I grabbed spares for everything to get a few thunderstrikes ahead and buy me a few years. For the top 3 parts, I grabbed everything they are left.

The battery voltage sensor is actually important these days as automation uses it to make decisions on which circuits to turn on/off. So for a few days until I got the part, I moved the panels’ voltage sensor to the battery. Sensing the panels is informational and has no real consequence on function. With anything solar, I have appreciated having spares at hand so it was time to spend some money and make that true for the monitoring side of things which we became more dependent on over time.
Built Me Another
I can make them pretty fast now, I bought top notch stepper drivers and servos for it. It’s so much quieter than the previous one. I’m learning that it makes no sense to buy cheap hardware when you’re not doing volume. The few bucks saved will be paid for many times over in wasted time. I took pictures for documentation but I’m not sure if I’ll have the time to sink into it.

A lot of refinements went into this one, from the thousands of hours that the previous model was in use.
This was the very first model, built long before I got into tabletop plotters:
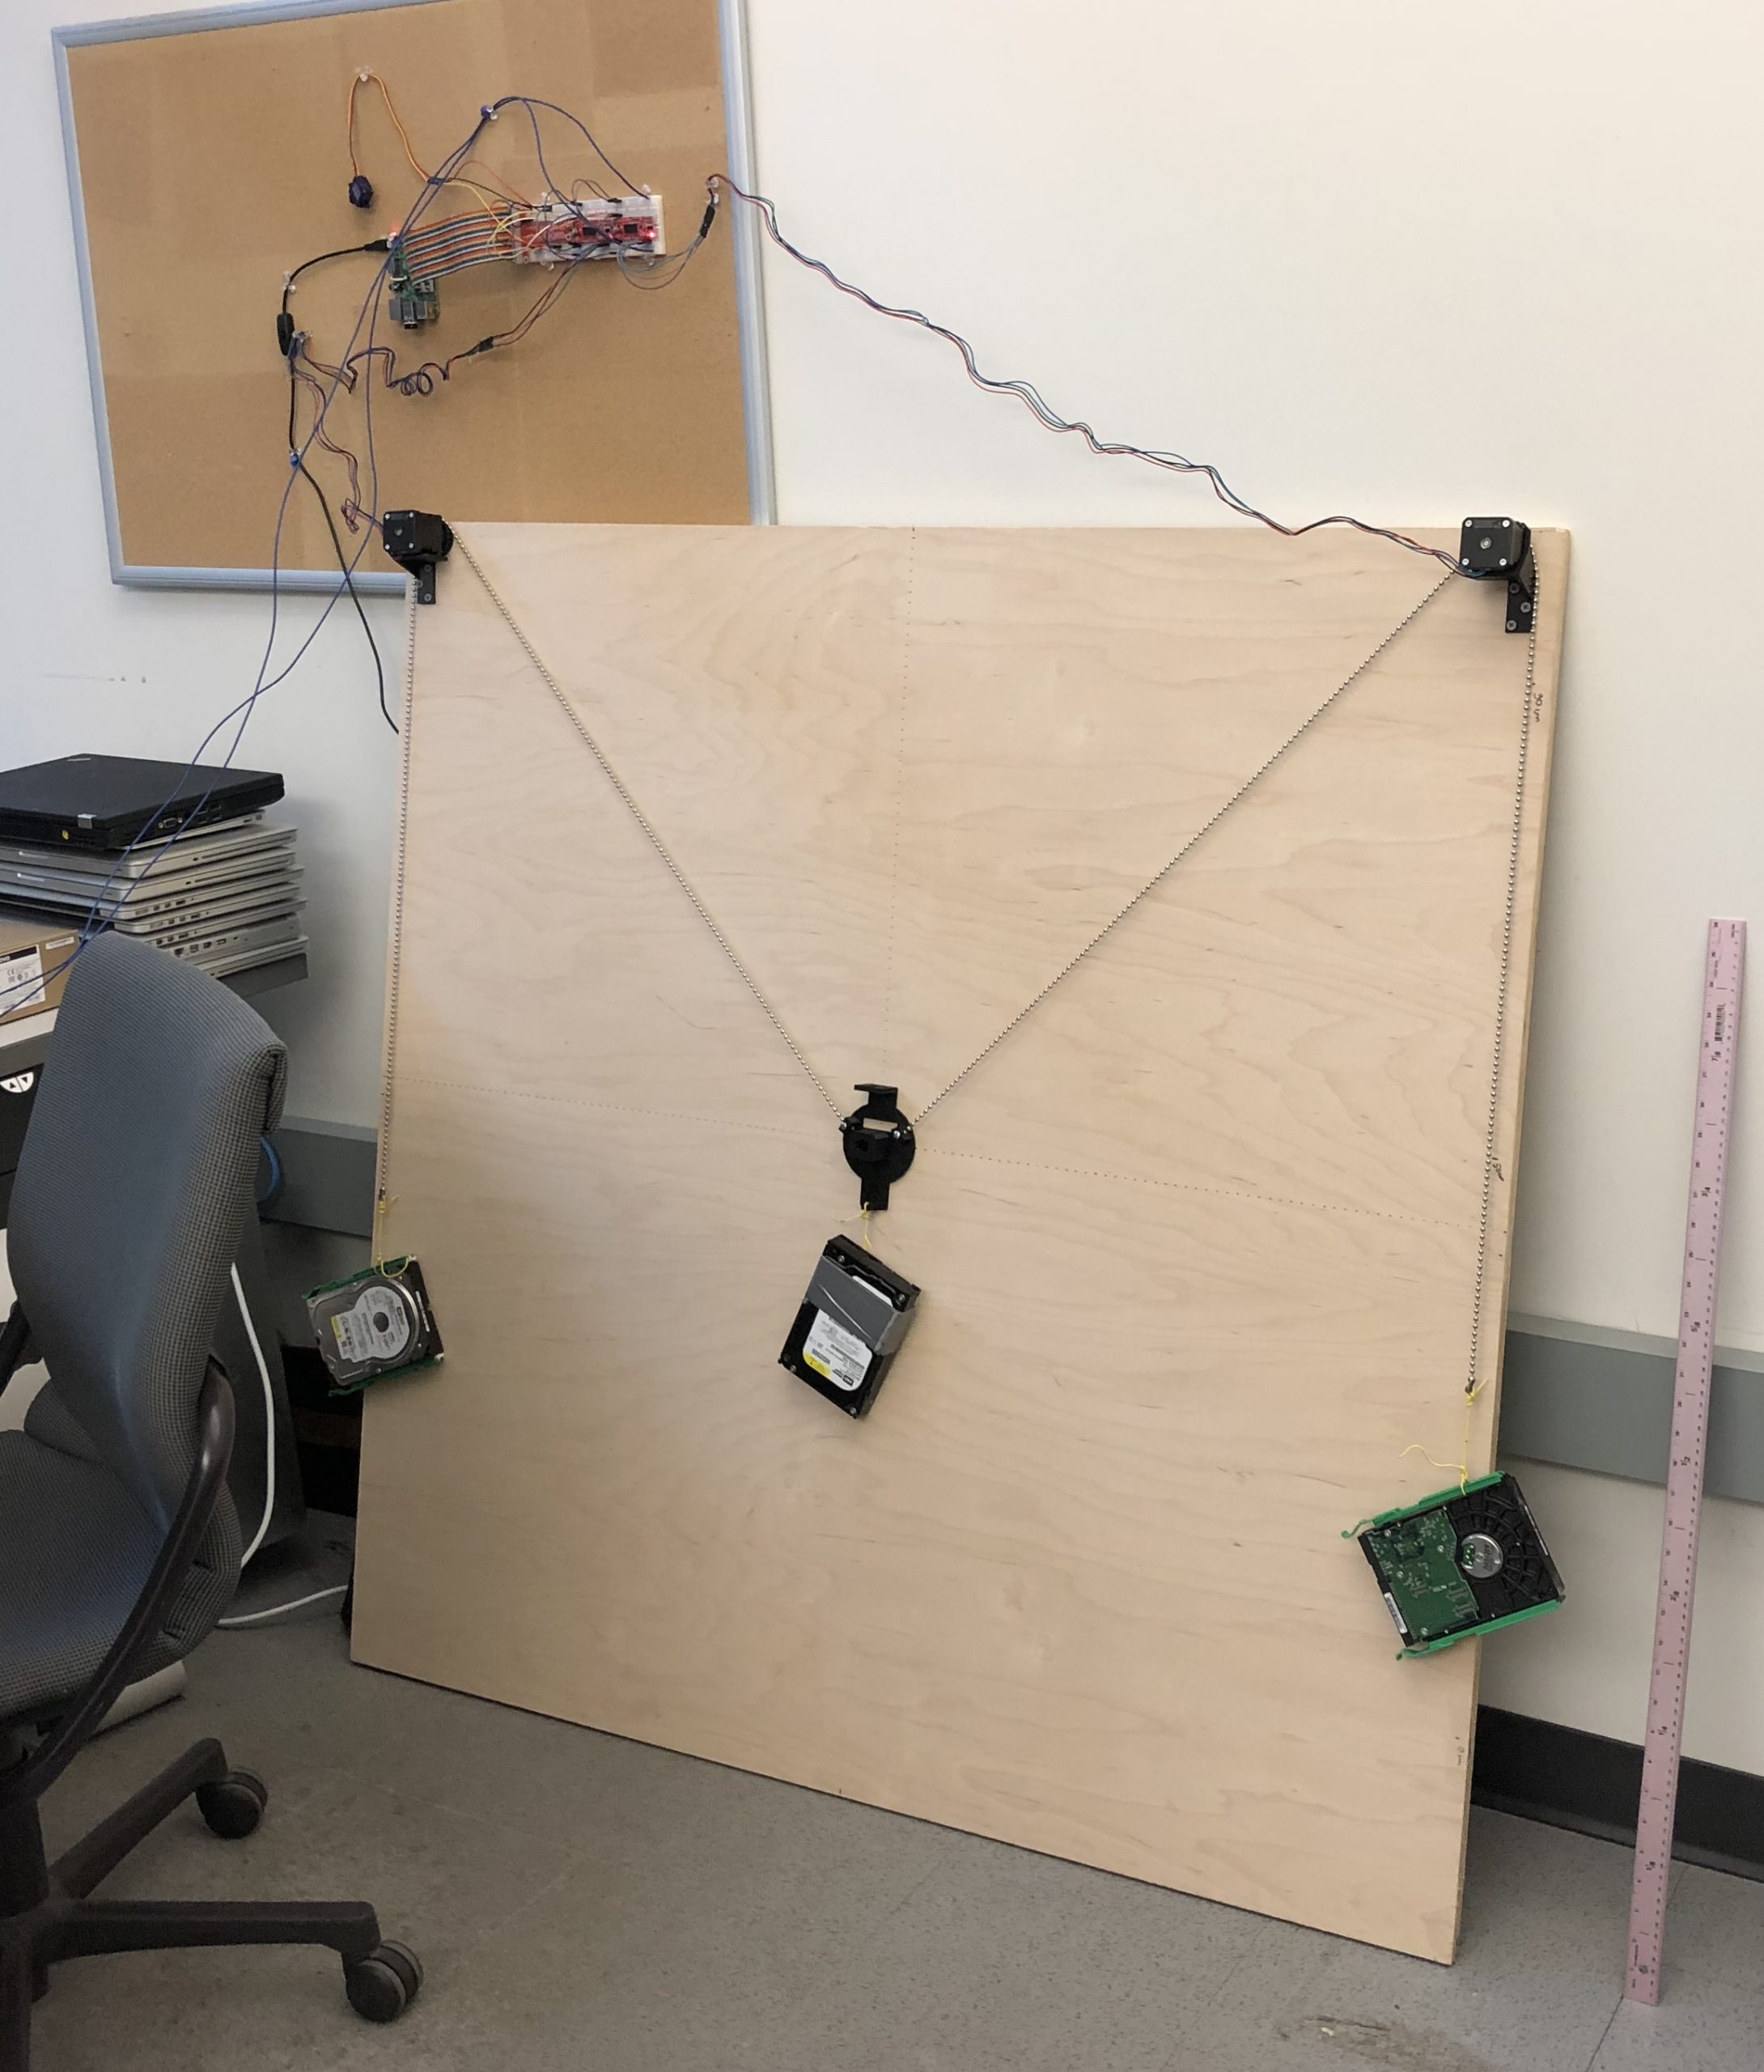
It’s pretty pathetic to look at 🙂 but it was a good stepping stone. I built another other one for teaching based on cheap 28BYJ-48 steppers. All this to say Gondola PlottyBot v2 is very much the result of a journey.
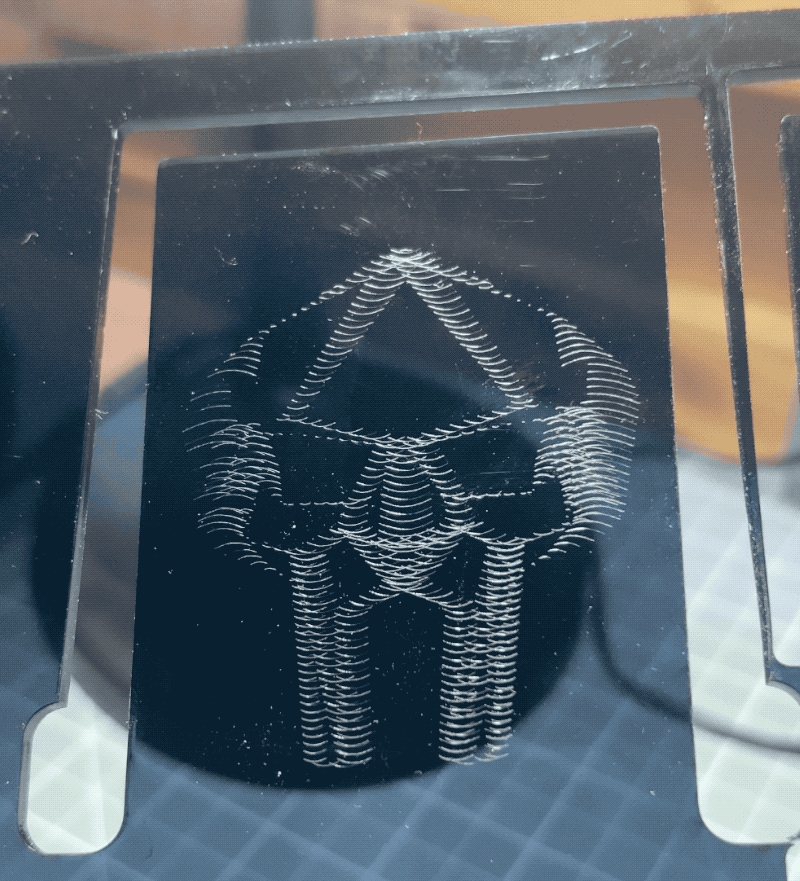
SketchyBot 1.0
I finally built a standard sized one. I ran into a few unexpected challenges given how smooth the small one went.
It really isn’t the most accurate machine, the belts inside aren’t timed, but it does pretty ok with some rendering algorithm and is fun.
Laser Portraits
I had a chance to run 2 Pewtybots at a public event where people could have their picture taken to be turned into line art to be rendered by lasers. I should have taken better pictures and videos, but I was too busy manning the station and talking to people. It’s unfortunate because it’s hard to convey the experience with words.
Ever since the first successful prototype, I kind of knew I wanted to do something for this event. And so I built 2 machines, refined the software, the math… well maybe that’ll be another post… I’m not sure I have it right just yet, I might. I have it right enough at least, let’s just say I refined the math. Finally, I spent time developing and practicing a pipeline where I can take someone’s picture and send it to either Pewtybot happens to be idle.
Esther helped man the station so we practiced at home with all her toys pretending to be the various personalities she’d encounter at such an event. From the overly curious bear to the llama in a hurry. And so the pipeline is as such: first we take your picture. A monitor is facing you to see what it is.

Then we turn that into lines to be drawn (or lasered in this case). This is supposed to be a first taste of eye candy as these algorithms are cool to see at work.

Then you go in a dark room, and see it all get zapped on the wall (I don’t have a picture of the lasered dog plush).
Because this was a first on many fronts, I was pretty anxious some things would go wrong (they did). I also didn’t know how to present it, or how people would react. So the first couple of “customers” helped me figure out how to guide them through the pipeline. And when the time comes to go in the dark room, I purposefully kind of dump people in there and vaguely tell them to wait for the wall to light up. I have the laser write their name and count down from 3 to 1, and then the laser moves much faster through their portrait.

Nicole quickly realized adding chairs in the dark room would invite people to take in the experience more. And I realized I was silly to tune my setting for single portraits, I almost exclusively had families and groups of friends in the same picture. The reactions were great, although I didn’t get any from inside the room, people coming out were full of questions and kids were smiling. As always with my silly projects, there’s also a smaller fraction of people with whom they resonate more deeply.
Overall it was a big success and pretty smooth for a first. I want to do more for sure. There’s something fireworksy about when the laser really starts moving and light shows up everywhere.
PewtyBot 1.0 x2
I built another one, it’s always been useful to have 2 of my drawing machines.
Evaporator Regulator
This isn’t the most involved project but I might as well document it. I’ve been trying to automate some of the more boring tasks of running the evaporator, I’ve got some nice stainless steel float valves to regulate the sap going in now for example. One of the things that kept requiring constant attention is the air intake to adjust the strength of the fire. I’d have to sit with a foot on it to be able to regulate it almost constantly, to make sure the fire wasn’t burning too hard or too weak. And so naturally I thought I could do something with a Pi.
This proved quite successful even with very loose wiring and fastening just to see how it would work.


All of a sudden I barely need to pay attention to the fire’s strength, with a few refinements I won’t have to at all.
The circuit is quite simple:


Wifi barely reaches the sugarhouse so I made sure this could run independent of connectivity. Which involves coding threads on a Pi Pico, which is supported but not as one would expect.
import machine
import time
import network
import socket
from max6675 import MAX6675
import _thread


html = """{\"evaporator_temperature\":<TEMPERATURE>}"""

# LED
led = machine.Pin( "LED", machine.Pin.OUT )

# temperature
sck = machine.Pin( 2, machine.Pin.OUT )
cs = machine.Pin( 3, machine.Pin.OUT )
so = machine.Pin( 4, machine.Pin.IN )
sensor = MAX6675( sck, cs , so )
temperature_min = 25
temperature_max = 30
temperature = -1337.0

# servo
servo = machine.PWM( machine.Pin(0) )
servo.freq( 50 )
servo_min = 1000
servo_max = 8000
servo_at = 0


def temp_to_servo( temp ):
    if (temperature_max - temperature_min)==0:
        # right in the middle
        return int( (servo_max-servo_min)/2 )
    result = (temp - temperature_min) * (servo_max - servo_min) / (temperature_max - temperature_min) + servo_min
    if result>servo_max:
        result = servo_max
    if result<servo_min:
        result = servo_min
    return int( result )


def blink_number( number ):
    number = str( int(number) )
    for char in number:
        for i in range(int(char)):
            led.value( 1 )
            time.sleep( 0.2 )
            led.value( 0 )
            time.sleep( 0.2 )
        time.sleep( 0.3 )
        led.value( 1 )
        time.sleep( 0.1 )
        led.value( 0 )
        time.sleep( 0.3 )


keep_going = False
def servo_thread():
    global temperature, servo_at, servo

    while keep_going:
        time.sleep( 5 )
        print( "# measuring average temperature over 1 seconds..." )
        temperature_total = 0.0
        for i in range(10):
            temperature_total += sensor.read()
            time.sleep( 0.1 )
        temperature = temperature_total / 10
        blink_number( temperature )
        print( "# " + str(temperature) )
        new_servo_position = temp_to_servo( temperature )
        print( "# new_servo_position: " + str(new_servo_position) )
        step = 1
        if new_servo_position<servo_at:
            step = -1
        for i in range(servo_at, new_servo_position, step):
            time.sleep( 0.001 )
            servo_at = i
            servo.duty_u16( i )
    print( "# servo tread finishing" )

# main thread
servo.duty_u16( servo_min )
for i in range(servo_min, servo_max):
    time.sleep( 0.001 )
    servo_at = i
    servo.duty_u16( i )

try:
    ssid = "<wifi_ssid>"
    password = "<wifi_password>"
    wlan = network.WLAN( network.STA_IF )
    wlan.active( True )
    wlan.connect( ssid, password )

    # wait for connect or fail
    max_wait = 20
    while max_wait>0:
        if wlan.status() < 0 or wlan.status() >= 3:
            break
        max_wait -= 1
        print( "> waiting for connection..." )
        time.sleep( 1 )

    # handle connection error
    if wlan.status()!=3:
        print( "> network connection failed, will launch servo thread in 1 minute" )
        time.sleep( 60 )
        print( "> launching" )
        keep_going = True
        _thread.start_new_thread(servo_thread, ())
        while True:
            time.sleep( 1 )
    else:
        print( "> connected" )
        status = wlan.ifconfig()
        print( "ip = " + status[0] )

        # open socket
        addr = socket.getaddrinfo( "0.0.0.0", 80)[0][-1]
        s = socket.socket()
        s.setsockopt( socket.SOL_SOCKET, socket.SO_REUSEADDR, 1 )
        #s.settimeout(1)
        s.bind( addr )
        s.listen( 1 )
        print( "> web server listening on", addr )

        # listen for connections
        while True:
            print( ">" )
            try:
                cl, addr = s.accept()
                print( "client connected from", addr)

                request = cl.recv( 1024 )

                request = request.decode( "utf-8" ).strip()
                print( request )

                if request.startswith( "GET / " ):
                    print( "get data" )
                    response = html.replace( "<TEMPERATURE>", str(temperature) )
                    cl.send( "HTTP/1.0 200 OK\r\nContent-type: application/json\r\n\r\n" )
                    cl.send( response )
                elif request.startswith( "GET /min_temperature " ):
                     print( "get min_temperature" )
                     cl.send( "HTTP/1.0 200 OK\r\nContent-type: application/json\r\n\r\n" )
                     cl.send( str(temperature_min) )
                elif request.startswith( "GET /max_temperature " ):
                     print( "get max_temperature" )
                     cl.send( "HTTP/1.0 200 OK\r\nContent-type: application/json\r\n\r\n" )
                     cl.send( str(temperature_max) )
                elif request.startswith( "PUT /min_temperature " ):
                    print( "put min_temperature" )
                    new_min_temperature = int(request.split( "\r\n\r\n" )[1])
                    print( new_min_temperature )
                    temperature_min = new_min_temperature
                    cl.send( "HTTP/1.0 200 OK\r\nContent-type: application/json\r\n\r\n" )
                    cl.send( "\"ok\"" )
                elif request.startswith( "PUT /max_temperature " ):
                    print( "put max_temperature" )
                    new_max_temperature = int(request.split( "\r\n\r\n" )[1])
                    print( new_max_temperature )
                    temperature_max = new_max_temperature
                    cl.send( "HTTP/1.0 200 OK\r\nContent-type: application/json\r\n\r\n" )
                    cl.send( "\"ok\"" )
                elif request.startswith( "PUT /start " ):
                    print( "put start" )
                    cl.send( "HTTP/1.0 200 OK\r\nContent-type: application/json\r\n\r\n" )
                    if keep_going:
                        print( "  already started" )
                        cl.send( "\"already started\"" )
                    else:
                        keep_going = True
                        _thread.start_new_thread(servo_thread, ())
                        cl.send( "\"started\"" )
                        for i in range(5000, 6000):
                            time.sleep( 0.001 )
                            servo_at = i
                            servo.duty_u16( i )
                elif request.startswith( "PUT /stop " ):
                    print( "put stop" )
                    #cl.send( "HTTP/1.0 501 OK\r\nContent-type: application/json\r\n\r\n" )
                    #cl.send( "\"not implemented\"" )
                    # crash on stop, thread support is that bad
                    cl.send( "HTTP/1.0 200 OK\r\nContent-type: application/json\r\n\r\n" )
                    if keep_going:
                        keep_going = False
                        cl.send( "\"stopped\"" )
                    else:
                        print( "  already stopped" )
                        cl.send( "\"already stopped\"" )

                cl.close()

            except OSError as e:
                cl.close()
                print( "> connection closed" )
                keep_going = False
                time.sleep( 2 )


except KeyboardInterrupt:
    print( "> ctrl+c, wrapping up..." )
    keep_going = False
    time.sleep( 10 )
except Exception as e:
    print( e )
    print( "> unexpected exception, wrapping up..." )
    keep_going = False
    time.sleep( 10 )
import time
class MAX6675:
    MEASUREMENT_PERIOD_MS = 220

    def __init__(self, sck, cs, so):
        """
        Creates new object for controlling MAX6675
        :param sck: SCK (clock) pin, must be configured as Pin.OUT
        :param cs: CS (select) pin, must be configured as Pin.OUT
        :param so: SO (data) pin, must be configured as Pin.IN
        """
        # Thermocouple
        self._sck = sck
        self._sck.low()

        self._cs = cs
        self._cs.high()

        self._so = so
        self._so.low()

        self._last_measurement_start = 0
        self._last_read_temp = 0
        self._error = 0

    def _cycle_sck(self):
        self._sck.high()
        time.sleep_us(1)
        self._sck.low()
        time.sleep_us(1)

    def refresh(self):
        """
        Start a new measurement.
        """
        self._cs.low()
        time.sleep_us(10)
        self._cs.high()
        self._last_measurement_start = time.ticks_ms()

    def ready(self):
        """
        Signals if measurement is finished.
        :return: True if measurement is ready for reading.
        """
        return time.ticks_ms() - self._last_measurement_start > MAX6675.MEASUREMENT_PERIOD_MS

    def error(self):
        """
        Returns error bit of last reading. If this bit is set (=1), there's problem with the
        thermocouple - it can be damaged or loosely connected
        :return: Error bit value
        """
        return self._error

    def read(self):
        """
        Reads last measurement and starts a new one. If new measurement is not ready yet, returns last value.
        Note: The last measurement can be quite old (e.g. since last call to `read`).
        To refresh measurement, call `refresh` and wait for `ready` to become True before reading.
        :return: Measured temperature
        """
        # Check if new reading is available
        if self.ready():
            # Bring CS pin low to start protocol for reading result of
            # the conversion process. Forcing the pin down outputs
            # first (dummy) sign bit 15.
            self._cs.low()
            time.sleep_us(10)

            # Read temperature bits 14-3 from MAX6675.
            value = 0
            for i in range(12):
                # SCK should resemble clock signal and new SO value
                # is presented at falling edge
                self._cycle_sck()
                value += self._so.value() << (11 - i)

            # Read the TC Input pin to check if the input is open
            self._cycle_sck()
            self._error = self._so.value()

            # Read the last two bits to complete protocol
            for i in range(2):
                self._cycle_sck()

            # Finish protocol and start new measurement
            self._cs.high()
            self._last_measurement_start = time.ticks_ms()

            self._last_read_temp = value * 0.25

return self._last_read_tempPewtyBot 1.0
I’ve used this project as a stepping stone and modified it some. I can’t say enough good things about it, it propelled development forward significantly and I found it to be expertly designed. Too bad the project it now defunct. I had to find assembly documentation on archive.org.
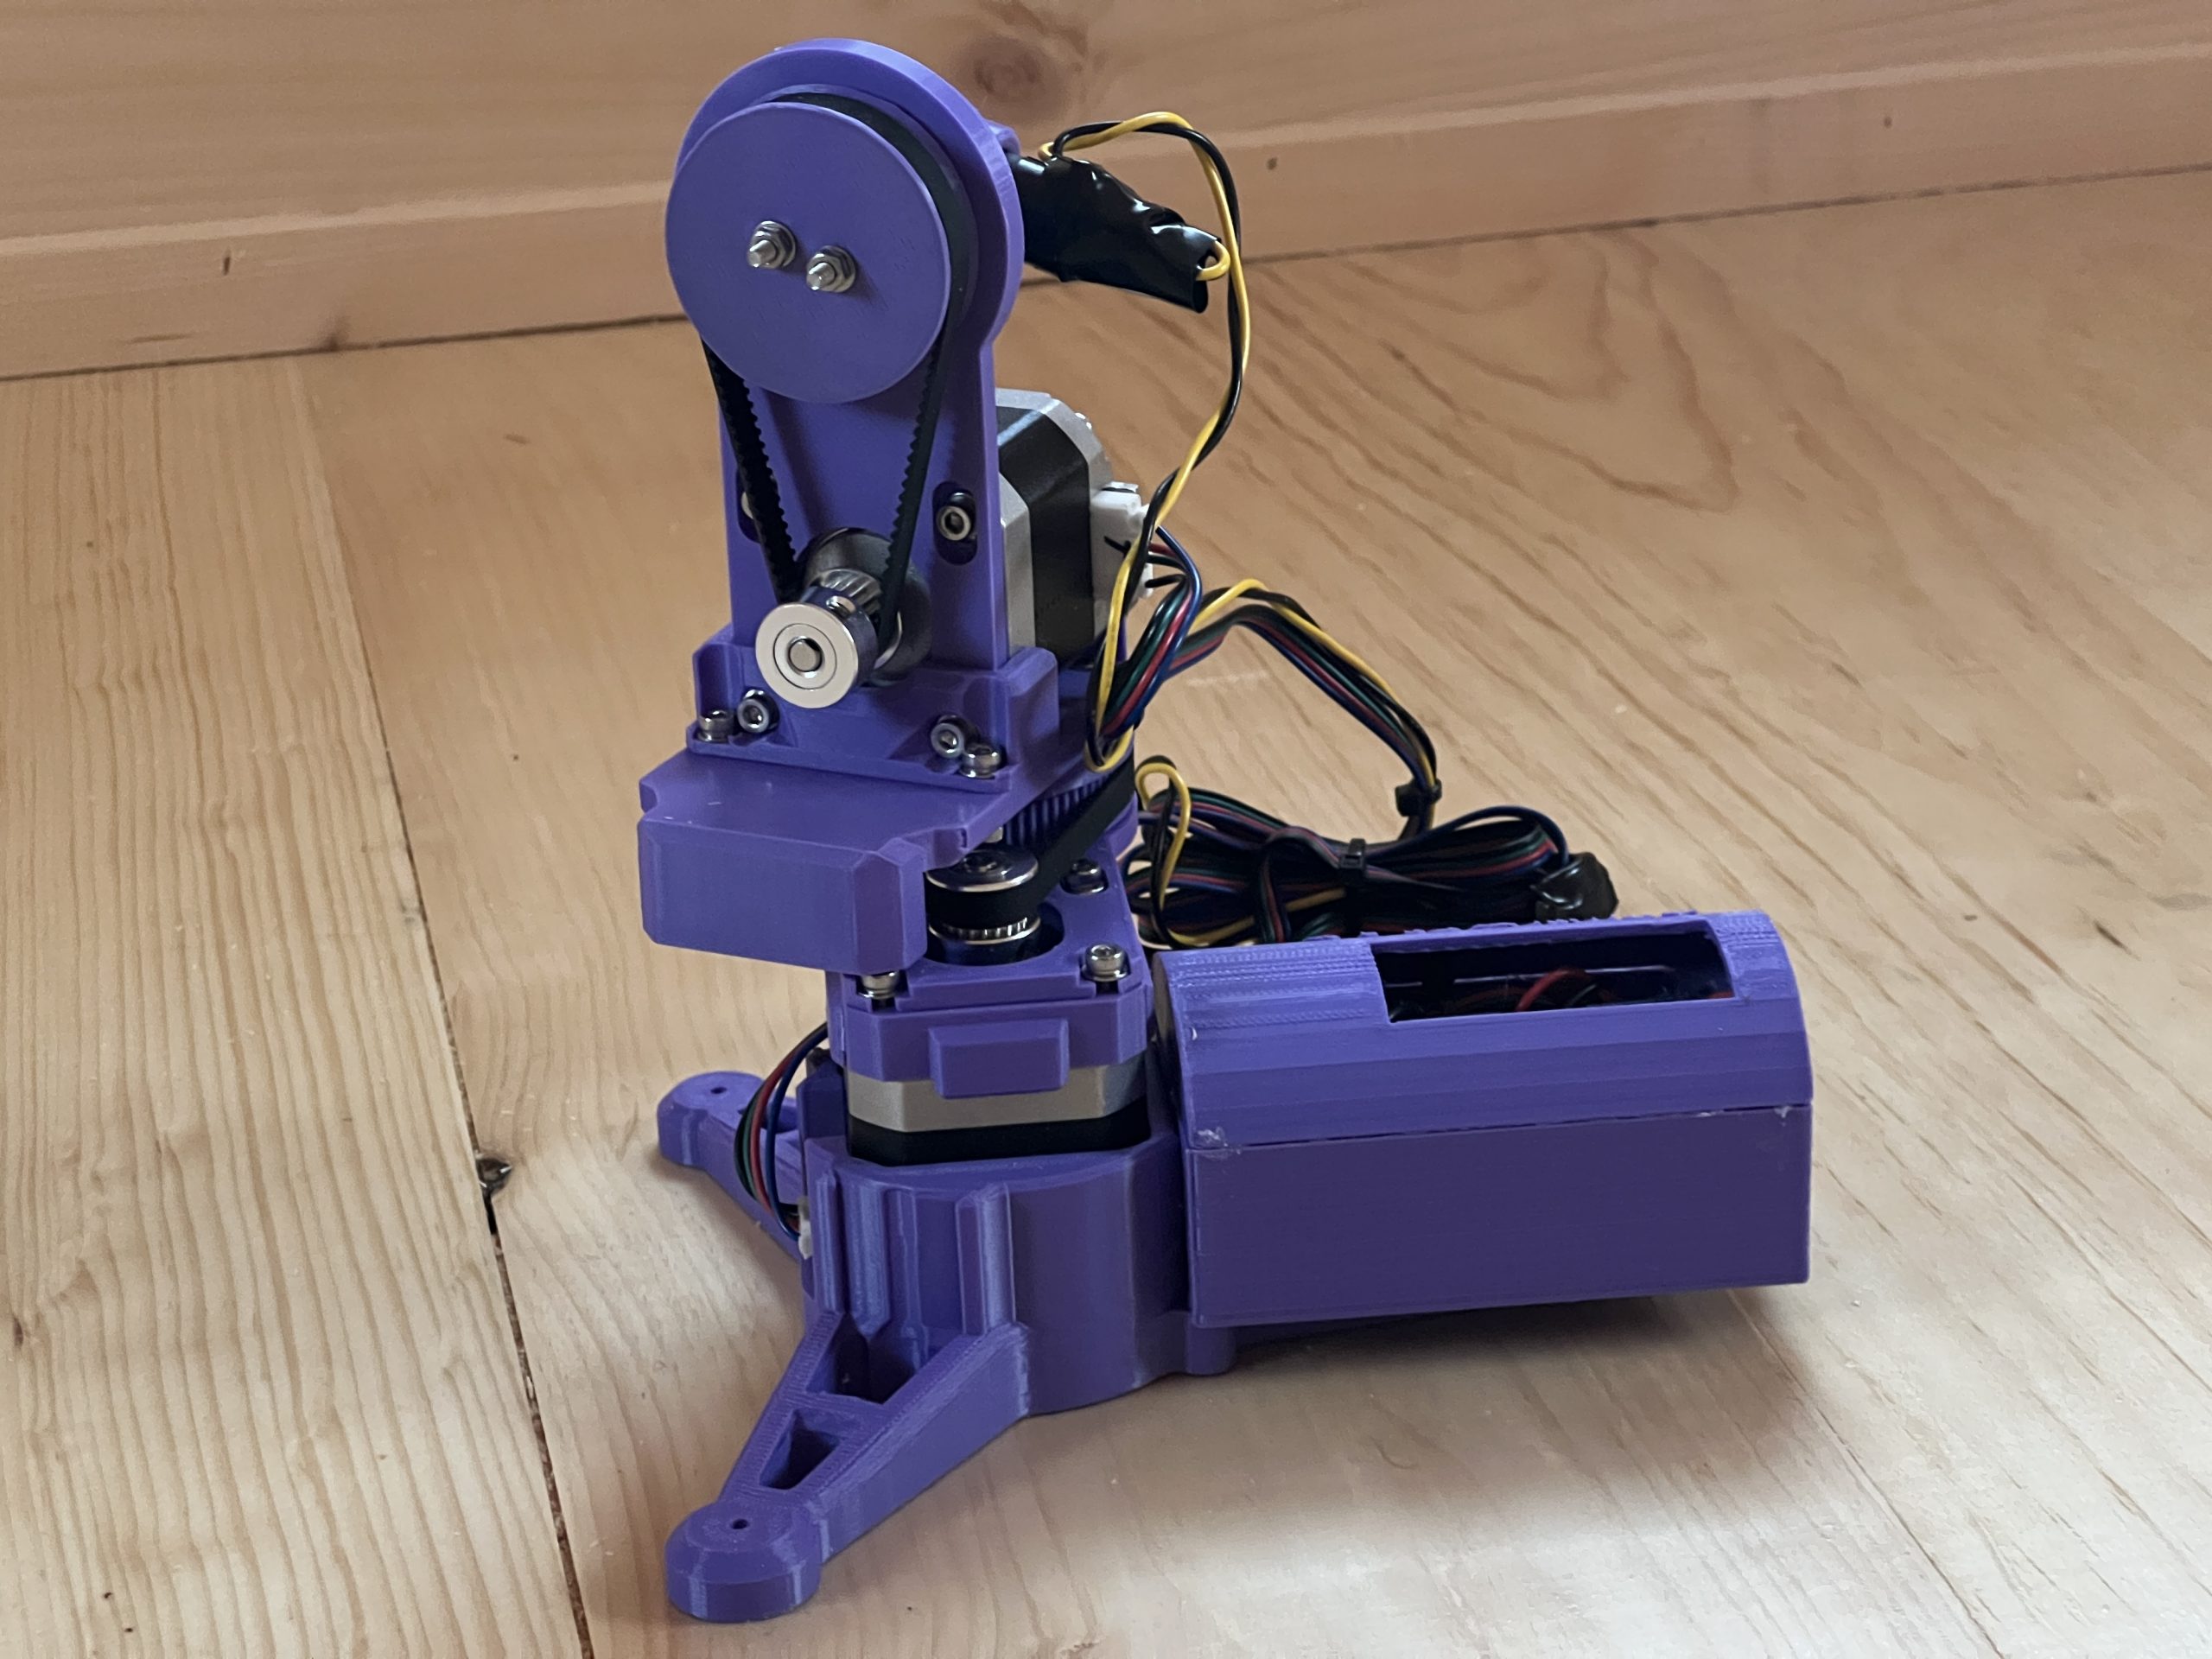
I’m not sure I’ll document it as well as I have the tabletop plotter or the gondola one. At least not yet, maybe that’ll be a Christmas project like the other 2. I did port the same software stack, it would be a shame not to given the years of feature development that went into it. Of course we should use these features with lasers. It might also change drastically, I want to investigate what rotating mirrors could do for speed. Currently some of the moving parts of the machine have enough mass that their inertia causes inaccuracies when moving at high speed.
It’s nice to have things tidied up, the development machine was a mess.
Laser Pew Pew
I have yet to crack the math, I’ve been banging my head against the wall with various implementations but this is a lot worse than the Gondola’s double polar system. I’d like the laser to be able to project a cartesian system in any position relative to the surface it’s drawing on. Alas, I’ve only been able to get decent results in ideal positions.
For Posterity
The first successful prototype of PewtyBot.
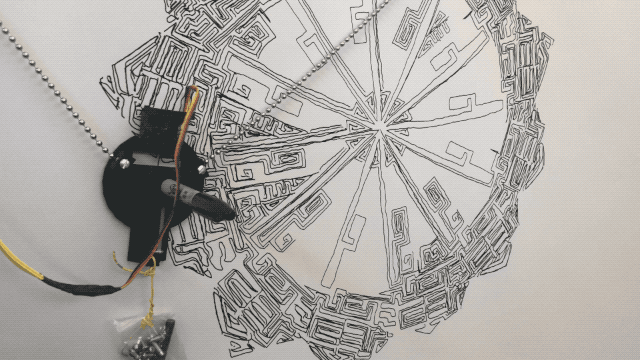
Philip from Germany got in touch to tell me about a cool project he had seen that involved photoluminescent paper. He thought maybe PlottyBot could so something with it, and maybe it could, but not fast enough I thought. I knew exactly what I wanted to do with it though, with the PlottyBot software stack, but a different machine. I love that people get in touch to show me cool things. I’ve been working on plotters for years now, and in some sense it felt like I had turned every stone. Out of nowhere Philip got in touch and steered me toward a whole new area of exploration. Of course one can buy glow-in-the-dark paper, of course I can shoot lasers at it, of course all the algorithms I’ve been working on these past years lend themselves to this new endeavor. Well, with some tweaking :).
It was a real struggle to get Trinamic drivers working on a Pi, but I wanted to step up my motor stepping game. Once I figured it out, holy shit do they work! There’s much else to talk about here, but this isn’t the point of this post, I just want to capture the miletone that is shooting lasers super fast at photoluminescent paper. I still haven’t wrapped my mind around what this all means.
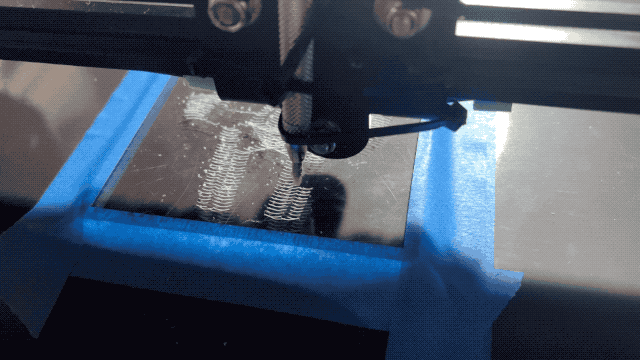
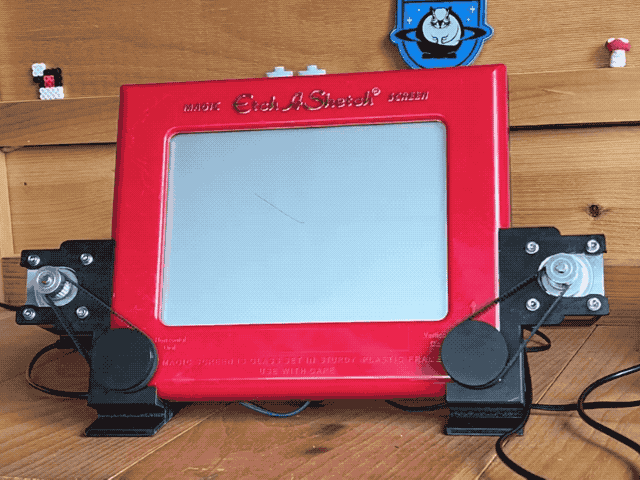
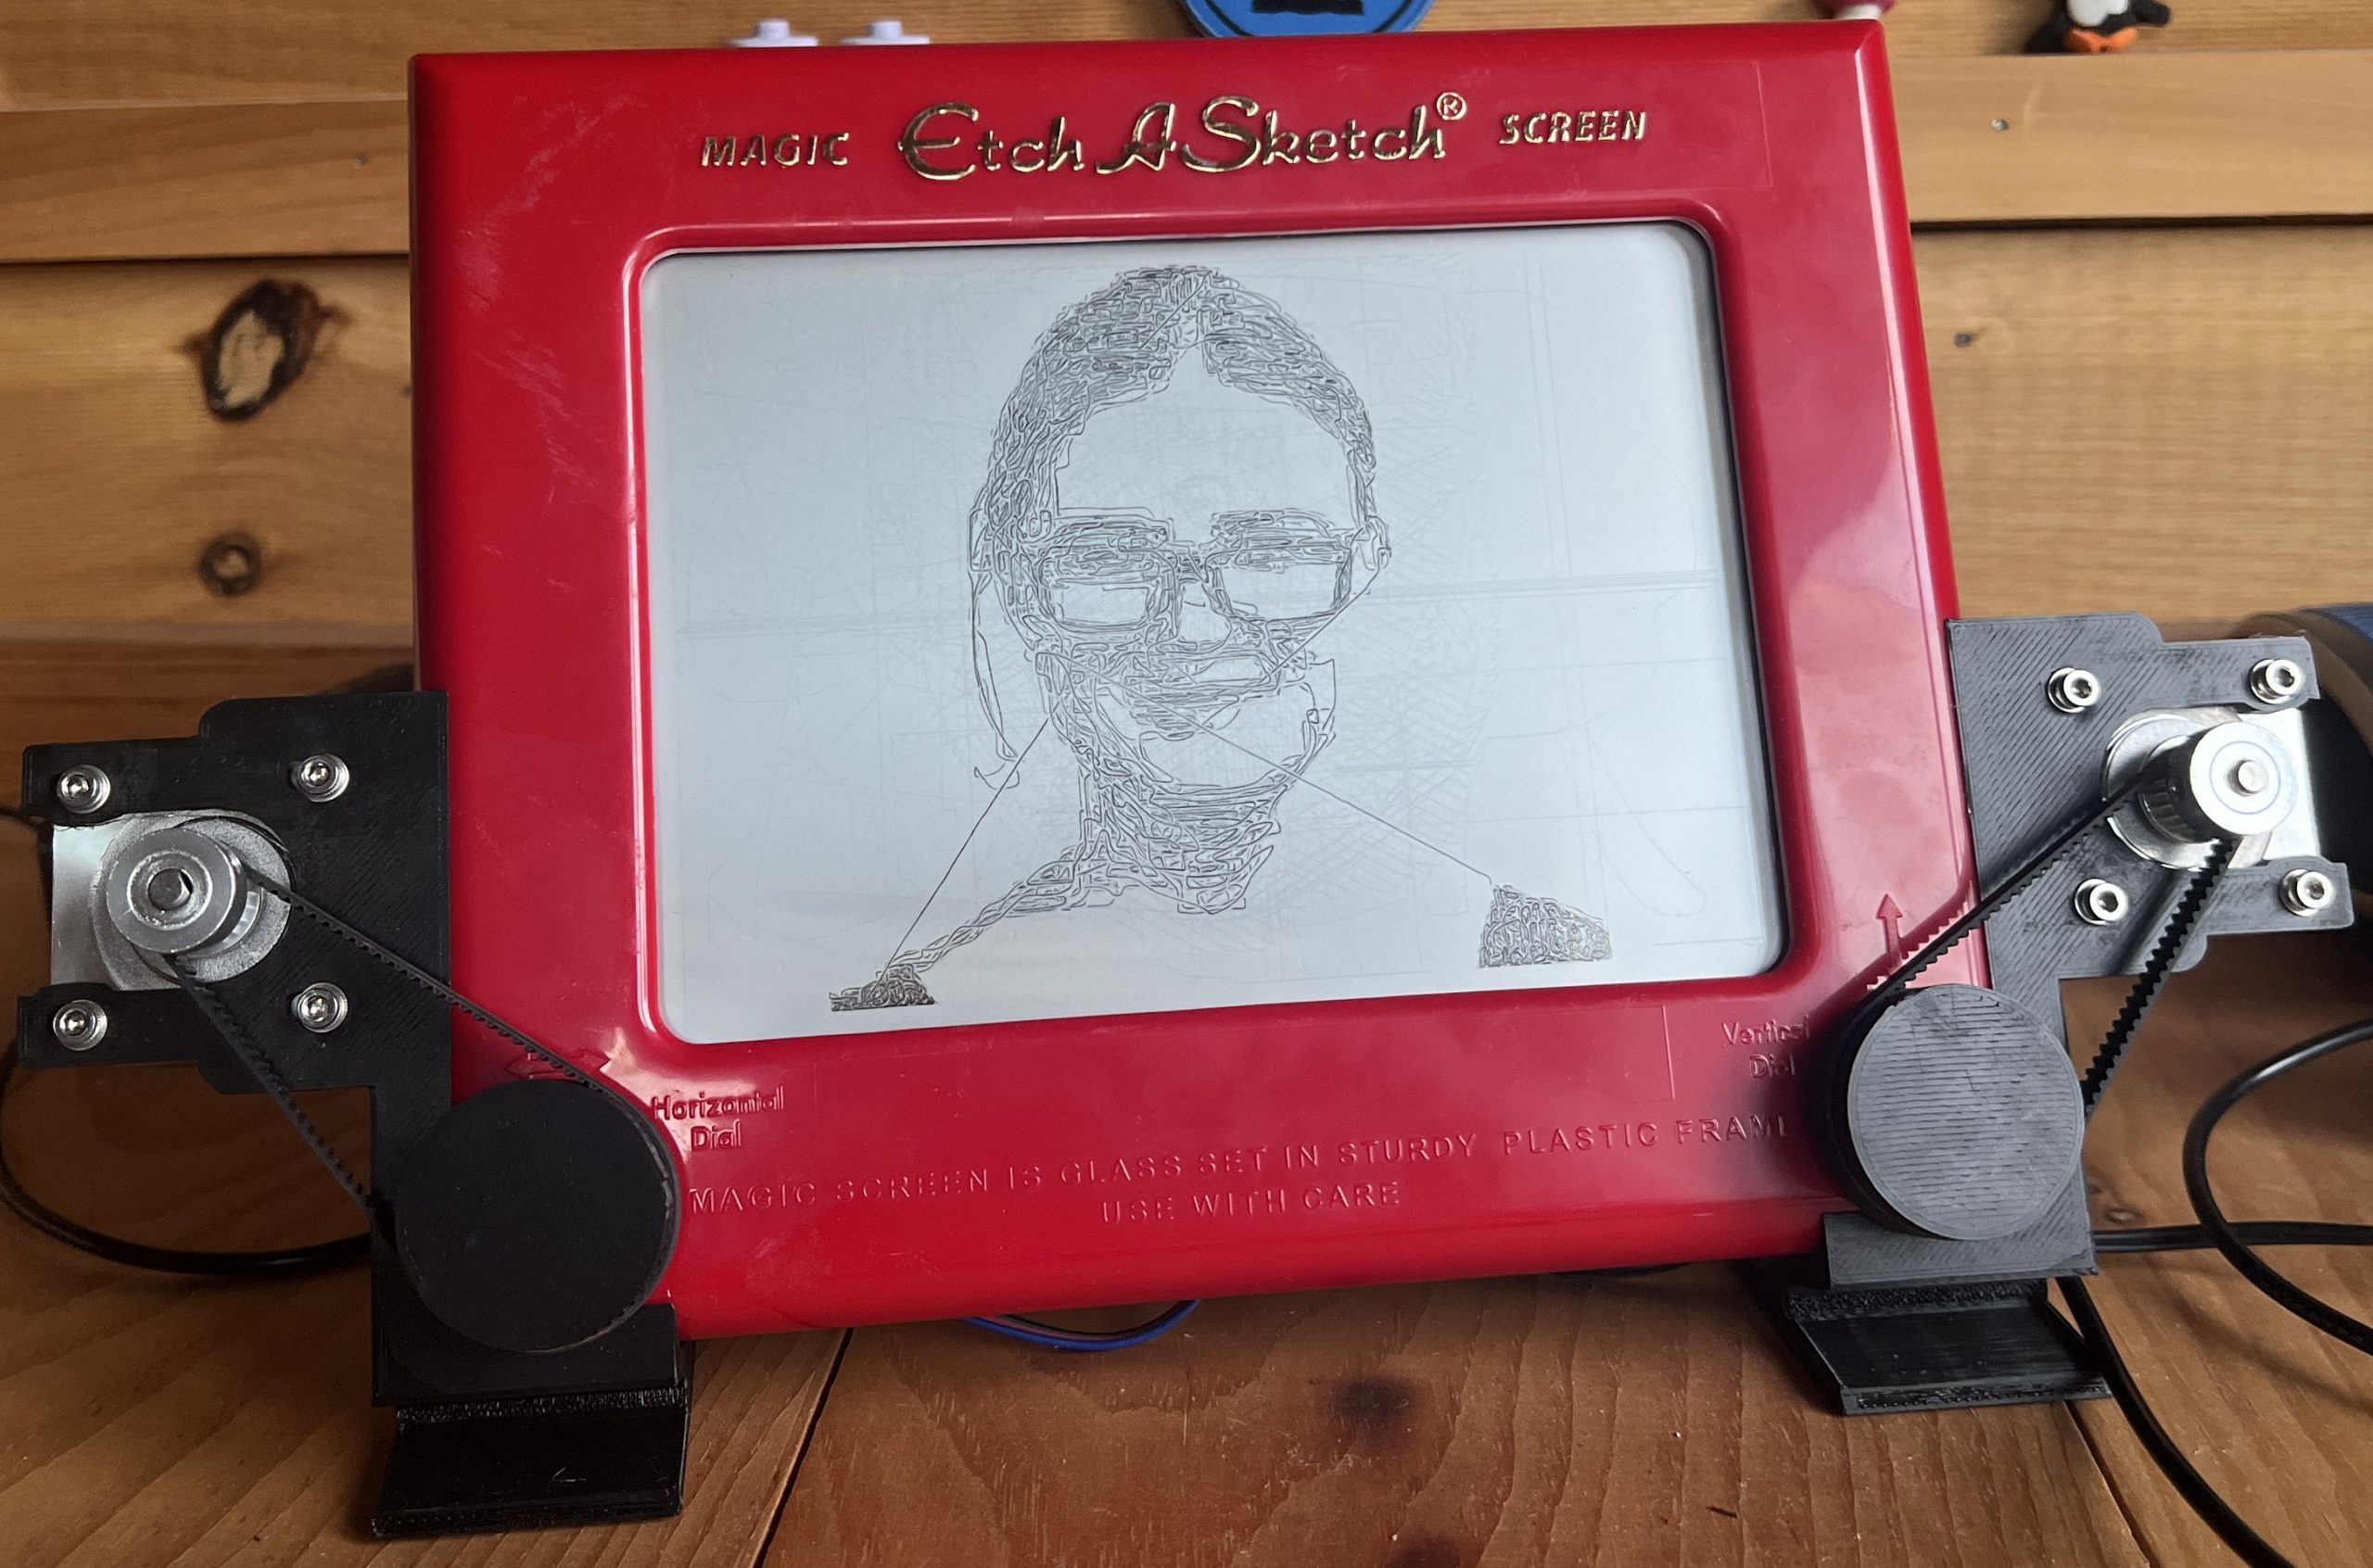
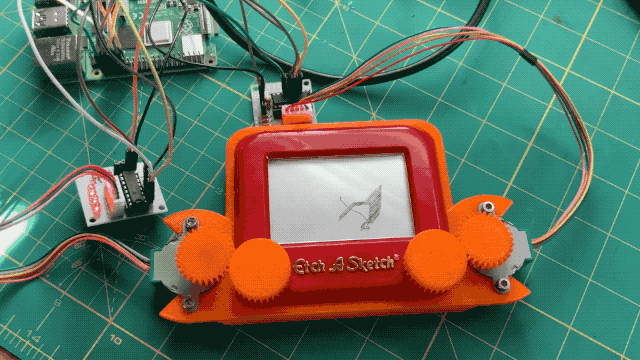
PlottyBot Port
I stumbled upon electronically actuated Etch-a-Sketches, and I pretty much had to see if I could port the PlottyBot stack to the toy. It was pretty straightforward. I got the parts from someone else on Thingiverse for a smaller Etch-a-Sketch and the fit isn’t great, but it’s enough of a proof of concept to know I want to make a nice big one, and really the work is all mechanical at this point. How about a web enabled Etch-a-Sketch that can write in your handwriting?
Beefed up Sensoring
A friend bought a couple of Sensirion SEN54s and I helped him get one working, and ended up buying the extra from him. It had been a few years since I researched what sensors were out there that worked well with Raspberry Pis, and were more on the industrial side than the hobbyist side. I was immediately enthused by Sensirion’s documentation, and their sensor looked top notch. My friend did all the homework on reading specs and comparing with others, it was really a no brainer.
With this SEN54 we’ve gained:
- accurate humidity (the previous sensor was worthless)
- VOC
- PM1.0
- PM2.5
- PM4.0
- PM10.0
It’ll be interesting to see the patterns. I’m honestly a little worried about what the particles will reveal seeing as we’re running 2 wood stoves in the house for half of the year. Reassuringly, the first few readings show we’re in the green, but then Nicole opened the stove to let out a bunch of grilled cheese sandwiches and the readings skyrocketed well above WHO guidelines for particles.

But those are only delicious cheese particles finding their way into your nostrils, surely that can’t have and adverse health effect. Jokes aside it’s interesting to see how much of a tail this benign event has. I’ll be really curious to discover more, I really have no idea what I’m looking at yet.
I am very glad to see the Pis become established as industry capable devices. It’s honestly remarkable what I’ve thrown at them over the years while they kept serving their purpose.
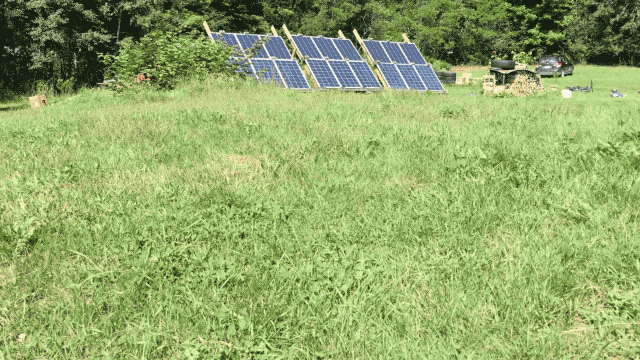
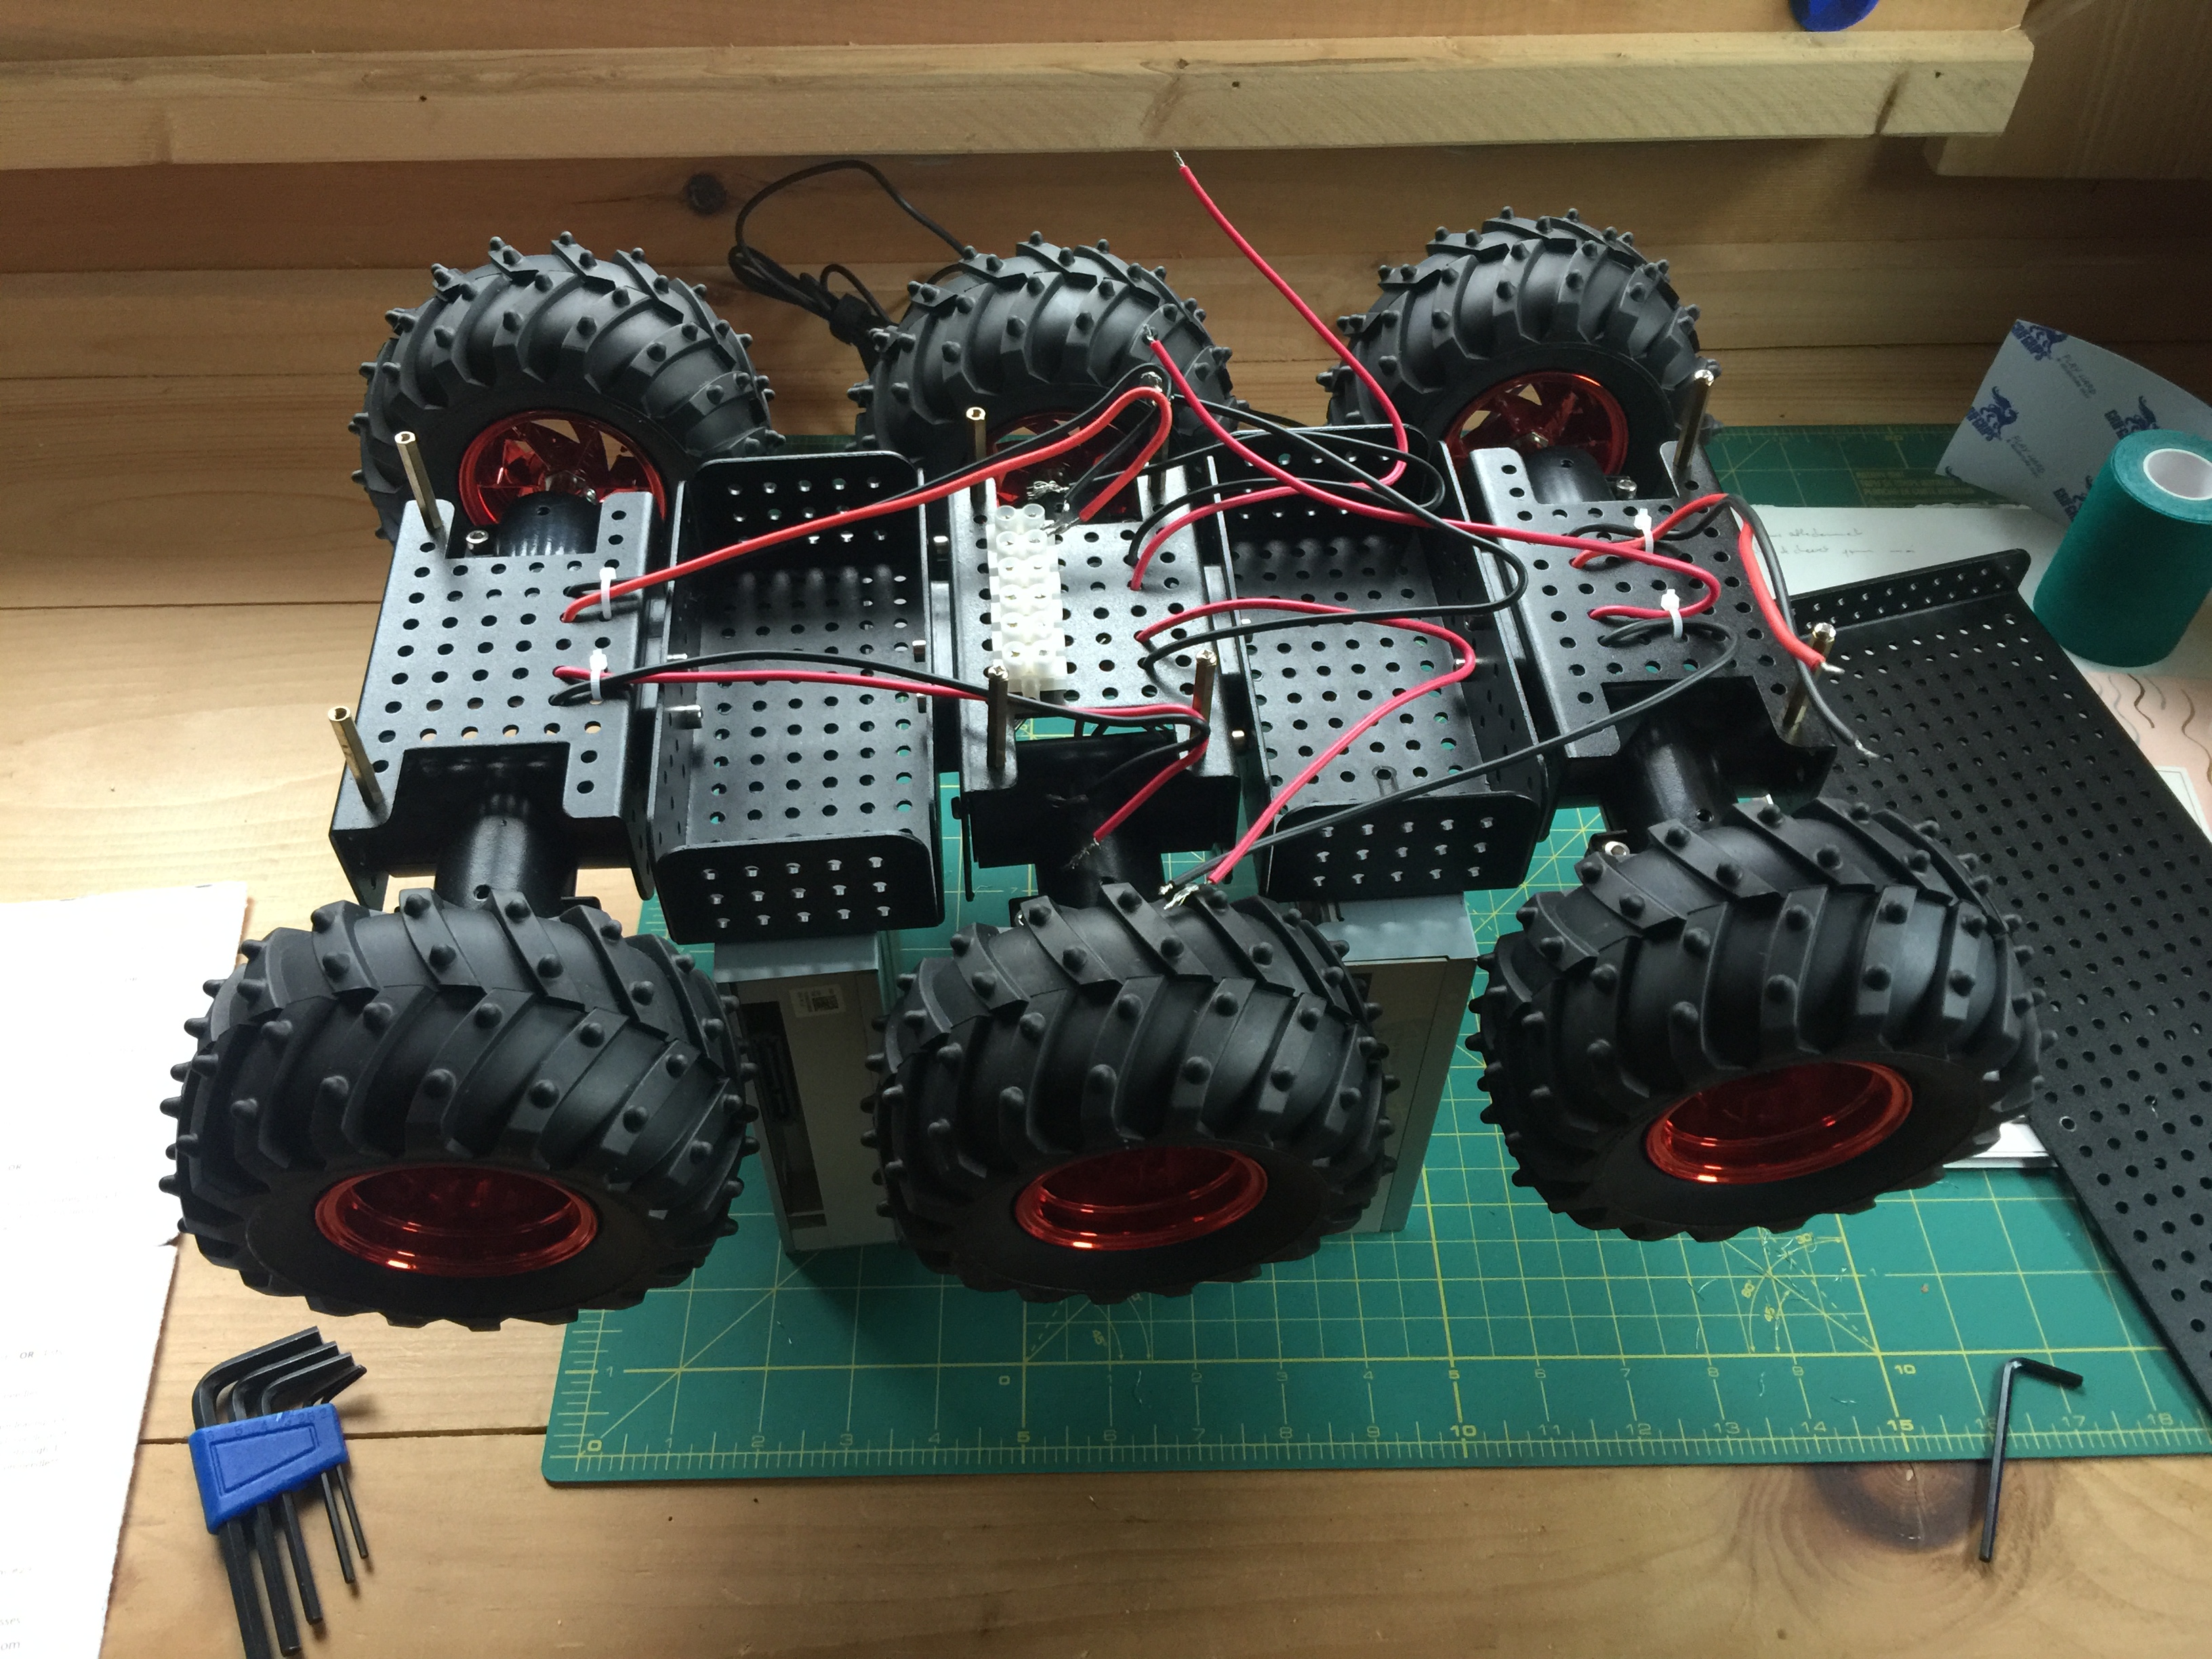
Introducing Curious Kraken
For a while I’ve been wanting a more capable Internet Enabled RC car, something that could go outside. Well, I finally got working the Wild Thumper I got a few weeks ago.
This is still very much a prototype

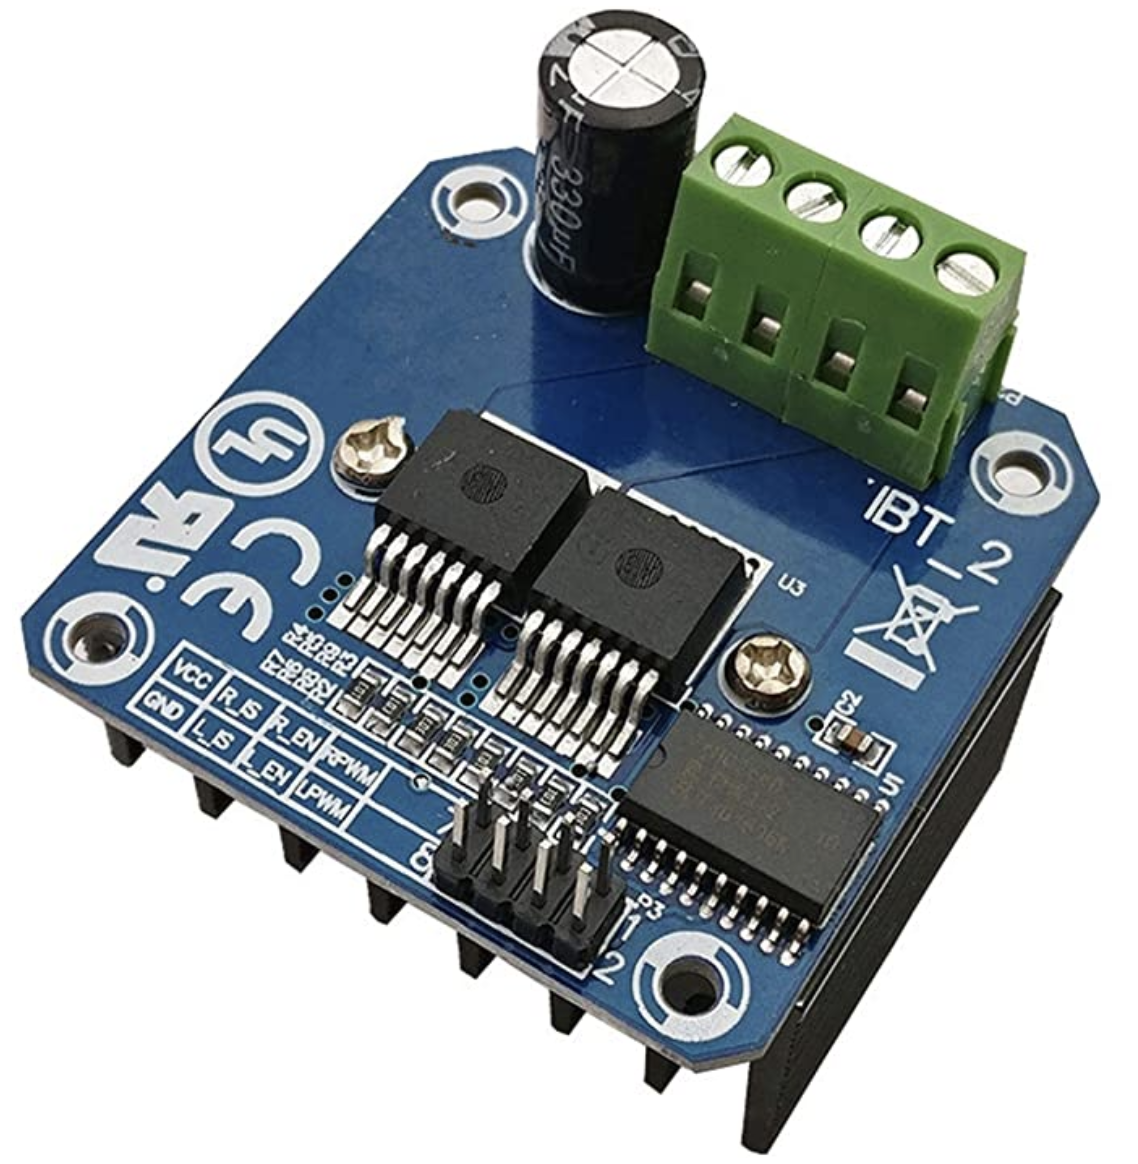
I initial tried controlling the motors with 3 L298Ns for each of the wheel pairs, but they overheated. So I tried a couple of other motor controllers, the ones that did the trick are a couple of BTS7960s.
Rated for high current, heating is simply not an issue
I ported the Nosy Monster code to work with them, and I improved several things, mostly around smoothing controls. You can’t just start these motors are full power, you need you ramp up and down. This is to be mechanically gentle on the motors, but it also helps with piloting.

Outside!
We’re figuring out the wifi range around the house, it’s worst than I thought, well, for live streaming video at least.
Iterating on a case for the electronics
The suspensions are excellent, the motors could be beefier
More to come…
The Nosy Monster’s Big Brother
Every time I throw the Nosy Monster outside, it can’t handle even the best cut grass. The wheels just don’t cut it. So I finally splurged and got a Wild Thumper from SparkFun.
There’s a million things I’d like to do with it, and I don’t know how many I’ll get to. But at the very least, I’d love to have the vehicle able to go outside. WiFi goes pretty far around the house, and it so it would have a nice range of operation.
I’d love to set it up so random people on the internet can pilot it. Maybe via some sort of voting system.
I’d love for it to be energy autonomous with a solar panel.
And I’d love for it to be able to take some rain and snow.
The later is unlikely to happen, the rest very well may over time. Ultimately, this will be a better setup allowing for more development.
The Nosy Monster will remain in its current funny form. We’ll need to find a cool name for this new one, but I want to see what it looks like when it’s done first.