Ben's Blog

I.T., plotters ben January 10, 2021

Working with Handwriting

One of my obsessions in developing PlottyBot has been handwriting. Even with Mandalagaba I care very much that the penstrokes originate from one’s hand and avoid tools which “do the drawing for you”. This is where your personality transpires on paper beyond your ability to draw. I thought it’d be neat to have a pen plotter able to write in one’s handwriting.

This idea came up a long time ago, and I researched many ways to achieve it. The unfortunate but predictable conclusion was that I would need to write my own font format to get there.

Introducing Flexible Font. PlottyBot comes with the ability to capture your handwriting. The Flexible Font format is monoline based, holds metadata on your pen strokes to define where ligatures may occur, it also allows for character variations. It’s tailored just for plotters :).

The video bellow shows several ways to use PlottyBot with handwriting. The first is a simple live replay of pen strokes from https://plottybot.mandalagaba.com, the next ones use Flexible Font.

https://ben.akrin.com/wp-content/uploads/2021/01/PlottyBot.mp4


aesthetics, plots ben December 29, 2020

UV Ink Experiment

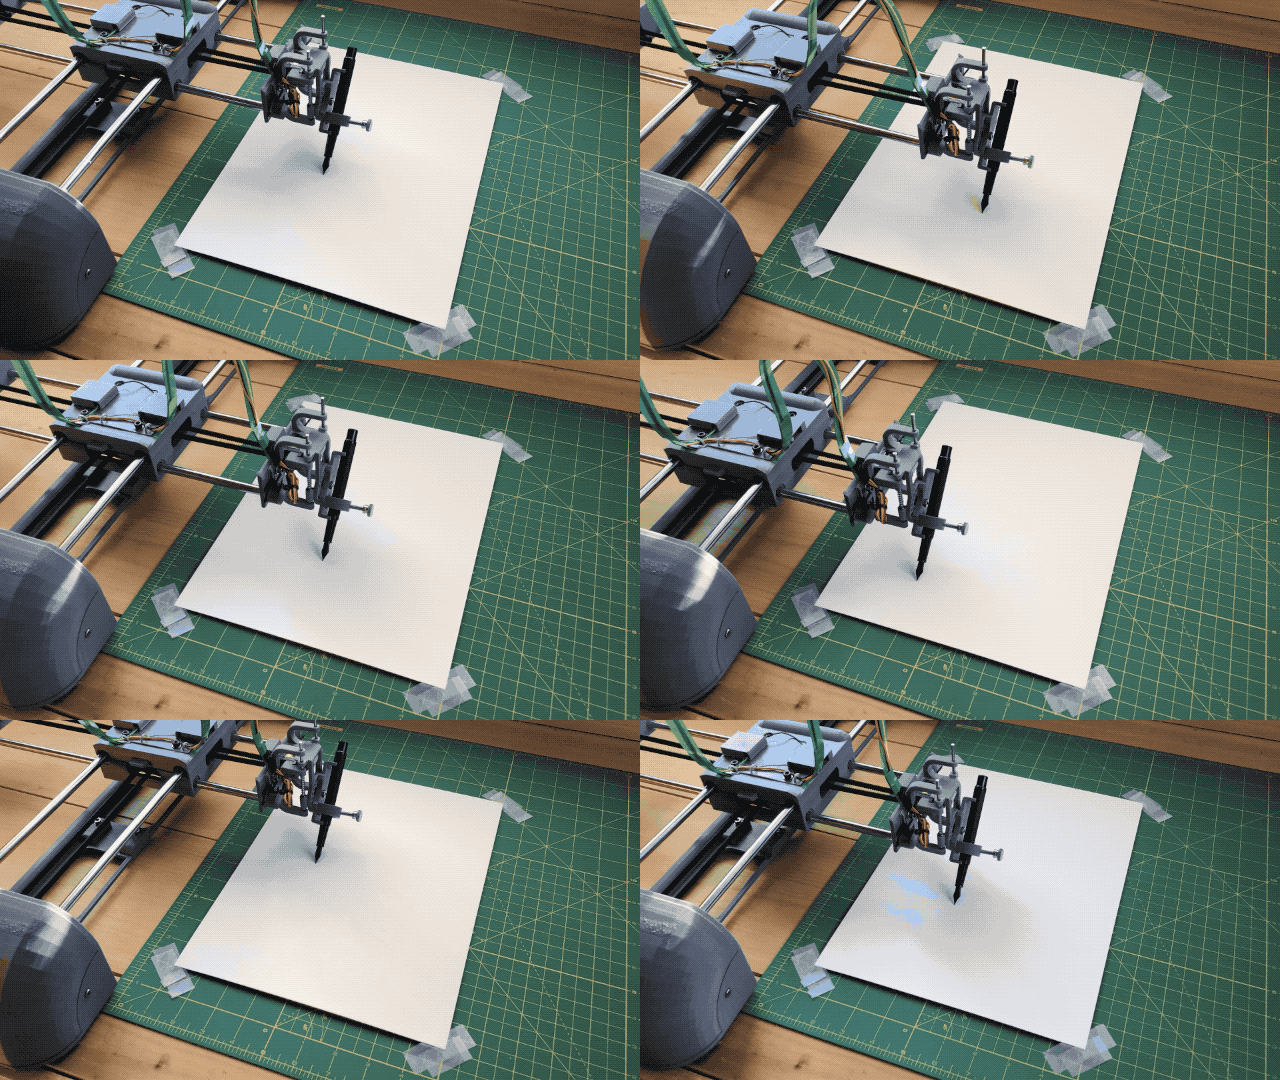
One advantage of a drawing machine working with coordinates is that it does not need to see what it draws.
Under the blue light
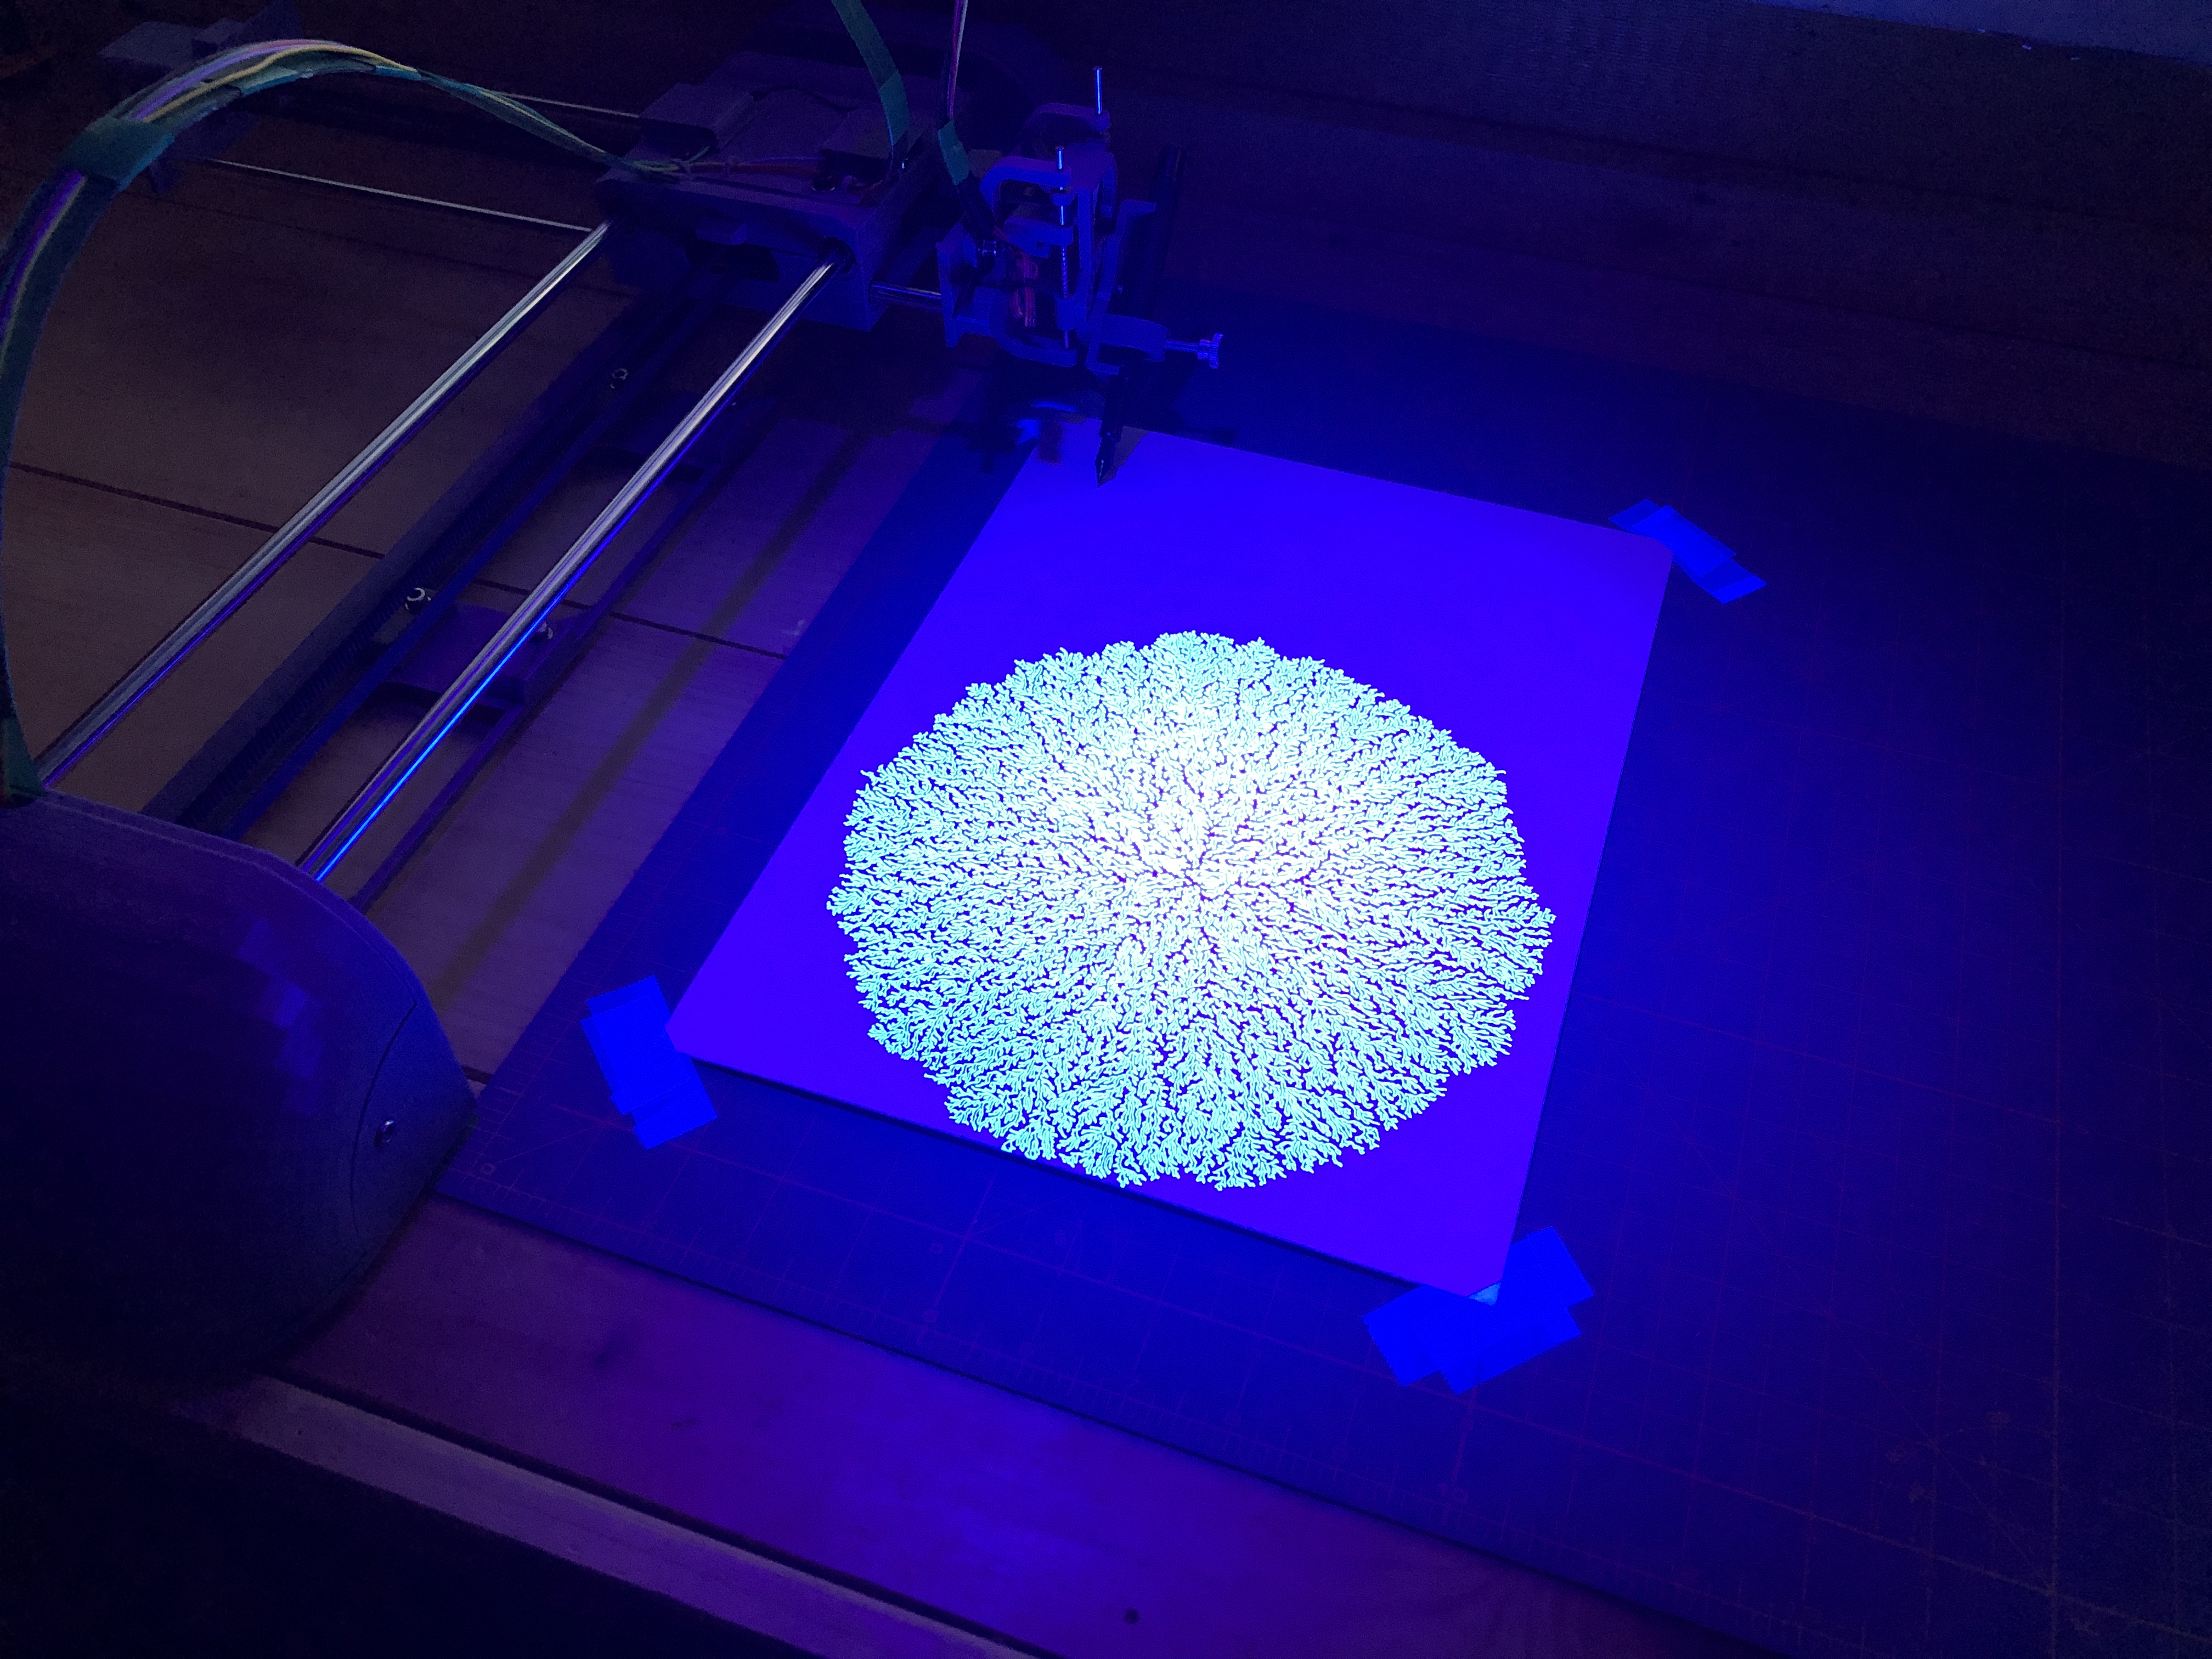
 

I bought a fountain pen with a refillable cartridge, and some UV ink.


The UV ink is invisible to the naked eye but the pen did leave trails on the paper.


3D modeling / printing, all out geekery, electronics, I.T., plotters ben December 26, 2020

PlottyBot is born

Years in the making, many prototypes, and I hope a software stack which brings novelty and ease of use to the world of pen plotting. It’s been a marathon building the final version and documenting the process carefully. I’m too pooped to say anything more about it for now.
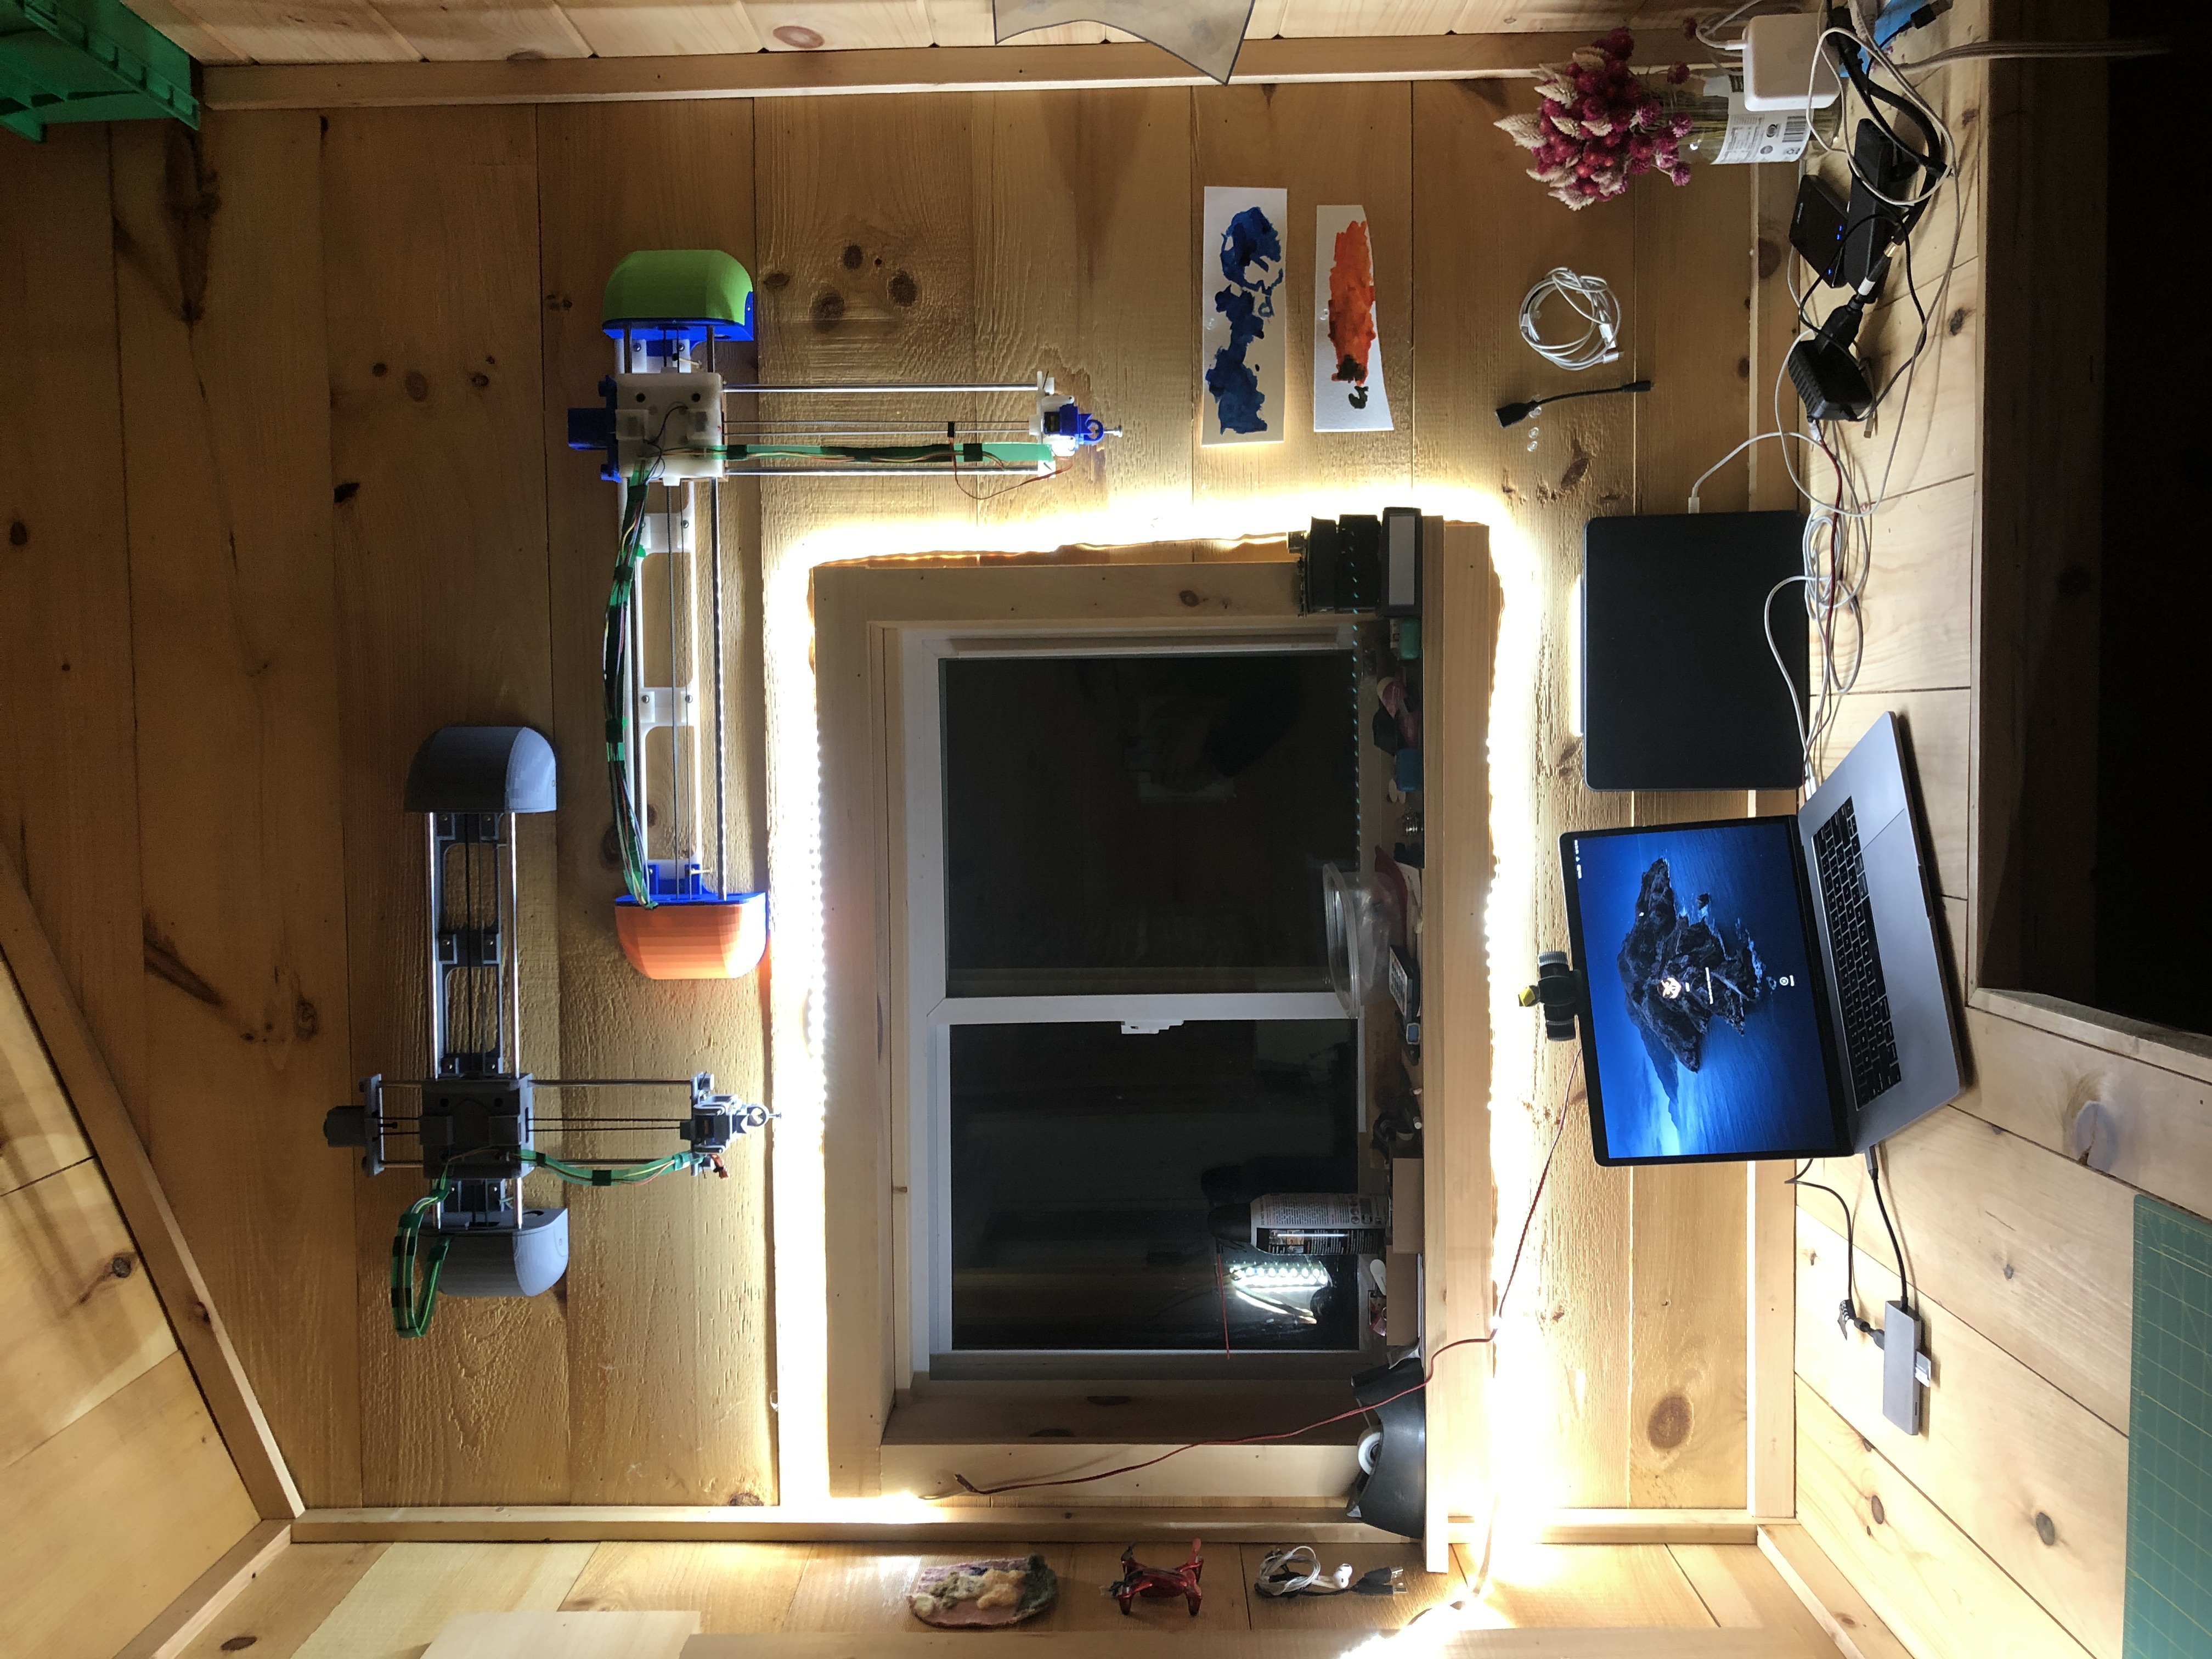
Instructions here

miscellaneous ben December 21, 2020

Protected: Fort Awesome

This content is password-protected. To view it, please enter the password below.

electronics, I.T. ben December 17, 2020

Driving a 28BYJ-48 Stepper Motor & ULN2003 driver with a Raspberry Pi

Quick points about this motor & driver

They are wonderfully cheap and extremely accurate due to 1/64 gearing. They move by 0.087890625° per step! However, the gearing is made of plastic and will wear out overtime, especially if moving heavy objects. Lastly the motors can become a little toasty if you work them hard.
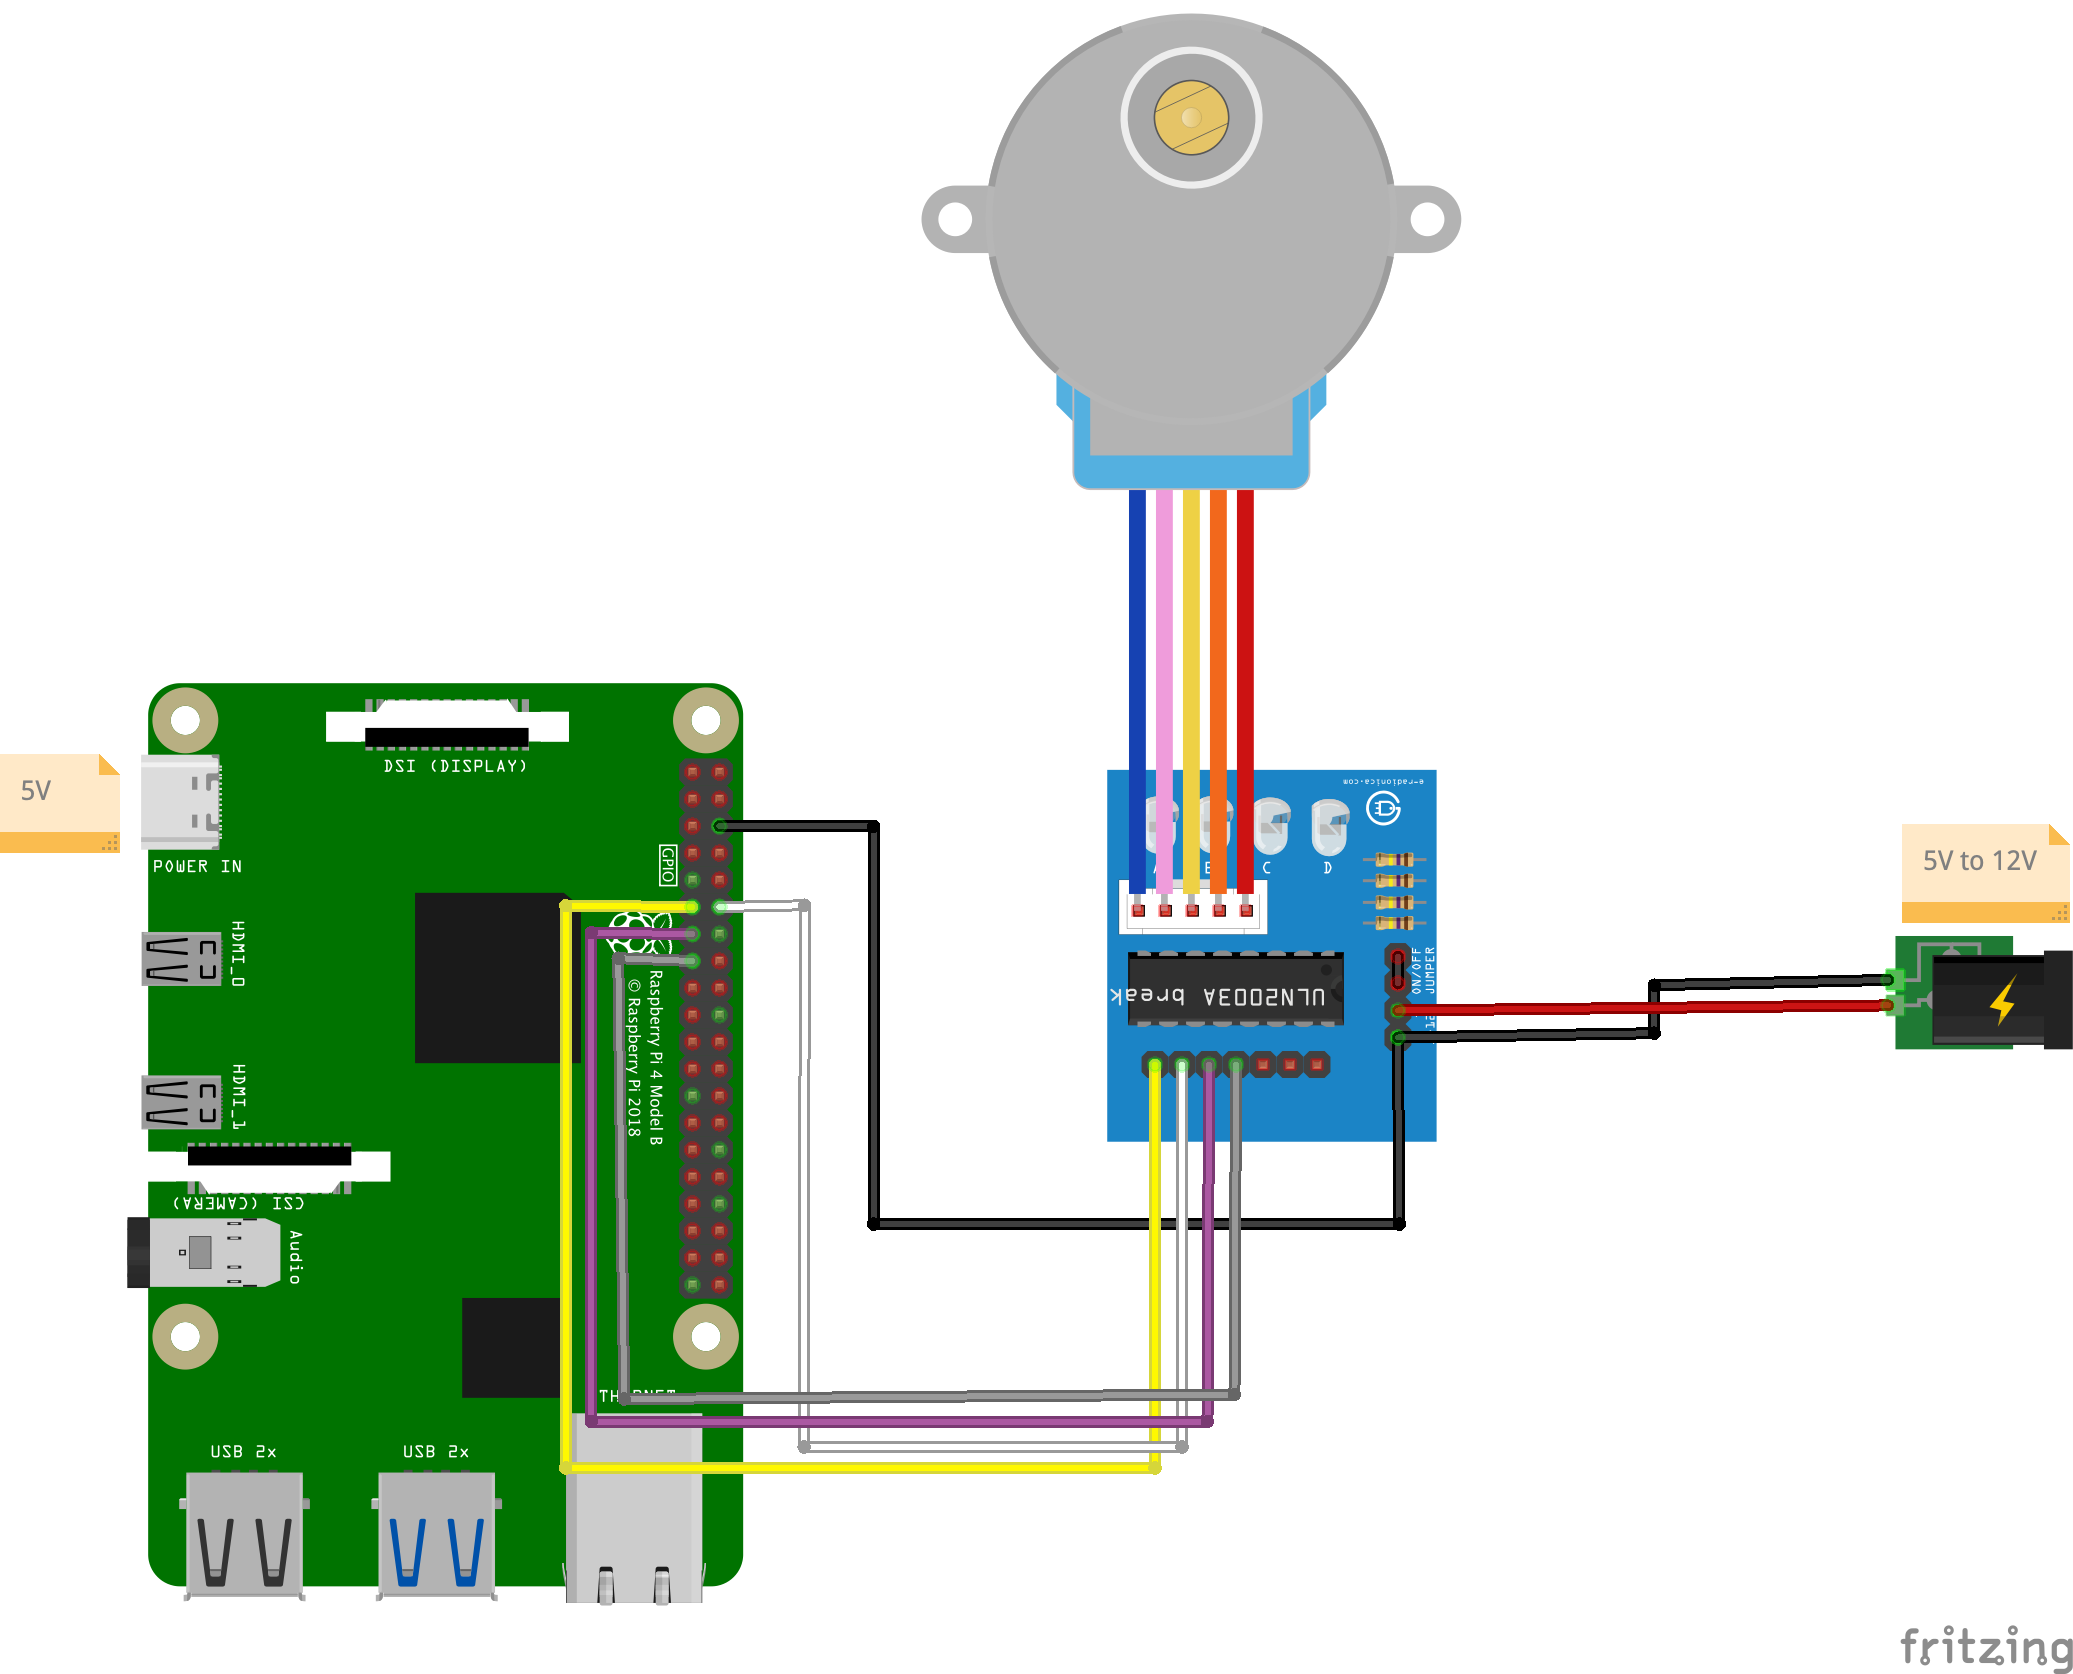
Circuit

Fritzing

Code

#!/usr/bin/python3
import RPi.GPIO as GPIO
import time

in1 = 17
in2 = 18
in3 = 27
in4 = 22

# careful lowering this, at some point you run into the mechanical limitation of how quick your motor can move
step_sleep = 0.002

step_count = 4096 # 5.625*(1/64) per step, 4096 steps is 360°

direction = False # True for clockwise, False for counter-clockwise

# defining stepper motor sequence (found in documentation http://www.4tronix.co.uk/arduino/Stepper-Motors.php)
step_sequence = [[1,0,0,1],
                 [1,0,0,0],
                 [1,1,0,0],
                 [0,1,0,0],
                 [0,1,1,0],
                 [0,0,1,0],
                 [0,0,1,1],
                 [0,0,0,1]]

# setting up
GPIO.setmode( GPIO.BCM )
GPIO.setup( in1, GPIO.OUT )
GPIO.setup( in2, GPIO.OUT )
GPIO.setup( in3, GPIO.OUT )
GPIO.setup( in4, GPIO.OUT )

# initializing
GPIO.output( in1, GPIO.LOW )
GPIO.output( in2, GPIO.LOW )
GPIO.output( in3, GPIO.LOW )
GPIO.output( in4, GPIO.LOW )

motor_pins = [in1,in2,in3,in4]
motor_step_counter = 0 ;

def cleanup():
    GPIO.output( in1, GPIO.LOW )
    GPIO.output( in2, GPIO.LOW )
    GPIO.output( in3, GPIO.LOW )
    GPIO.output( in4, GPIO.LOW )
    GPIO.cleanup()

# the meat
try:
    i = 0
    for i in range(step_count):
        for pin in range(0, len(motor_pins)):
            GPIO.output( motor_pins[pin], step_sequence[motor_step_counter][pin] )
        if direction==True:
            motor_step_counter = (motor_step_counter - 1) % 8
        elif direction==False:
            motor_step_counter = (motor_step_counter + 1) % 8
        else: # defensive programming
            print( "uh oh... direction should *always* be either True or False" )
            cleanup()
            exit( 1 )
        time.sleep( step_sleep )

except KeyboardInterrupt:
    cleanup()
    exit( 1 )

cleanup()
exit( 0 )

Stuff you might need for this to run:

sudo apt-get update --fix-missing && sudo apt-get install python3-rpi.gpio

Results

This motor takes 5.625*(1/64)° per step, this means 2048 steps for 180°:
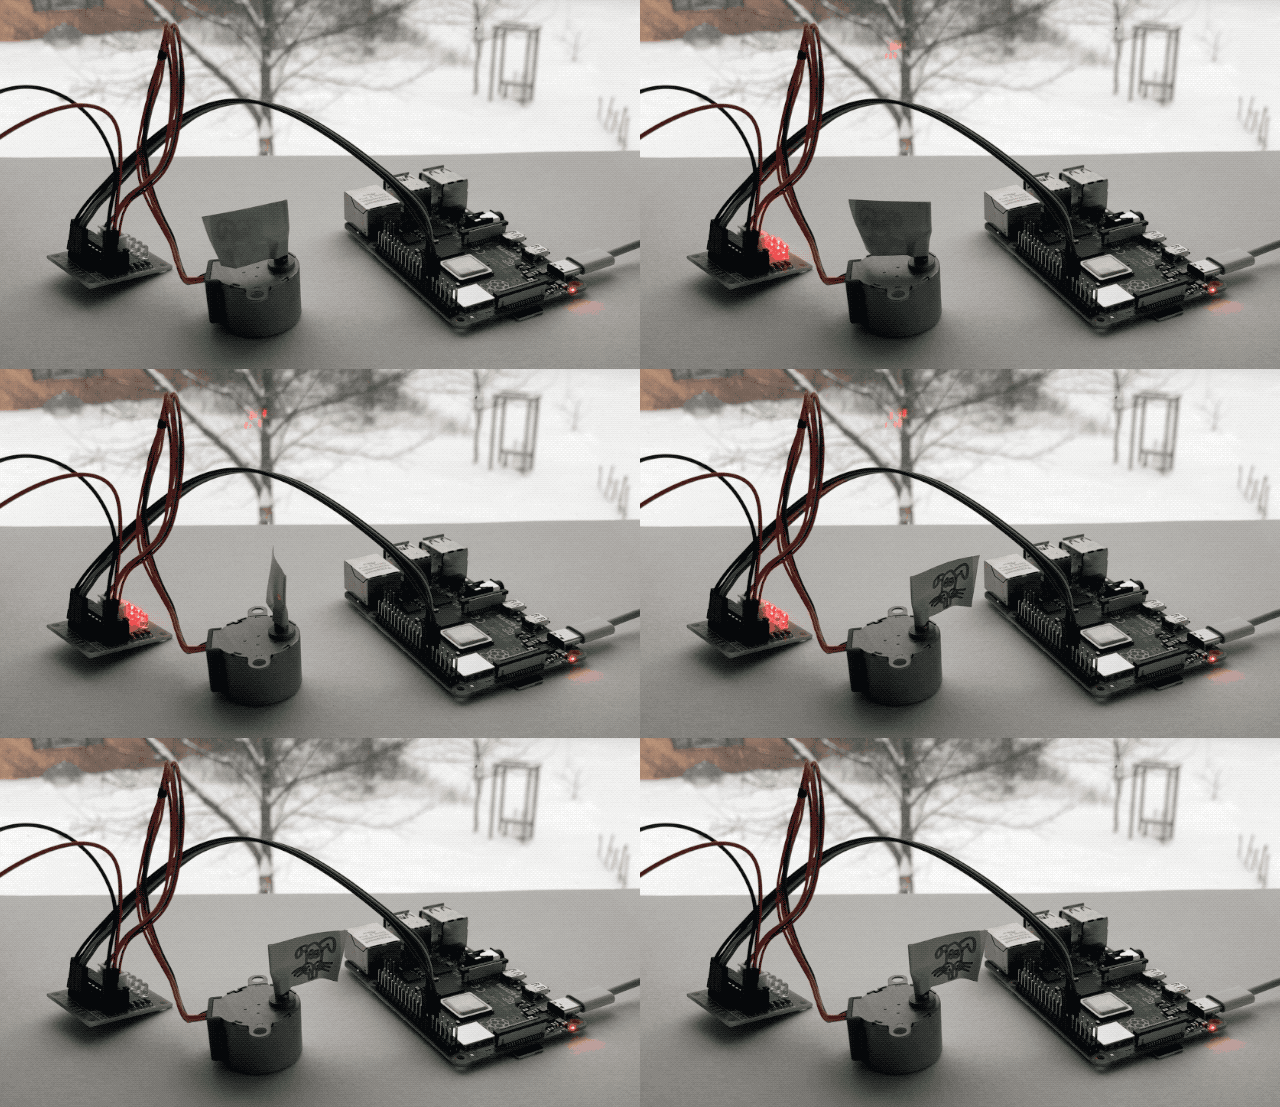
and 4096 steps for 360°:

One thing that is super cool about the driver board are the LEDs. Projects are always cooler with blinky LEDs, but these guys also help show what is actually going on inside the stepper, and can help you find issues. They are supposed to light up in sequence.

self sustainability, solar power ben December 15, 2020

Compromises, Getting 70 Amps on Demand

We barely used our Champion generator these past 5 years, but it did come in handy on rare occasions. It sat for 2 years unused at one point and needed some TLC to get back going again, a fact we didn’t want another way. Working from home in the time of Covid, having upgraded our solar setup, and still not making enough power through very cloudy days, we had to compromise our values a bit more and get decent fossil based 🙁 regenerating capabilities.

I’m still gathering information on water and wind turbines to diversify down the road, but today we are not ready to pull that trigger and we need to work.

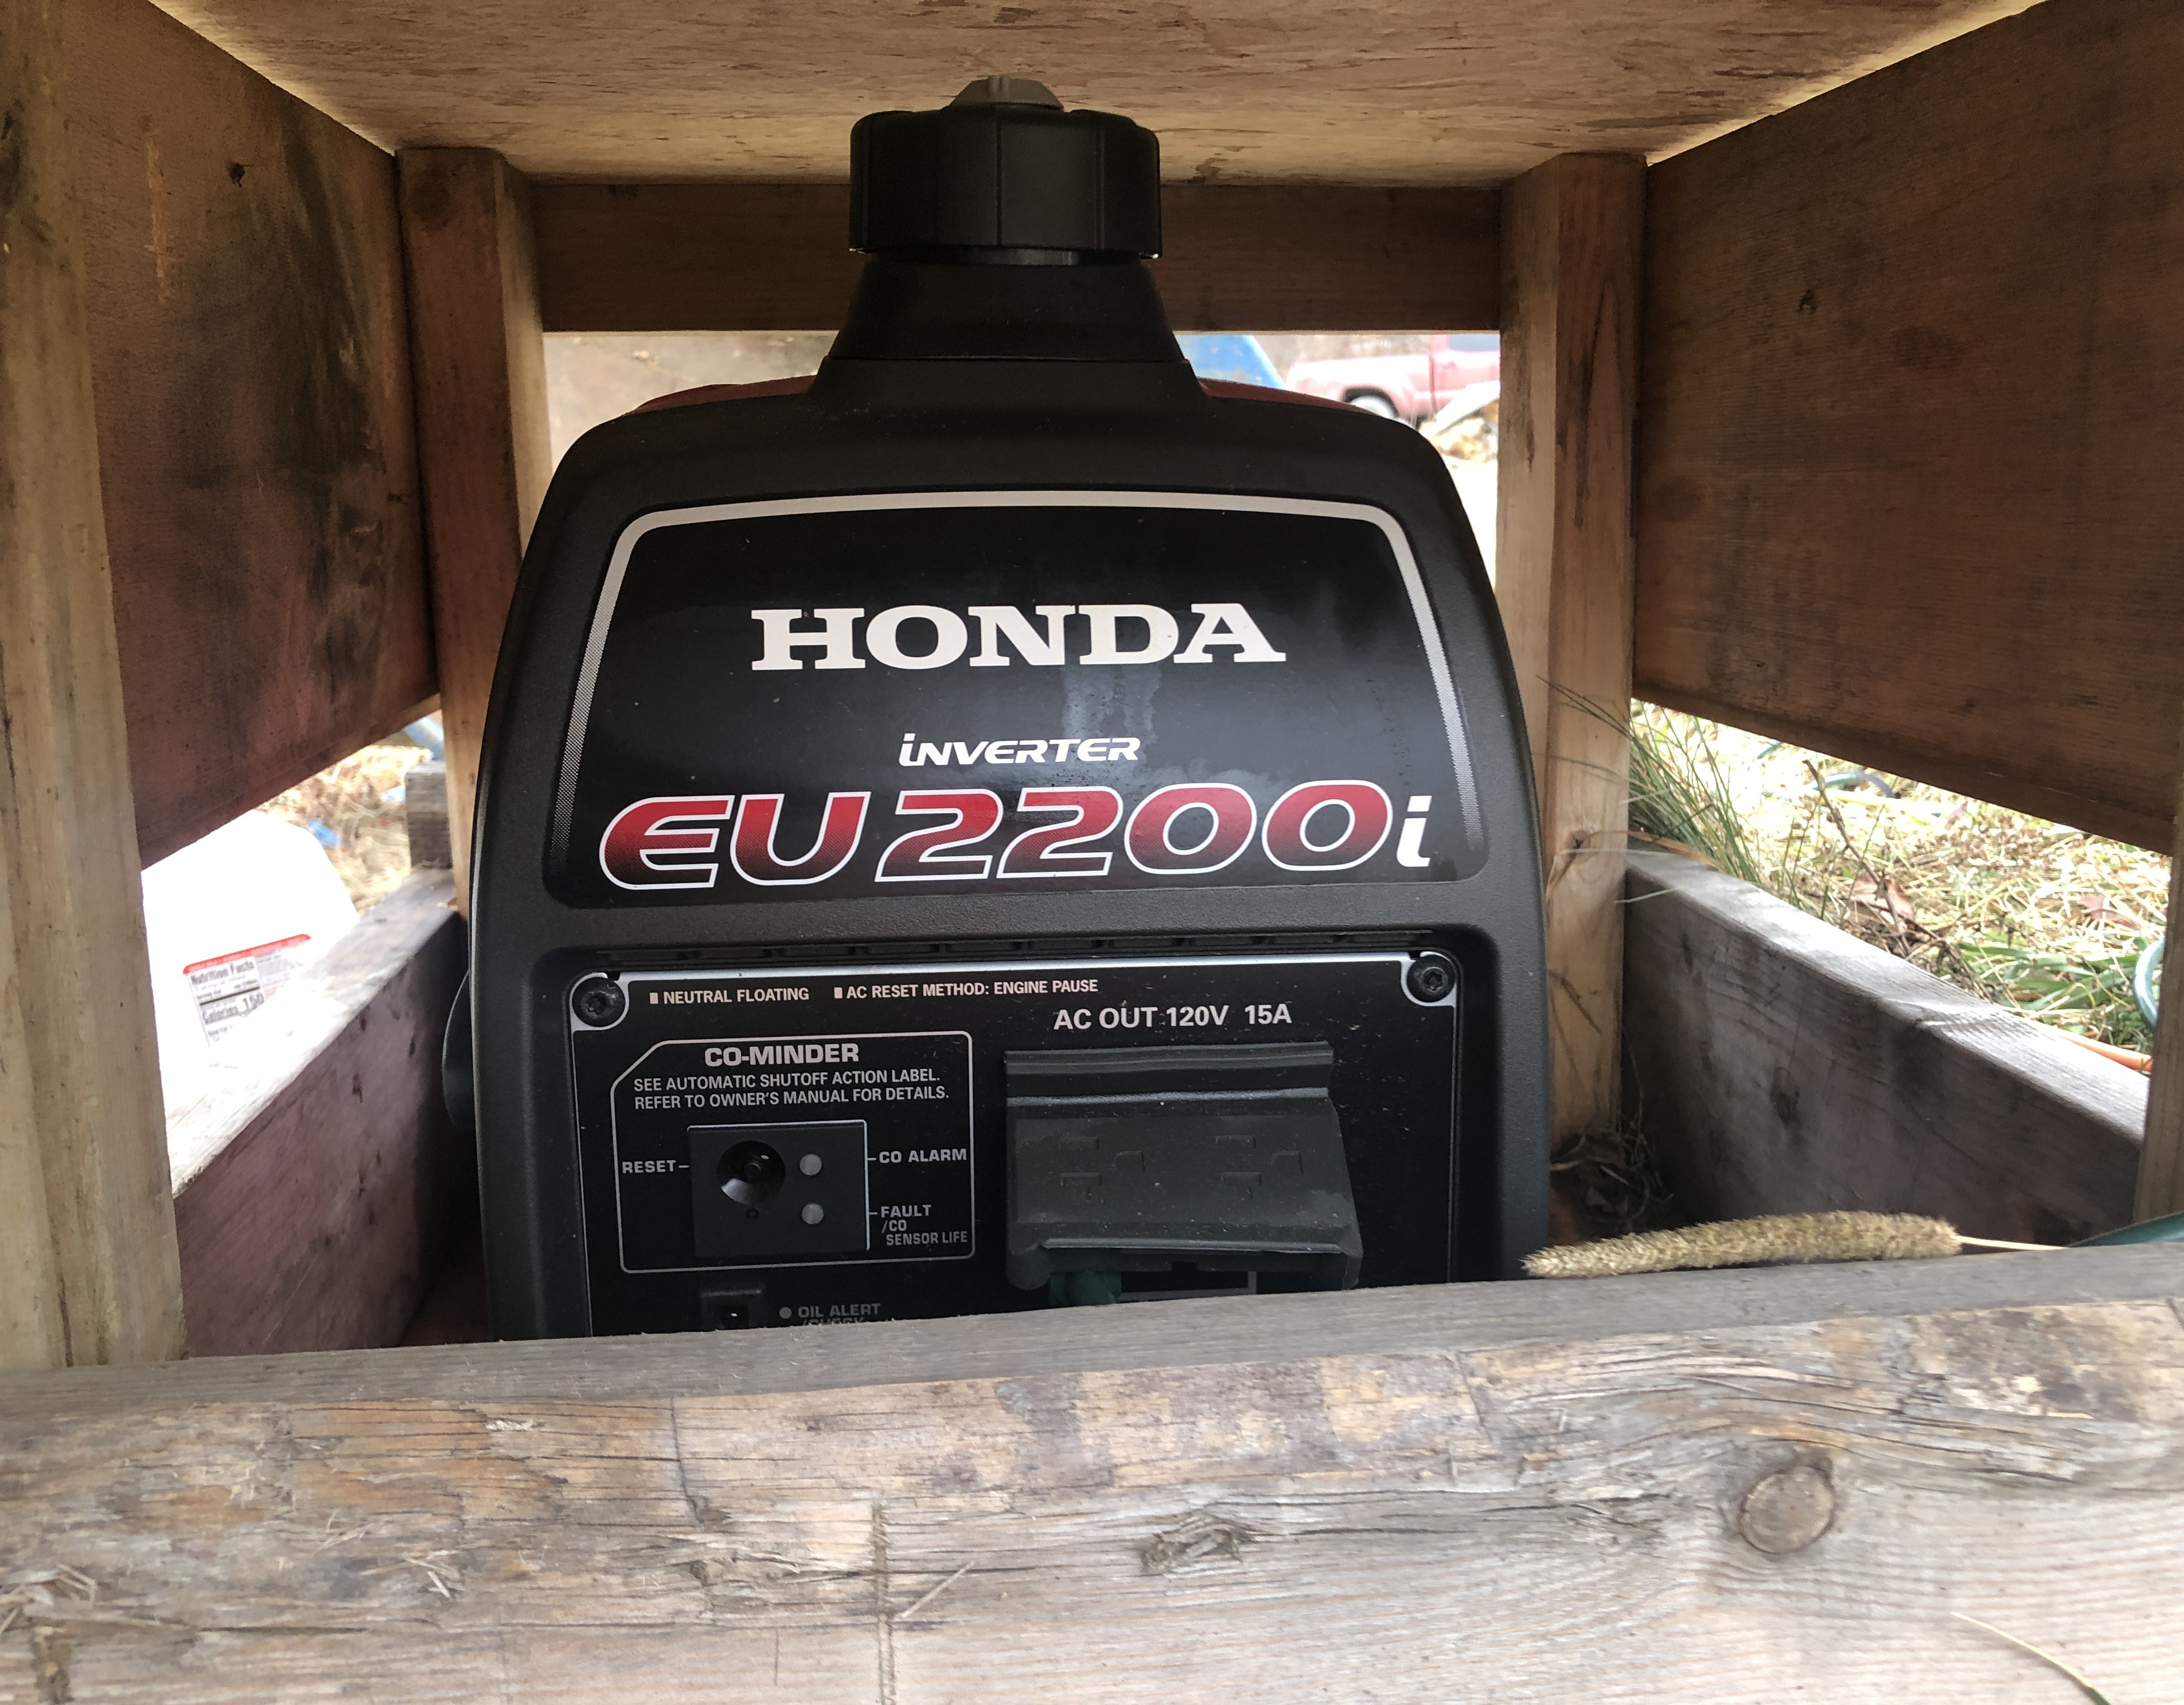
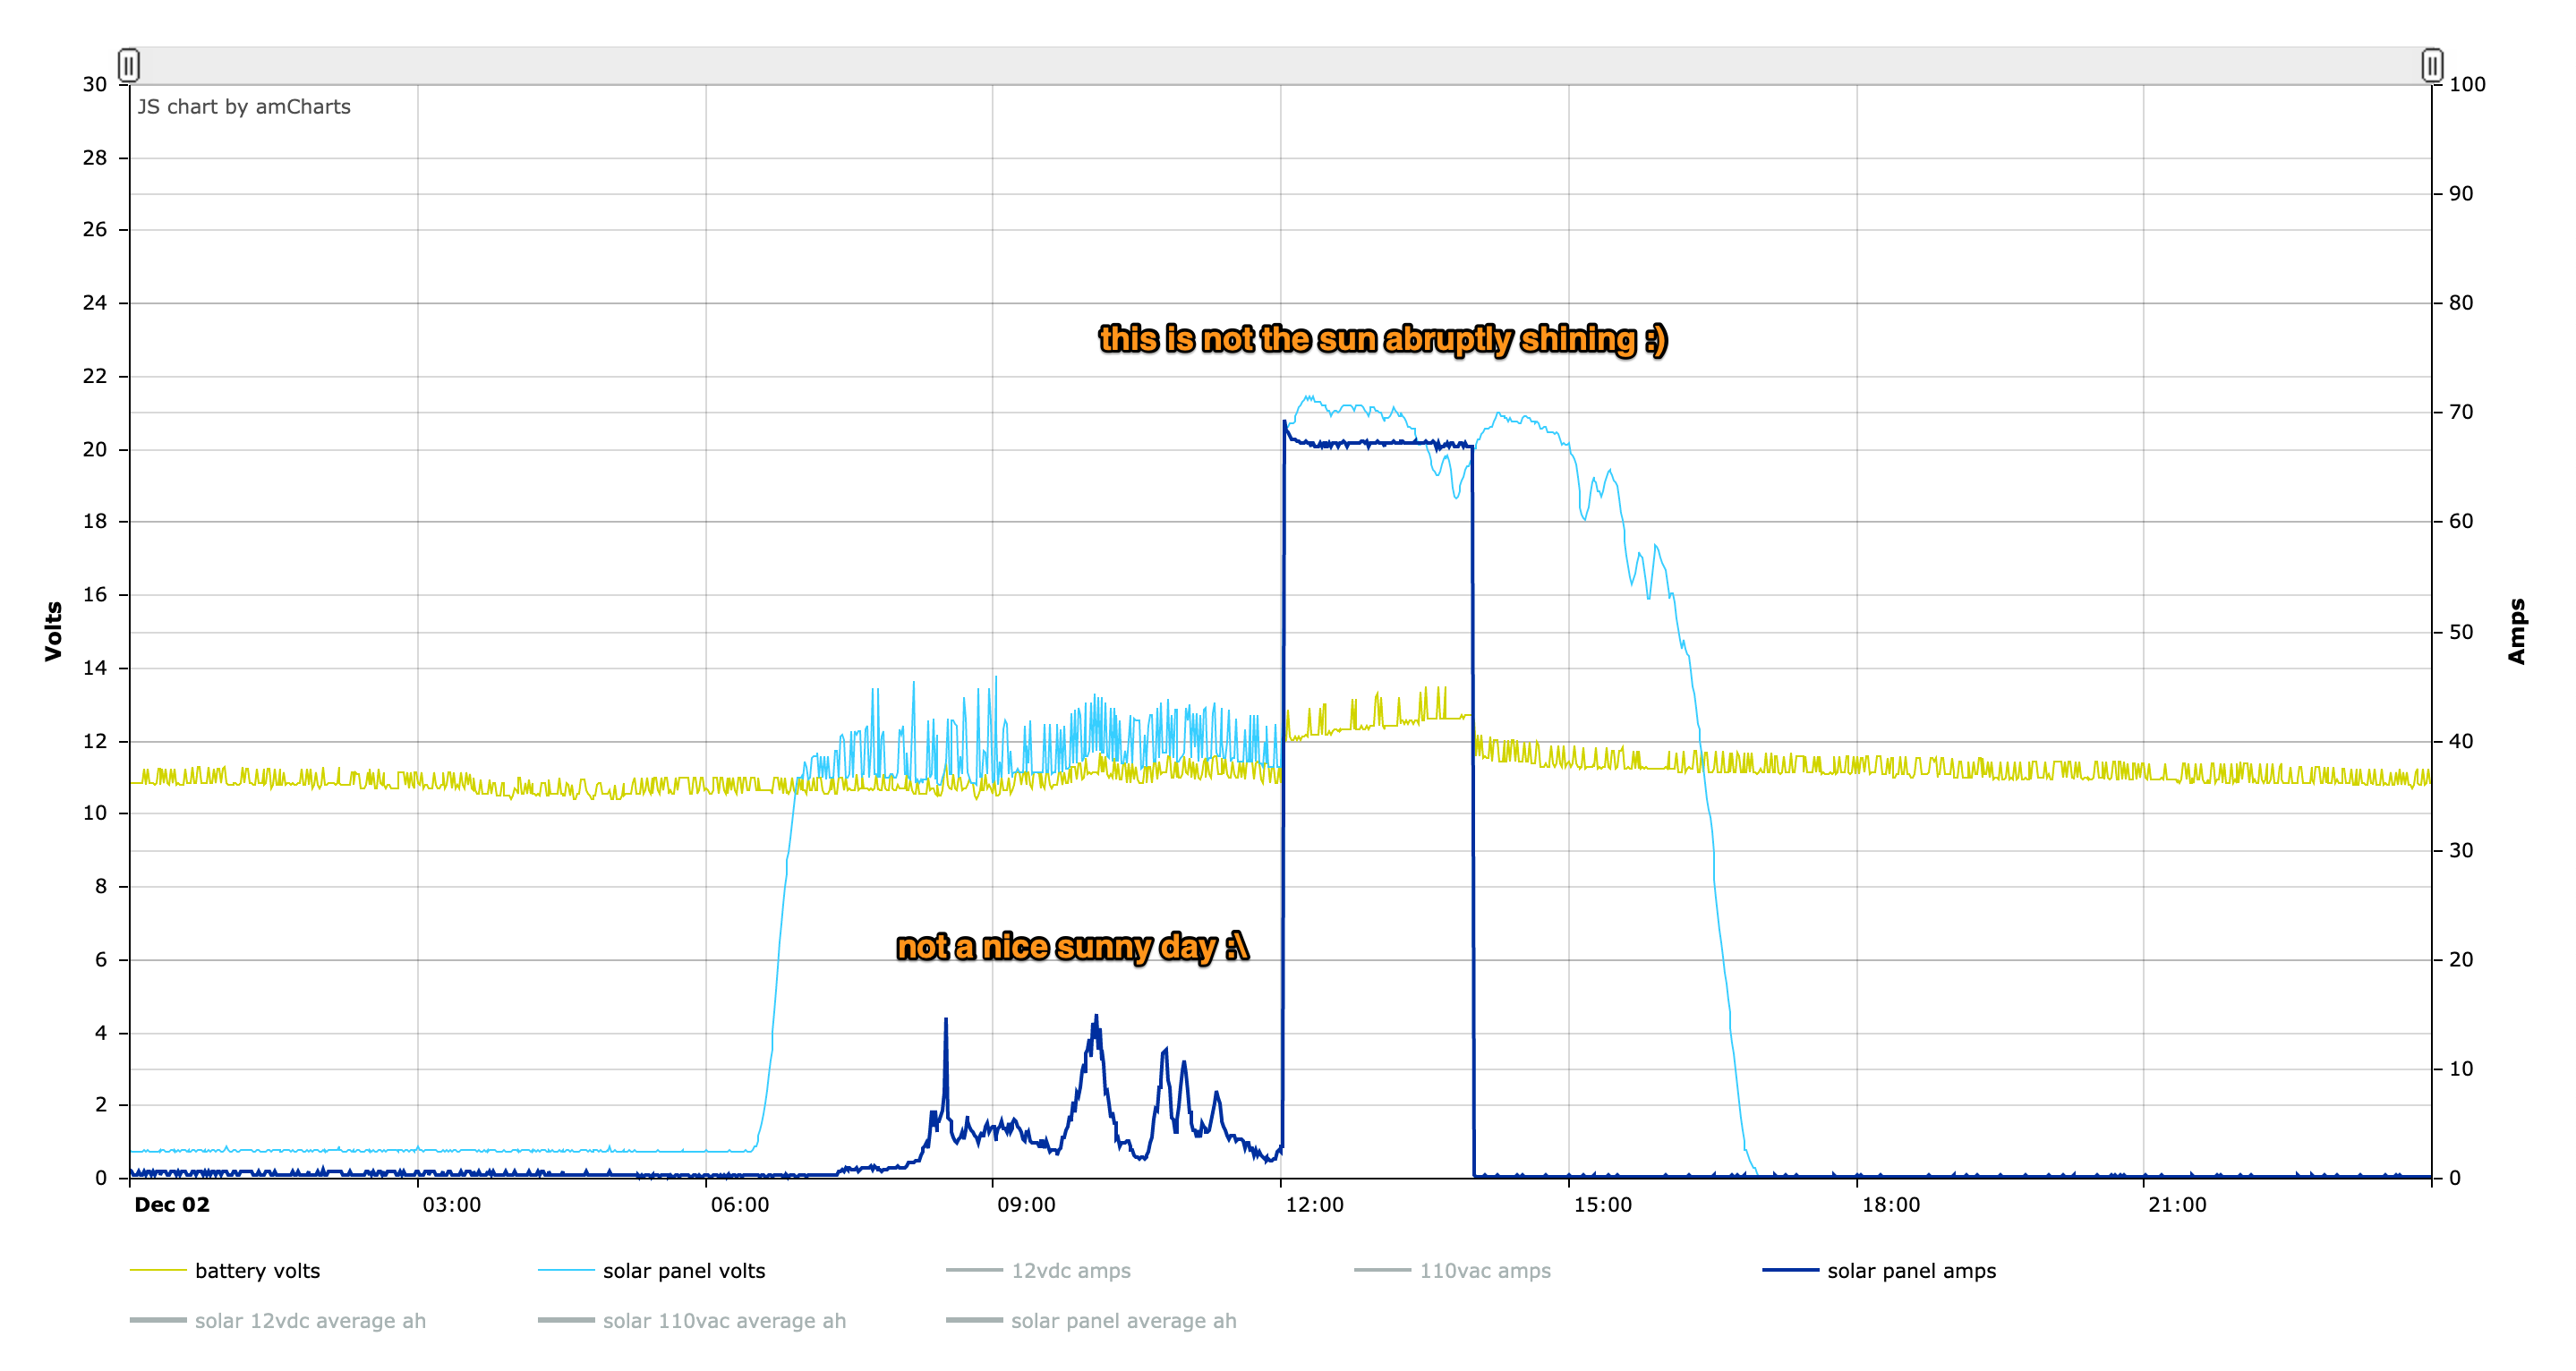
So we acquired a very nice Honda EU2200i, and a wonderful little device that plugs into it and produces 70A at 12VDC on demand.

The Honda generator is really nice and very quiet.
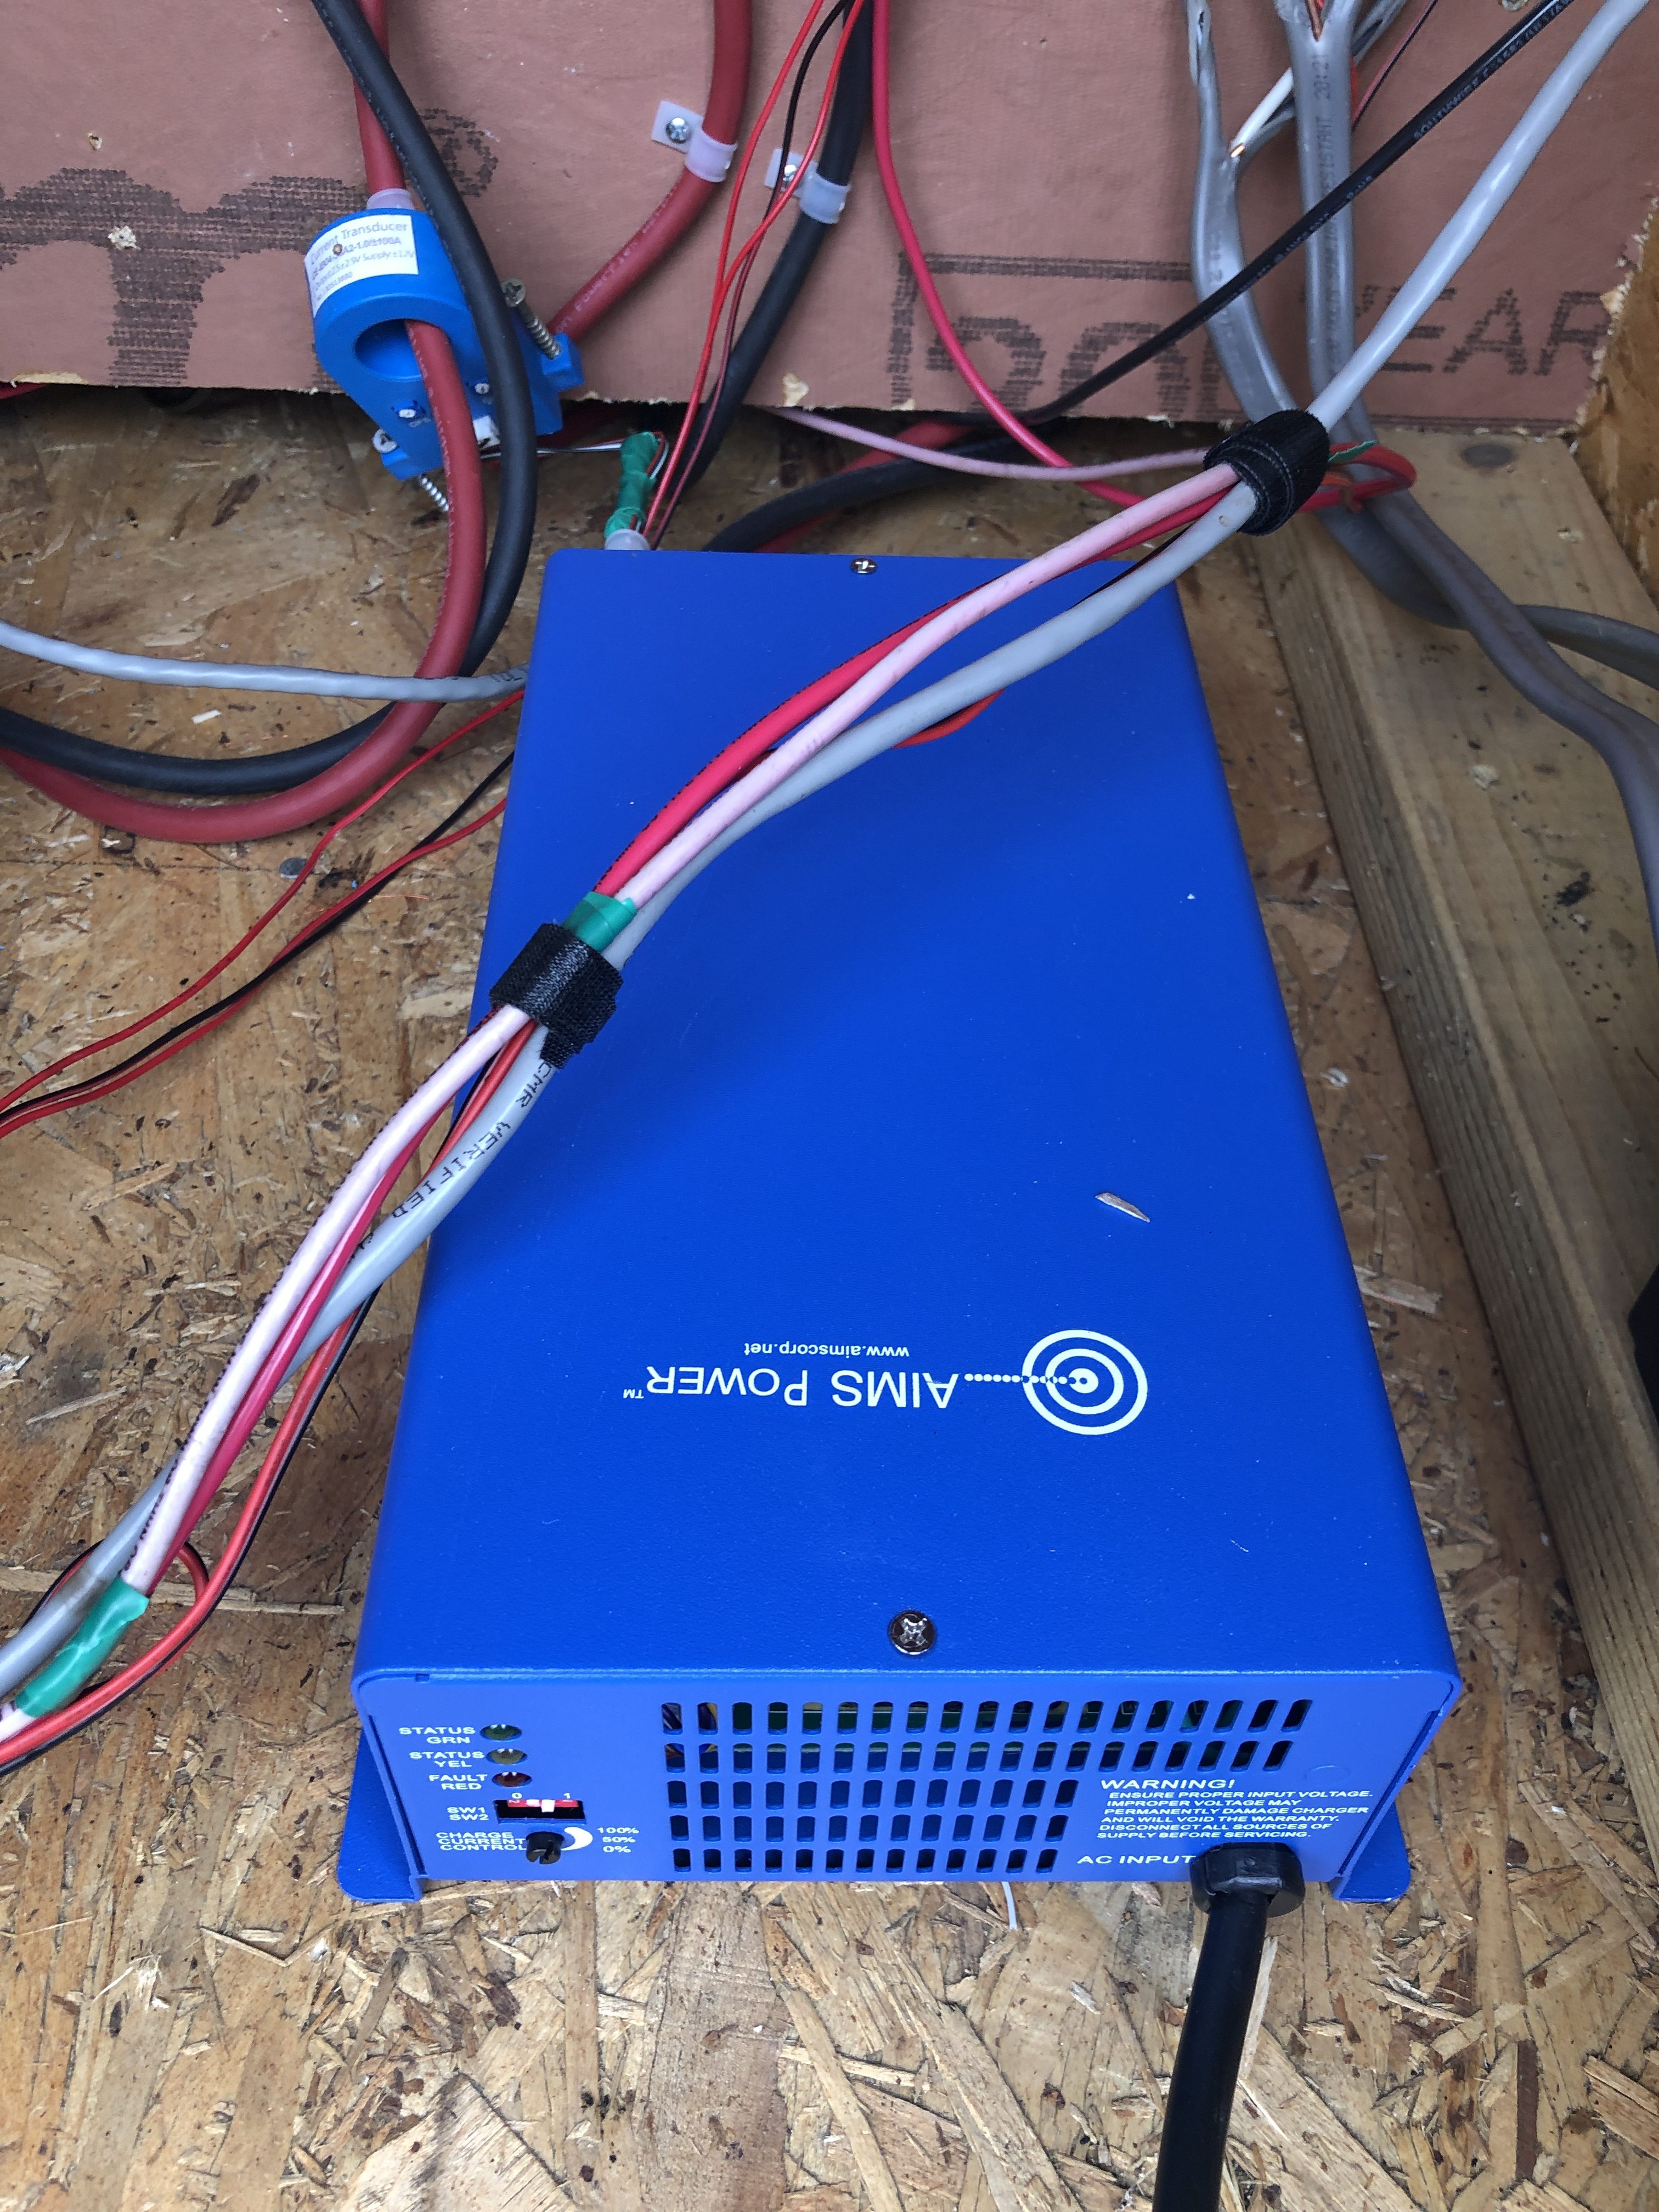
The AIMS Power CON120AC1224DC is very impressive, is can truly put out 70A on demand, it can be tuned to charge several battery types, and it decouples the load. I don’t need to switch the load to the generator, which means it’s always on the nice clean pure sine inverter.
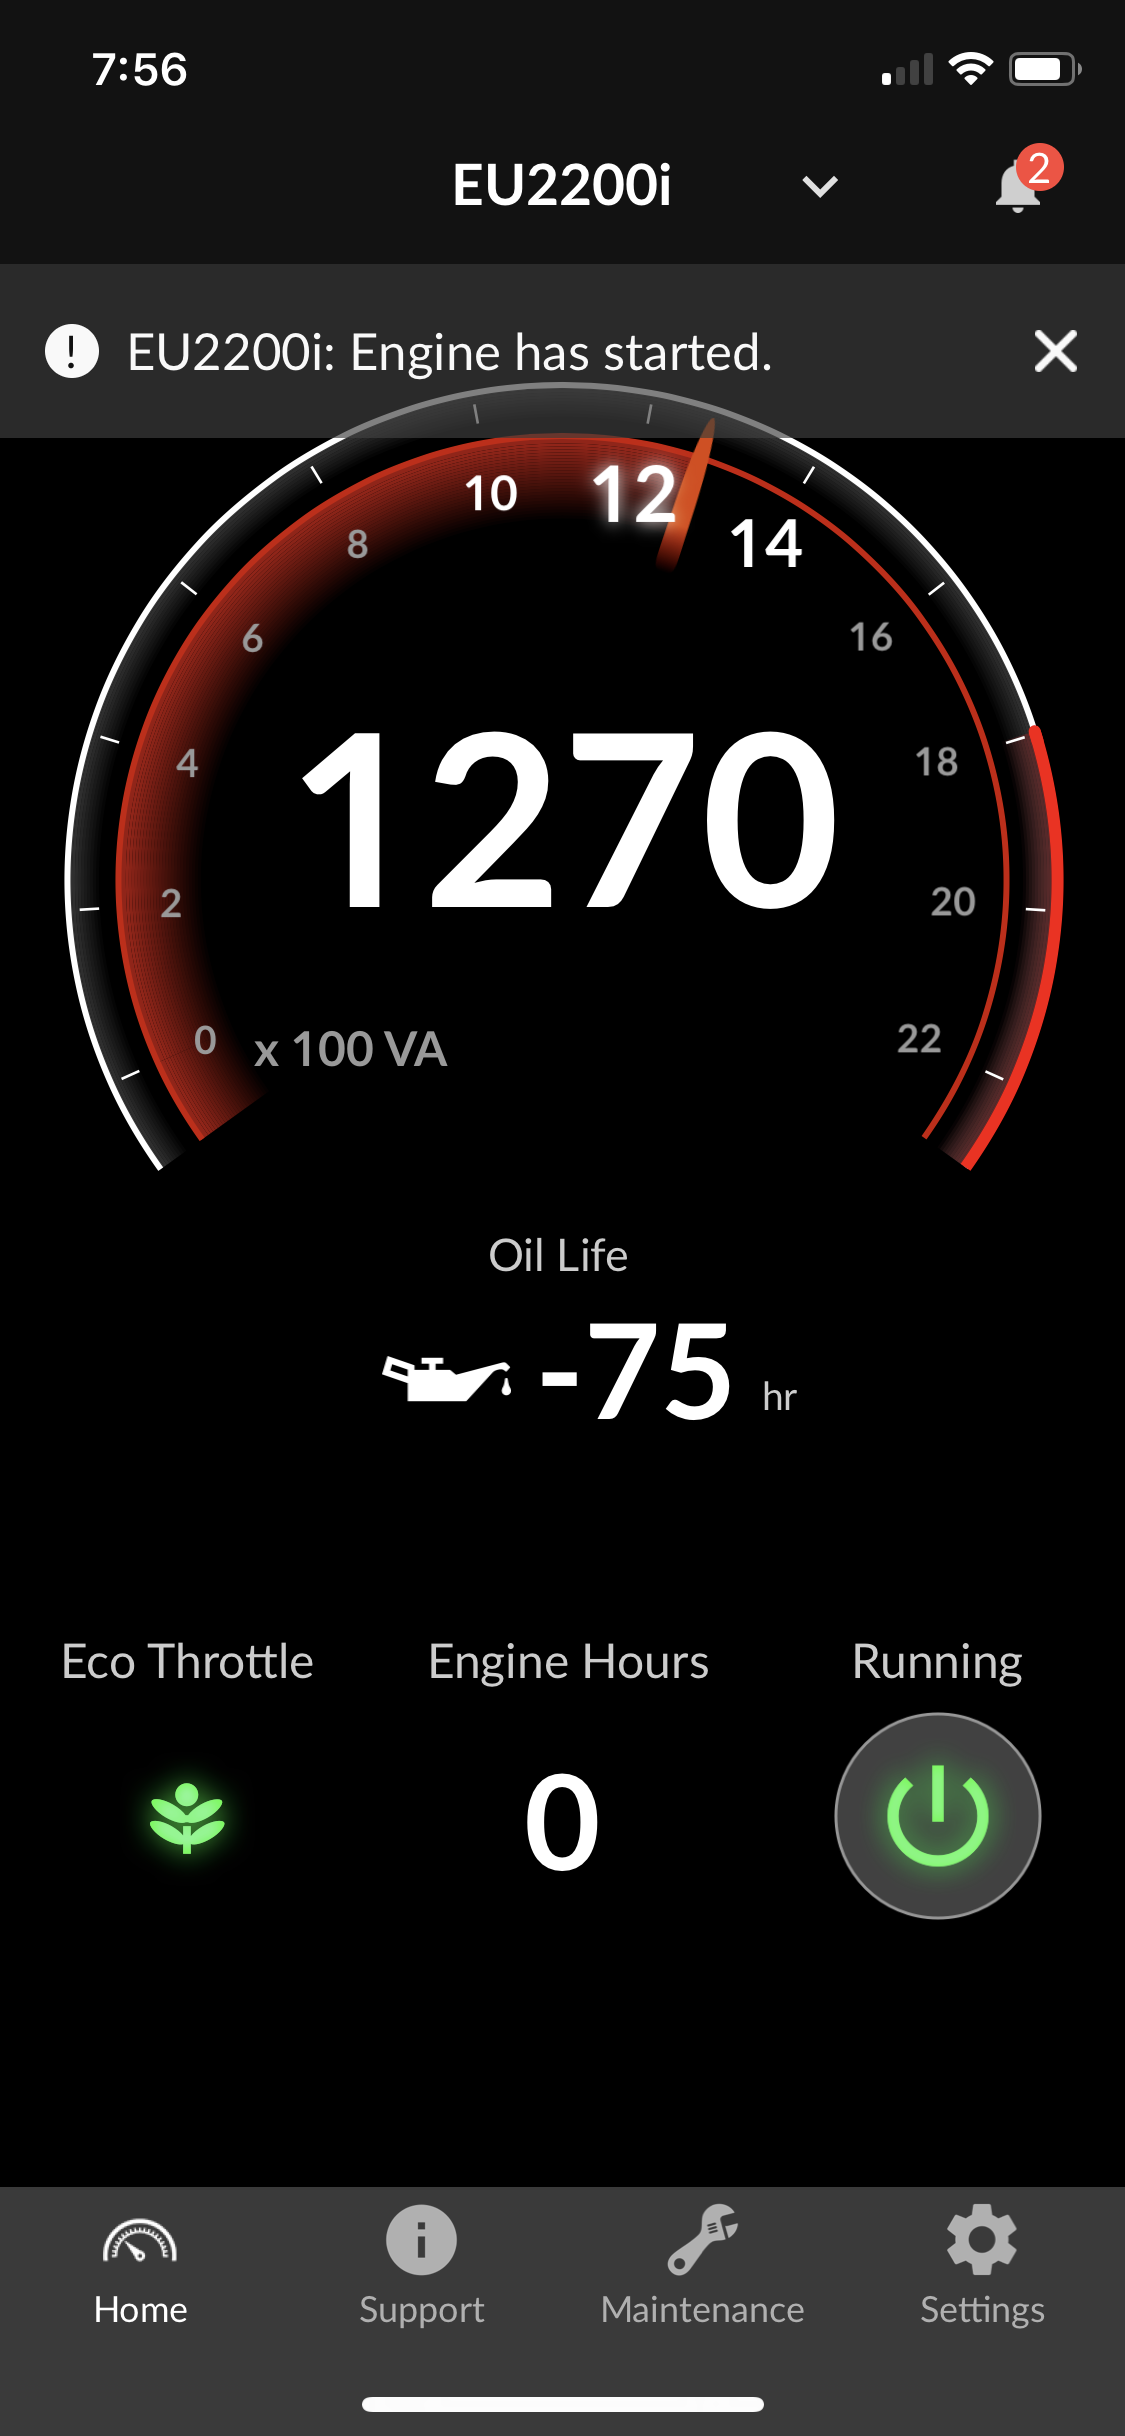
The Honda generator comes with Bluetooth, a fact I was not happy about as it’s gimmicky, but I have to say it is nice to not have to go back outside to turn off the generator. The AIMS converter is definitely working it hard.
 

The results on the solar graph are, well, a bit absurd to look at :).
electronics, I.T. ben December 15, 2020

Driving a Bipolar Stepper Motor with an L298N and a Raspberry Pi

A few things to know about the L298N

This is a rudimentary way to drive a stepper motor. You are activating the motor’s coils in sequence yourself to have it take steps. There exist cheap stepper drivers which only require 1 signal from the Pi to be instructed to execute a full step sequence.

There are 2 coils on a bipolar stepper motor, each with a + and a – side. As such, this method requires 4 pins from your Pi to drive the Motor Vs only 1 pin with a more advanced stepper driver. Equally true is that a more advanced stepper driver will require at least another pin for direction and they’ll usually have other pins for micro-stepping.

This method does not allow for micro-stepping, only full steps. This is fine enough for most applications.

Lastly, while the L298N method might appear less appealing because of the above points, I find it to be extremely robust (advanced stepper drivers can be very finicky). You can power your Pi or Arduino with it thanks to a 5V port (warning, it can only provide so many amps and a Pi running heavy processing will crash).

It can be used to drive 2 DC motors instead of 2 stepper coils of a bipolar stepper motor, and has 2 PWM pins to adjust power given to the motors. It’s a very versatile and enabling device to master. You’ll also learn a lot about how stepper motors work.

Finding your stepper motor coils

Documentation for electronics is often inaccurate, disparate, when it’s even available. It’s good to find or verify what wires you think your coils are on. To do so you can put an LED on 2 motor pins and spin it until it lights up. When it does, induction powered your LED so you know you are holding the 2 wires of a coil. The other 2 wires are obviously the other coil.
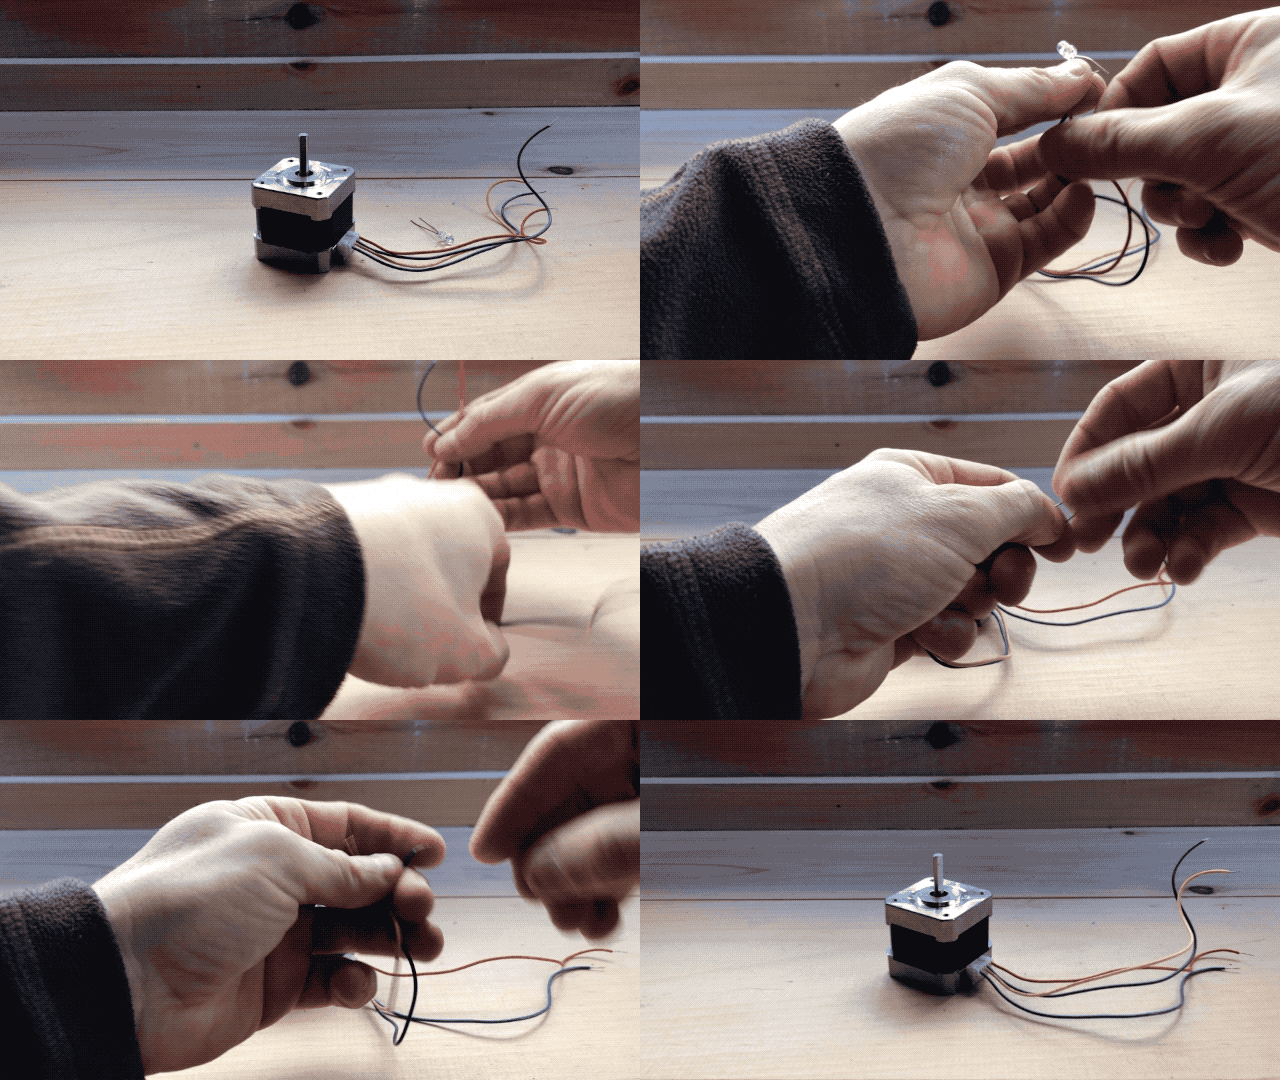
There is no good way I could find to verify which of a coil’s wire is positive or negative. In my trials, I found that it doesn’t matter for a bipolar stepper motor on an L298N. The worst that will happen is that your motor may turn in the other direction which is easy enough to fix by flipping wires.
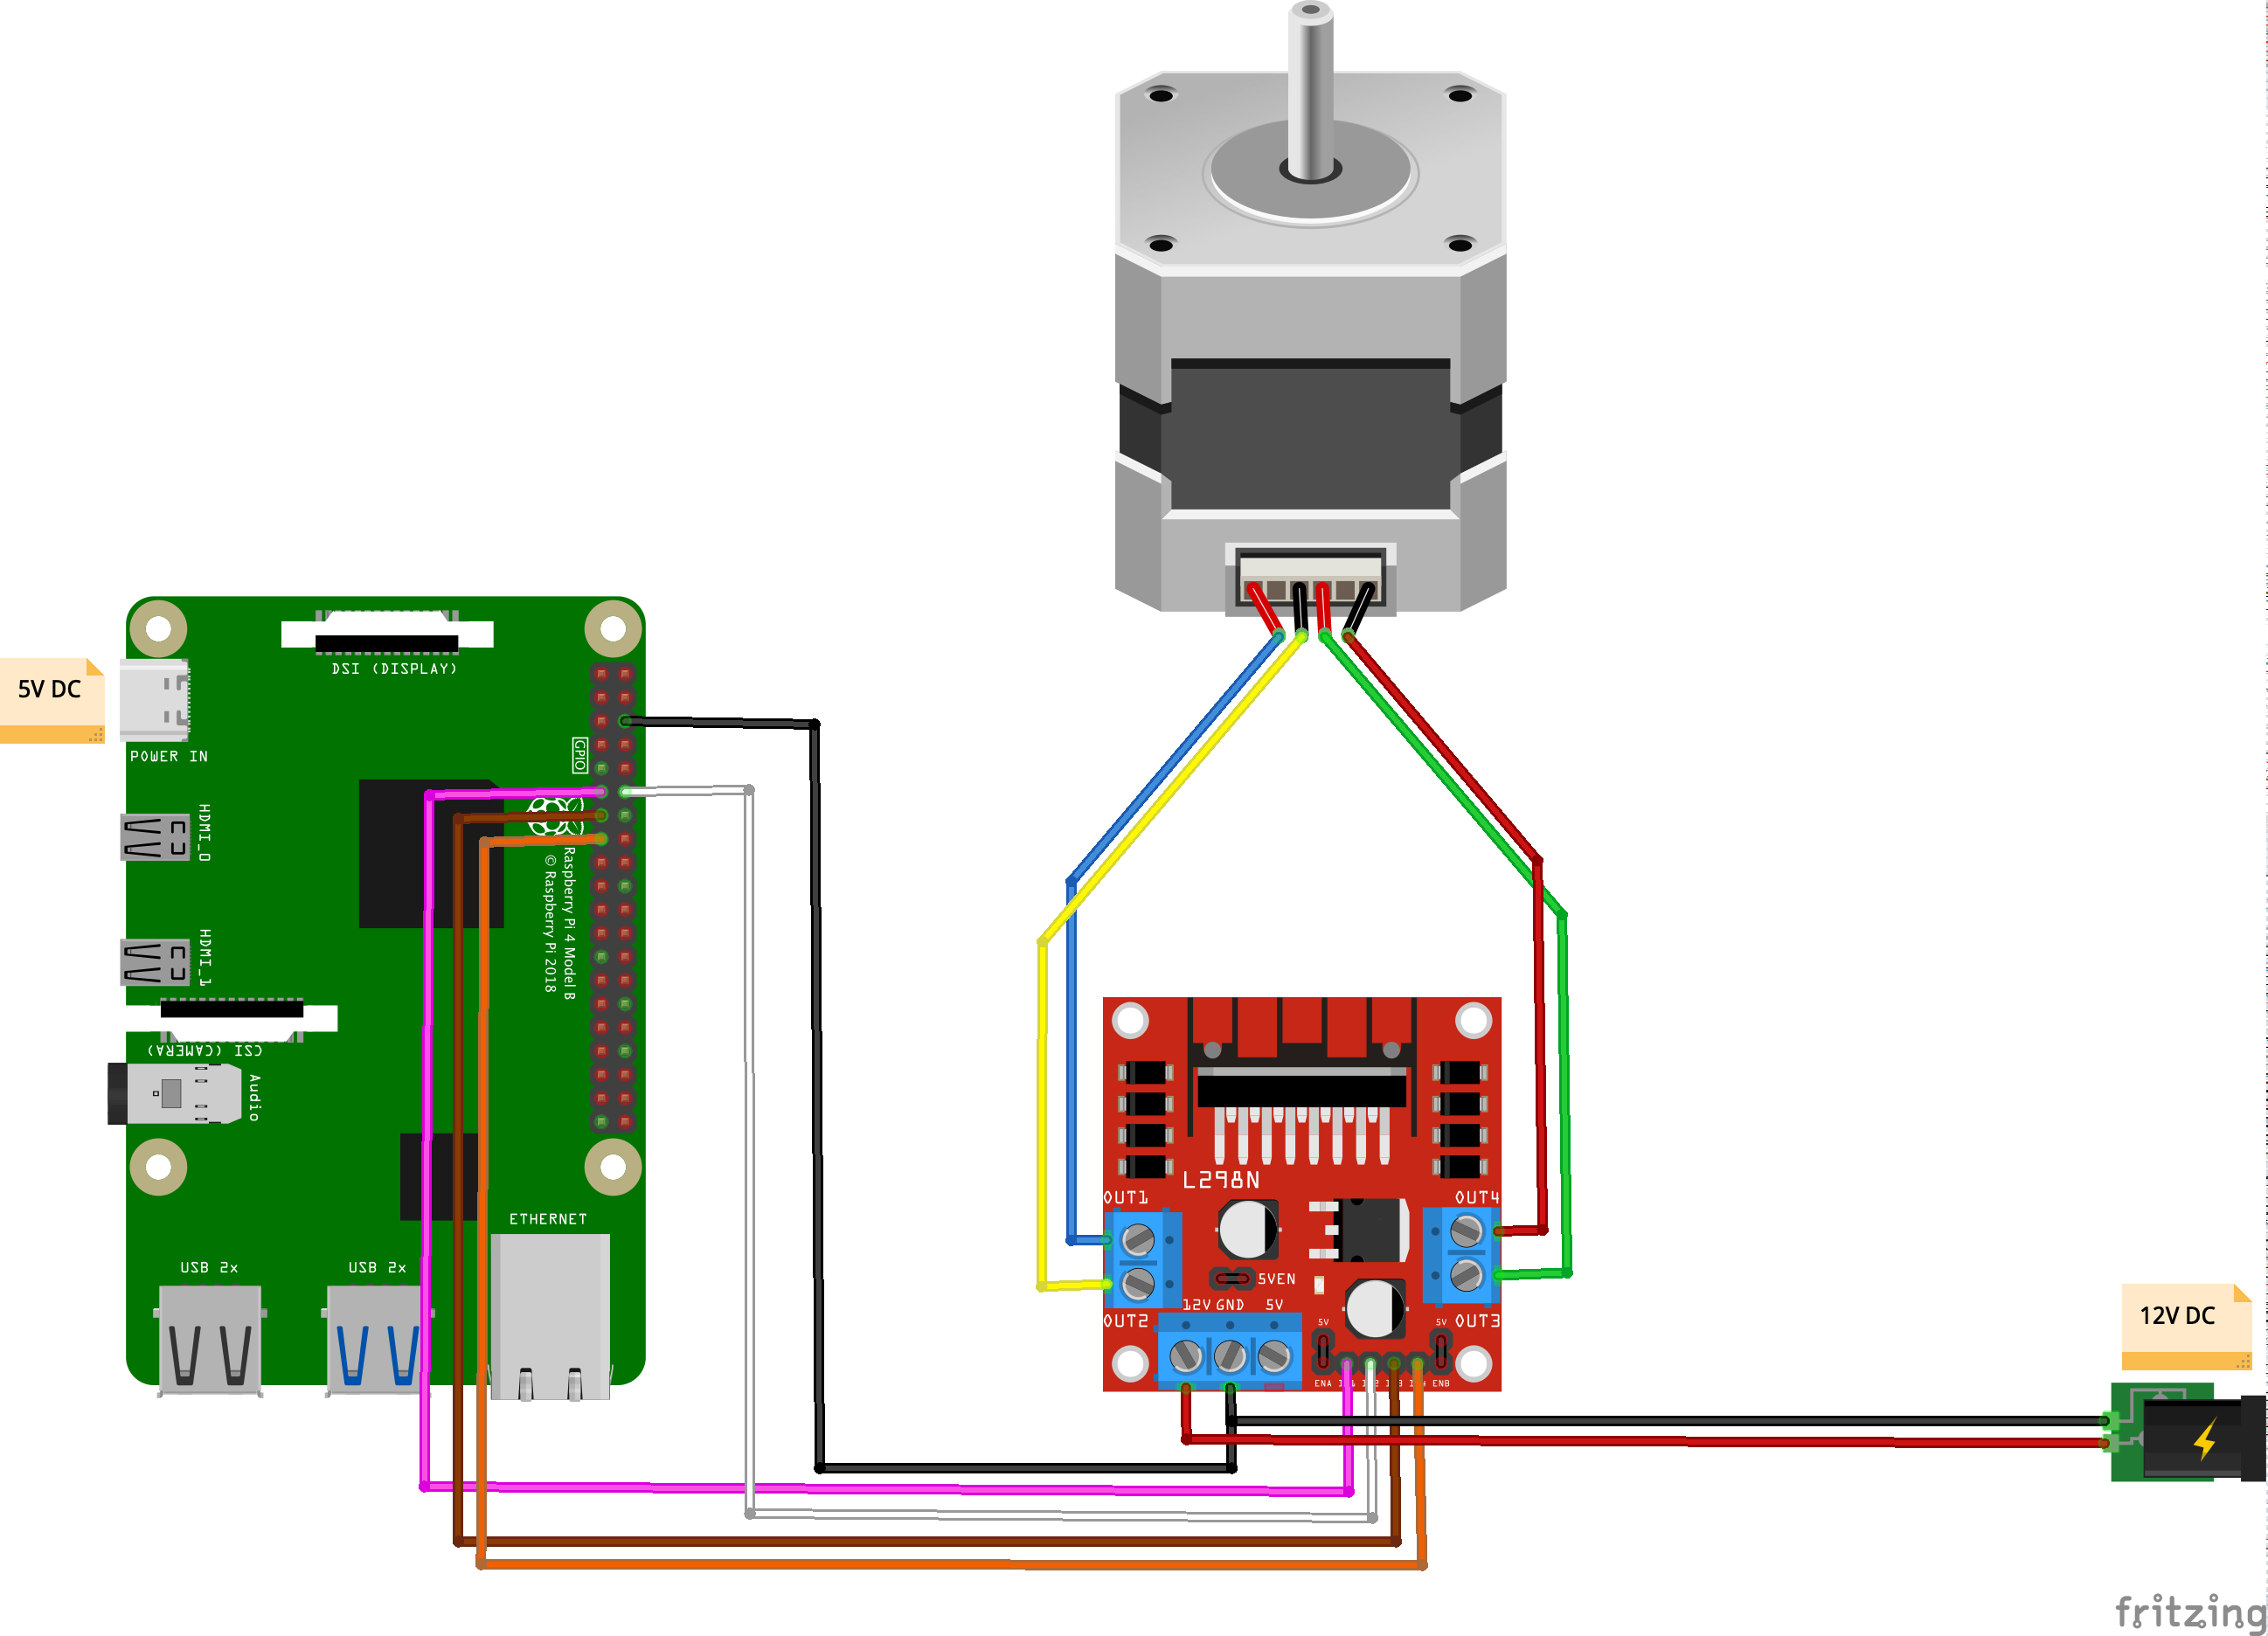
Circuit

Fritzing

Code

[python]#!/usr/bin/python3
import RPi.GPIO as GPIO
import time

out1 = 17
out2 = 18
out3 = 27
out4 = 22

# careful lowering this, at some point you run into the mechanical limitation of how quick your motor can move
step_sleep = 0.002

step_count = 200

# setting up
GPIO.setmode( GPIO.BCM )
GPIO.setup( out1, GPIO.OUT )
GPIO.setup( out2, GPIO.OUT )
GPIO.setup( out3, GPIO.OUT )
GPIO.setup( out4, GPIO.OUT )

# initializing
GPIO.output( out1, GPIO.LOW )
GPIO.output( out2, GPIO.LOW )
GPIO.output( out3, GPIO.LOW )
GPIO.output( out4, GPIO.LOW )

def cleanup():
GPIO.output( out1, GPIO.LOW )
GPIO.output( out2, GPIO.LOW )
GPIO.output( out3, GPIO.LOW )
GPIO.output( out4, GPIO.LOW )
GPIO.cleanup()

# the meat
try:
i = 0
for i in range(step_count):
if i%4==0:
GPIO.output( out4, GPIO.HIGH )
GPIO.output( out3, GPIO.LOW )
GPIO.output( out2, GPIO.LOW )
GPIO.output( out1, GPIO.LOW )
elif i%4==1:
GPIO.output( out4, GPIO.LOW )
GPIO.output( out3, GPIO.LOW )
GPIO.output( out2, GPIO.HIGH )
GPIO.output( out1, GPIO.LOW )
elif i%4==2:
GPIO.output( out4, GPIO.LOW )
GPIO.output( out3, GPIO.HIGH )
GPIO.output( out2, GPIO.LOW )
GPIO.output( out1, GPIO.LOW )
elif i%4==3:
GPIO.output( out4, GPIO.LOW )
GPIO.output( out3, GPIO.LOW )
GPIO.output( out2, GPIO.LOW )
GPIO.output( out1, GPIO.HIGH )

time.sleep( step_sleep )

except KeyboardInterrupt:
cleanup()
exit( 1 )

cleanup()
exit( 0 )[/python]

Stuff you might need for this to run:

[bash]sudo apt-get update –fix-missing && sudo apt-get install python3-rpi.gpio[/bash]


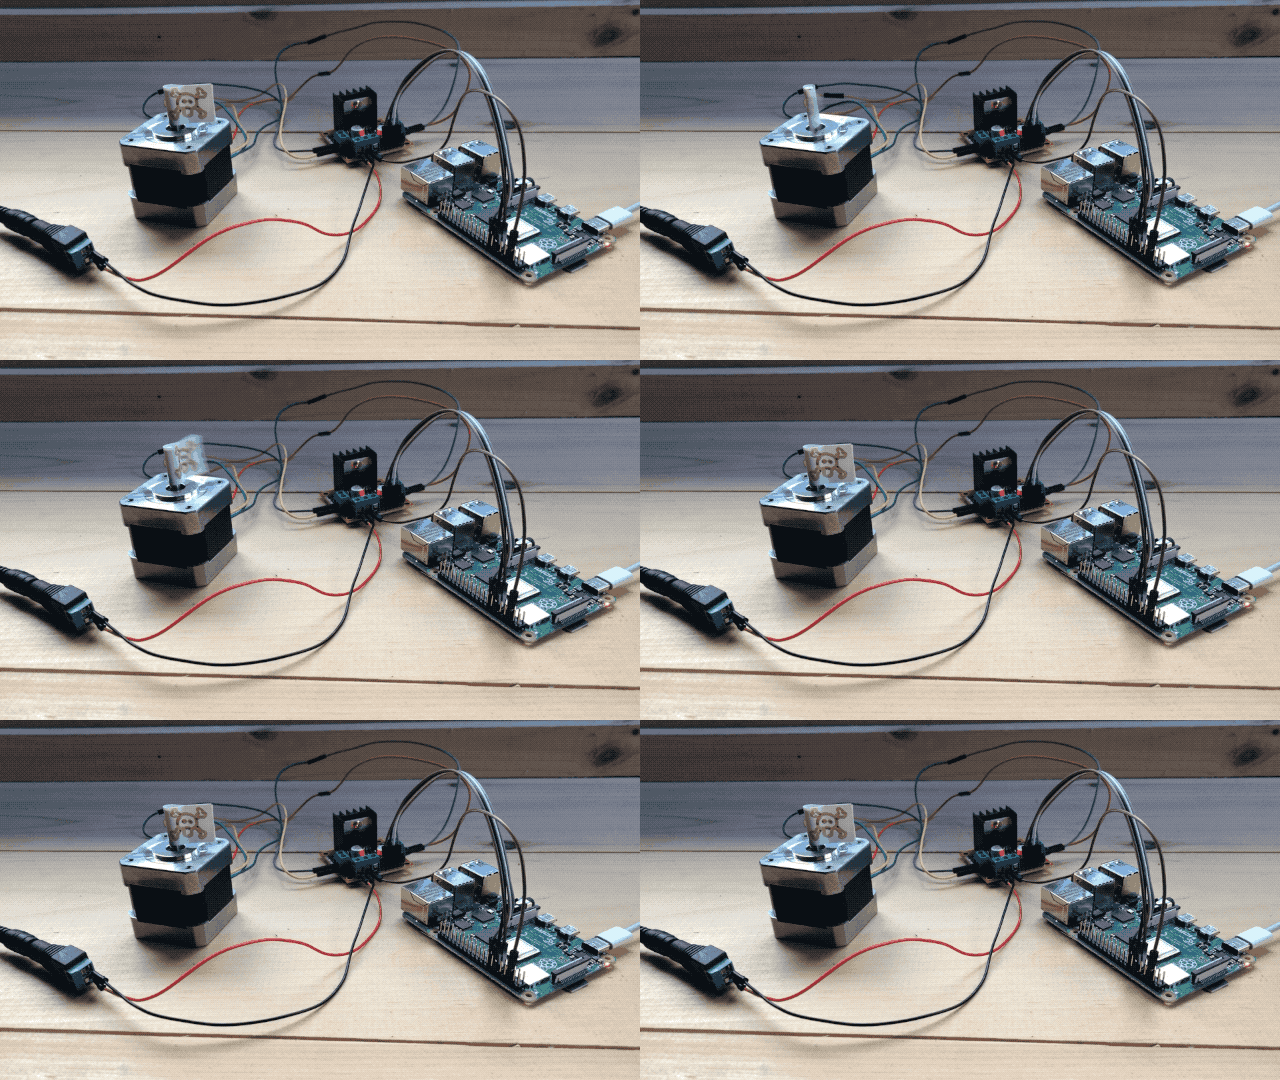
This stepper motor is rated for rotating by 1.8° per step. This means that it takes 100 steps to rotate 180 degrees:
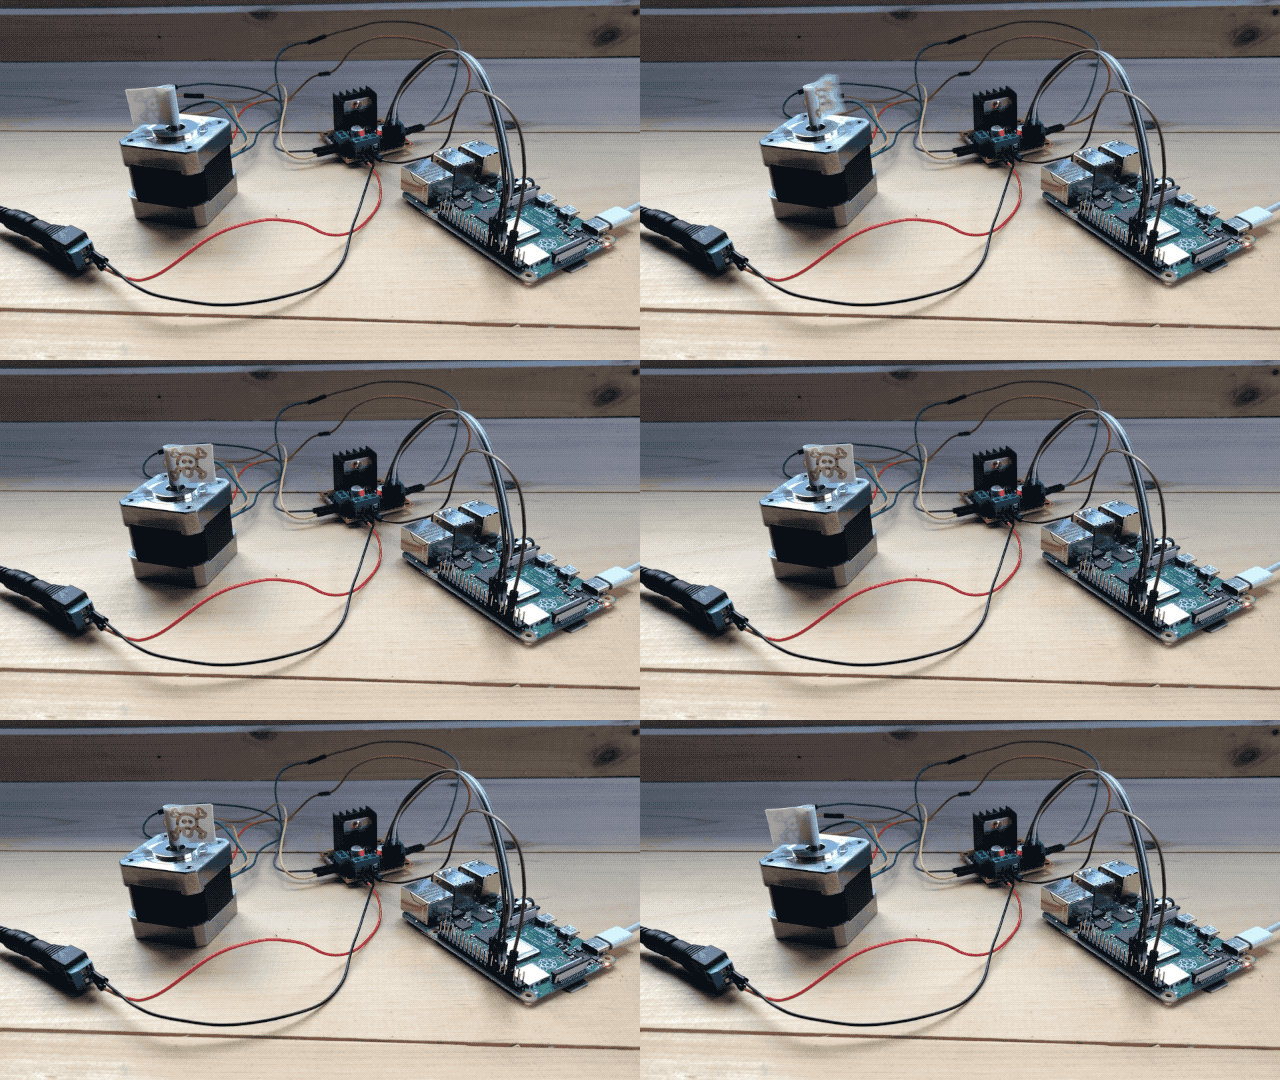
and 200 to do a full 360:
Power the Pi from the L298N?

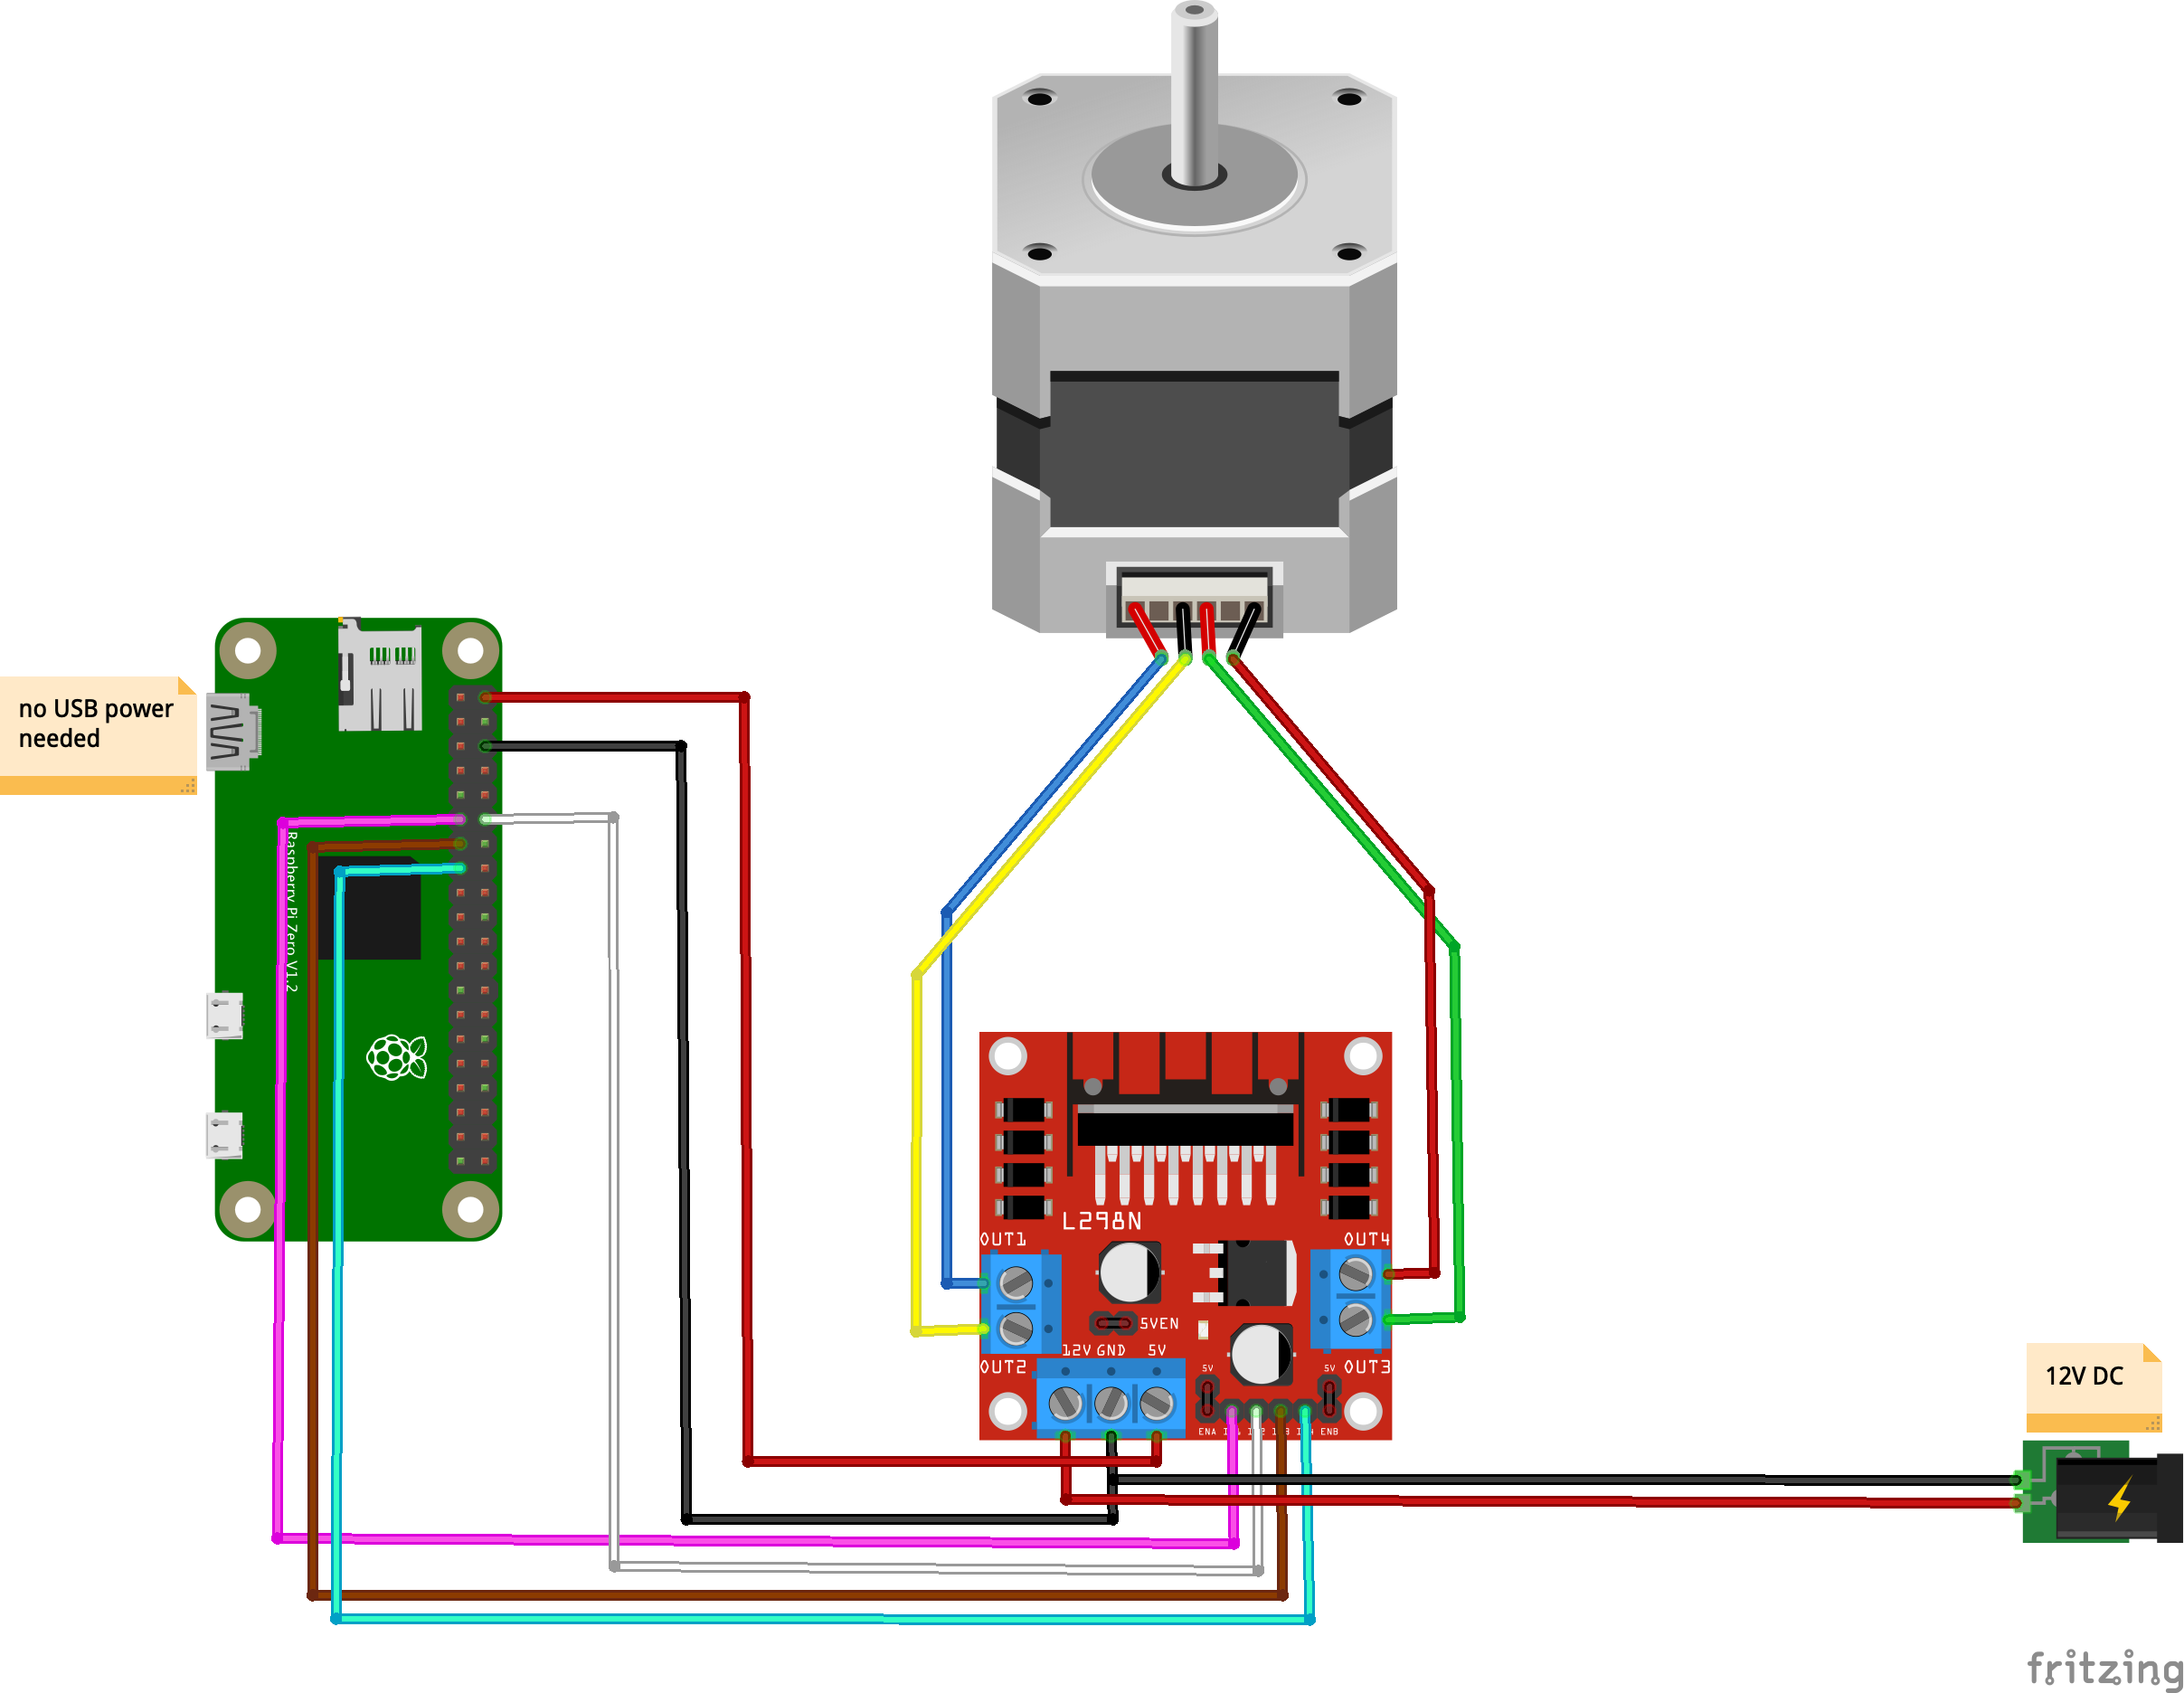
As I alluded to earlier, the L298N comes with a 5V power output that is most convenient to power Pis and Arduinos as it allows you to eliminate one of the 2 power supplies to your system. Be advised that while it provides the right voltage, it does not provide enough amps to power a standard Raspberry Pi, and while it can power a Pi Zero, the later will not get enough power and crash if it works hard enough (having a camera and a live streaming server pushed it over the edge in my testing). It will power a Pi Zero on Wifi running Python which is enough for a lot of applications.

Here’s the circuit if you want to do this:
Fritzing

miscellaneous ben December 07, 2020

Protected: Esther the Cat Herder

This content is password-protected. To view it, please enter the password below.

aesthetics, plots ben December 07, 2020

6 and 1/2 hour job

Someone in Brazil drew this on Mandalagaba years ago and I’ve used it to stress test plotters since :). I wish I could get in touch to show them.


https://ben.akrin.com/wp-content/uploads/2020/12/6andahalf.mp4

self sustainability, solar power ben November 30, 2020

Chasing the Dip

As Murphy’s law would have it, our solar upgrade coincided with a strange phenomenon which affected us for the whole month of November. Our batteries voltage took a sudden drop every night around 9:00PM going to well bellow any usable voltage and leaving us scrambling for power through the nights.
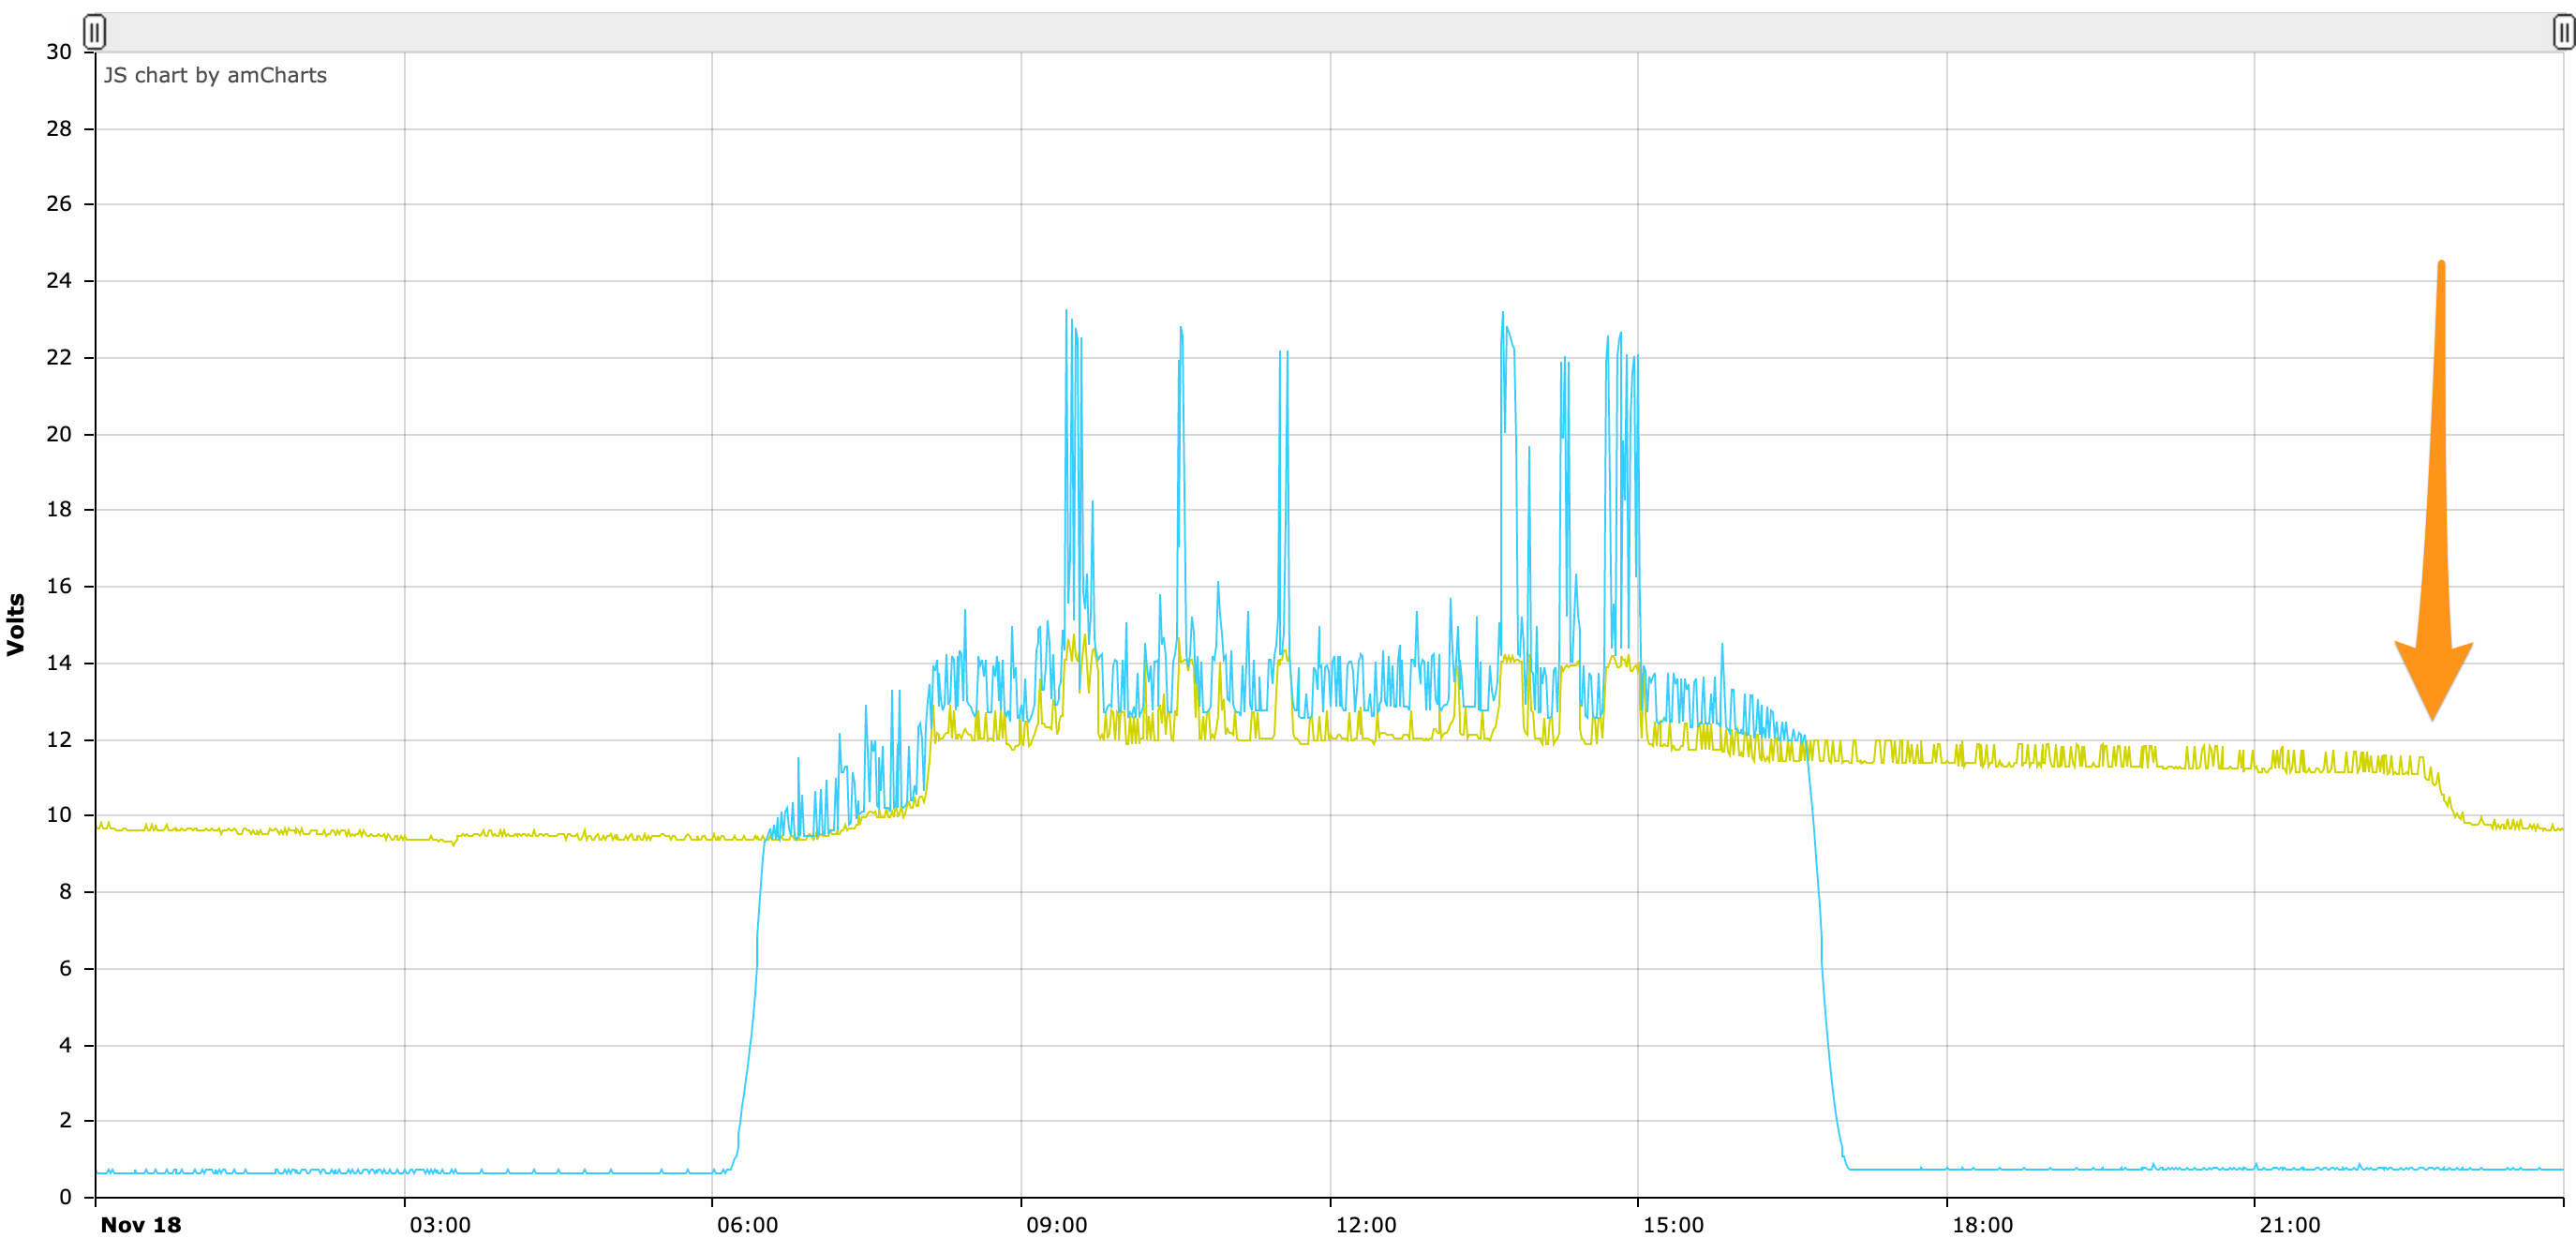
Because of this unfortunate timing, and my lack of understanding of all things battery related. I ended up chasing this dip for weeks, trying everything under the sun isolate it. Long story short, all our AGM batteries are shot.

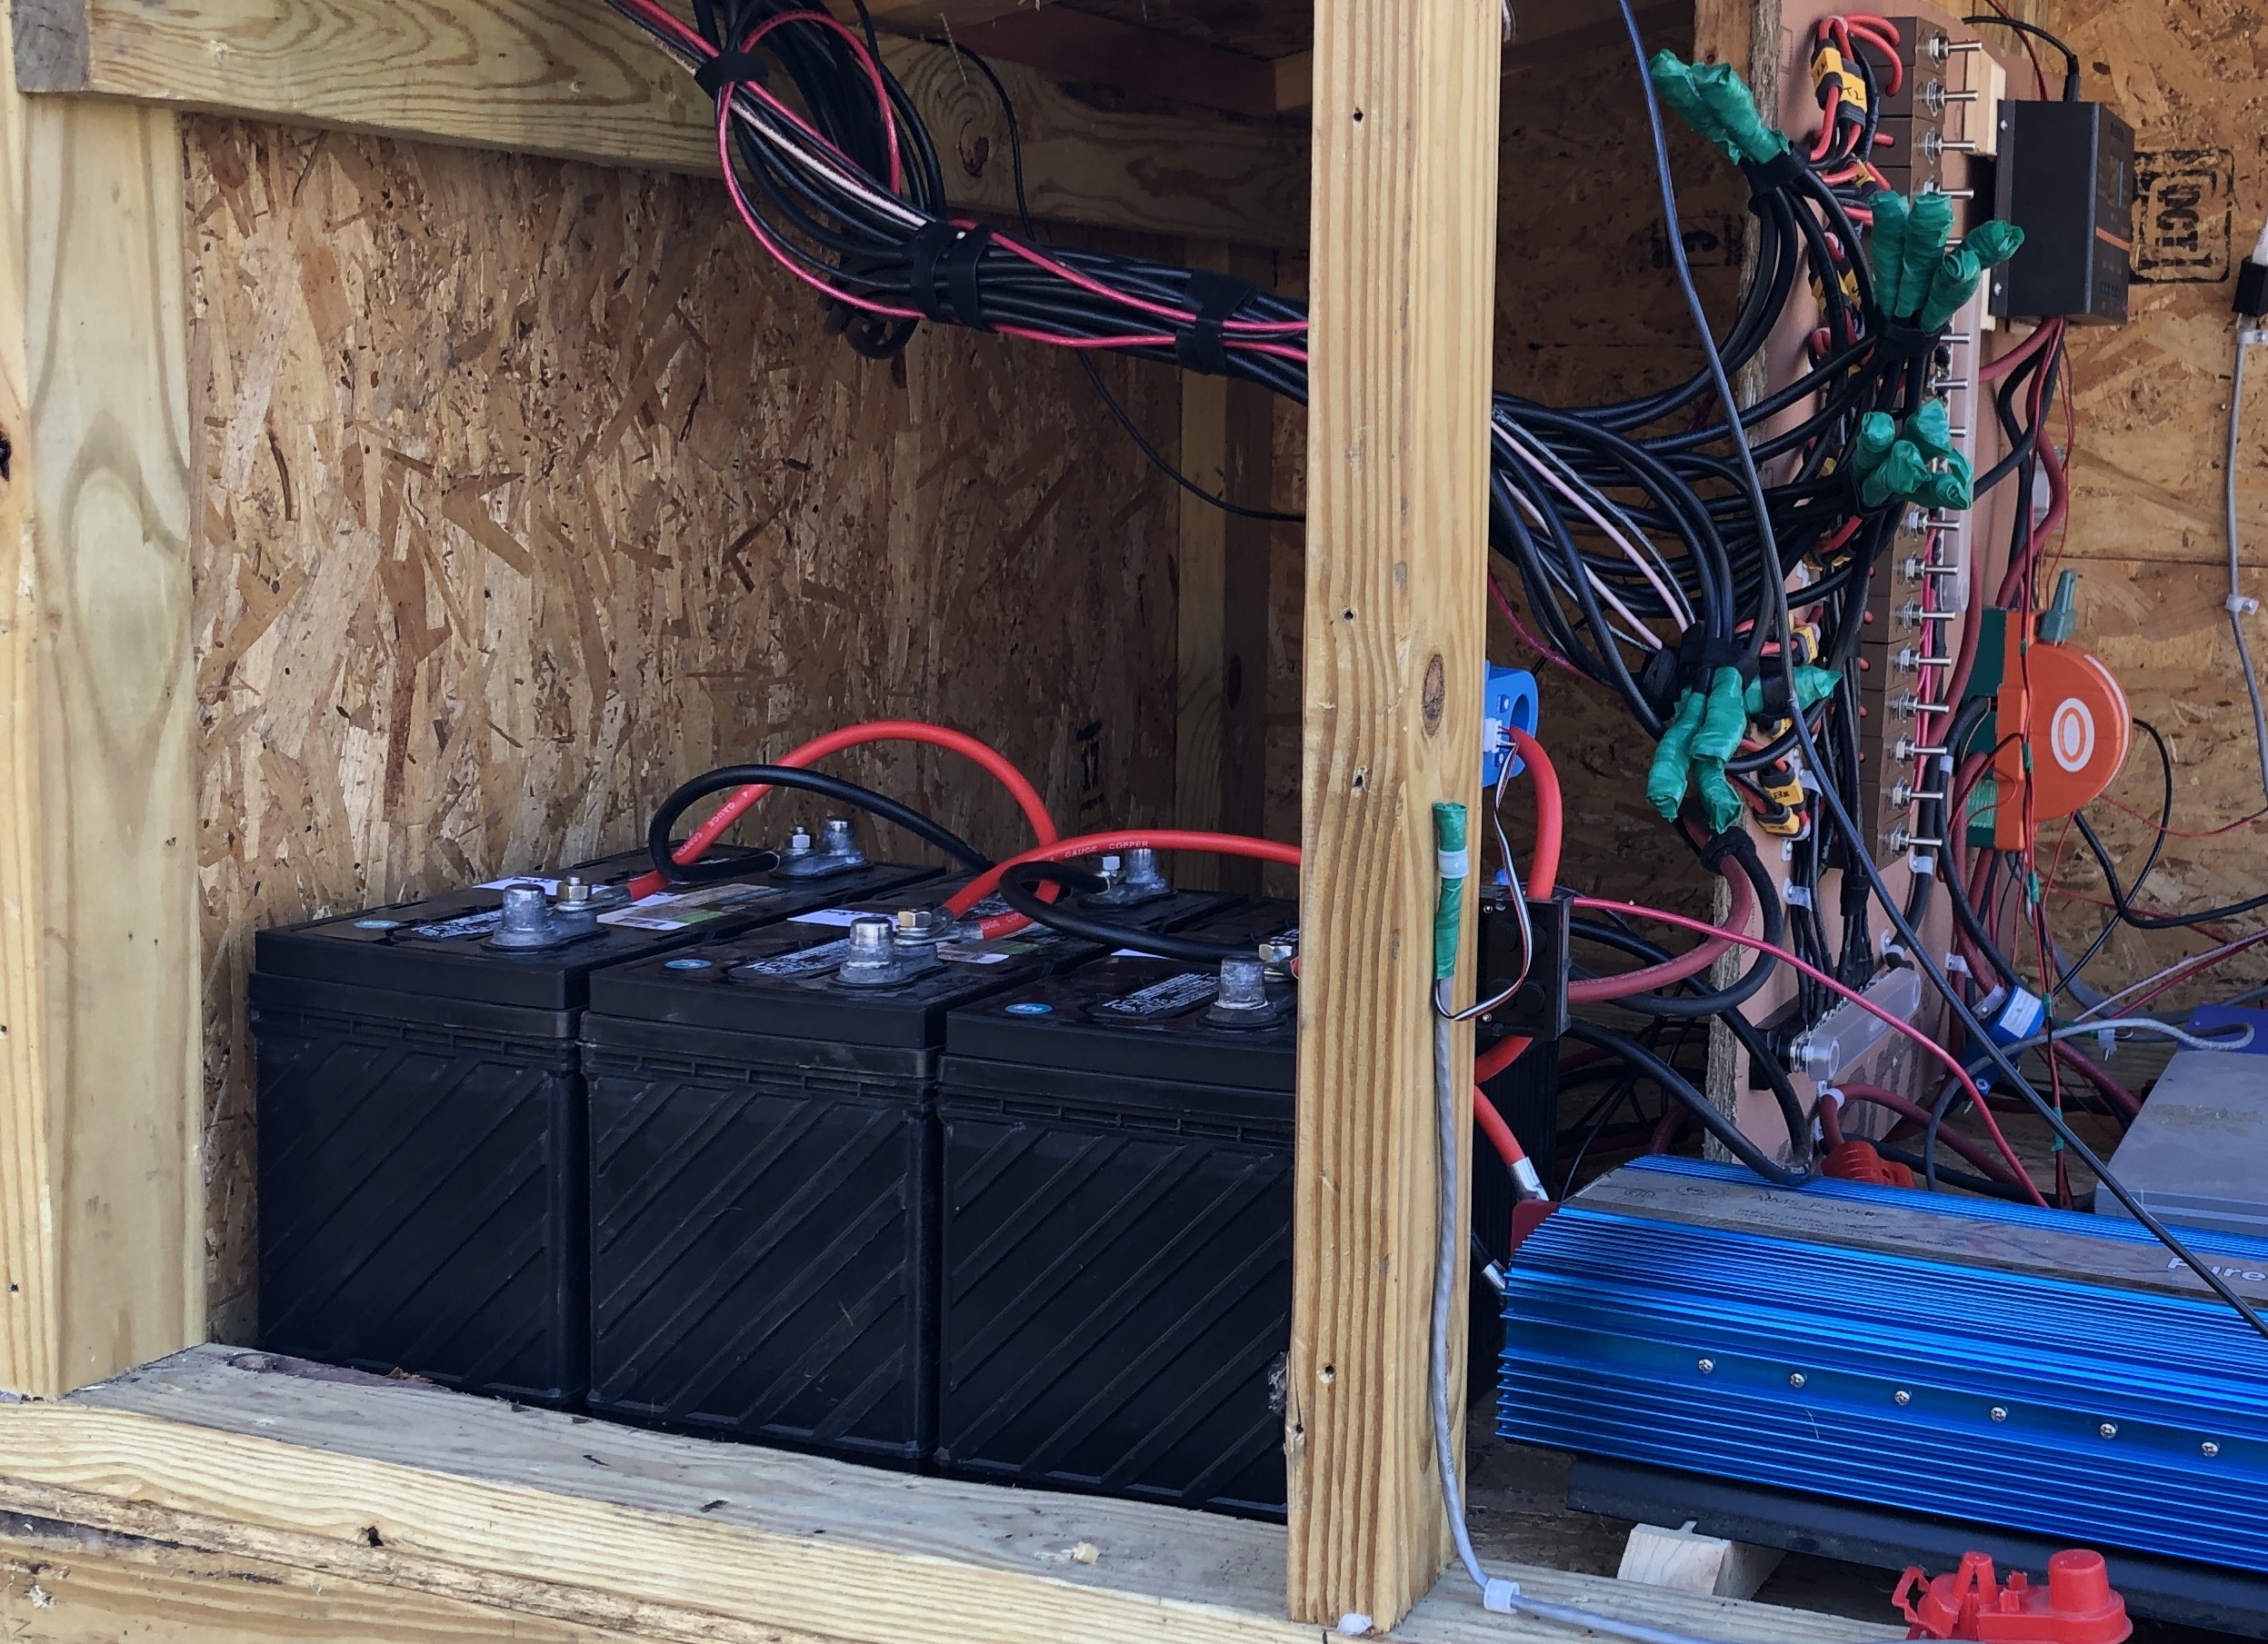
Years ago I bought AGM batteries because they are more self contained and don’t require maintenance (no off gazing, no re-filling them). A choice that made sense when everything was new and too much to think about. Today, I’m realizing that the flip side of this is that AGM batteries have a shorter lifetime and that there is nothing you can do about it. Sure they were no maintenance for a few years, but today they are between 3 and 5 years old and we have to replace them all (all $1600 worth of them).

I reevaluated our battery situation, and with a much better grasp of all things solar, I decided to go with regular flooded lead acid batteries, they are deep cycle, they have 65Ah, they have a port to maintain the chemicals in them.

It does mean I’ll be poking at them every couple of months to better quantify their state and not let a slow boiling voltage dip sneak up on me. And I’ll be maintaining the chemicals (mostly adding distilled water on occasion).

This conclusion was confirmed by chatting with a couple of old timers who have been off-grid for decades. One gets 6 to 8 years out of his batteries which are allowed to freeze (our situation today), the other gets 10 to 13 in a controlled environment and a water turbine providing constant power 24h a day. This helps the batteries not cycle so much.

It was a real education talking to people who have been doing this for decades. As I build my own experience, I make mistakes and sub-optimal decisions. For today though, I’ve eliminated a blind spot of our solar setup. I can recognize the phenomenon for what it is, the data I collect was really helpful and I have ideas for algorithms to interpret them automatically and get a health measure of the battery array.

So I bought only 3 new batteries, giving us 195Ah to get through night and cloud. It turns out it’s a thousand times better than where we were with our theoretical 775Ah as it had slow boiled down to pretty much nothing :). I’ll get in the habit of maintaining these batteries properly.
building, self sustainability, water ben November 25, 2020

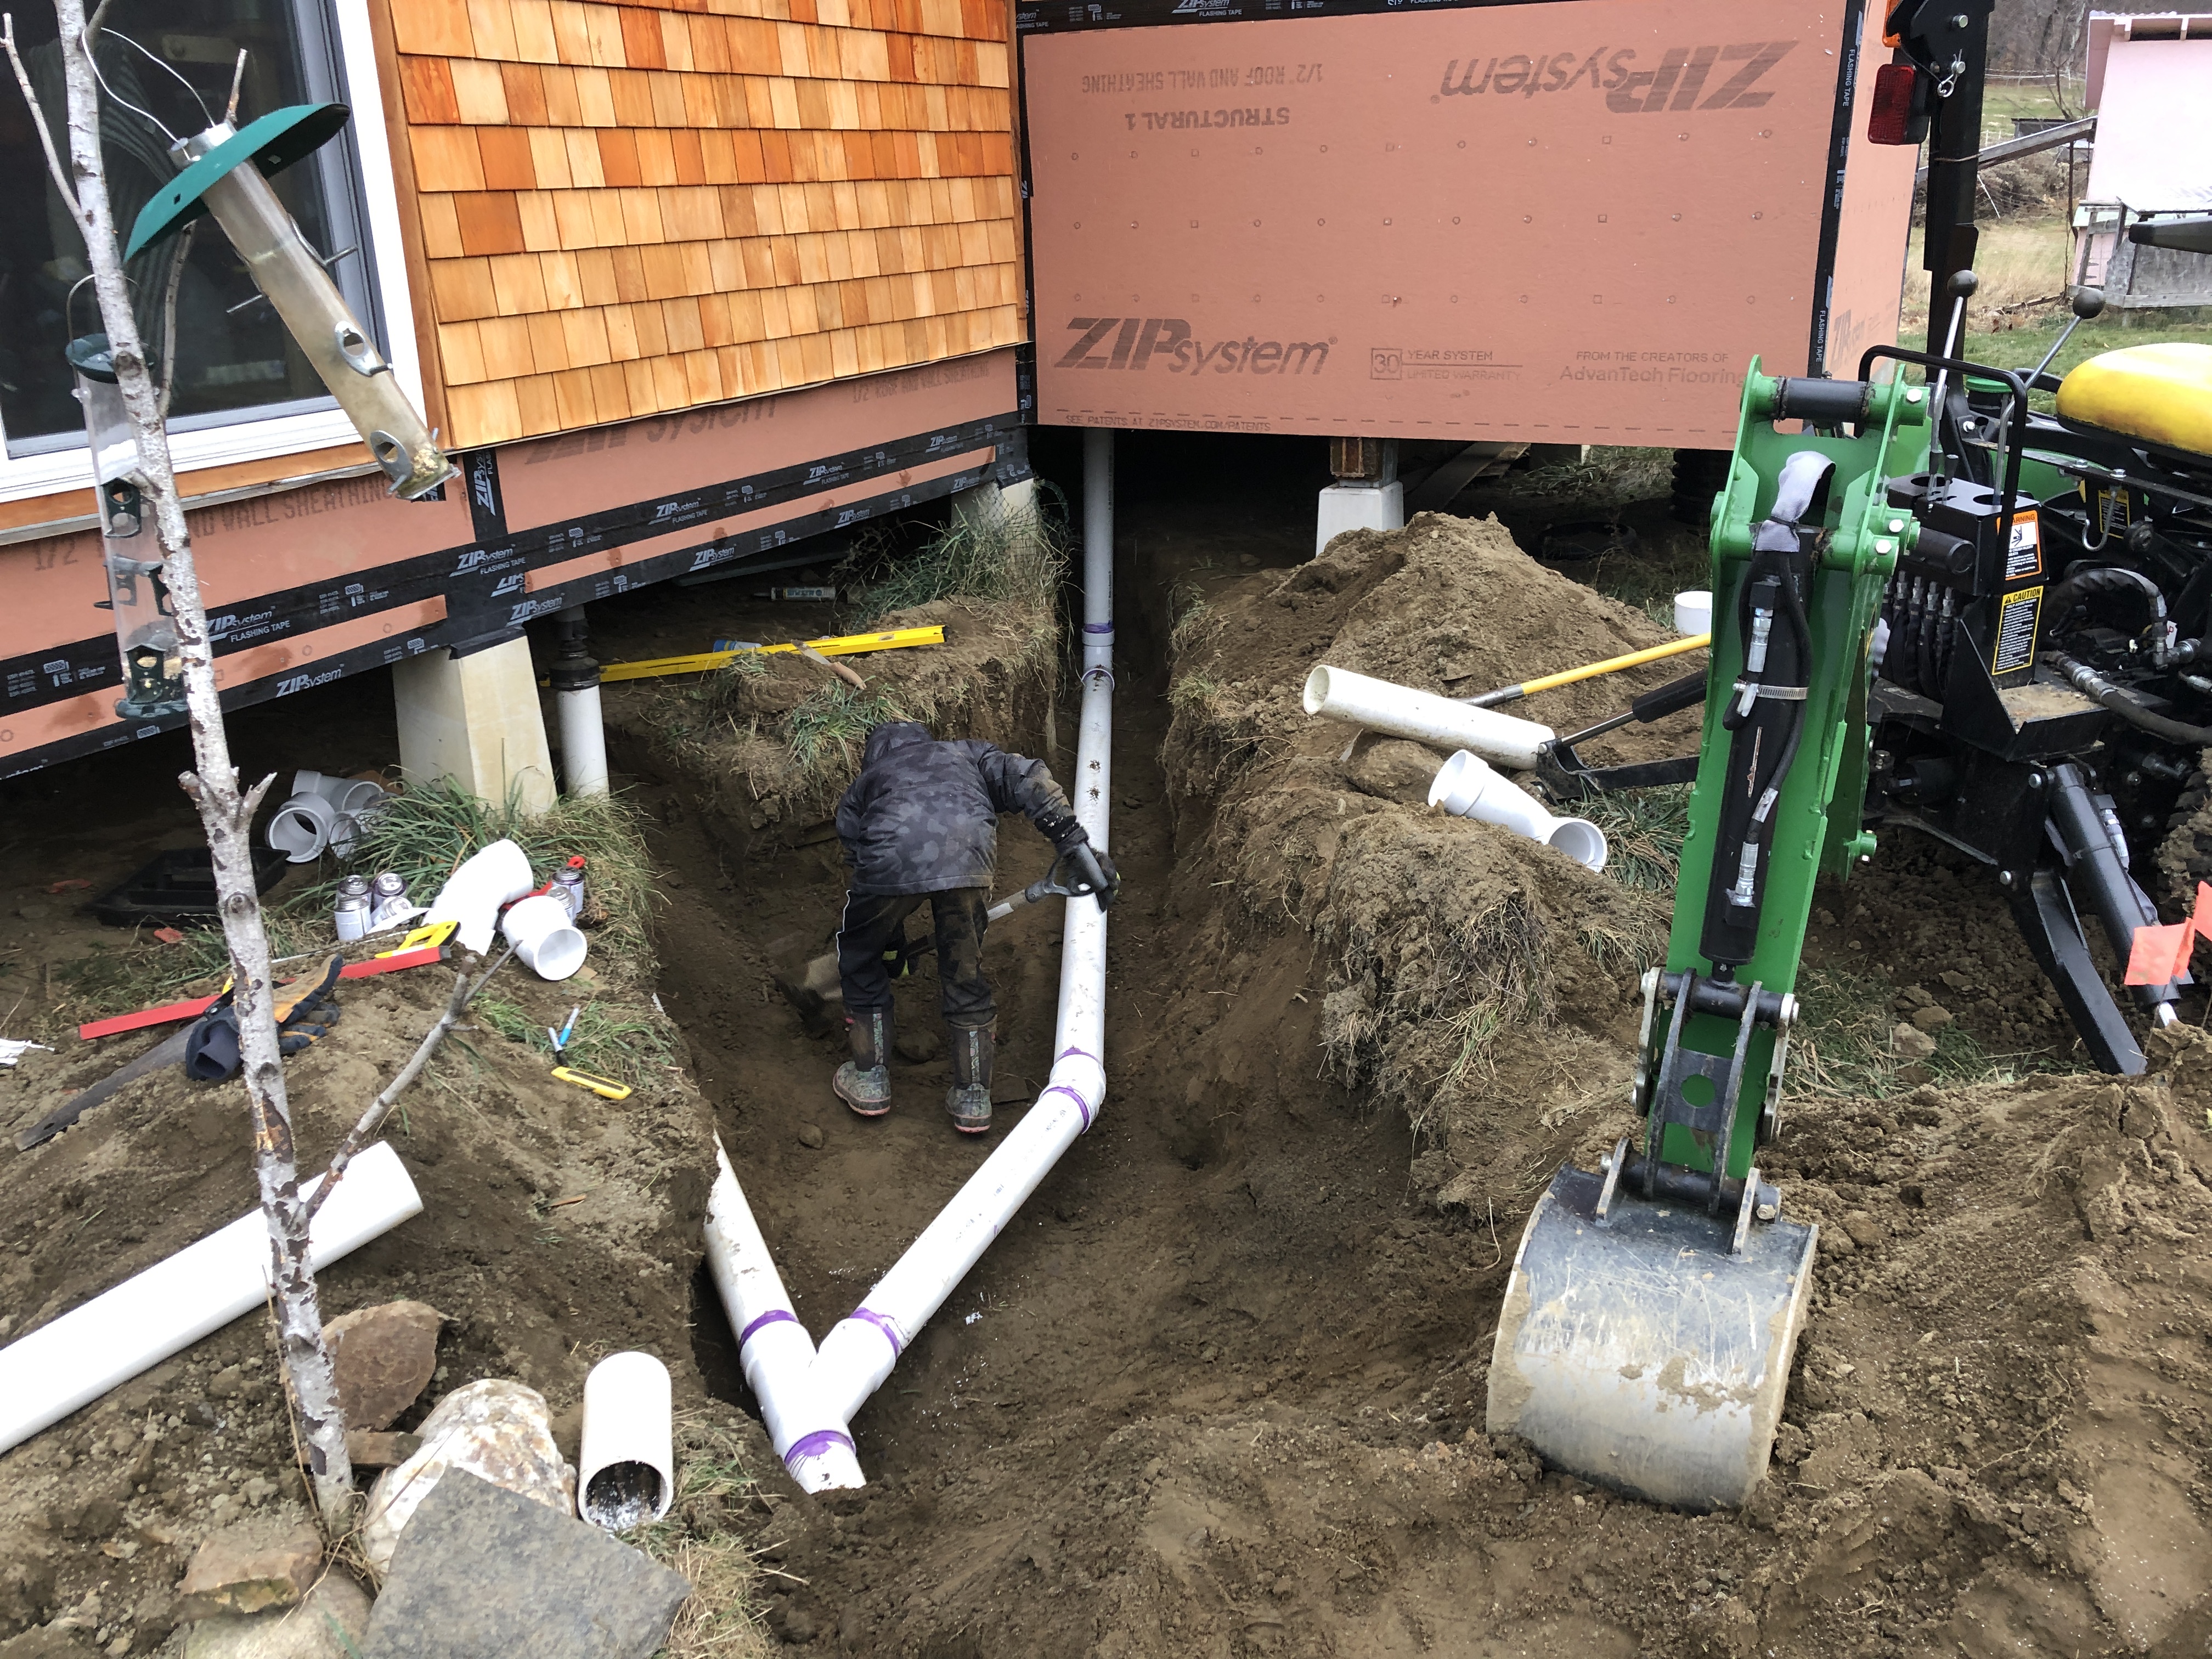
Mild Winter Bathroom

It’s late November and the ground isn’t frozen, it’s a perfect opportunity to work on water evacuation to the septic tank as we get ready to create our bathroom. If we don’t do it now we’ll have to wait another 4 months. We unearthed the existing line to split it into another one for the bathroom.
I.T., plotters ben November 15, 2020

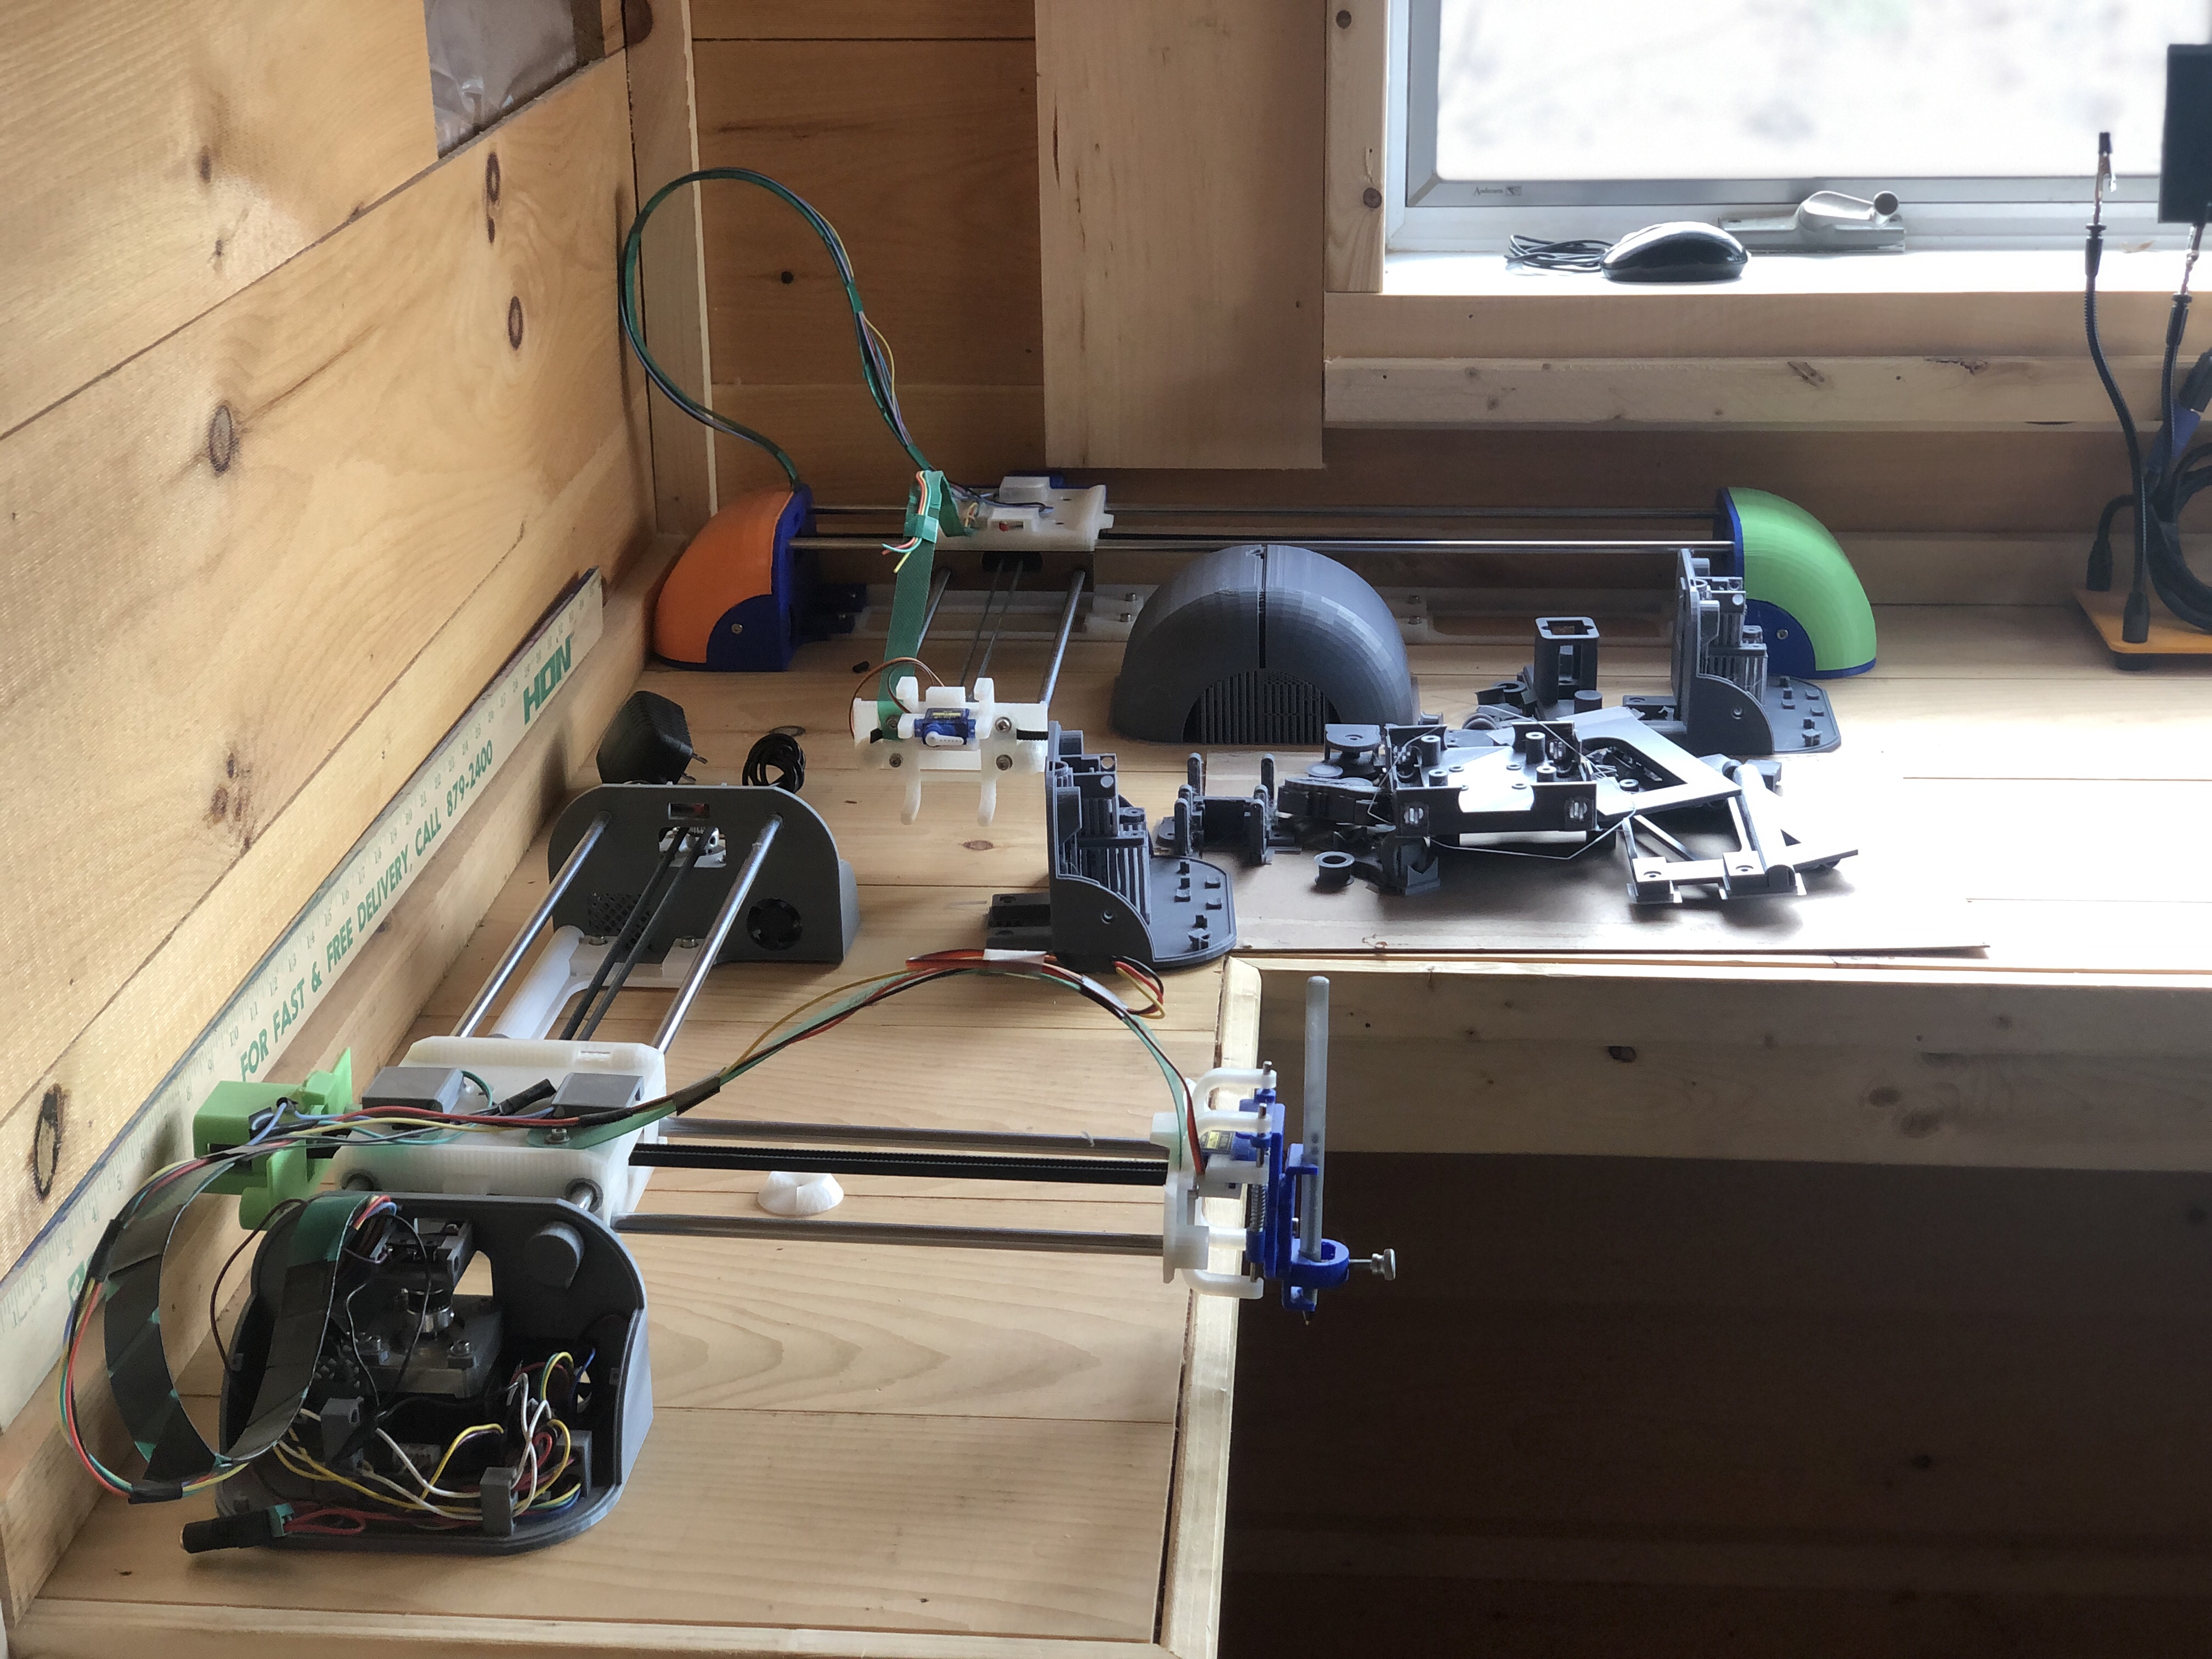
The Plot Thickens

Covid and 3D printer mishaps have seriously hindered my ability to iterate on the plotter design which I was hoping would be behind me last March :\. Oh well, I’m getting close to finally being able to release it into the world.
self sustainability, solar power ben November 11, 2020

Double the Amps :)

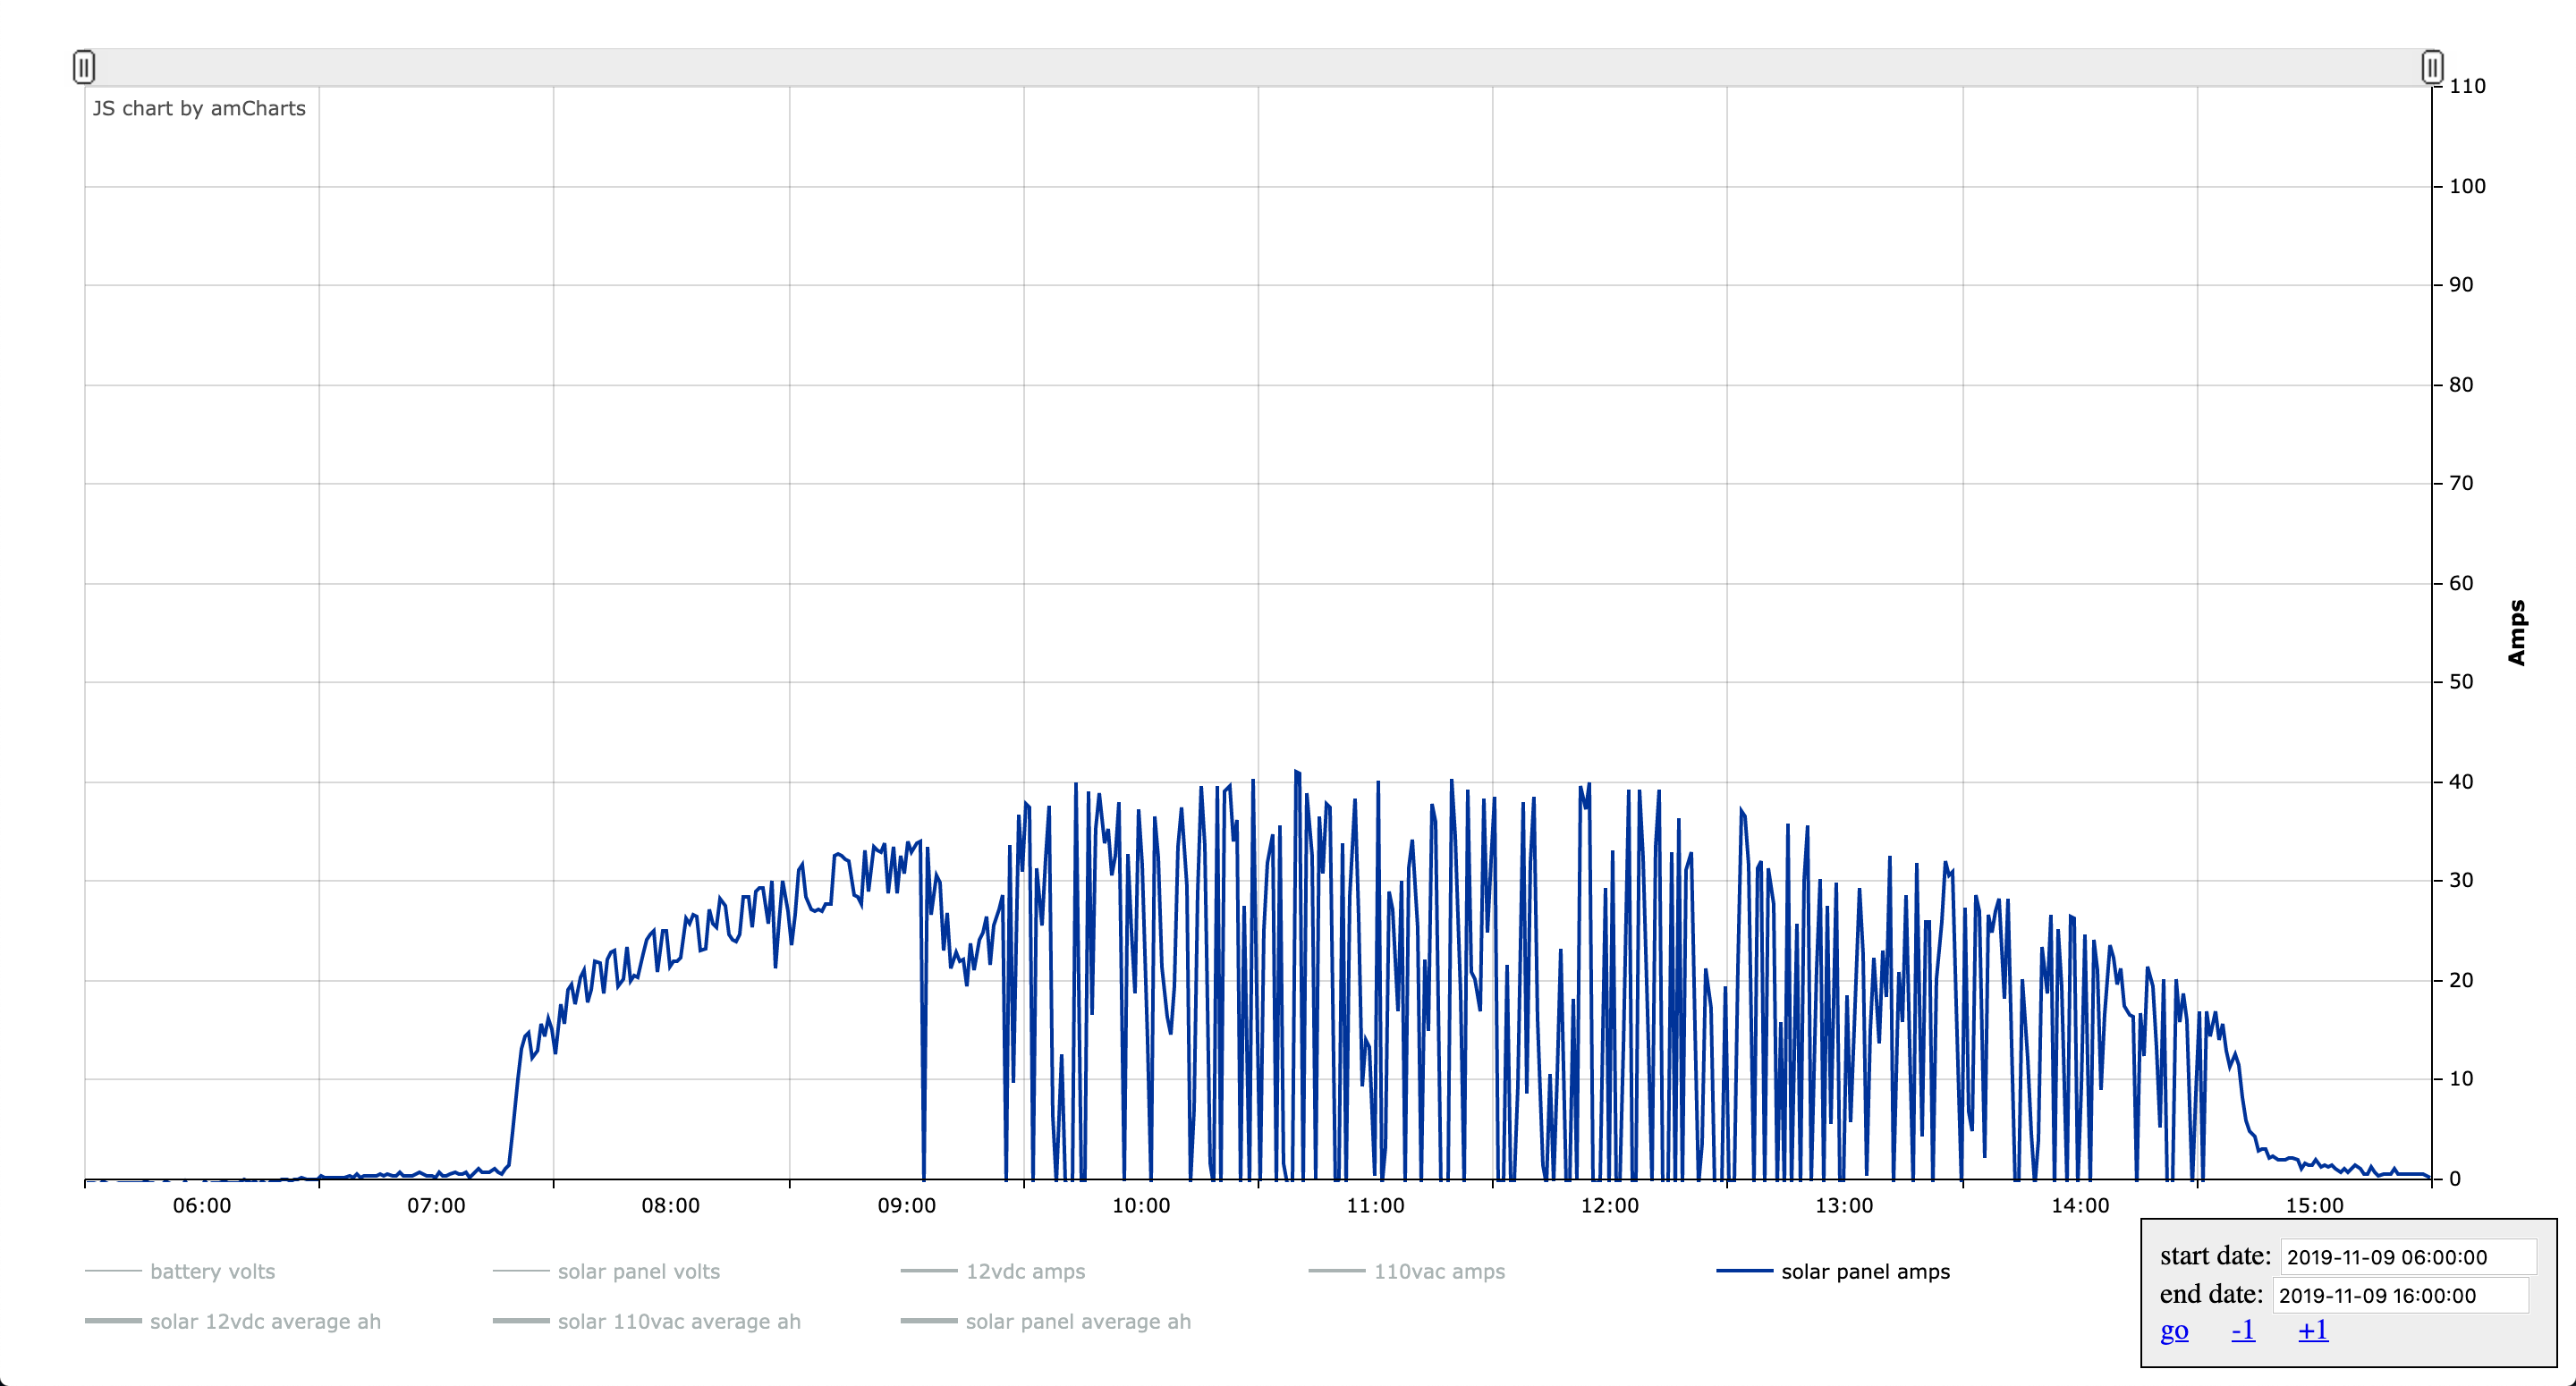
November 9th 2019


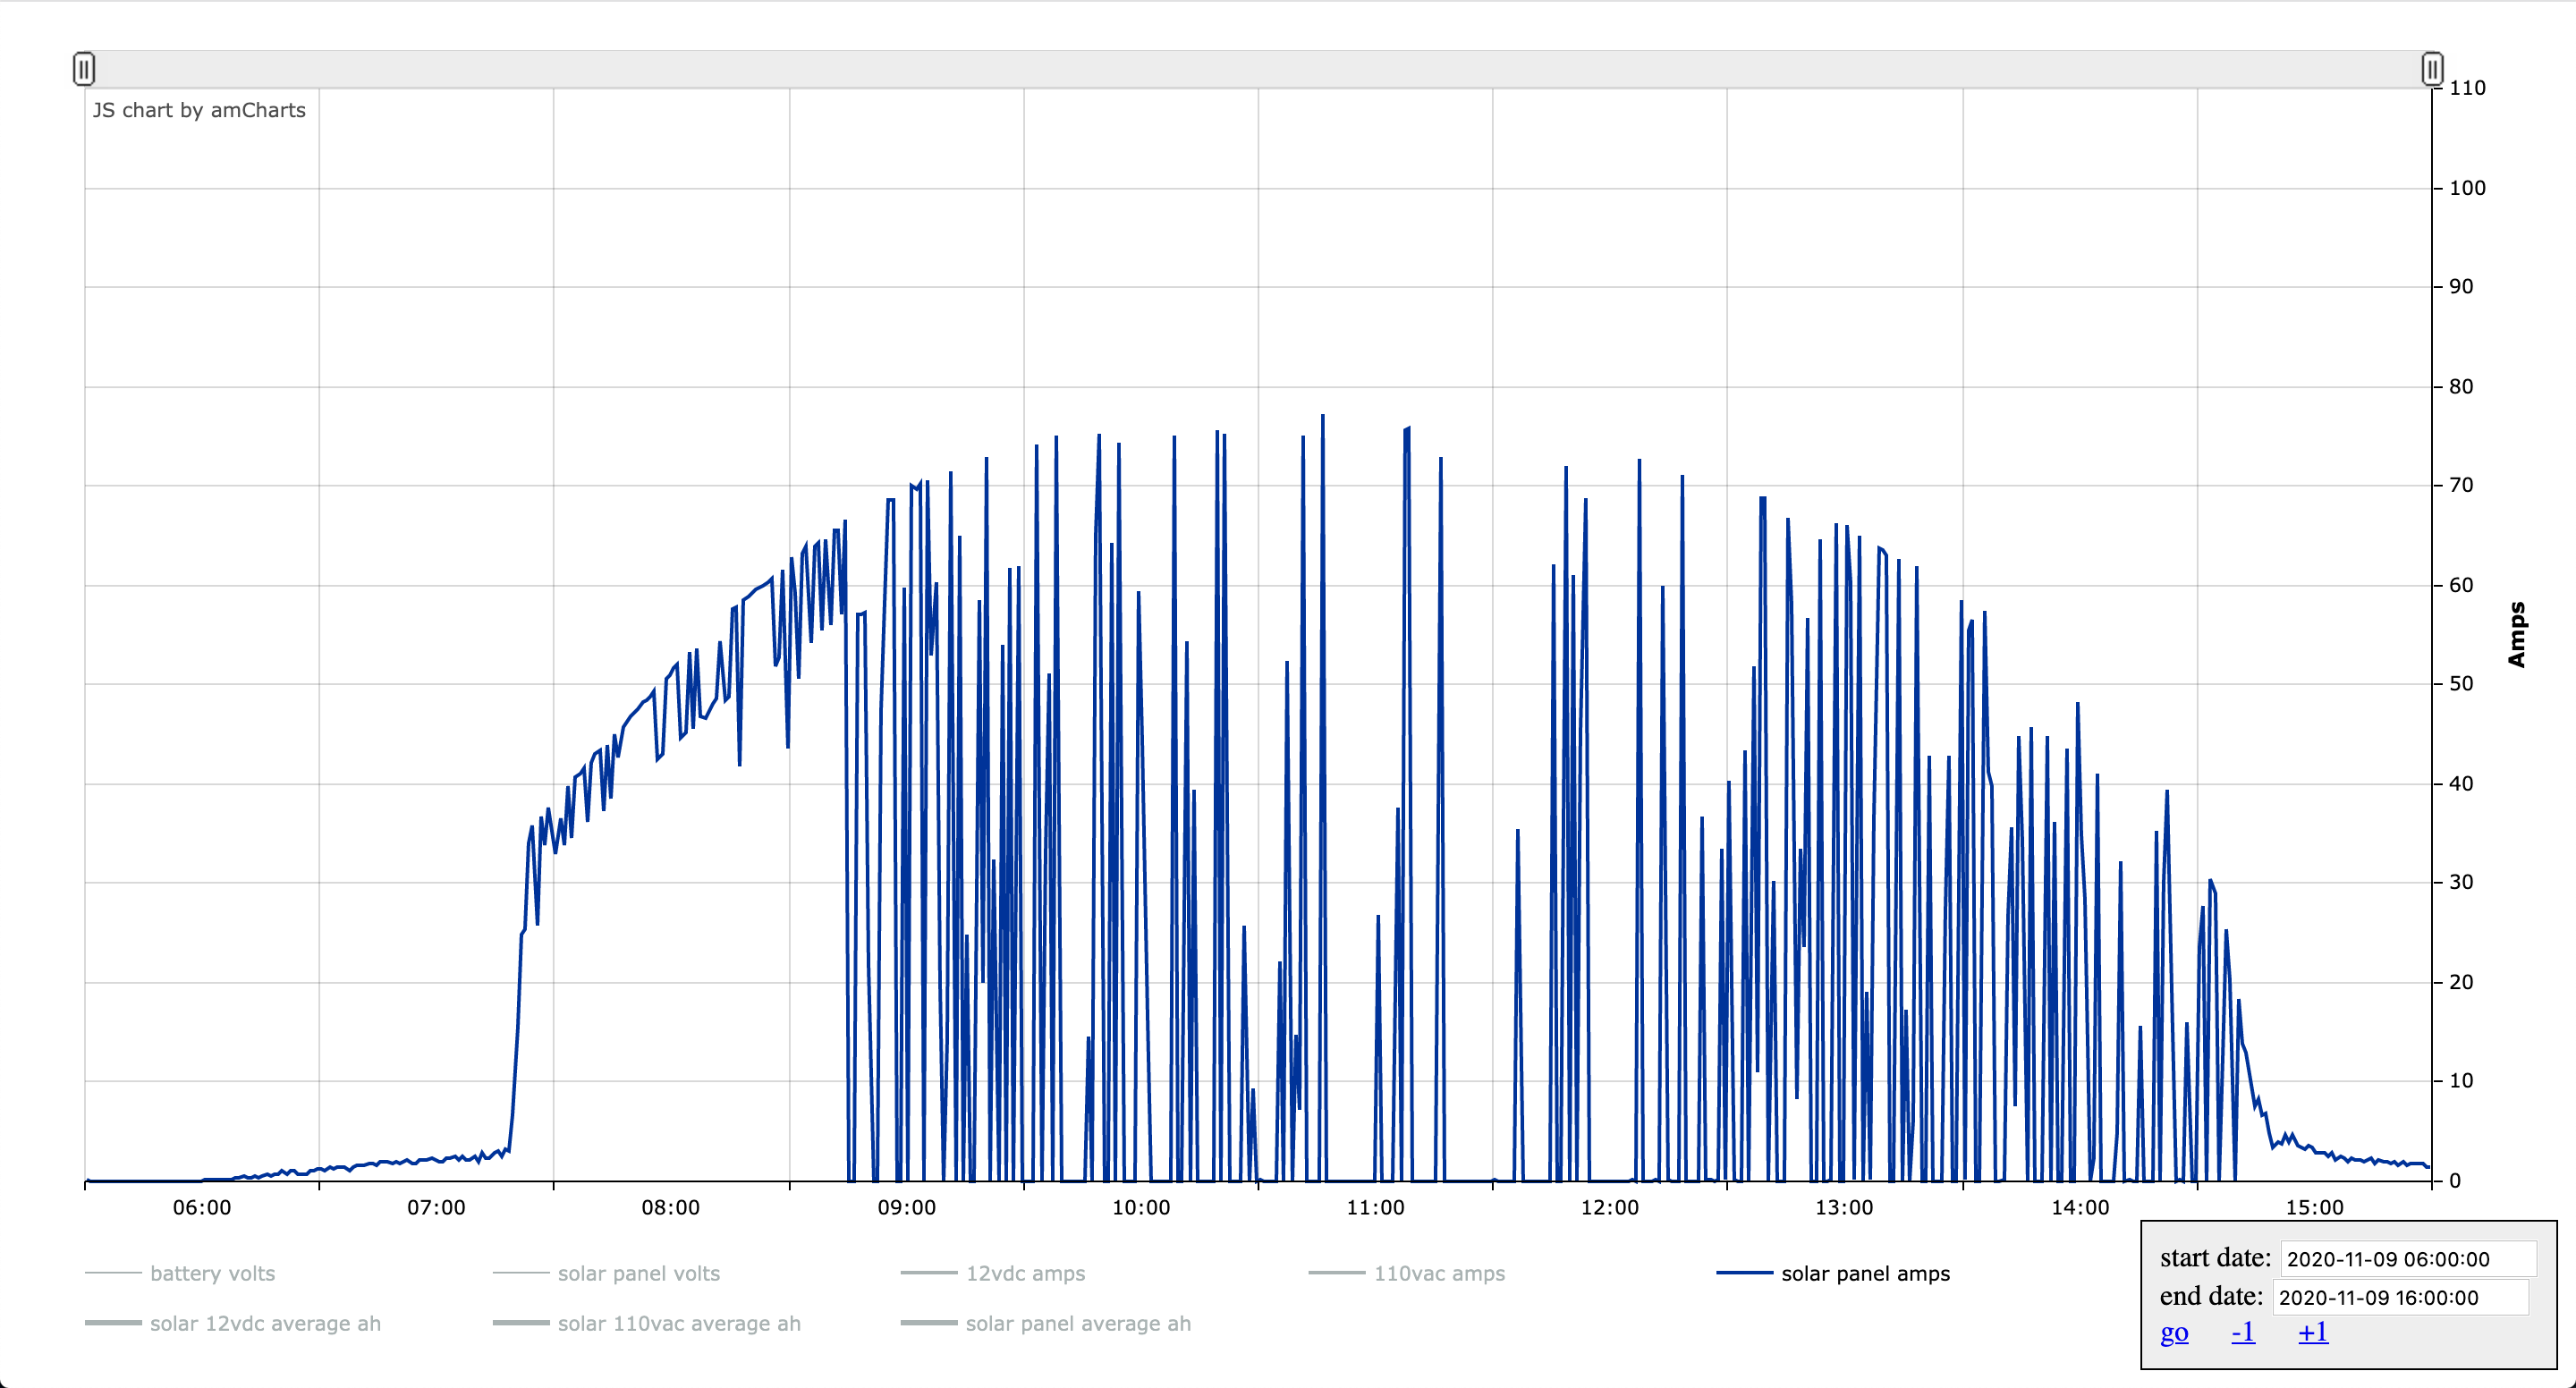
November 9th 2020


And just for fun, here is November 9th 2015
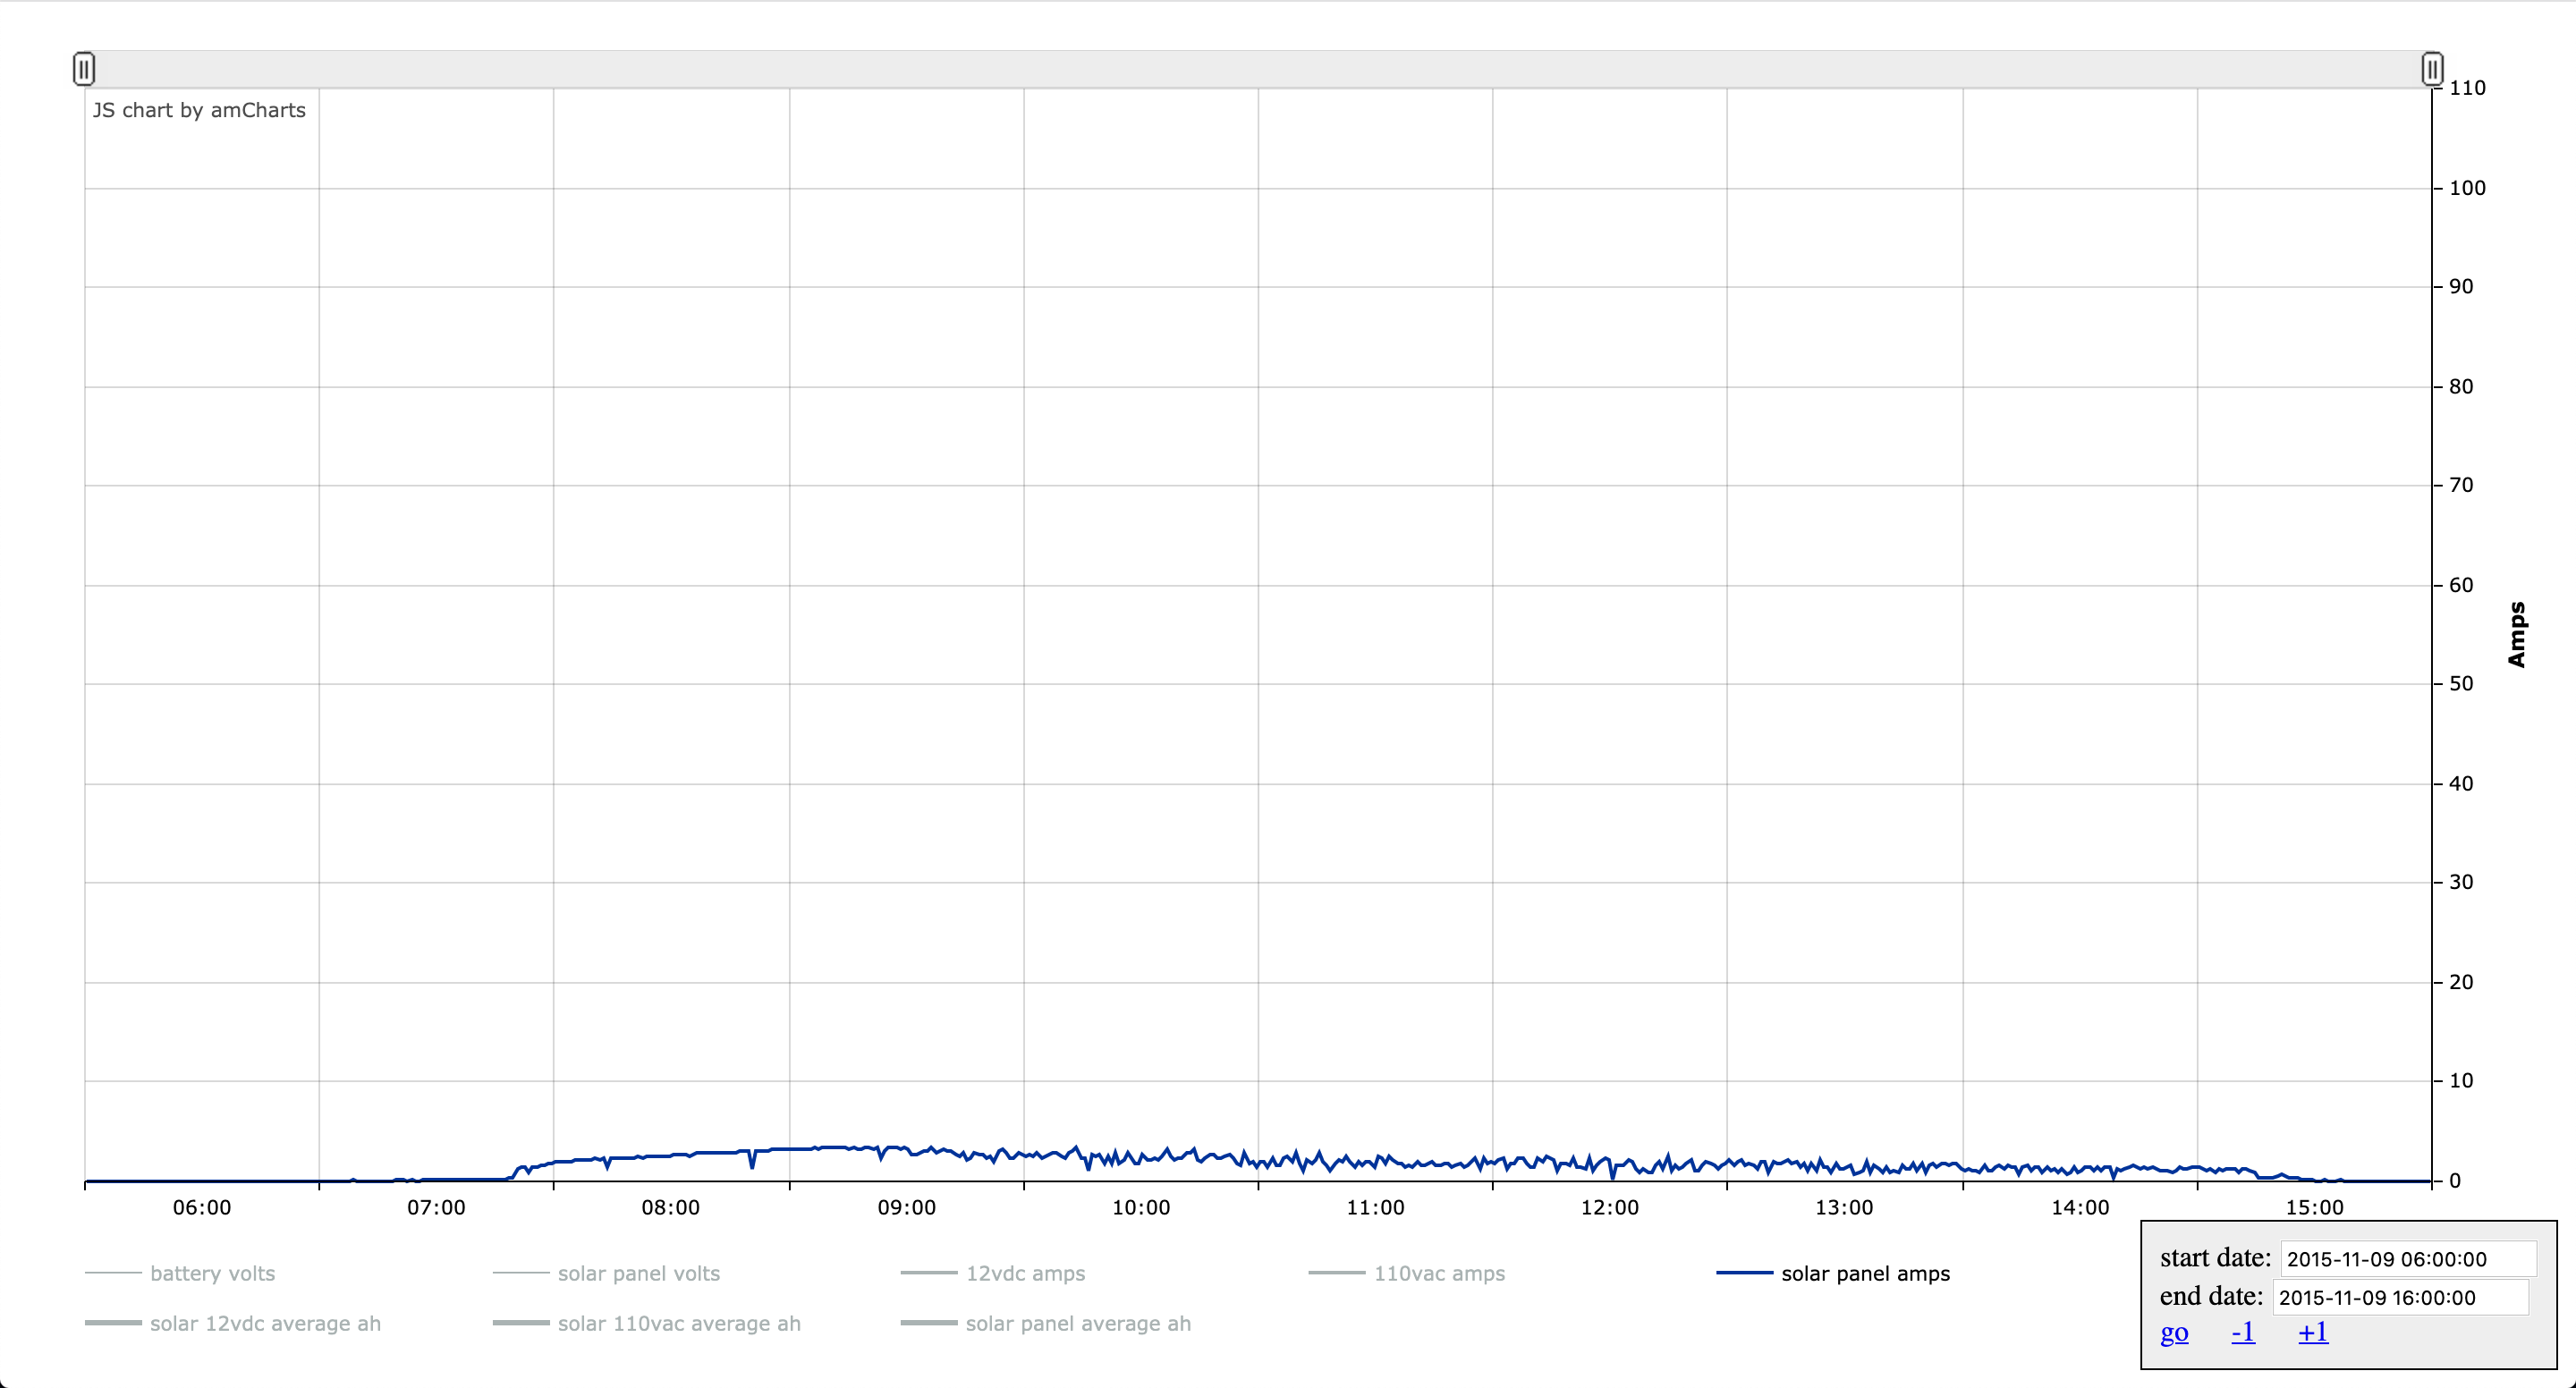
We’ve come a long way 🙂 It’s supposed to be cloudy tomorrow. This will be a good test of the strategy that is trying to squeeze more amps with more panels from a non-optimal day.

self sustainability, solar power ben November 08, 2020

Double Measures

Our demand for electricity surpasses our ability to produce it often these days. Between the fridge, working from home,  kids growing up, and soon a water pump, we’ve expanded drastically but our solar setup has not. With Winter looming, it was time for an upgrade.

We can pick 2 strategies for an upgrade:

  • Beef up storage by buying batteries which can carry us through more cloudy days.
  • Beef up our panels to milk more amps out of cloudy days.

The former doesn’t make sense for us right now, battery lifetimes wouldn’t be in sync, and they freeze on the really cold days which is not advisable for their long term performance. Batteries are very expensive and we know that whatever we get will take a beating. In a few years, when we have a root cellar, we’ll also have an ideal place for batteries which won’t be subject to drastic temperature swings, then it will make sense to upgrade those. In the meantime, the only strategy left to to milk the cloudy days for more by buying more panels.

I couldn’t find the exact same panels so I bought some similar, and well, I had to get 9 for things to look symmetrical

I went vertical because I like where everything is now, I didn’t want to increase the panels’ footprint on the land.

I expanded on the existing frames made of pressure treated 2x4s. It looks a little eclectic and that’s ok, it works well :). We do get very high winds here so I have to build sturdy or I’ll be picking panels off the ground after a storm.

Now this is starting to be a serious array. I don’t think we’ll ever need more panels than this. Note that the top row looks a little different, as I said they aren’t the exact same panels.

Because we have more panels, everything downstream also needed to be upgraded. Truth be told, it needed to be upgraded a while back. I was definitely pushing the gauge of the wiring, and a lot of things I had done poorly as I was learning. I rewired everything with better gear, better knowledge, and dare I say better skills.

I started work on the control panel of my dreams inside. I’ve gotten to appreciate just how much time, and how much skill proper wiring takes.

Each solar panel now gets its own wiring, with an on/off switch and a diode to prevent electricity feedback. The panels have their own diode locally to prevent feedback damage, but between they and the control panel, there’s a lot of wire one could make mistakes with. Working together,  they can produce 100 Amps and so you really don’t want feedback. I soldered heavily (and uglily) any connection I could.

The solar on/off button casing is an fork from the previous on/off switch casing but with room for a diode and made so they can stack.

Download links here:
solar_on_off_button_casing.stl
solar_on_off_button_casing.dae
solar_on_off_button_casing.skp

I’m also making the control panel fully detachable, anything connected to it has a plug. It’ll make it easier to work on down the road.

Now we’re talking!

Long story short, it took several days of work to rewire all 18 solar panels and create this awesome control panel. There are still a few things I need to polish or position better. I “reverse-engineered” what powers our fiber ONT so I wouldn’t have to rely on an inverter to power a UPS to power it (ouch for efficiency). Turns out it just needs 12V, guess what I have plenty of in this solar shed? I got a 12V power cleaner (the aluminum radiator looking square to the right) to at least give it a very clean 12V, the other pins are optional signal pins to take various UPS actions based on power scenarios. It really didn’t make sense to jump through all these hoops to have a 12V battery backup when my whole system is essentially a 12V battery backup. We’ll see if anyone comes knocking on my door :).

The smarts for monitoring and hosting this very blog are mostly untouched but I did re-arrange them a bit. I tried to fit everything on the control panel but it made sense to separate by function.

Robin enjoyed playing with the switches, including the big catchunking one. We experimented with various scenarios, compared panel outputs et cetera. This was a nice unforeseen side effect this design.

All in all I still have a bit of work, but I knew exactly what I was doing and didn’t make a single wiring mistake which is really nice. I used to be way more puzzled by how to wire something much more basic than this. The charge controller stopped working mid-day, that’s because it stops at 80 Amps and the panels had reached this. Fortunately, it was very easy to turn off 4 panels and the system worked again. It’ll be just as easy to re-add them on a cloudy day. The real solution will be to upgrade the charge controller, this will be left for another time. With the Sun almost gone well behind the tree line, we were still making 2Amps, this is now definitely a nice setup :). “Legit Brah” as Robin would say.

nature encounters ben November 02, 2020

Thanksgiving Chickens

nature encounters ben October 23, 2020

Ruffed Grouse

In the Summer of 2014, when we took possession of our land, there were so many ruffed grouses thumping away that it sounded like old tractors were starting constantly. We were in fact puzzled for a long time as to what the sound was. We haven’t heard them since, and we never really saw them either. Until a few days ago, when we heard one, and then saw a female next to the house, and then a male in the forest. I can only hope it means they are back for good.

agriculture, apple, foraging, self sustainability ben October 07, 2020

Bad Years & Mast Years

It’s a pretty bad apple year and it’s likely we won’t be making cider. However it is a mast year for acorns, filling up a bag is as easy a taking a walk in the woods. In the spirit of going along with what nature decides, we’re trying acorn flour this year.

In the newly reinstalled greenhouse

Acorns are drying

We have no idea what to expect from this.

self sustainability, water ben October 06, 2020

Our Running Water Setup

It’s still fairly untested at this point but it’s a nice summary of the reasons behind the choices.

miscellaneous ben September 30, 2020

Protected: Leaf Picker

This content is password-protected. To view it, please enter the password below.

self sustainability, water ben September 28, 2020

Making it run

When we drilled our well 4 years ago, we didn’t install an electric pump, only a manual one. We didn’t have power we could spare, we didn’t know how to run power to the well, we didn’t know how to bring water inside the house, the house didn’t even have its final footprint. All these reasons kept us pumping water by hand and carrying it in the house for years. It’s honestly not a bad chore but it does add up with 4 of us taking showers, on top of the drinking and various other uses. If I had to guess, I would say we use about 20 to 30 gallons every day. Now with the Summer stream shower this goes down significantly.

In any case, I made it my mission this Summer to run water inside the house. I tried very hard to have a professional do the work on the well casing, but not a single contractor was interested in the work. As with roofers, they have a ton of work, they get to pick the easy nice paying jobs. I couldn’t even convince them to give me a high quote. I called everyone in the region, and they were honest in saying in a very typically Vermont way that it was just too much trouble to install a pitless adapter. I was very scared to mess up the well and would have been happy to pay someone with expertise to do it, but no one wanted to, so I didn’t have a choice.

I spent months researching it, talking to everyone, watching videos, and replaying in my head the motions for what would need to happen the day of. Until finally I felt like I had turned every stone and just had nothing left to inquire. It was time for action.

One of the complicating factors in this endeavor is the design. Most wells are installed with a pitless adapter under ground and a 110V AC deep well pump in the well itself. That’s what we would have gotten from a contractor and the easy, known to be reliable, choice. However, there are a few things about our situation which don’t necessarily make this the best fit. And so adding to my initial uncertainty about anything touching the well, was the fact that I evaluated designs which aren’t conventional. It’s a bit nerve wracking to question established wisdom having no practical experience on the matter. This is why it took me so long to get to a point where I thought I had it.

Here are the points which held me back from a conventional in-well setup:

  • With a pump inside the well, one needs to run power to the well, and all the way down the well to where the pump lives. It requires extra trenching, extra conduit, extra wire, extra hole in the casing, et cetera. That’s  a whole lot work and infrastructure to maintain down the road.
  • I need to invert power (and lose efficiency) to run a 110V  AC pump, that one’s easy enough, you can buy 12V DC ones.
  • Maintenance on the pump requires a heavy operation of opening the well up and pulling it out.
  • Our house is built on piers, there is an fairly exposed spot from the ground to the house floor where a water pipe goes that could freeze. Insulating 6 ways to Sunday is one thing, but ideally, I’d like the possibility of flushing the water out of there. A well pump can’t be asked to release the water it has pushed up back into the well.

Now our well has a very high static level, in fact water oozes out the top a about 4 gallons per hour which required us to create a whole way of disposing of it under ground bellow the frost line so it wouldn’t freeze and damage the well & pump. This seems to be true even today, after a whole month of no rain in Vermont. I cursed my well for having us do all this disposal apparatus for a mere 4 gallons per hour, but the other side of that coin is that it is unaffected by very dry spells when we hear of friends’ wells running dry. I realized that water pumps are rated for how many feet of height they can call water from. A super cheap pump I’ve been moving sap & stream water with can call up to 10′, better more expensive pumps can self-prime up to 20′, anything more than that starts to require specialty pumps. There is just about 10′ between where the well static level is (enforced by the overflow disposal) and where the floor of the house is. Could I have the pump in the house and call the water from the well?

I climbed up a 10′ ladder with the pump to test the assertion and sure enough, it pulls water up just fine. This meant we can have a super cheap pump right inside the house where we can work on it if we need to, with electricity right there. Even better, I can put a simple valve right there to let air in the pipe and all the water will go back into the well, leaving no chance of freezing on the super cold days.

That’s for the somewhat unconventional design, it remained to be seen if all would work in practice. It was time for action.

The backhoe is up for duty again, it has paid for itself many times over this Summer. I had to move the green house away from the well too.

I already have pipes in the ground from the well overflow disposal, and because I dropped the pipe to run in the house then for when I’d need it. I had to be very careful digging.

More work to get there than it looks, a lot is done by hand to not damage the pipes. It’s time to re-do the 10′ height test, the house is also 100′ away from the well, and the pipe a different size so I was ready to think it wouldn’t work.

It didn’t initially work which had me worried, stalled the project for a week as I was bracing for plan B. But I re-did it properly with hose clamps at every coupling and plumber’s tape and it worked like a charm. I will get into how I ran the pipe in the house later.

So with this successful test, I knew I could proceed with the well work. I removed the hand pump and realized I’d need to think about the logistics of moving around it more. I might need someone else, I might need to disassemble it, or I might need some sort of rig to hold it while I work on the rest.

After another week of thinking and preparation, I decided to go for the rig:

I really didn’t want to disassemble it, it just needs to be out of the way enough that I can work in the well. It does weight quite a bit with the 72′ of piping in the well.

Time to make a hole for the pitless adapter

I went in the hole, cleaned up a spot and started drilling. To my surprise, the static is barely above the overflow disposal outlet, and water came out. This meant I did the rest of the work in the mud…

The pitless adapter hole is complete. One of the scarier part of the project.

What the inside of a well looks like.

Time to put the pitless through the hole I just drilled (notice the T shaped metal pull pipe in the grass, I learned you want metal and not plastic for rigidity). Now, because I don’t have a pump sitting at the bottom of my well, I tried to feed the pipe already attached to the pitless adapter.

First the pipe goes in (it’s 100′ long)

Then you thread the pull pipe on the pitless and bring it down into the well, where the hole is. I bleached the ever living shit out of anything that touches the well.

Not the easiest operation but not the worst thing I’ve done either.

Inside the well, white is the hand pump pipe, it’s secured with a string. The pull pipe and the pitless adapter further down.

You do NOT want to lose anything in the well.

Outside the casing, this is starting to smell like success.

Secured

Which means we can unscrew and remove the pull pipe. Again note that I did this all in one operation because I could get away with it. In a lot of cases, with the pitless secured, it’s now time to separate it and retrieve the section to attach pipes & pumps to. Then you lower it back down in the well.

Getting ready to receive the pipe which goes all the way inside the house.

Hot water helps with tight fits.

Looks a little funny but it doesn’t matter, and yes I later clamped the coupler.

With all this done, I went back in the house and ran the pump one last time. I pumped 15 gallons at the press of a button. It’s exhilarating to think of our lives getting better, and relieving to feel the stress of months of apprehension vanish.

I filled the hole back up, and of course the kids showed up to play in the dirt.


On to the second phase of the project, which actually happened before: bringing the pipe in the house.

Years ago, when we ran the overflow disposal, I added another pipe in the trench, from the well to somewhere near the house. It was tricky to find it again, a vertical post in the ground helped a lot.

Connected to the pipe that’s been sitting in the ground, waiting patiently for 4 years.


I made another hole in the house and ran the pipe through it.

I attached 3 temperature probes on the pipe at different levels to have the ability to keep an eye on potential freezing. If I learn that we don’t get anywhere near freezing on the super cold stretches, I won’t ever have to worry about it. Otherwise, I’ll be able to flush the water back into the well, maybe even automatically so.

Then it’s one layer of insulation & vapor barrier after the next.

Finally, I used a culvert going 5′ in the ground to not only insulate, but provide a rigid conduit inside the house. I’ll be able to further insulate it if needs be, there is plenty of space left in it.

That’s all 🙂 we are now ready to bring water to various places in the house. It’ll be cake compared to this.

miscellaneous ben September 23, 2020

Protected: Race Track

This content is password-protected. To view it, please enter the password below.

Lego / Duplo ben September 19, 2020

Protected: When it Clicks

This content is password-protected. To view it, please enter the password below.

I.T., web development ben September 19, 2020

The Covid Bump

With teachers scrambling to move to online teaching last March, Mandalagaba’s traffic saw a noticeable bump in use which then died off in with the Summer break. With schools now back in session it looks like the bump is back.

I’ve kind of given up on trying to do anything big with it, there’s just so much noise out there it’s really hard to get anything more than an occasional spotlight. Which means the site is completely free of all the perverse incentives which ruin the internet these days. In other words, perfect for educators teaching to kids. I was already happy to know that about a thousand people per day enjoyed doodling with absolutely no strings attached, but it’s a whole other layer of contentment to see teachers use it for teaching. You can tell there’s love, kindness and attention in the way they address their kids. I love finding their videos online.

I often get asked what restrictions there are on the material people produce, or what my privacy policy is. I respond that I don’t have any of either, but the questions bother me for they reflect that everything online comes with strings attached these days.

Posts pagination

← Previous 1 … 18 19 20 … 52 Next →

This blog is solar powered

Interactive

Handwriting Capture
Mandalagaba
IPv6 link-local to MAC converter
IPv6 MAC to link-local converter
Markov Text Generation
Markov Word Generation
Markov Music Generation
Duplogrifier
Flood Fill Algorithms
Homestead Metrics
RGB Playground
Web Games

Categories

  • aesthetics111
    • plots54
    • specular holography6
  • Books4
  • I.T.204
    • 3D modeling / printing21
    • AI7
    • all out geekery37
    • electronics28
    • homestead automation7
    • maniacal paranoia27
    • plotters49
    • unix / linux29
    • video games4
    • web development30
    • web games3
  • Lego / Duplo67
  • life in the U.S.42
  • miscellaneous204
  • nature encounters115
  • old vinyls3
  • organs2
  • self sustainability563
    • agriculture107
    • apiculture38
    • apple20
    • building132
    • canning3
    • crochet6
    • foraging6
    • hunting10
    • maple syrup47
    • poultry39
    • preserving2
    • solar power28
    • water23
    • wood84
  • trip to a new life6
Theme by Bloompixel. Proudly Powered by WordPress