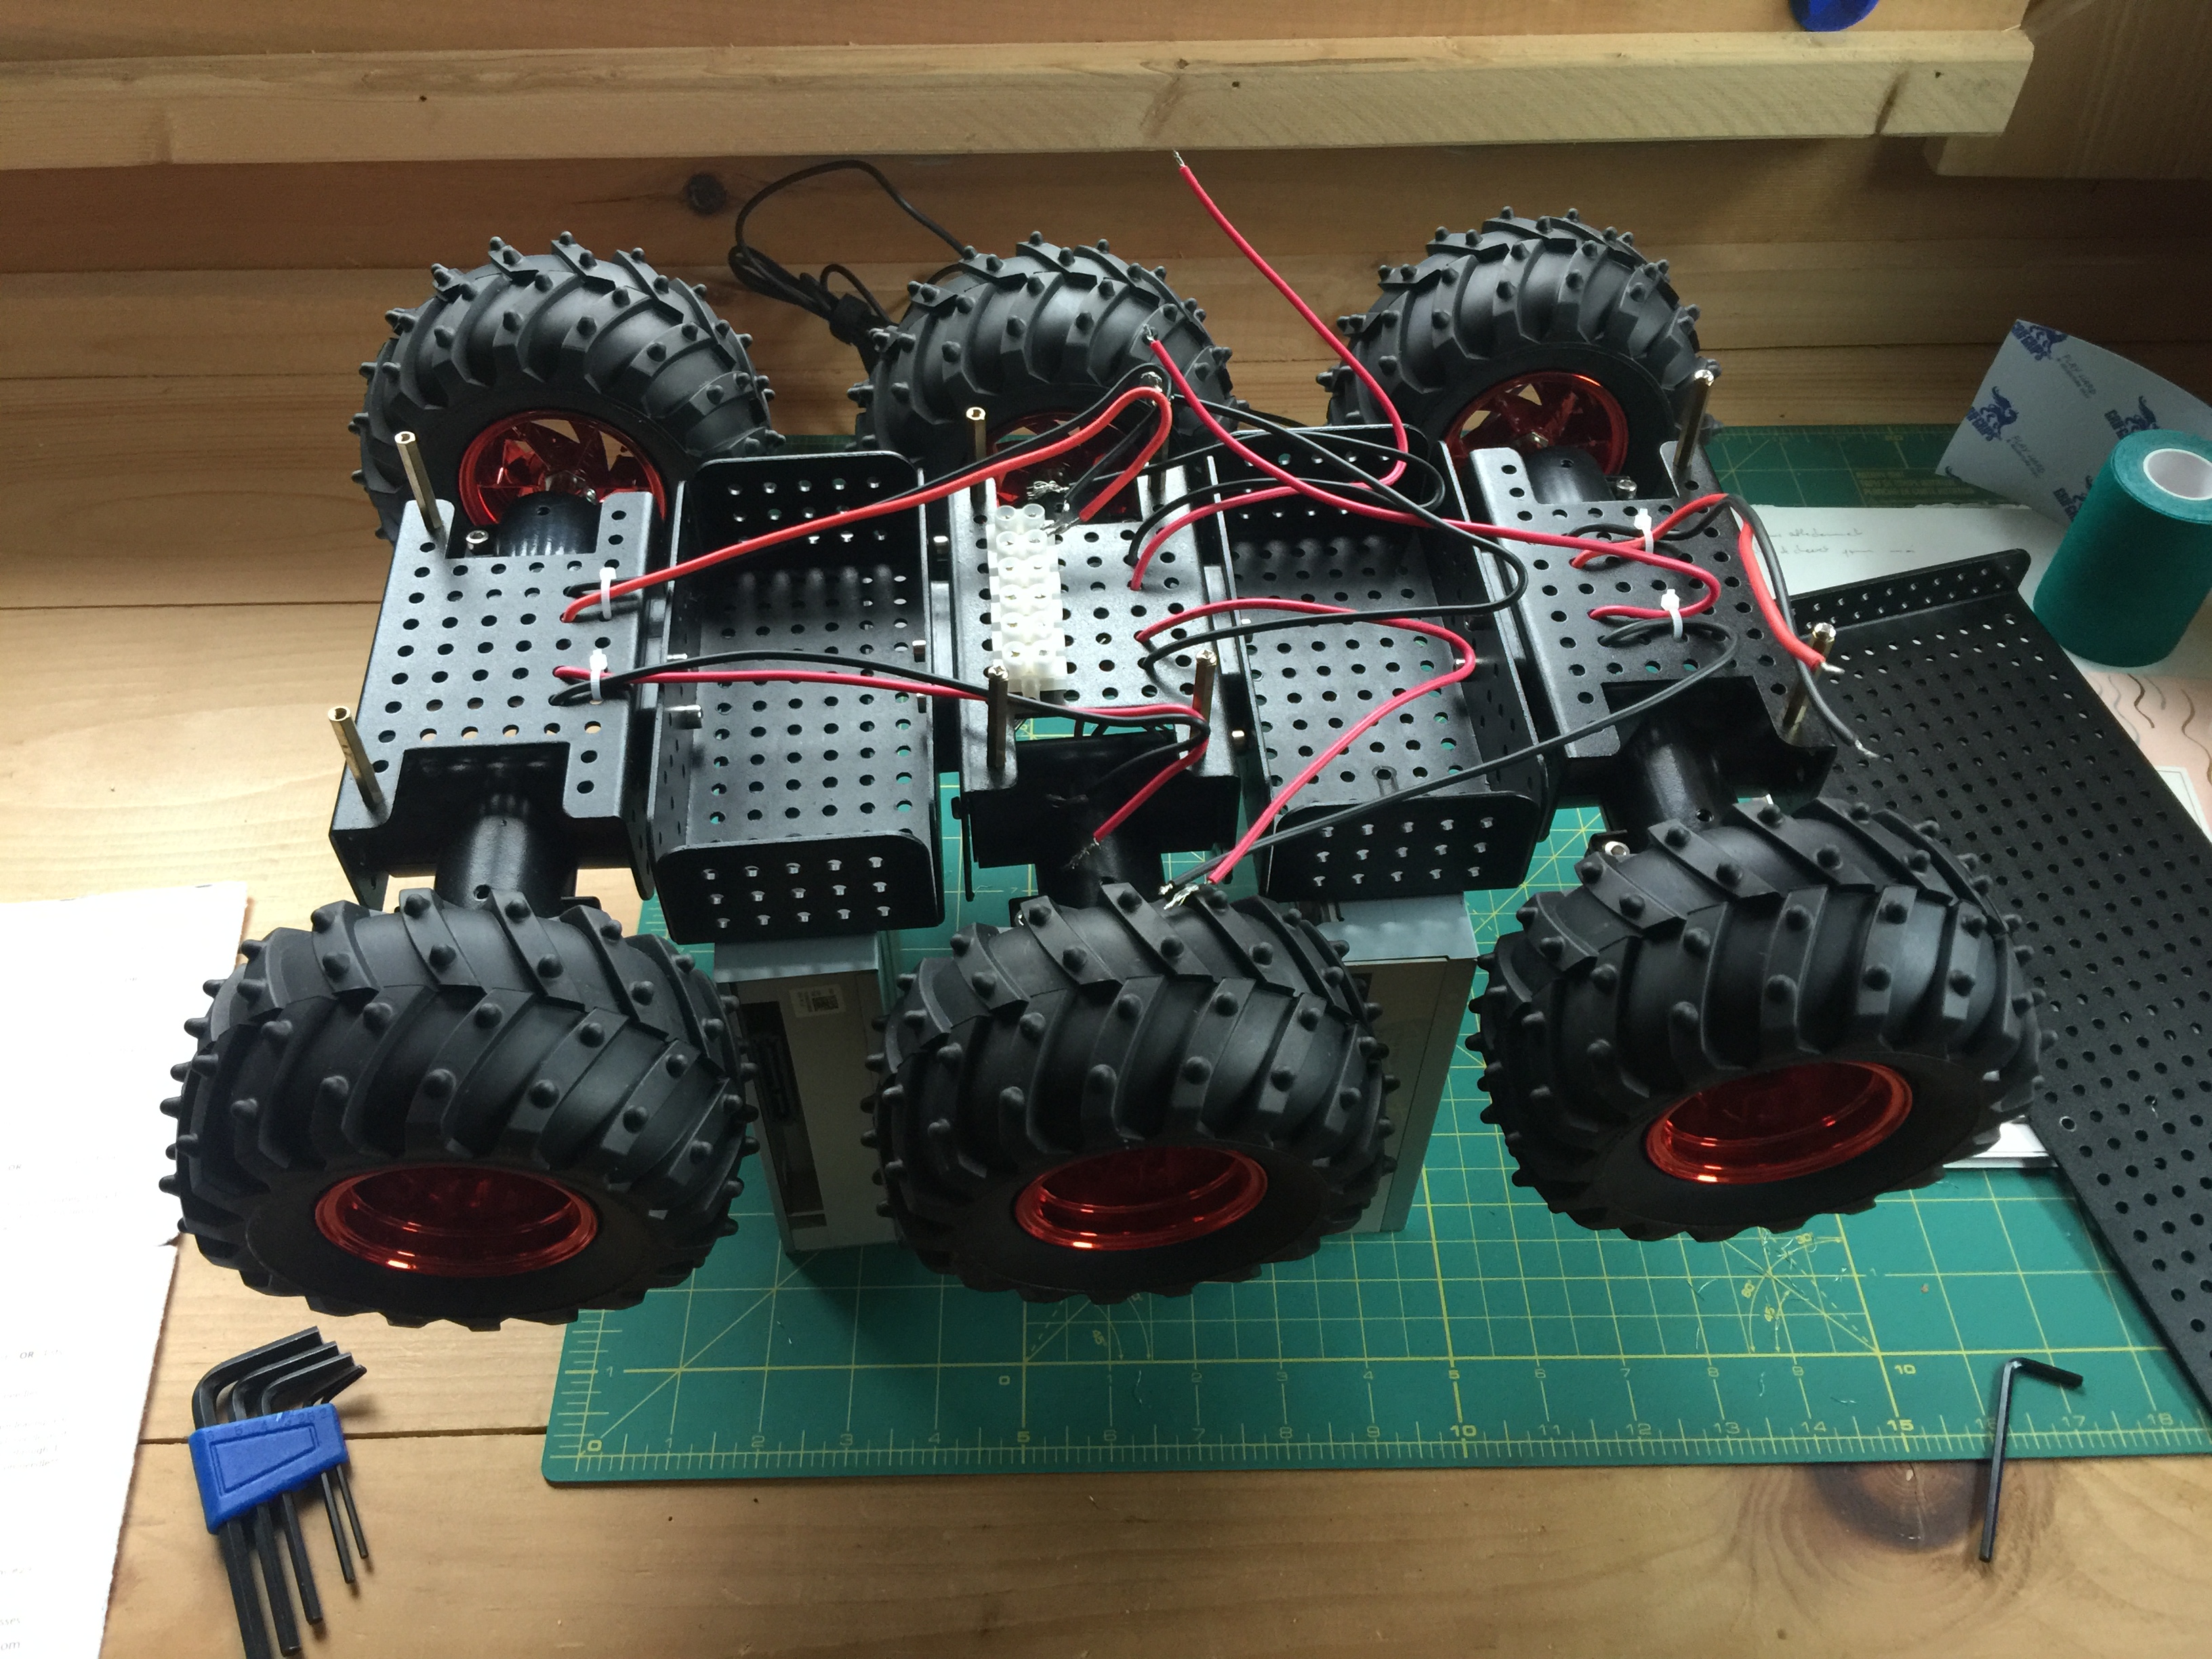
Introducing Curious Kraken
For a while I’ve been wanting a more capable Internet Enabled RC car, something that could go outside. Well, I finally got working the Wild Thumper I got a few weeks ago.
This is still very much a prototype

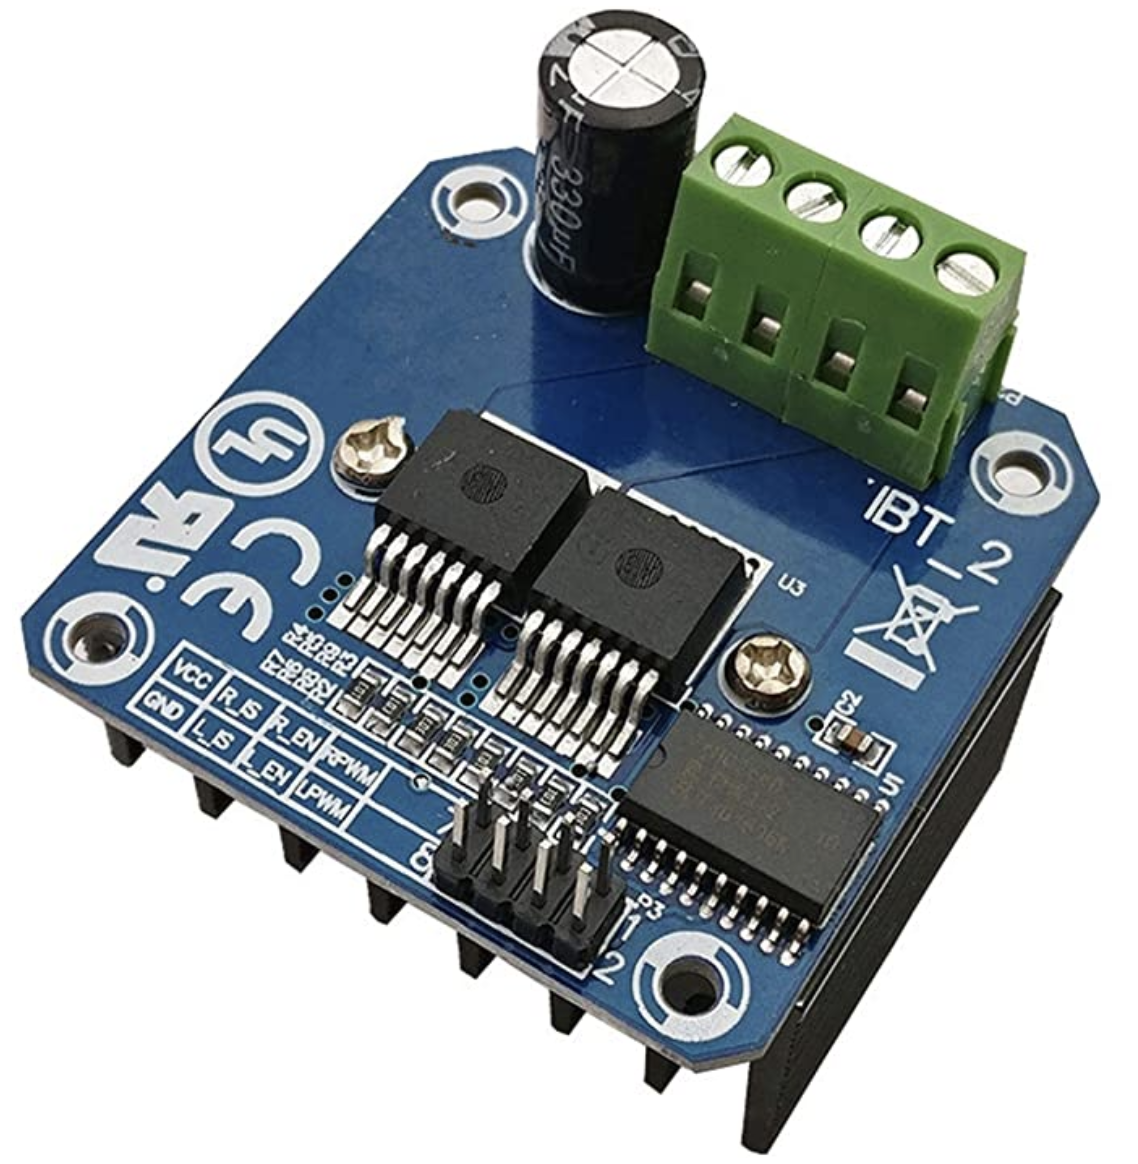
I initial tried controlling the motors with 3 L298Ns for each of the wheel pairs, but they overheated. So I tried a couple of other motor controllers, the ones that did the trick are a couple of BTS7960s.
Rated for high current, heating is simply not an issue
I ported the Nosy Monster code to work with them, and I improved several things, mostly around smoothing controls. You can’t just start these motors are full power, you need you ramp up and down. This is to be mechanically gentle on the motors, but it also helps with piloting.

Outside!
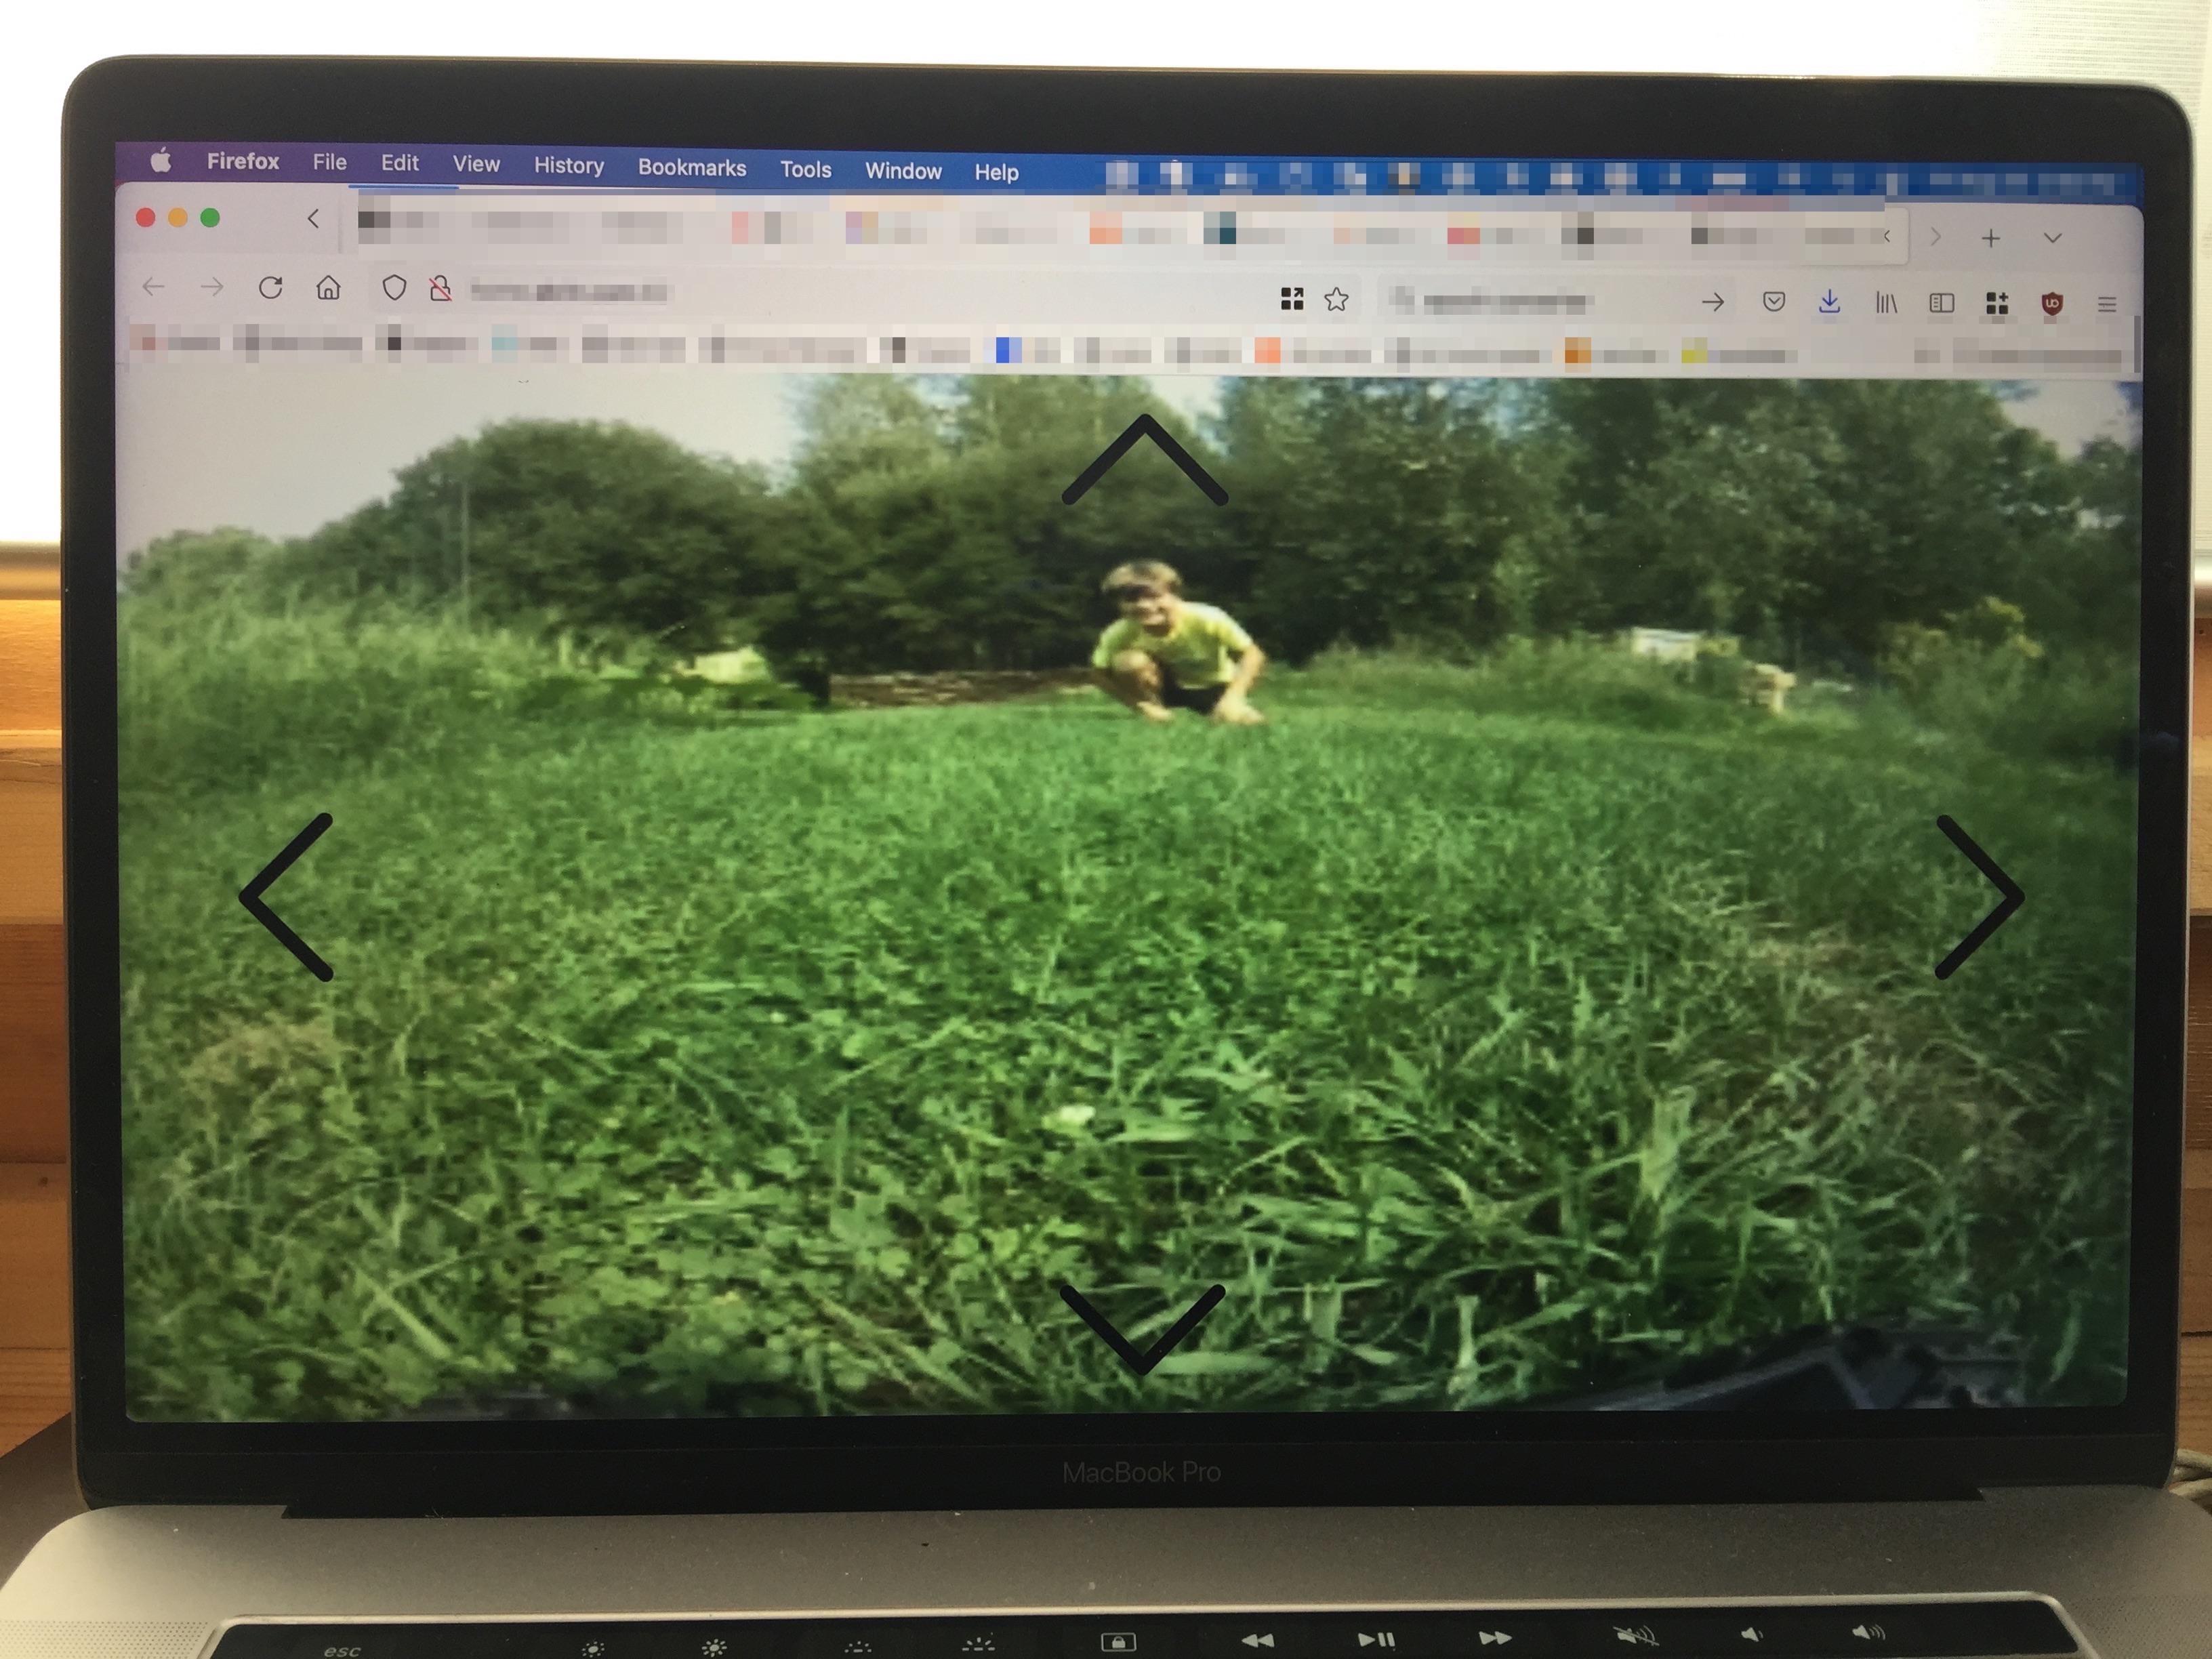
We’re figuring out the wifi range around the house, it’s worst than I thought, well, for live streaming video at least.
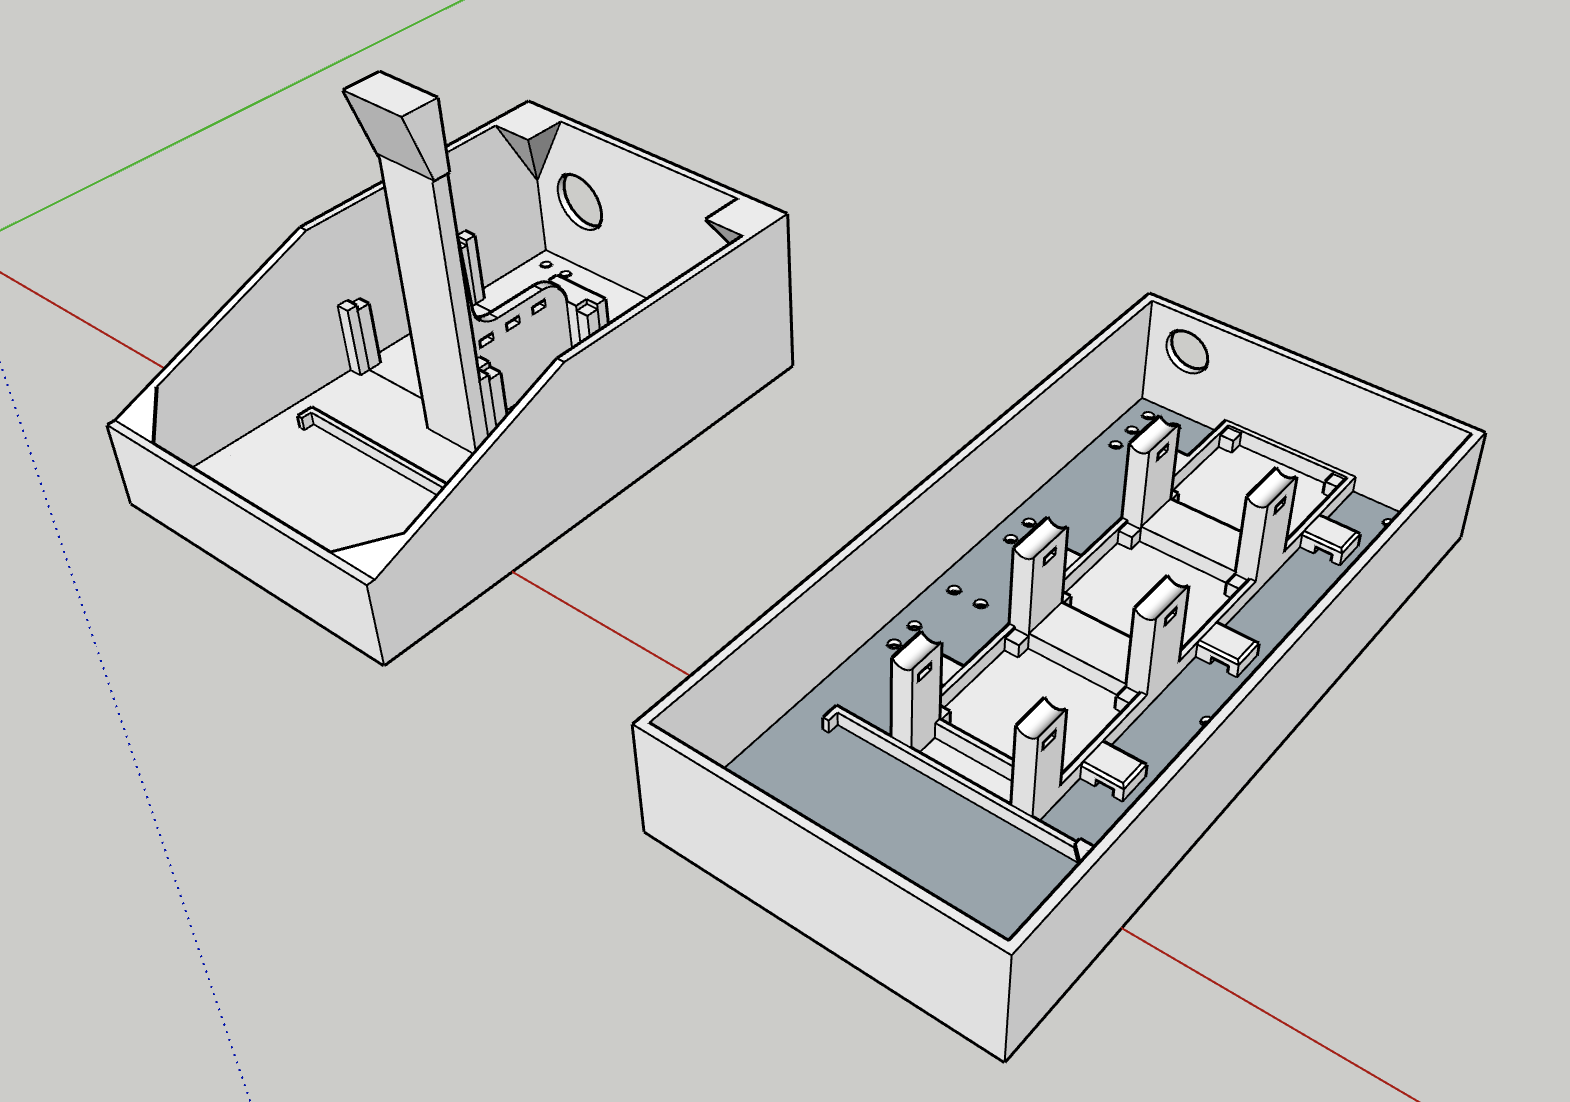
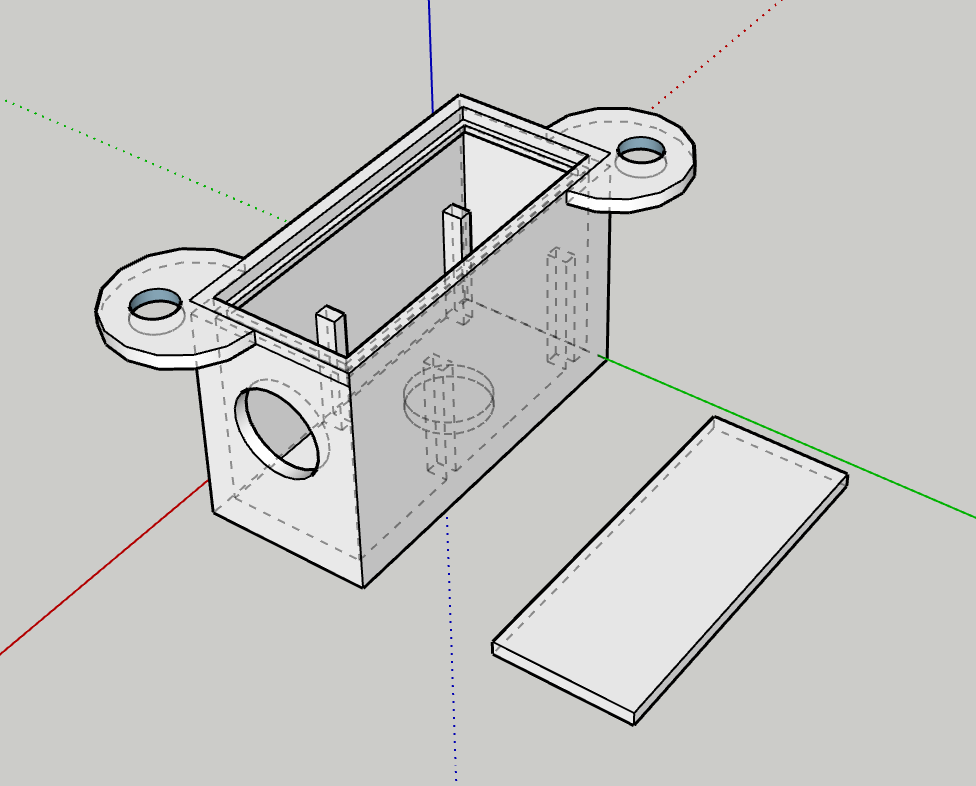
Iterating on a case for the electronics
The suspensions are excellent, the motors could be beefier
More to come…
The Nosy Monster’s Big Brother
Every time I throw the Nosy Monster outside, it can’t handle even the best cut grass. The wheels just don’t cut it. So I finally splurged and got a Wild Thumper from SparkFun.
There’s a million things I’d like to do with it, and I don’t know how many I’ll get to. But at the very least, I’d love to have the vehicle able to go outside. WiFi goes pretty far around the house, and it so it would have a nice range of operation.
I’d love to set it up so random people on the internet can pilot it. Maybe via some sort of voting system.
I’d love for it to be energy autonomous with a solar panel.
And I’d love for it to be able to take some rain and snow.
The later is unlikely to happen, the rest very well may over time. Ultimately, this will be a better setup allowing for more development.
The Nosy Monster will remain in its current funny form. We’ll need to find a cool name for this new one, but I want to see what it looks like when it’s done first.
First Build
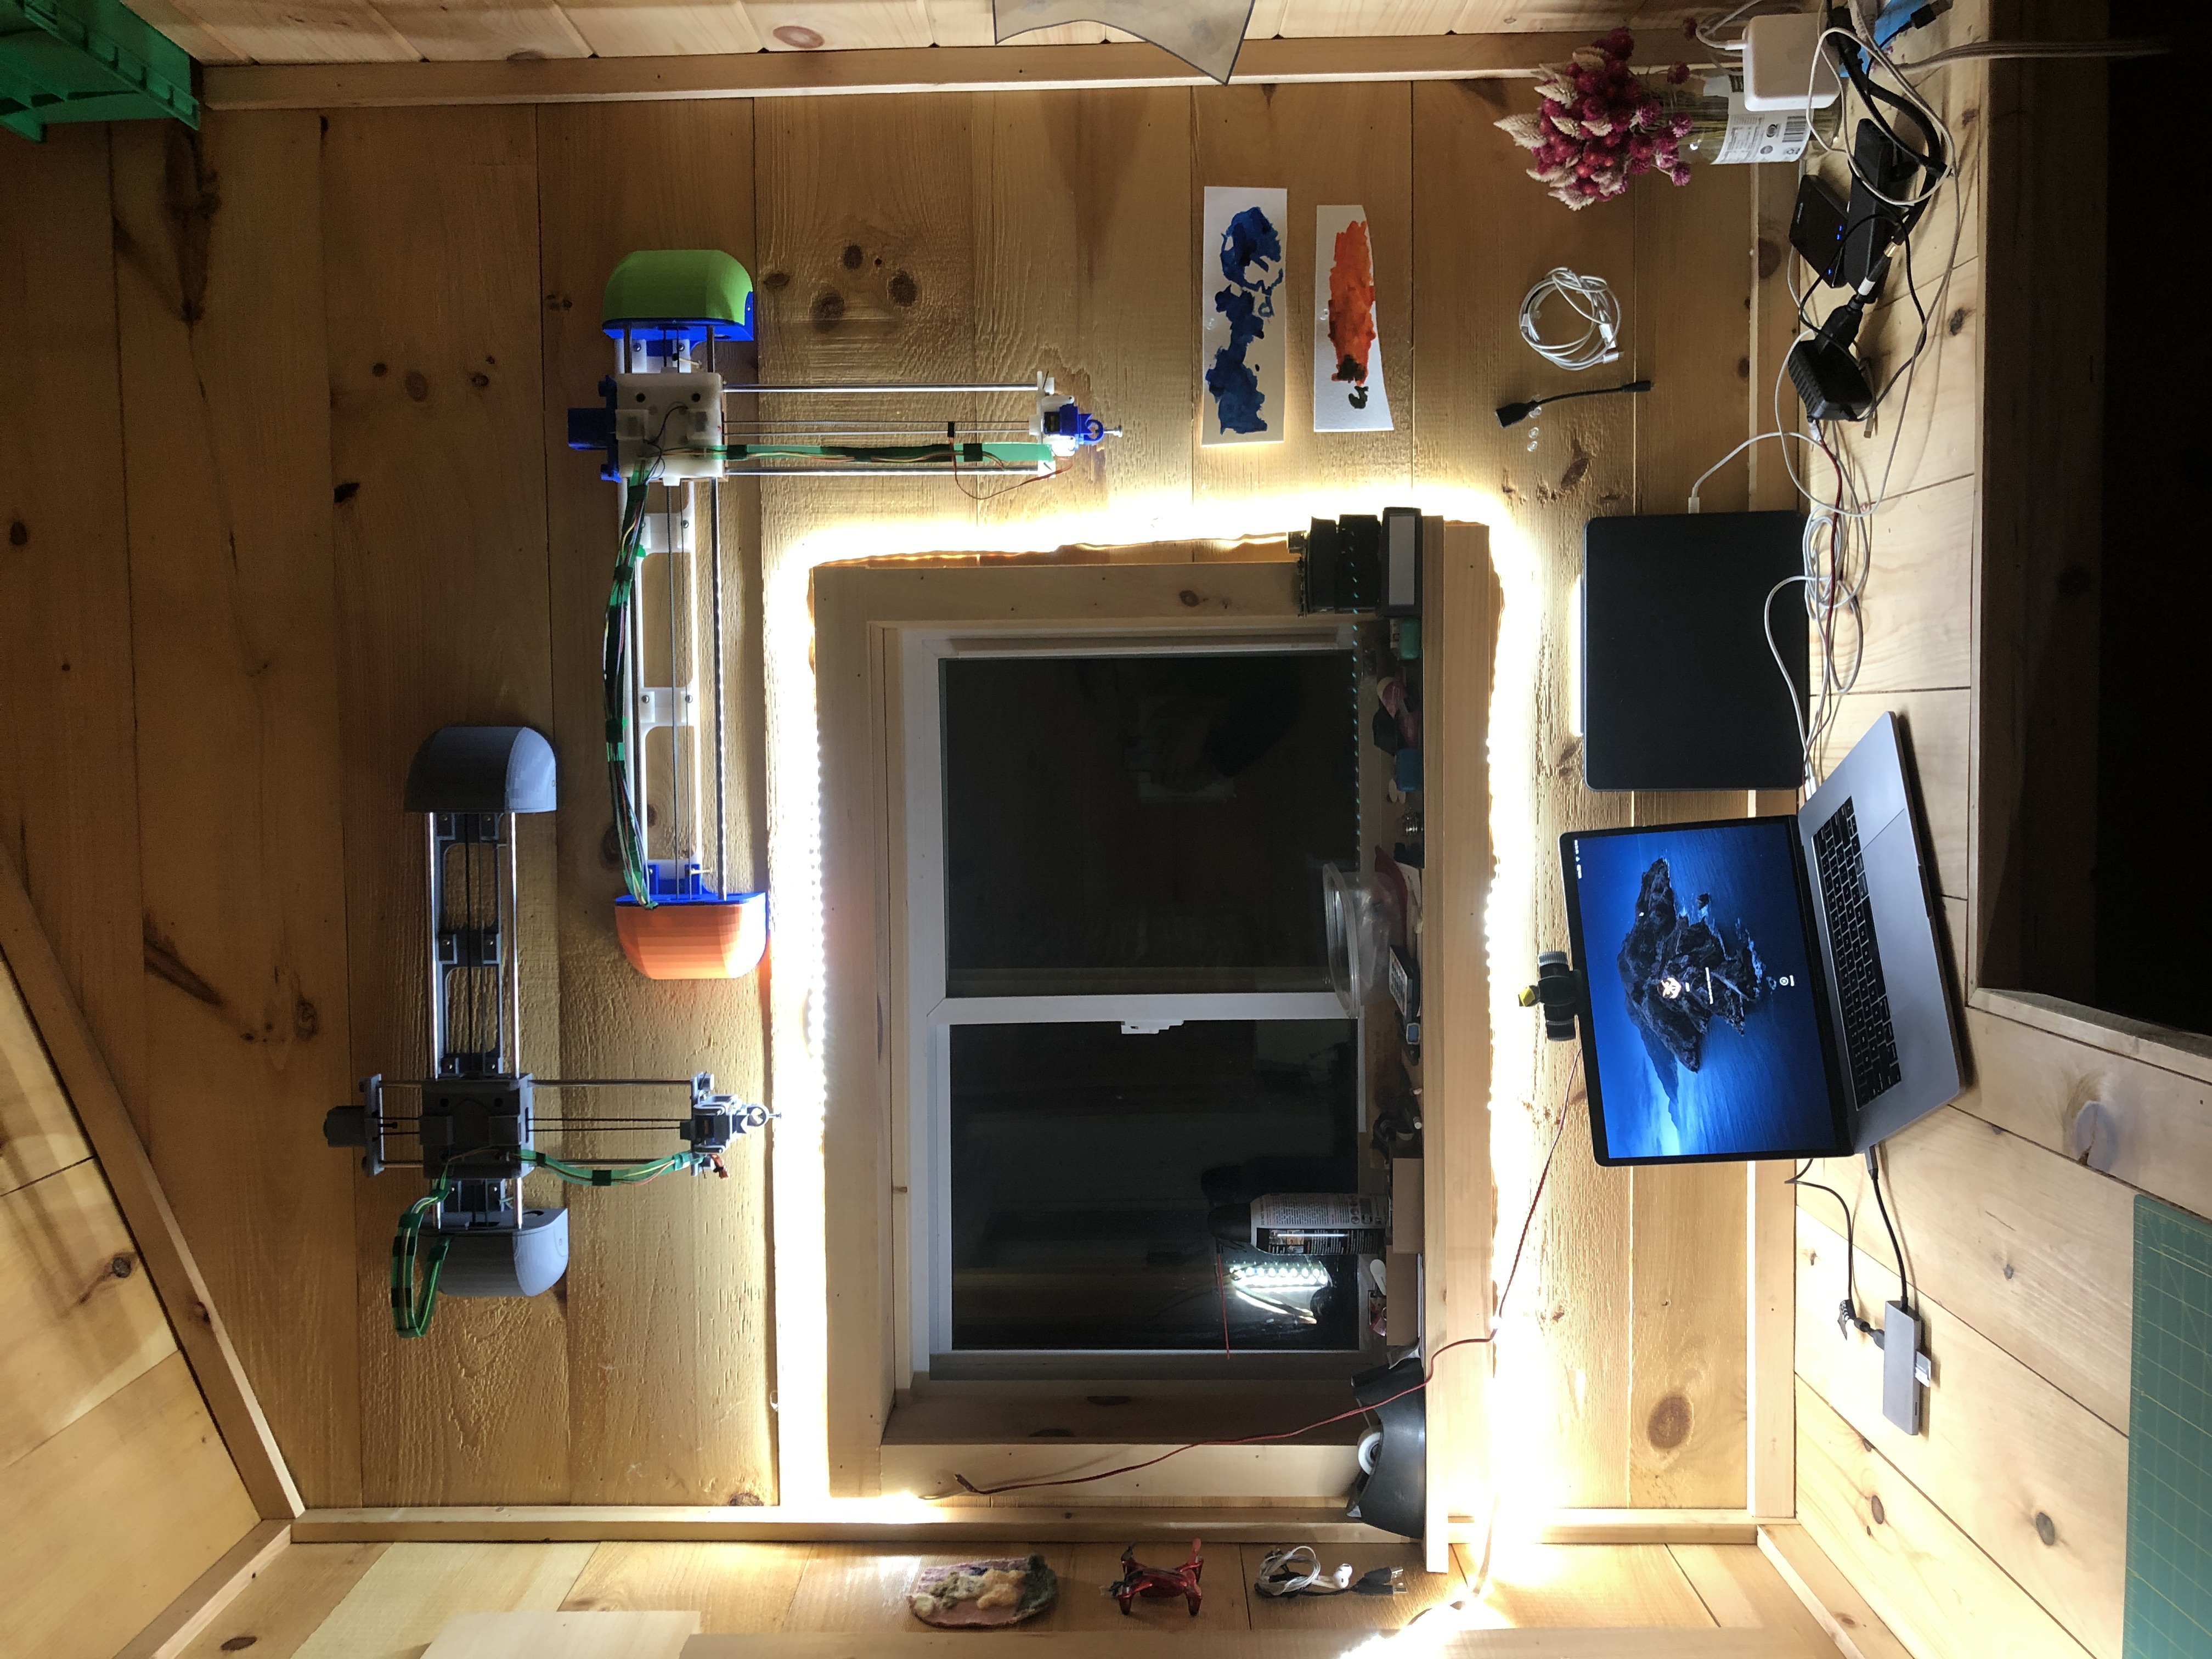
I’ve heard from several people building their own PlottyBot but it’s the first time I see a picture of one :). It truly is a great honor.
Built by Jeff.

Ipad Test
It works really well, I need to think about what cool doors this opens up.

Captured Robin’s handwriting at age 10
It’s a surprisingly endearing thing to do. A personality snapshot in time.
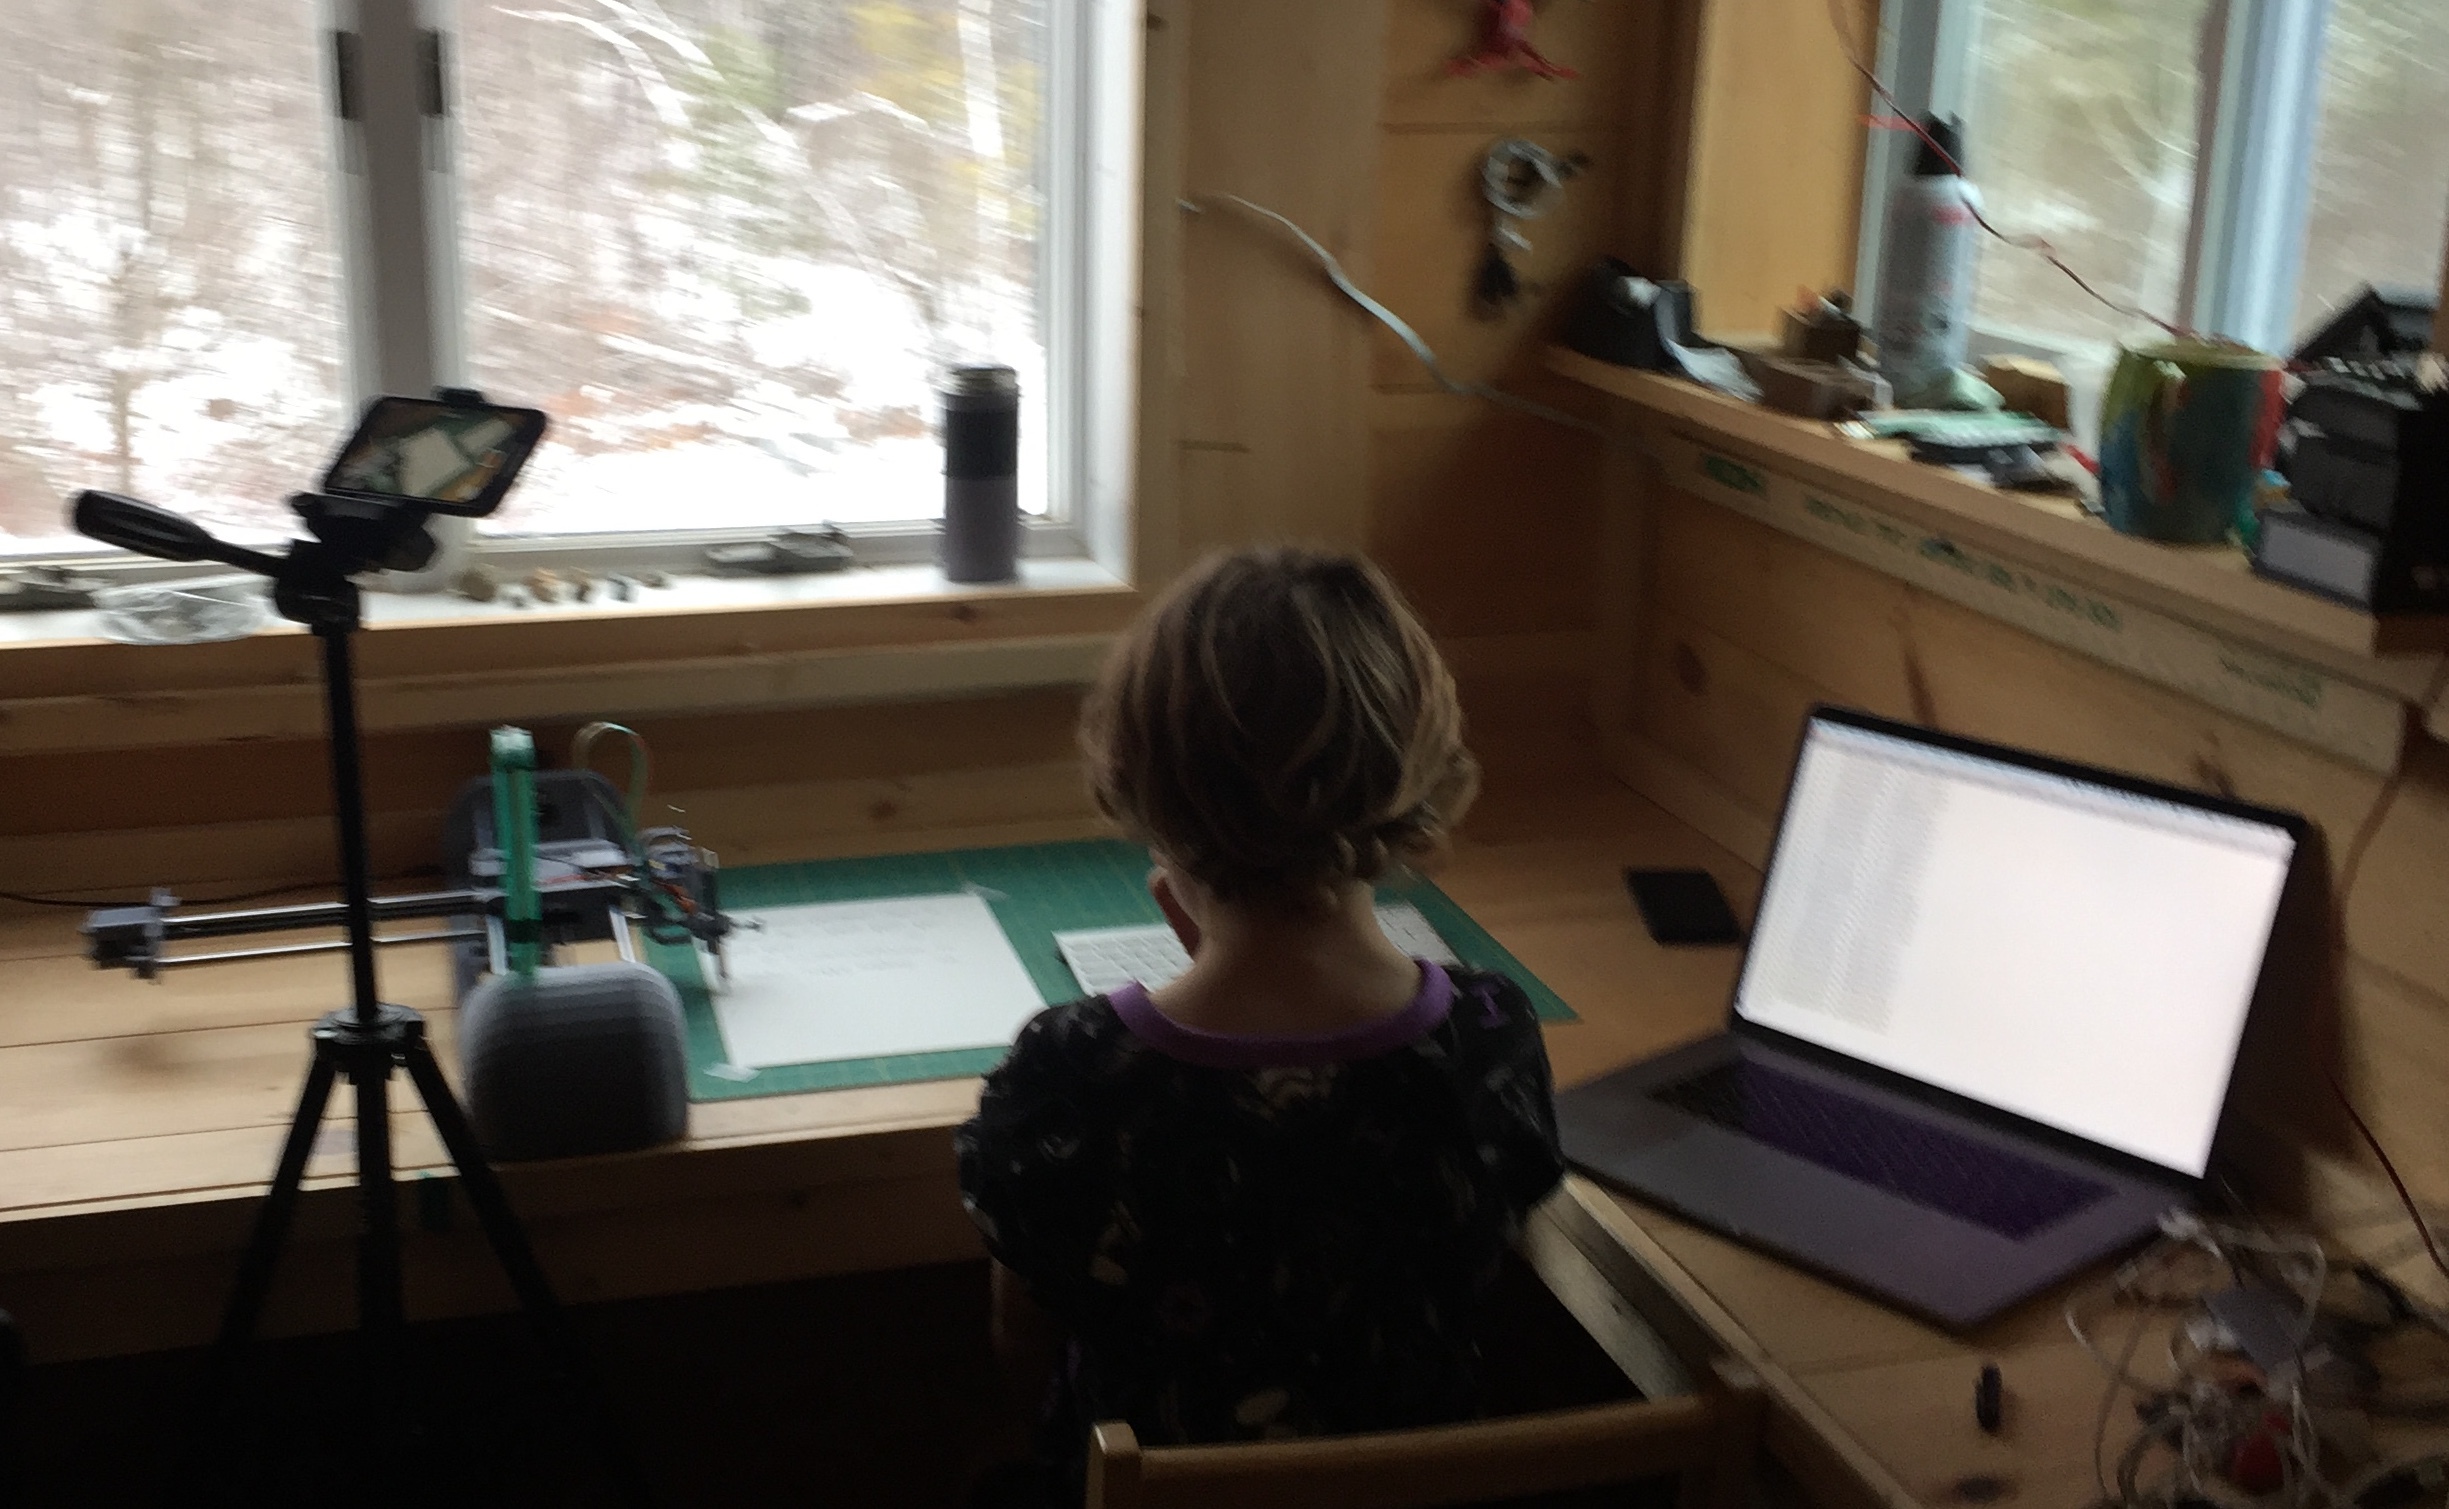

Working with Handwriting
One of my obsessions in developing PlottyBot has been handwriting. Even with Mandalagaba I care very much that the penstrokes originate from one’s hand and avoid tools which “do the drawing for you”. This is where your personality transpires on paper beyond your ability to draw. I thought it’d be neat to have a pen plotter able to write in one’s handwriting.
This idea came up a long time ago, and I researched many ways to achieve it. The unfortunate but predictable conclusion was that I would need to write my own font format to get there.
Introducing Flexible Font. PlottyBot comes with the ability to capture your handwriting. The Flexible Font format is monoline based, holds metadata on your pen strokes to define where ligatures may occur, it also allows for character variations. It’s tailored just for plotters :).
The video bellow shows several ways to use PlottyBot with handwriting. The first is a simple live replay of pen strokes from https://plottybot.mandalagaba.com, the next ones use Flexible Font.
PlottyBot is born
Years in the making, many prototypes, and I hope a software stack which brings novelty and ease of use to the world of pen plotting. It’s been a marathon building the final version and documenting the process carefully. I’m too pooped to say anything more about it for now.
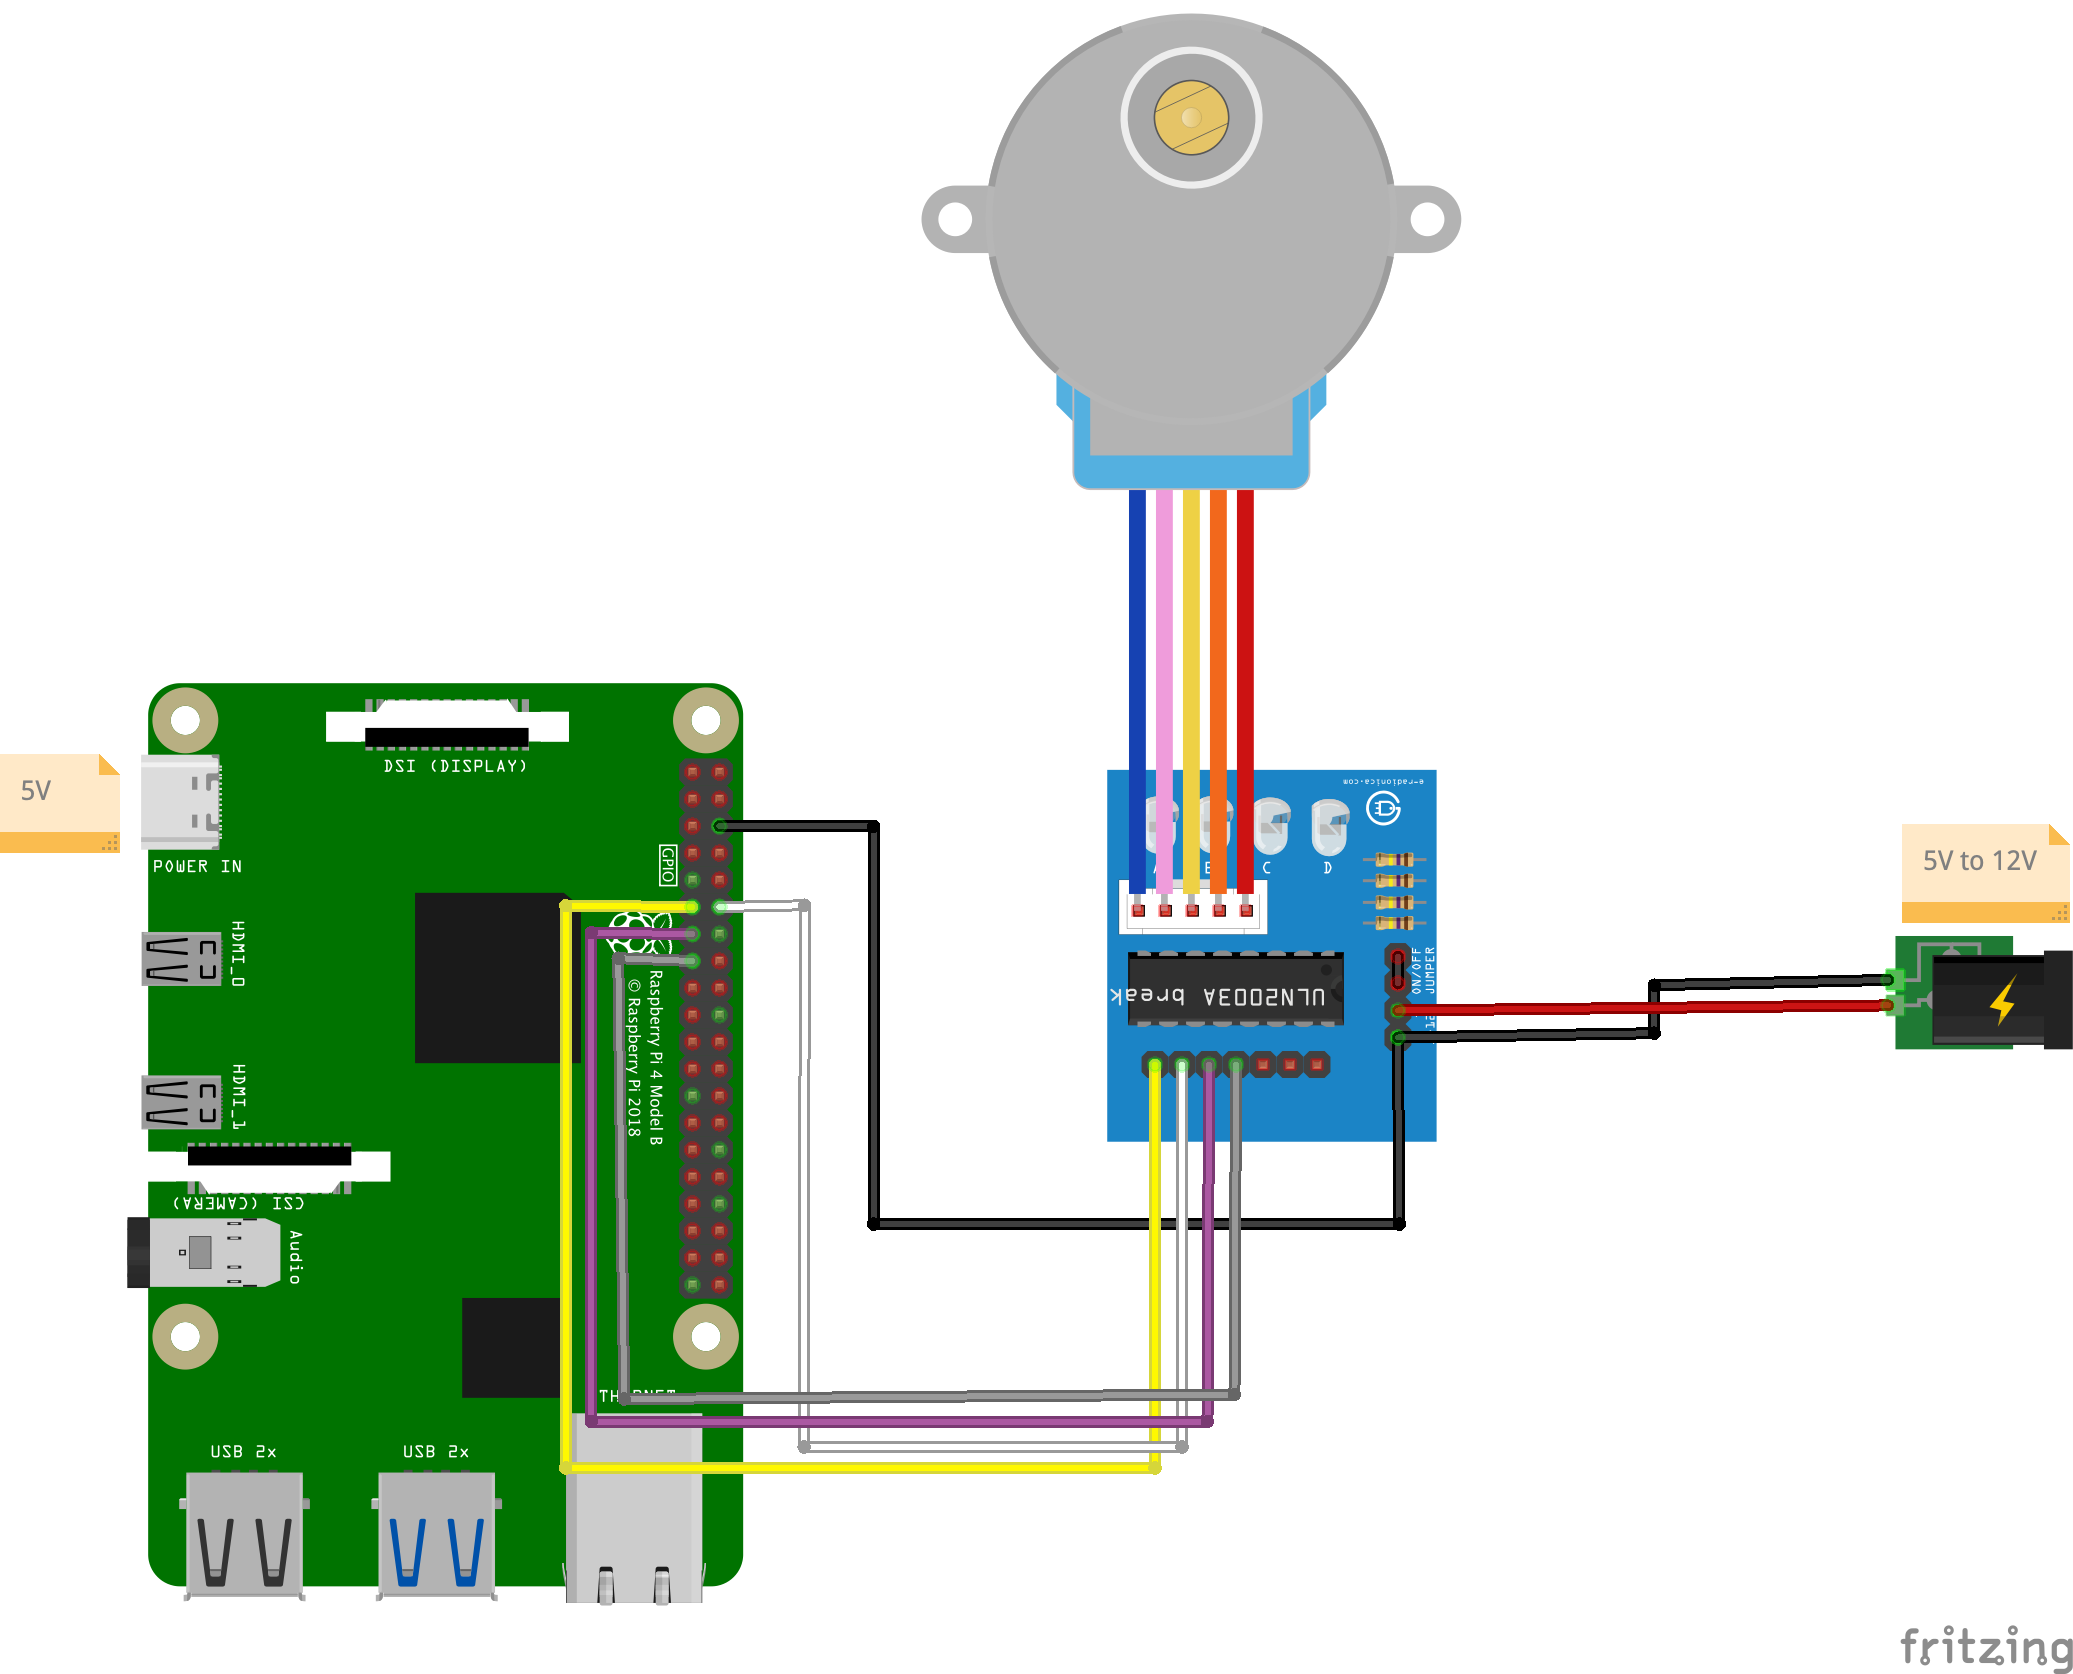
Driving a 28BYJ-48 Stepper Motor & ULN2003 driver with a Raspberry Pi
Quick points about this motor & driver
They are wonderfully cheap and extremely accurate due to 1/64 gearing. They move by 0.087890625° per step! However, the gearing is made of plastic and will wear out overtime, especially if moving heavy objects. Lastly the motors can become a little toasty if you work them hard.
Circuit
Code
#!/usr/bin/python3
import RPi.GPIO as GPIO
import time

in1 = 17
in2 = 18
in3 = 27
in4 = 22

# careful lowering this, at some point you run into the mechanical limitation of how quick your motor can move
step_sleep = 0.002

step_count = 4096 # 5.625*(1/64) per step, 4096 steps is 360°

direction = False # True for clockwise, False for counter-clockwise

# defining stepper motor sequence (found in documentation http://www.4tronix.co.uk/arduino/Stepper-Motors.php)
step_sequence = [[1,0,0,1],
                 [1,0,0,0],
                 [1,1,0,0],
                 [0,1,0,0],
                 [0,1,1,0],
                 [0,0,1,0],
                 [0,0,1,1],
                 [0,0,0,1]]

# setting up
GPIO.setmode( GPIO.BCM )
GPIO.setup( in1, GPIO.OUT )
GPIO.setup( in2, GPIO.OUT )
GPIO.setup( in3, GPIO.OUT )
GPIO.setup( in4, GPIO.OUT )

# initializing
GPIO.output( in1, GPIO.LOW )
GPIO.output( in2, GPIO.LOW )
GPIO.output( in3, GPIO.LOW )
GPIO.output( in4, GPIO.LOW )

motor_pins = [in1,in2,in3,in4]
motor_step_counter = 0 ;

def cleanup():
    GPIO.output( in1, GPIO.LOW )
    GPIO.output( in2, GPIO.LOW )
    GPIO.output( in3, GPIO.LOW )
    GPIO.output( in4, GPIO.LOW )
    GPIO.cleanup()

# the meat
try:
    i = 0
    for i in range(step_count):
        for pin in range(0, len(motor_pins)):
            GPIO.output( motor_pins[pin], step_sequence[motor_step_counter][pin] )
        if direction==True:
            motor_step_counter = (motor_step_counter - 1) % 8
        elif direction==False:
            motor_step_counter = (motor_step_counter + 1) % 8
        else: # defensive programming
            print( "uh oh... direction should *always* be either True or False" )
            cleanup()
            exit( 1 )
        time.sleep( step_sleep )

except KeyboardInterrupt:
    cleanup()
    exit( 1 )

cleanup()
exit( 0 )
Stuff you might need for this to run:
sudo apt-get update --fix-missing && sudo apt-get install python3-rpi.gpioResults
This motor takes 5.625*(1/64)° per step, this means 2048 steps for 180°:
and 4096 steps for 360°:

One thing that is super cool about the driver board are the LEDs. Projects are always cooler with blinky LEDs, but these guys also help show what is actually going on inside the stepper, and can help you find issues. They are supposed to light up in sequence.

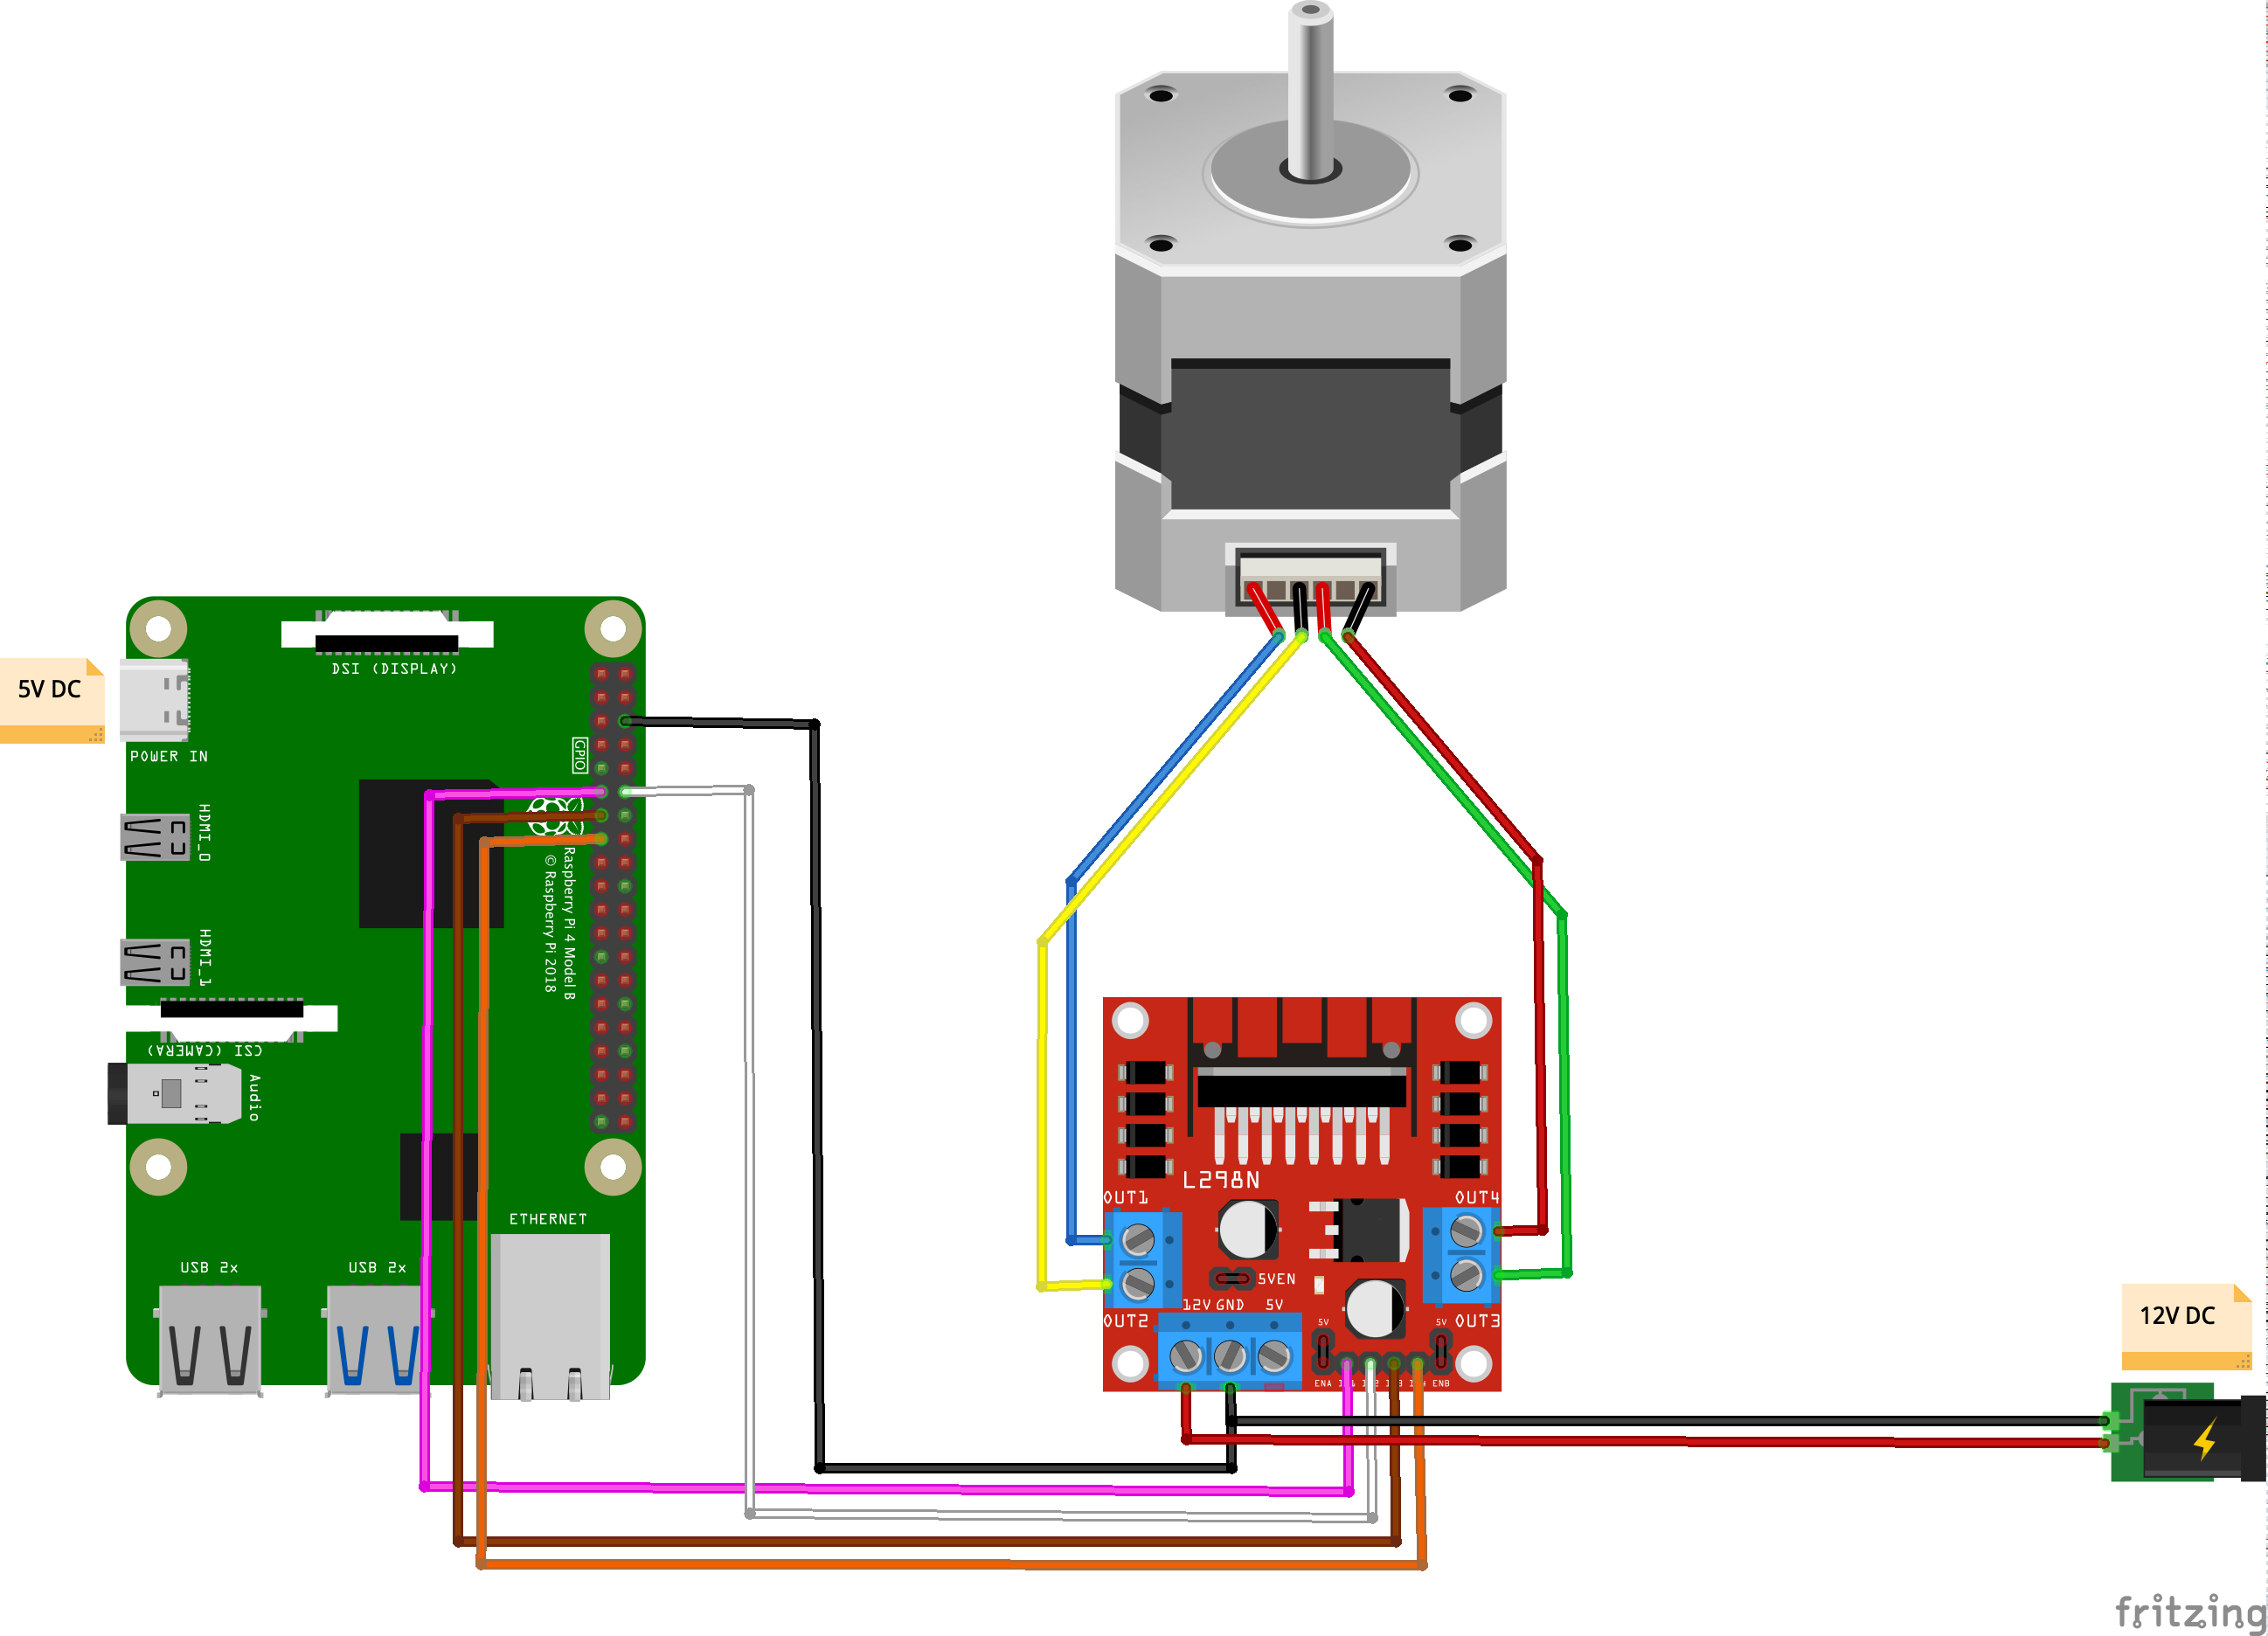
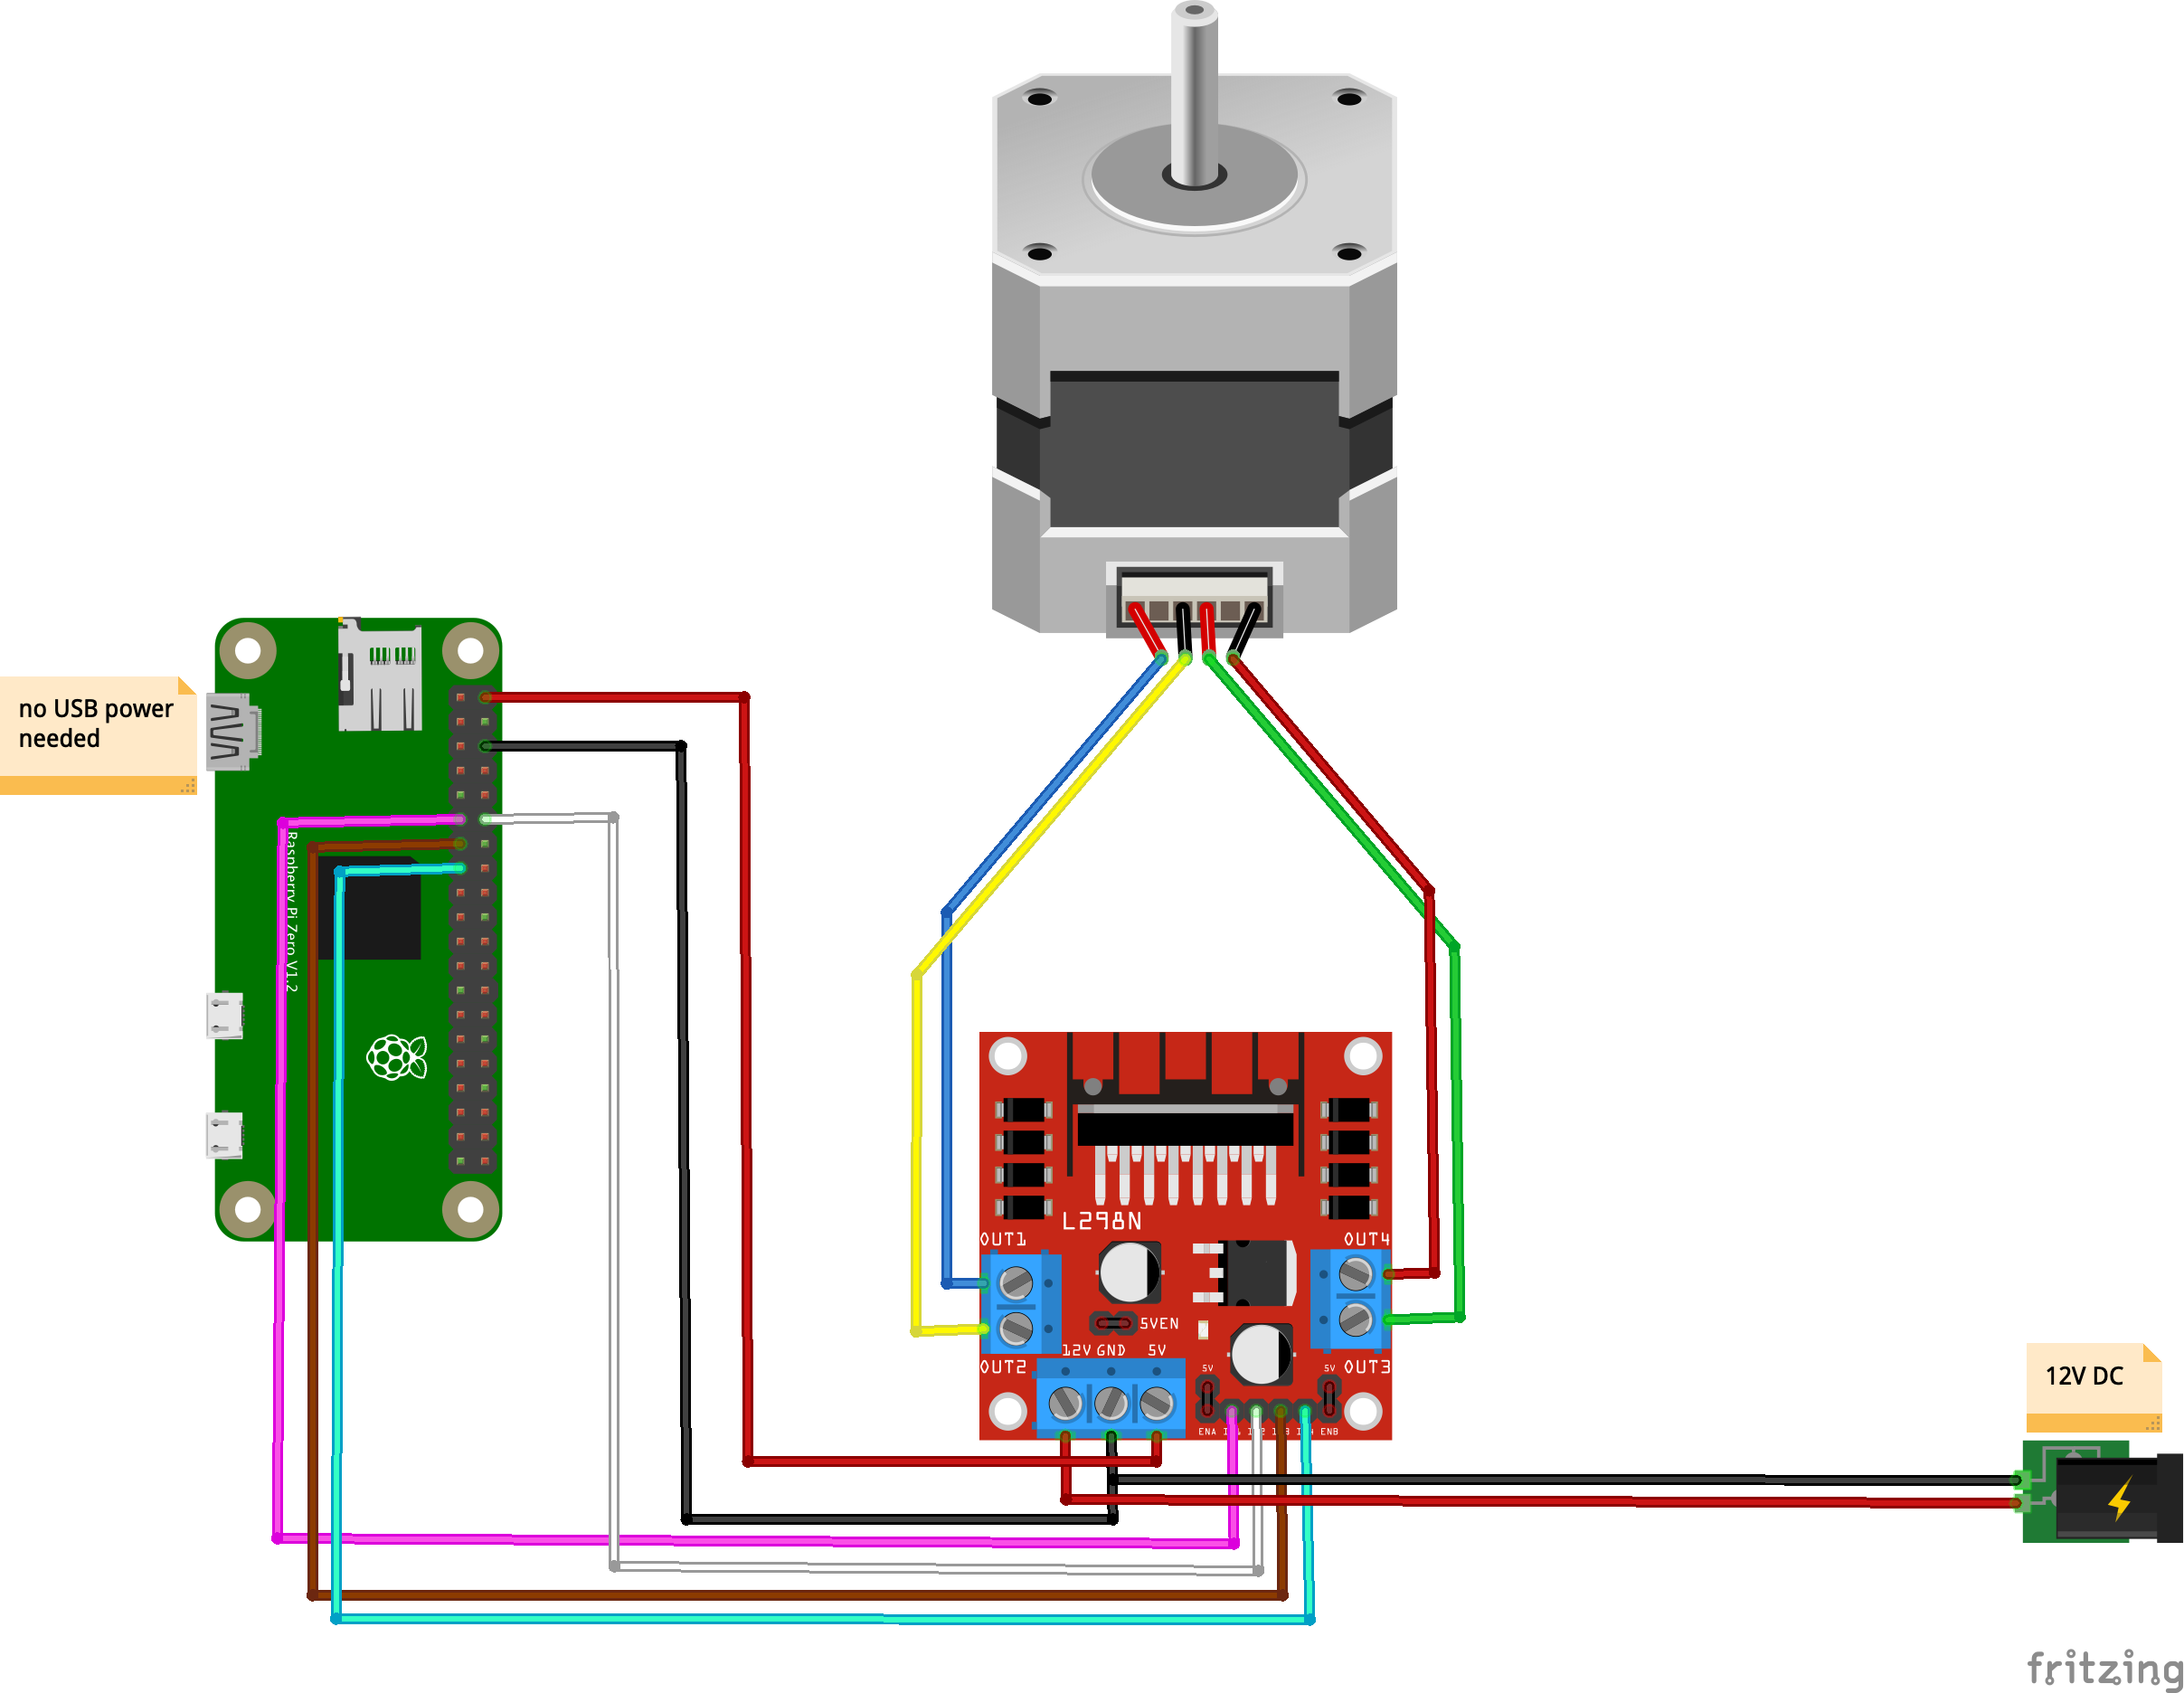
Driving a Bipolar Stepper Motor with an L298N and a Raspberry Pi
A few things to know about the L298N
This is a rudimentary way to drive a stepper motor. You are activating the motor’s coils in sequence yourself to have it take steps. There exist cheap stepper drivers which only require 1 signal from the Pi to be instructed to execute a full step sequence.
There are 2 coils on a bipolar stepper motor, each with a + and a – side. As such, this method requires 4 pins from your Pi to drive the Motor Vs only 1 pin with a more advanced stepper driver. Equally true is that a more advanced stepper driver will require at least another pin for direction and they’ll usually have other pins for micro-stepping.
This method does not allow for micro-stepping, only full steps. This is fine enough for most applications.
Lastly, while the L298N method might appear less appealing because of the above points, I find it to be extremely robust (advanced stepper drivers can be very finicky). You can power your Pi or Arduino with it thanks to a 5V port (warning, it can only provide so many amps and a Pi running heavy processing will crash).
It can be used to drive 2 DC motors instead of 2 stepper coils of a bipolar stepper motor, and has 2 PWM pins to adjust power given to the motors. It’s a very versatile and enabling device to master. You’ll also learn a lot about how stepper motors work.
Finding your stepper motor coils
Documentation for electronics is often inaccurate, disparate, when it’s even available. It’s good to find or verify what wires you think your coils are on. To do so you can put an LED on 2 motor pins and spin it until it lights up. When it does, induction powered your LED so you know you are holding the 2 wires of a coil. The other 2 wires are obviously the other coil.

There is no good way I could find to verify which of a coil’s wire is positive or negative. In my trials, I found that it doesn’t matter for a bipolar stepper motor on an L298N. The worst that will happen is that your motor may turn in the other direction which is easy enough to fix by flipping wires.
Circuit
Code
[python]#!/usr/bin/python3
import RPi.GPIO as GPIO
import time
out1 = 17
out2 = 18
out3 = 27
out4 = 22
# careful lowering this, at some point you run into the mechanical limitation of how quick your motor can move
step_sleep = 0.002
step_count = 200
# setting up
GPIO.setmode( GPIO.BCM )
GPIO.setup( out1, GPIO.OUT )
GPIO.setup( out2, GPIO.OUT )
GPIO.setup( out3, GPIO.OUT )
GPIO.setup( out4, GPIO.OUT )
# initializing
GPIO.output( out1, GPIO.LOW )
GPIO.output( out2, GPIO.LOW )
GPIO.output( out3, GPIO.LOW )
GPIO.output( out4, GPIO.LOW )
def cleanup():
GPIO.output( out1, GPIO.LOW )
GPIO.output( out2, GPIO.LOW )
GPIO.output( out3, GPIO.LOW )
GPIO.output( out4, GPIO.LOW )
GPIO.cleanup()
# the meat
try:
i = 0
for i in range(step_count):
if i%4==0:
GPIO.output( out4, GPIO.HIGH )
GPIO.output( out3, GPIO.LOW )
GPIO.output( out2, GPIO.LOW )
GPIO.output( out1, GPIO.LOW )
elif i%4==1:
GPIO.output( out4, GPIO.LOW )
GPIO.output( out3, GPIO.LOW )
GPIO.output( out2, GPIO.HIGH )
GPIO.output( out1, GPIO.LOW )
elif i%4==2:
GPIO.output( out4, GPIO.LOW )
GPIO.output( out3, GPIO.HIGH )
GPIO.output( out2, GPIO.LOW )
GPIO.output( out1, GPIO.LOW )
elif i%4==3:
GPIO.output( out4, GPIO.LOW )
GPIO.output( out3, GPIO.LOW )
GPIO.output( out2, GPIO.LOW )
GPIO.output( out1, GPIO.HIGH )
time.sleep( step_sleep )
except KeyboardInterrupt:
cleanup()
exit( 1 )
cleanup()
exit( 0 )[/python]
Stuff you might need for this to run:
[bash]sudo apt-get update –fix-missing && sudo apt-get install python3-rpi.gpio[/bash]
This stepper motor is rated for rotating by 1.8° per step. This means that it takes 100 steps to rotate 180 degrees:
and 200 to do a full 360:
Power the Pi from the L298N?
As I alluded to earlier, the L298N comes with a 5V power output that is most convenient to power Pis and Arduinos as it allows you to eliminate one of the 2 power supplies to your system. Be advised that while it provides the right voltage, it does not provide enough amps to power a standard Raspberry Pi, and while it can power a Pi Zero, the later will not get enough power and crash if it works hard enough (having a camera and a live streaming server pushed it over the edge in my testing). It will power a Pi Zero on Wifi running Python which is enough for a lot of applications.
Here’s the circuit if you want to do this:
The Plot Thickens
Covid and 3D printer mishaps have seriously hindered my ability to iterate on the plotter design which I was hoping would be behind me last March :\. Oh well, I’m getting close to finally being able to release it into the world.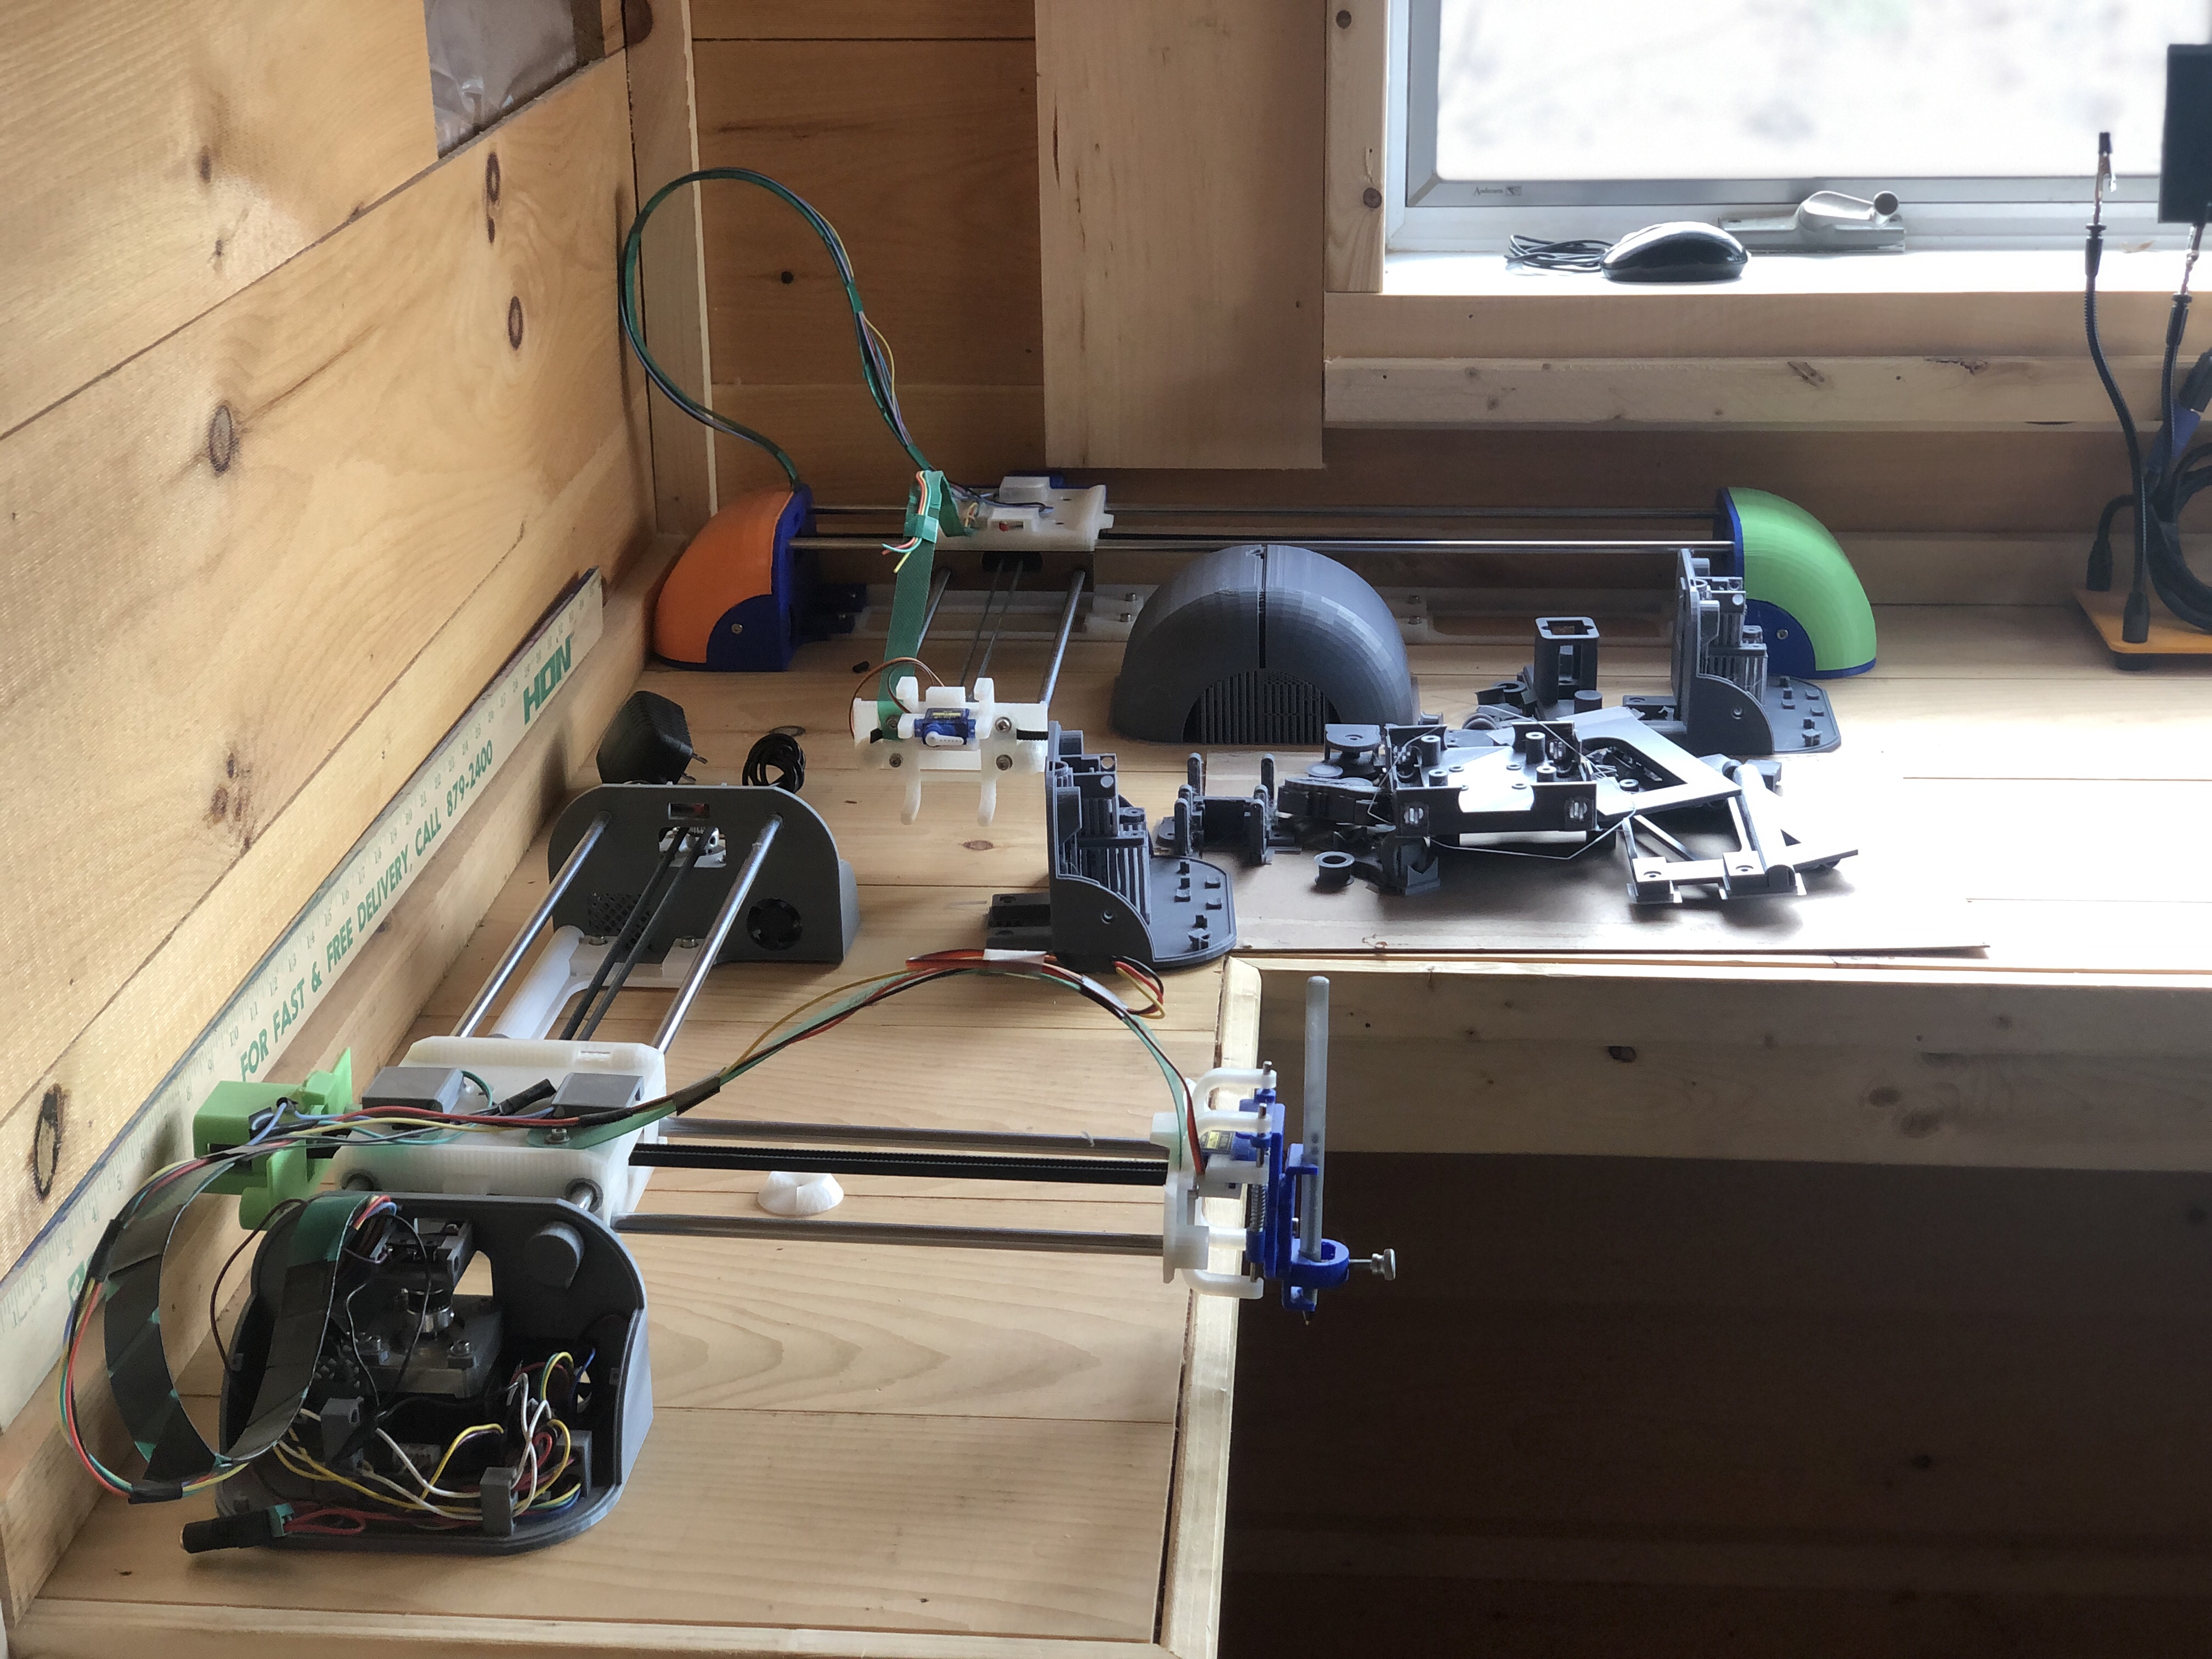
The Covid Bump
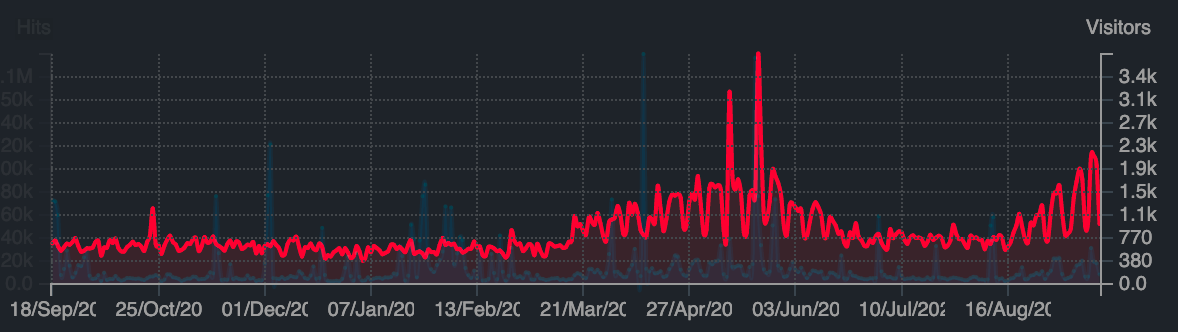
With teachers scrambling to move to online teaching last March, Mandalagaba’s traffic saw a noticeable bump in use which then died off in with the Summer break. With schools now back in session it looks like the bump is back.
I’ve kind of given up on trying to do anything big with it, there’s just so much noise out there it’s really hard to get anything more than an occasional spotlight. Which means the site is completely free of all the perverse incentives which ruin the internet these days. In other words, perfect for educators teaching to kids. I was already happy to know that about a thousand people per day enjoyed doodling with absolutely no strings attached, but it’s a whole other layer of contentment to see teachers use it for teaching. You can tell there’s love, kindness and attention in the way they address their kids. I love finding their videos online.
I often get asked what restrictions there are on the material people produce, or what my privacy policy is. I respond that I don’t have any of either, but the questions bother me for they reflect that everything online comes with strings attached these days.
Handwriting Typewiter
I’ve been working on the plotter, some of the features are hard to explain in the absence of a full release with documentation. I won’t try to, I’m mostly posting this bit late for posterity: the first test of the Handwriting Typewriter.
100 Mbps
We just took a giant connectivity leap moving to fiber.

DSL was pretty ok really, but the service had other issues which made the lower bandwidth harder to bear. Hosting on the solar powered Pi is finally a very viable option with a symmetric uplink which makes the incredible assumption that households may be more than entertainment gobbling cattle. And so I no longer cache large assets on AWS. And I will most likely repatriate Mandalagaba and other things which found their way to the cloud because of bandwidth needs.
The magic box which makes it all possible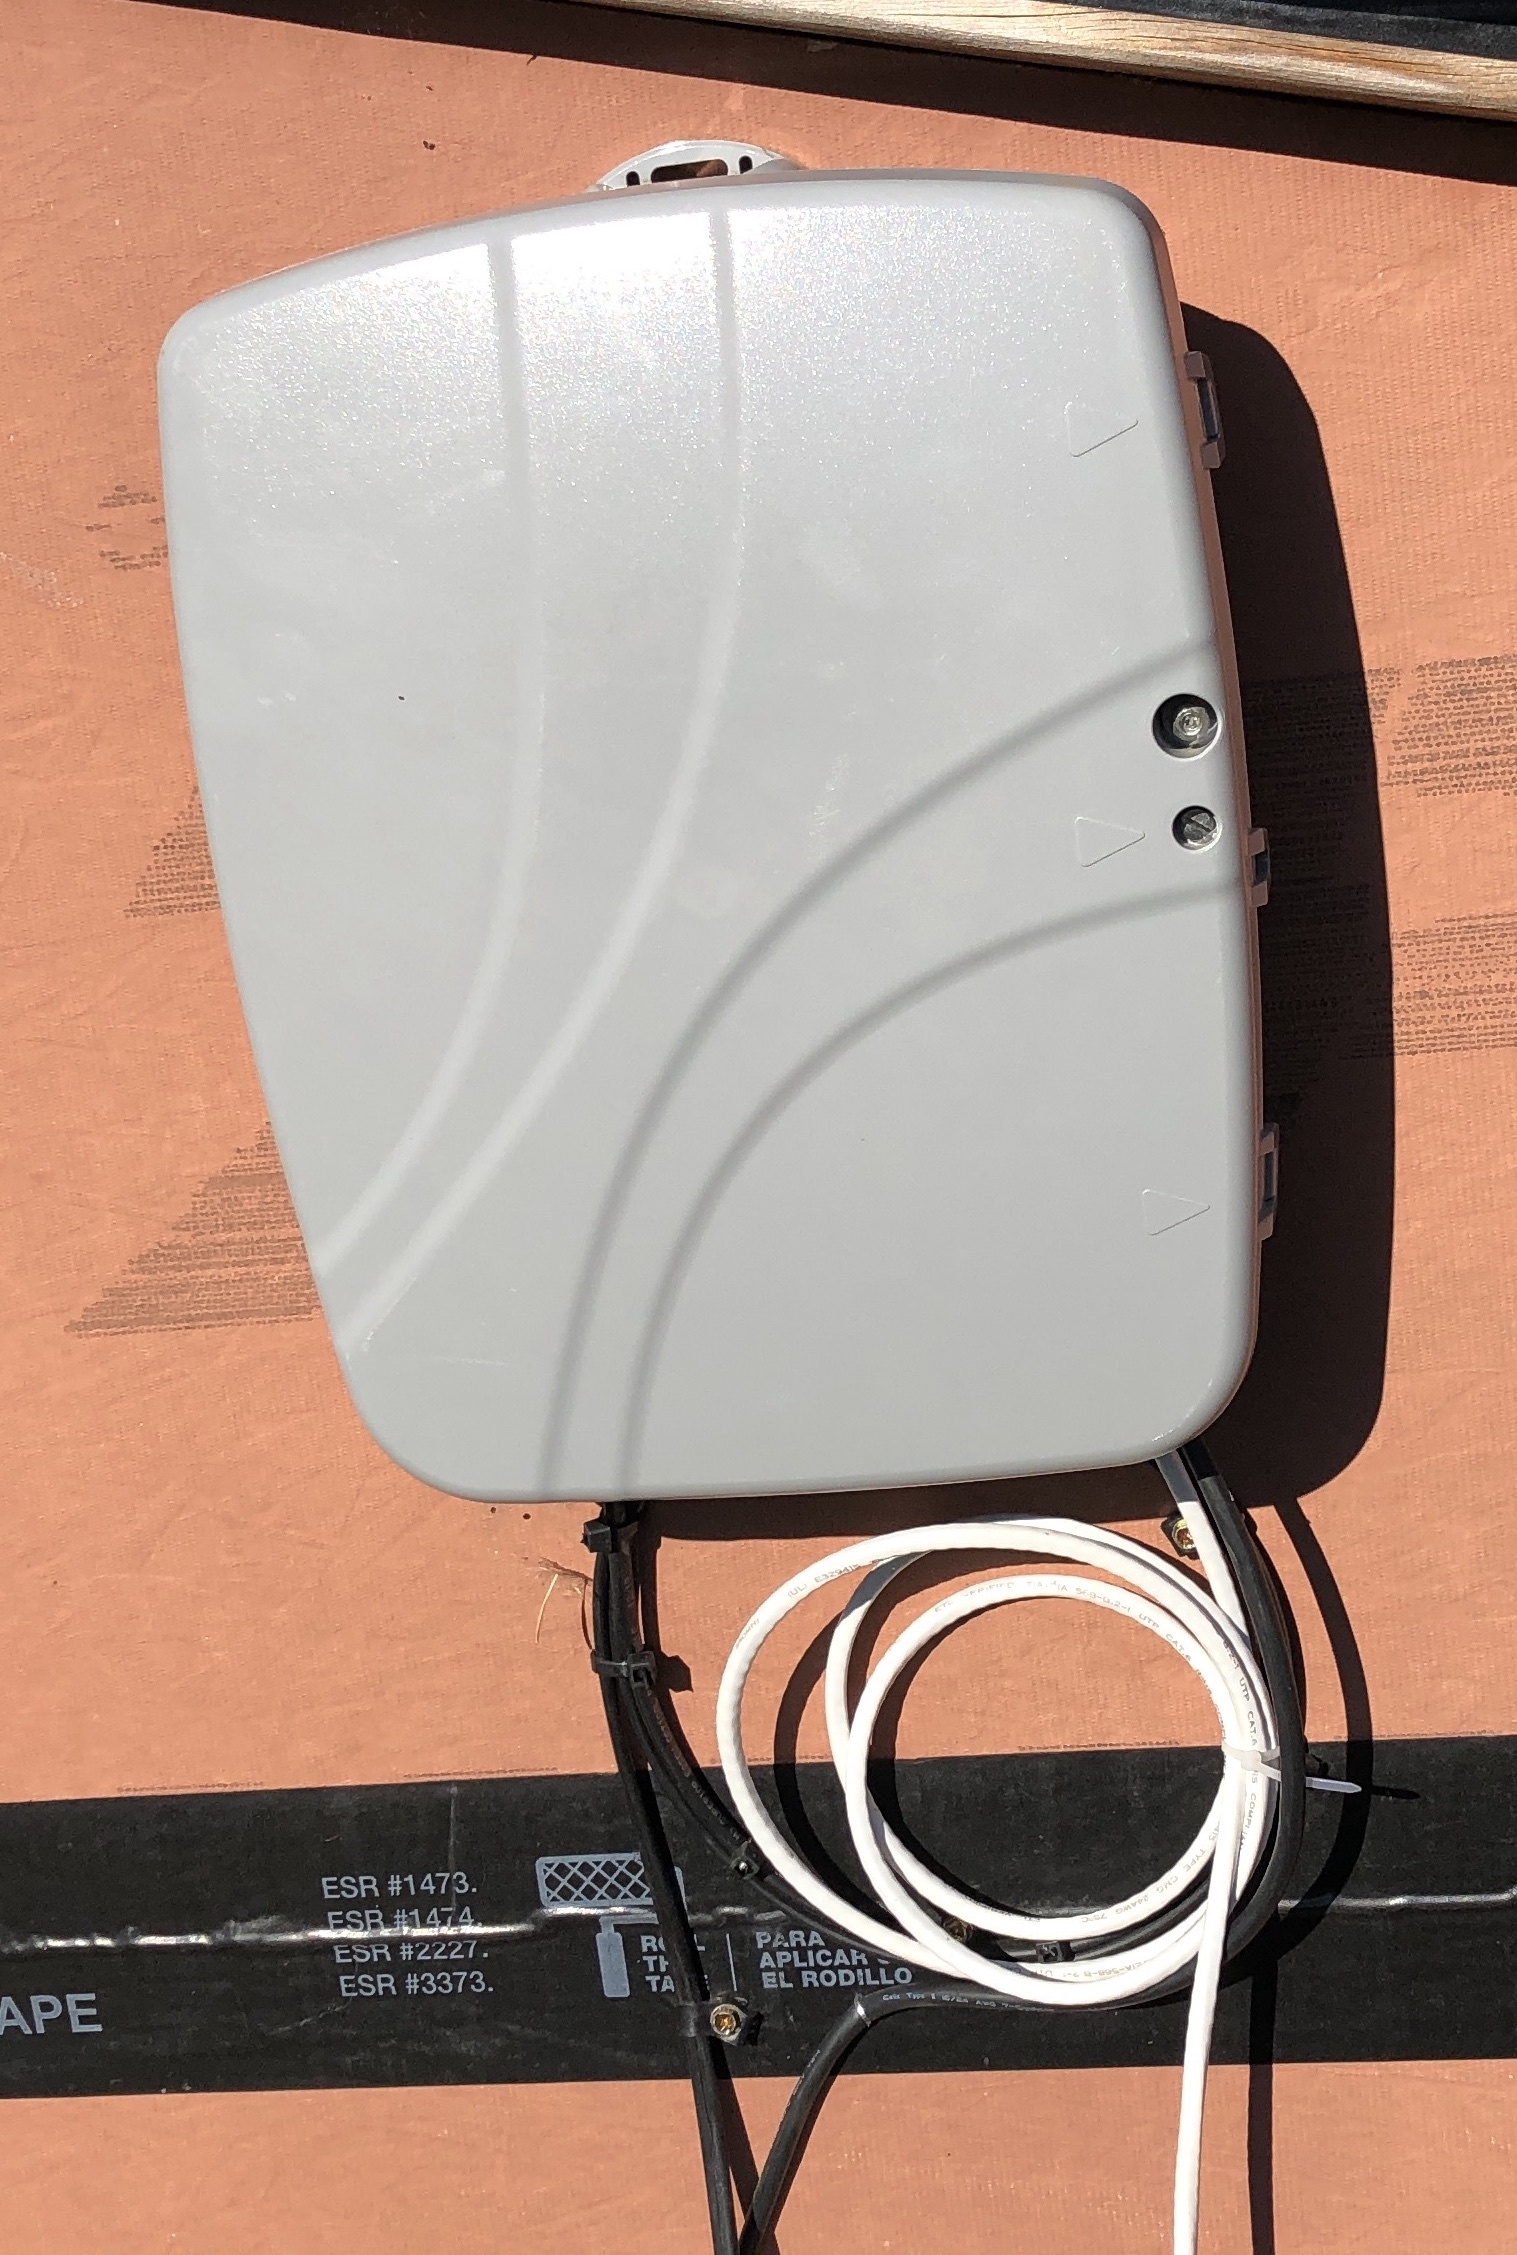
PHP Zoom API JWT Bit Banging
It’s always hard to nail the exact sequence when authorizing through a new API. Here’s what I came up with for PHP authorization with Zoom’s JWTs. This is essentially a quick start which gets you enough functions to do a first API call: to list zoom users. Line 40->68 is where the JWt meat happens.
[php]
<?php
// config parameters you need to define
define( ‘ZOOM_TOKEN_FILE’, "/var/.zoom_token" ) ; // some location on the filesystem used to cache your token while it’s current (make sure permissions are restrictive)
define( ‘ZOOM_API_KEY’, "" ) ;
define( ‘ZOOM_API_SECRET’, "" ) ;
// main
print_r( zoom_list_users() ) ;
exit( 0 ) ;
// functions
function zoom_list_users() {
$users = array() ;
$page_number = 1 ;
$keep_going = true ;
while( $keep_going && $page_number<10000 ) {
$result = zoom_make_api_call( "GET", "https://api.zoom.us/v2/users", array(‘page_size’=>300, ‘page_number’=>$page_number, ‘status’=>"active") ) ;
$result = json_decode( $result, true ) ;
if( array_key_exists(‘users’, $result) &&
count($result[‘users’])>0 ) {
foreach( $result[‘users’] as $user ) {
$users[] = $user ;
}
$page_number++ ;
if( $page_number>$result[‘page_count’] ) {
$keep_going = false ;
}
} else {
$keep_going = false ;
}
}
return $users ;
}
// PHP’s default base64 encode isn’t URL safe which messes up the JWT, we need these functions instead
function base64_url_encode( $data ) {
return rtrim( strtr(base64_encode($data), ‘+/’, ‘-_’), ‘=’ ) ;
}
function base64_url_decode( $data ) {
return base64_decode( str_pad(strtr($data, ‘-_’, ‘+/’), strlen($data) % 4, ‘=’, STR_PAD_RIGHT) ) ;
}
function get_token( $refresh=false ) {
if( $refresh===false &&
file_exists(ZOOM_TOKEN_FILE) ) {
return file_get_contents( ZOOM_TOKEN_FILE ) ;
}
$jwt_request_date = @date( "U" ) ; // no warning, proper system timezone assumed
$jwt_expiration_date = $jwt_request_date + 60*60 ; # +1 hour
$jwt_header = ‘{"alg":"HS256","typ":"JWT"}’ ;
$jwt_claim_set = ‘{"iss":"’ . ZOOM_API_KEY . ‘","exp":’ . $jwt_expiration_date . ‘}’ ;
$jwt_signature = sign_data( base64_url_encode($jwt_header) . ‘.’ . base64_url_encode($jwt_claim_set), ZOOM_API_SECRET ) ;
$jwt = base64_url_encode( $jwt_header ) . "." . base64_url_encode( $jwt_claim_set ) . "." . base64_url_encode( $jwt_signature ) ;
file_put_contents( ZOOM_TOKEN_FILE, $jwt ) ;
return $jwt ;
}
function sign_data( $data, $key ) {
return hash_hmac( "SHA256" , $data, $key, true) ;
}
function zoom_make_api_call( $request, $url, $get_variables=null, $post_variables=null, $force_refresh_token=false ) {
$ch = curl_init() ;
$token = get_token( $force_refresh_token ) ;
$getfields = "" ;
if( $get_variables!==null && is_array($get_variables) ) {
foreach( $get_variables as $get_variable_key=>$get_variable_value ) {
$getfields .= "&" . urlencode( $get_variable_key ) . "=" . urlencode( $get_variable_value ) ;
}
if( strlen($getfields)>0 ) {
$getfields = "?" . substr( $getfields, 1 ) ;
}
}
curl_setopt( $ch, CURLOPT_URL, "{$url}{$getfields}" ) ;
curl_setopt( $ch, CURLOPT_PORT , 443 ) ;
curl_setopt( $ch, CURLOPT_CUSTOMREQUEST, $request ) ;
curl_setopt( $ch, CURLOPT_SSL_VERIFYPEER, false ) ;
if( $post_variables!==null && is_array($post_variables) ) {
$postfields = "" ;
foreach( $post_variables as $post_variable_key=>$post_variable_value ) {
$postfields .= "&" . urlencode( $post_variable_key ) . "=" . urlencode( $post_variable_value ) ;
}
$postfields = substr( $postfields, 1 ) ;
curl_setopt( $ch, CURLOPT_POSTFIELDS, $postfields ) ;
} else if( $post_variables!==null && is_string($post_variables) ) {
curl_setopt( $ch, CURLOPT_POSTFIELDS, $post_variables ) ;
}
curl_setopt( $ch, CURLOPT_HTTPHEADER, array( "authorization: Bearer {$token}",
"content-type: application/json") ) ;
curl_setopt( $ch, CURLOPT_RETURNTRANSFER, 1 ) ;
curl_setopt( $ch, CURLOPT_HEADER, true ) ;
$response = curl_exec( $ch ) ;
curl_close( $ch ) ;
$response = parse_http_response( $response ) ;
if( $response[‘code’]=="200" ||
$response[‘code’]=="204" ||
$response[‘code’]=="404" ) {
return $response[‘body’] ;
} else if( $response[‘code’]=="401" ) { // expired token
if( $force_refresh_token===false ) {
// safe to recurse
return zoom_make_api_call( $request, $url, $get_variables, $post_variables, true ) ;
} else {
echo "ERROR: had an expired token and I tried to refresh it, yet somehow it’s still expired\n" ;
print_r( $response ) ;
exit( 1 ) ;
}
} else {
echo "ERROR: I have no idea what to do with this response from Zoom\n" ;
print_r( $response ) ;
exit( 1 ) ;
}
}
function parse_http_response( $raw_data ) {
$parsed_response = array( ‘code’=>-1, ‘headers’=>array(), ‘body’=>"" ) ;
$raw_data = explode( "\r\n", $raw_data ) ;
$parsed_response[‘code’] = explode( " ", $raw_data[0] ) ;
$parsed_response[‘code’] = $parsed_response[‘code’][1] ;
$i = 1 ;
if( $parsed_response[‘code’]=="100" ) {
$parsed_response[‘code’] = explode( " ", $raw_data[2] ) ;
$parsed_response[‘code’] = $parsed_response[‘code’][1] ;
$i = 3 ;
}
for( ; $i<count($raw_data) ; $i++ ) {
$raw_datum = $raw_data[$i] ;
$raw_datum = trim( $raw_datum ) ;
if( $raw_datum!="" ) {
if( substr_count($raw_datum, ‘:’)>=1 ) {
$raw_datum = explode( ‘:’, $raw_datum, 2 ) ;
$parsed_response[‘headers’][strtolower($raw_datum[0])] = trim( $raw_datum[1] ) ;
} else {
echo "ERROR: we’re in the headers section of parsing an HTTP section and no colon was found for line: {$raw_datum}\n" ;
exit( 1 ) ;
}
} else {
// we’ve moved to the body section
if( ($i+1)<count($raw_data) ) {
for( $j=($i+1) ; $j<count($raw_data) ; $j++ ) {
$parsed_response[‘body’] .= $raw_data[$j] . "\n" ;
}
}
// we don’t need to continue the $i loop
break ;
}
}
return $parsed_response ;
}
?>
[/php]
GPIO 2 Inverter
I figured out a way to turn our inverter on and off with a Pi so I can leave it off when Winter forces us to be frugal. It takes a little more than an amp hour just sitting there doing nothing, so I do like to turn it off. This capability will serve to automate the fridge in the future, before I do that though, I need to figure out a way to bring cold air from the outside into it. The idea is to have a logic which looks at outside temperature, solar status, and fridge temperature to decide if we just turn it on or if we can simply (and for less electricity) fan in cold air from the outside.
Running a fridge on the coldest months, when solar power is scarce, is doubly absurd.
Plotter Trials
I’m getting closer to a very usable plotter, for now the prototype is serving all my plotting needs. Another prototype is in the works, this way I’ll be able to work on a plotter and keep another one for drawing. I keep finding ideas for really cool videos which I’m certain will make splashes online. I want to have my next steps figured out before I try to do just that. I know that at least the plotter build will be documented as a DYI project.
I found my birthday presents for the next 10 years

First trial with paint, I coded for “ink refill” capabilities for all instruments which require it. Obviously I’ve learned a few lessons here 🙂

Raspberry Pi Servo Jitter
Here’s the final solution I came up with to finally get a servo motor to behave on a Pi. It may not seem like much but it took a lot of doing to gather all the right bits. This was tested with an SG90, SG92R, and an MG90S on a Pi Zero.
Scroll straight to the end for the solution.
The most common way for controlling a servo motor on a Pi with is through RPi.GPIO as such:
#!/usr/bin/python3
import RPi.GPIO as GPIO
import time

servo = 23

GPIO.setmode( GPIO.BCM )
GPIO.setup( servo, GPIO.OUT )

# info on frequency and PWM formula at https://rpi.science.uoit.ca/lab/servo/
pwm = GPIO.PWM( servo, 50 )
pwm.start( 2.5 )

print( "0 deg" )
pwm.ChangeDutyCycle( 2.5 )  # turn towards 0 degree
time.sleep( 3 )

print( "90 deg" )
pwm.ChangeDutyCycle( 7.5 )  # turn towards 90 degree
time.sleep( 3 )

print( "180 deg" )
pwm.ChangeDutyCycle( 12.5 ) # turn towards 180 degree
time.sleep( 3 )

pwm.stop()
GPIO.cleanup()
Stuff you might need for this to run:
sudo apt-get update && sudo apt-get install python3-rpi.gpioIt results in super jitter which is unacceptable for the holy mission of pen plotting.

As far as I understand, the jitter comes from the wave form RPi.GPIO produces for Pulse Width Modulation, which is made in software and so it’s not super stable (no dedicated resources to build it). From what I gather, pigpio is programmed to tap into the one hardware PWM that Pis have.
The solution thus is as such:
#!/usr/bin/python3
import RPi.GPIO as GPIO
import pigpio
import time

servo = 23

# more info at http://abyz.me.uk/rpi/pigpio/python.html#set_servo_pulsewidth

pwm = pigpio.pi()
pwm.set_mode(servo, pigpio.OUTPUT)

pwm.set_PWM_frequency( servo, 50 )

print( "0 deg" )
pwm.set_servo_pulsewidth( servo, 500 ) ;
time.sleep( 3 )

print( "90 deg" )
pwm.set_servo_pulsewidth( servo, 1500 ) ;
time.sleep( 3 )

print( "180 deg" )
pwm.set_servo_pulsewidth( servo, 2500 ) ;
time.sleep( 3 )

# turning off servo
pwm.set_PWM_dutycycle( servo, 0 )
pwm.set_PWM_frequency( servo, 0 )
Stuff you might need for this to run:
sudo apt-get update && sudo apt-get install python3-pigpio
sudo pigpiod
And the resulting super smooth motion and holds: